


81
TOUCAN Duo
Updated 06-2015
Models
REMOVAL - INSTALLATION PROCEDURES
VI-5
VI-5
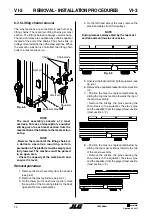
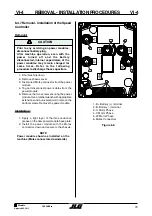
Do not use compressed air to remove the
cylinder rod. Use only a source of controlled
hydraulic oil pressure if the rod assembly is
hard to remove.
8- Withdraw the rod assembly from the cylinder
barrel and move it to a clean work area.
Exercise extreme care when handling or
setting down the cylinder rod. Do not damage
the chrome surface.
NOTE
It is recommended to cover the cylinder barrel
opening to prevent contamination.
When installing new seals, avoid stretching
seals and damaging the grooved surfaces.
NOTE
Aligning discarded seals in the order of
disassembly will facilitate installation of new
seals and rings
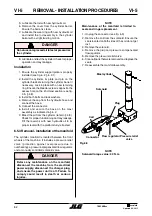
9- Remove the guide ring and the stop ring from
the rod.
10- Remove the cylinder head.
11- Remove the seals, wiper ring from the cylinder
head.
DANGER
Guide ring
Fig. 6.8
Rod assembly
Barrel
Head
Stop ring
!
CAUTION
!
CAUTION
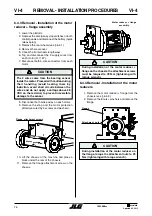
6.5.2 Mast cylinder inspection
1- Clean all parts with a solvent and dry them with
compressed air. Inspect all parts for
serviceability.
Before installing new seals and rings, clean
all surfaces and carefully remove burrs and
nicks. Parts displaying excessive wear or
damaged should be replaced.
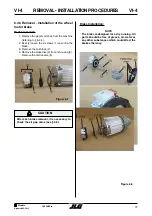
2- Stone out minor blemishes and polish with a
fine crocus cloth except on surfaces rectified
and polished.
3- Clean with a solvent and dry with compressed
air any parts that have been rectified and
polished.
4- Inspect the barrel carefully for scoring.
6.5.3 Mast cylinder assembly
When installing seals, avoid damaging
grooves and seals.
NOTE
Lubricate new seals with new hydraulic oil.
Avoid stretching the seal, ensure the seals
and rings are installed in correct order. Ensure
all components are clean prior to and during
assembly.
1- Install the wiper ring in the cylinder head.
2- Install the seals and rings in the cylinder head.
3- Install the cylinder head on the cylinder rod.
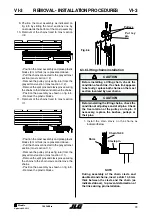
4- Install the stop ring and the rings onto the rod.
When installing the stop ring onto the rod,
(see fig. 6.8), ensure it is installed on the
appropriate groove (the groove furthest from
the cylinder manifold).
!
CAUTION
!
CAUTION
!
CAUTION
!
CAUTION
Содержание TOUCAN DUO
Страница 2: ......
Страница 3: ...3 TOUCAN Duo Updated 06 2015 Models MA0323 05 Models N ________________...
Страница 4: ......
Страница 8: ...Updated 06 2015 TOUCAN Duo models 8 This page has been left blank intentionally...
Страница 9: ...CHAPTER 1 INTRODUCTION...
Страница 14: ...Updated 06 2015 TOUCAN Duo models 14 This page has been left blank intentionally...
Страница 15: ...CHAPTER 2 WORK PLATFORM CHARACTERISTICS...
Страница 19: ...CHAPTER 3 GENERAL...
Страница 34: ...Updated 06 2015 TOUCAN Duo models 34 This page has been intentionnally left blank...
Страница 35: ...CHAPTER 4 ADJUSTMENTS...
Страница 48: ...Updated 06 2015 TOUCAN Duo models 48 This page has been intentionnally left blank...
Страница 49: ...CHAPTER 5 SCHEMATICS...
Страница 50: ...Updated 06 2015 TOUCAN Duo models 50 This page has been intentionnally left blank...
Страница 53: ...53 TOUCAN Duo Updated 06 2015 Models R f ELE258 half right SCHEMATICS V 1 V 1...
Страница 54: ...Updated 06 2015 TOUCAN Duo models 54 Wiring diagramme Power SCHEMATICS V 1 V 1...
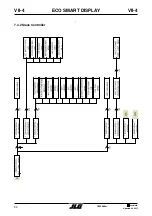
Страница 55: ...55 TOUCAN Duo Updated 06 2015 Models Wiring diagramme Controls SCHEMATICS V 1 V 1...
Страница 56: ...Updated 06 2015 TOUCAN Duo models 56 Upper control box SCHEMATICS V 1 V 1...
Страница 57: ...57 TOUCAN Duo Updated 06 2015 Models Shelf box SCHEMATICS V 1 V 1...
Страница 58: ...Updated 06 2015 TOUCAN Duo models 58 Cardbox SCHEMATICS V 1 V 1...
Страница 59: ...59 TOUCAN Duo Updated 06 2015 Models Lower control box SCHEMATICS V 1 V 1...
Страница 61: ...61 TOUCAN Duo Updated 06 2015 Models SCHEMATICS V 2 V 2 5 2 Hydraulic sch matic Ref FL0148_04...
Страница 62: ...Updated 06 2015 TOUCAN Duo models 62 This page has been intentionnally left blank...
Страница 63: ...CHAPTER 6 REMOVAL INSTALLATION PROCEDURES...
Страница 84: ...Updated 06 2015 TOUCAN Duo models 84 NOTES...
Страница 85: ...85 TOUCAN Duo Updated 06 2015 Models CHAPTER 7 ECO SMART DISPLAY...
Страница 86: ...Updated 06 2015 TOUCAN Duo models 86 This page has been intentionnally left blank...
Страница 89: ...89 TOUCAN Duo Updated 06 2015 Models ECO SMART DISPLAY VII 4 VII 4 7 4 Menus display 7 4 1 Display...
Страница 90: ...Updated 06 2015 TOUCAN Duo models 90 ECO SMART DISPLAY VII 4 VII 4 7 4 2 Slave Controller...
Страница 91: ...91 TOUCAN Duo Updated 06 2015 Models ECO SMART DISPLAY VII 4 VII 4...
Страница 92: ...Updated 06 2015 TOUCAN Duo models 92 ECO SMART DISPLAY VII 4 VII 4...
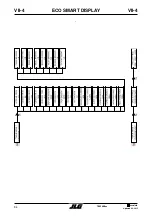
Страница 93: ...93 TOUCAN Duo Updated 06 2015 Models 7 4 3 Master Controller ECO SMART DISPLAY VII 4 VII 4...
Страница 94: ...Updated 06 2015 TOUCAN Duo models 94 ECO SMART DISPLAY VII 4 VII 4...
Страница 95: ...95 TOUCAN Duo Updated 06 2015 Models ECO SMART DISPLAY VII 4 VII 4...
Страница 96: ...Updated 06 2015 TOUCAN Duo models 96 ECO SMART DISPLAY VII 4 VII 4...
Страница 99: ...99 TOUCAN Duo Updated 06 2015 Models CHAPTER 8 ALARMS AND WARNINGS...
Страница 100: ...Updated 06 2015 TOUCAN Duo models 100 This page has been intentionnally left blank...
Страница 102: ...Updated 06 2015 TOUCAN Duo models 102 8 3 Alarms ALARMS AND WARNINGS VIII 3 VIII 3...
Страница 103: ...103 TOUCAN Duo Updated 06 2015 Models ALARMS AND WARNINGS VIII 3 VIII 3...
Страница 104: ...Updated 06 2015 TOUCAN Duo models 104 ALARMS AND WARNINGS VIII 3 VIII 3...
Страница 105: ...105 TOUCAN Duo Updated 06 2015 Models ALARMS AND WARNINGS VIII 4 VIII 4 8 4 Warnings...
Страница 106: ...Updated 06 2015 TOUCAN Duo models 106 ALARMS AND WARNINGS VIII 4 VIII 4...
Страница 107: ...107 TOUCAN Duo Updated 06 2015 Models ALARMS AND WARNINGS VIII 4 VIII 4...
Страница 108: ...Updated 06 2015 TOUCAN Duo models 108 This page has been intentionnaly left blank...