Updated 06-2015
TOUCAN Duo
models
40
DANGER
4.5 Pressure relief valves
adjustment
Pressure relief valves are used to protect the hydraulic
system from excessive pressures. They return the oil
to the reservoir when the pressure setting is reached,
relieving pressure within the circuit in which they are
used.
The pressure relief valves are checked and adjusted
by bringing the circuit to reach its prescribed pressure
limit. At this point, the relief valve opens, returning oil
to the reservoir. The cylinder circuit can be adjusted
by extending the cylinder to its limit of travel.
The values indicated correspond to the settings to be
obtained with the pressure gauge connected to the
pressure point on the power unit. Connecting the gauge
to another point of the circuit presents risks of setting
the relief valve too high and could result in serious
injuries and equipment damage.
A correct setting of the relief valve is mandatory for
the hydraulic circuit to function correctly. Settings must
be performed by qualified technicians only using
correct equipment, within tolerances and only after
the need for adjustment has been established.
Setting values of the relief valves are indicated in
chapters 4.5.1 and 4.5.2. If the setting of a relief
valve is not within ± 5% of the indicated setting, adjust
it to its correct value.
Do not exceed indicated torque values.
Do not leave the relief valve open for more
than one minute.
NOTE
To adjust a relief valve, turn the setting screw
until the correct setting is reached (pressure
increase by tightening the setting screw).
Do not adjust the pressure of the system
above its prescribed value. Increasing the
pressure could damage the hydraulic
components.
! CAUTION
Do not attempt to loosen hydraulic fittings in
pressurized lines or when the pump motor
assembly is running. Failure to do so may
result in death or serious injuries.
4.5.1 Mast power unit pressure relief valve
1- Place the rated load increased by 10% in the
platform (approximately 220 kg).
2- Connect a 0-400 bar pressure gauge on the
pressure plug (mini-mess type) of the power
unit.
3- Remove the plug.
4- Loosen the locknut.
5- From the emergency control panel, fully raise
the mast.
6- Adjust the setting to 15 MPa using the setting
screw.
7- Tighten the locknut while holding the setting
screw to preserve the setting. Torque to
16 ± 1 N.m.
8- Install the seal
9- Torque the plug to 11 ± 1 N.m.
ADJUSTMENTS
IV-5
IV-5
DANGER
DANGER
Locknut
Seal
Plug
Setting screw
Fig. 4.2 Power
unit
Содержание TOUCAN DUO
Страница 2: ......
Страница 3: ...3 TOUCAN Duo Updated 06 2015 Models MA0323 05 Models N ________________...
Страница 4: ......
Страница 8: ...Updated 06 2015 TOUCAN Duo models 8 This page has been left blank intentionally...
Страница 9: ...CHAPTER 1 INTRODUCTION...
Страница 14: ...Updated 06 2015 TOUCAN Duo models 14 This page has been left blank intentionally...
Страница 15: ...CHAPTER 2 WORK PLATFORM CHARACTERISTICS...
Страница 19: ...CHAPTER 3 GENERAL...
Страница 34: ...Updated 06 2015 TOUCAN Duo models 34 This page has been intentionnally left blank...
Страница 35: ...CHAPTER 4 ADJUSTMENTS...
Страница 48: ...Updated 06 2015 TOUCAN Duo models 48 This page has been intentionnally left blank...
Страница 49: ...CHAPTER 5 SCHEMATICS...
Страница 50: ...Updated 06 2015 TOUCAN Duo models 50 This page has been intentionnally left blank...
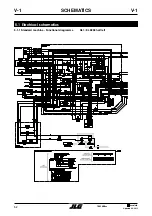
Страница 53: ...53 TOUCAN Duo Updated 06 2015 Models R f ELE258 half right SCHEMATICS V 1 V 1...
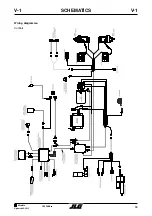
Страница 54: ...Updated 06 2015 TOUCAN Duo models 54 Wiring diagramme Power SCHEMATICS V 1 V 1...
Страница 55: ...55 TOUCAN Duo Updated 06 2015 Models Wiring diagramme Controls SCHEMATICS V 1 V 1...
Страница 56: ...Updated 06 2015 TOUCAN Duo models 56 Upper control box SCHEMATICS V 1 V 1...
Страница 57: ...57 TOUCAN Duo Updated 06 2015 Models Shelf box SCHEMATICS V 1 V 1...
Страница 58: ...Updated 06 2015 TOUCAN Duo models 58 Cardbox SCHEMATICS V 1 V 1...
Страница 59: ...59 TOUCAN Duo Updated 06 2015 Models Lower control box SCHEMATICS V 1 V 1...
Страница 61: ...61 TOUCAN Duo Updated 06 2015 Models SCHEMATICS V 2 V 2 5 2 Hydraulic sch matic Ref FL0148_04...
Страница 62: ...Updated 06 2015 TOUCAN Duo models 62 This page has been intentionnally left blank...
Страница 63: ...CHAPTER 6 REMOVAL INSTALLATION PROCEDURES...
Страница 84: ...Updated 06 2015 TOUCAN Duo models 84 NOTES...
Страница 85: ...85 TOUCAN Duo Updated 06 2015 Models CHAPTER 7 ECO SMART DISPLAY...
Страница 86: ...Updated 06 2015 TOUCAN Duo models 86 This page has been intentionnally left blank...
Страница 89: ...89 TOUCAN Duo Updated 06 2015 Models ECO SMART DISPLAY VII 4 VII 4 7 4 Menus display 7 4 1 Display...
Страница 90: ...Updated 06 2015 TOUCAN Duo models 90 ECO SMART DISPLAY VII 4 VII 4 7 4 2 Slave Controller...
Страница 91: ...91 TOUCAN Duo Updated 06 2015 Models ECO SMART DISPLAY VII 4 VII 4...
Страница 92: ...Updated 06 2015 TOUCAN Duo models 92 ECO SMART DISPLAY VII 4 VII 4...
Страница 93: ...93 TOUCAN Duo Updated 06 2015 Models 7 4 3 Master Controller ECO SMART DISPLAY VII 4 VII 4...
Страница 94: ...Updated 06 2015 TOUCAN Duo models 94 ECO SMART DISPLAY VII 4 VII 4...
Страница 95: ...95 TOUCAN Duo Updated 06 2015 Models ECO SMART DISPLAY VII 4 VII 4...
Страница 96: ...Updated 06 2015 TOUCAN Duo models 96 ECO SMART DISPLAY VII 4 VII 4...
Страница 99: ...99 TOUCAN Duo Updated 06 2015 Models CHAPTER 8 ALARMS AND WARNINGS...
Страница 100: ...Updated 06 2015 TOUCAN Duo models 100 This page has been intentionnally left blank...
Страница 102: ...Updated 06 2015 TOUCAN Duo models 102 8 3 Alarms ALARMS AND WARNINGS VIII 3 VIII 3...
Страница 103: ...103 TOUCAN Duo Updated 06 2015 Models ALARMS AND WARNINGS VIII 3 VIII 3...
Страница 104: ...Updated 06 2015 TOUCAN Duo models 104 ALARMS AND WARNINGS VIII 3 VIII 3...
Страница 105: ...105 TOUCAN Duo Updated 06 2015 Models ALARMS AND WARNINGS VIII 4 VIII 4 8 4 Warnings...
Страница 106: ...Updated 06 2015 TOUCAN Duo models 106 ALARMS AND WARNINGS VIII 4 VIII 4...
Страница 107: ...107 TOUCAN Duo Updated 06 2015 Models ALARMS AND WARNINGS VIII 4 VIII 4...
Страница 108: ...Updated 06 2015 TOUCAN Duo models 108 This page has been intentionnaly left blank...


