background image

· 4 ·

REF. 60004

INSTRUCTION MANUAL

EN

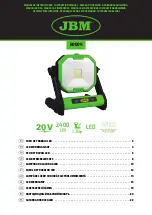
PRODUCT’S PRESENTATION

This LED working light has been designed to ensure a perfect 

illumination of the working area and any other place. Its opera-

tion with the portable lithium battery makes it ideal to move it 

freely all over the workplace, as well as in situations when there 

is no access to the electrical power supply. Even so, if the bat-

tery runs out, it is possible to connect the power cable provided 

into the slot at the rear side of the work light and plug it into the 

230V power supply.

The LED light lens provides a light output which can be adjusted 

to 1200 and 2400 lumens, and the work light head features a 

360º adjustment angle to adapt the direction of the light bulb 

as appropriate.

SAFETY INSTRUCTIONS

•  Check for breakage of parts, damage to switches and any 

other conditions that may affect its operation.

•  Disconnect the battery from the tool and place the switch in 

the locked or off position before making any adjustments, 

changing accessories, or storing the tool.

•  Keep the working area clean and well illuminated.

• 

Do  not  operate  the  tool  in  the  presence  of  flammable  li

-

quids, gases, or dust.

•  Keep children and non-authorized people away from the 

tool while in use.

•  Do not operate the tool if you get tired easily or under the 

influence of drugs, alcohol or medication.

•  Dress properly. Do not wear loose clothing or jewelry and 

contain long hair.

•  Remove adjusting keys or wrenches before turning the 

tool on.

•  Use safety equipment. Always wear safety glasses and 

use a dust mask, non-skid safety shoes, safety helmet or 

hearing protection when necessary.

•  Do not use the tool if the switch does not longer work and 

repair it immediately.

•  Store the tool out of reach of the children while not in use.

•  Do not expose the tool to rain or wet conditions.

•  Do not modify or open the work light in any case, all elec-

tronic parts are fixed already.

•  You must change a cracked glass before using the work 

light again.

OPERATION

Adjusting the light direction

This led work light has an angle adjustment of 360º:

1.   Loosen the side locking knob.

2.  Turn and adjust the work light head to the desired position.

3.  Retighten the knob.

Turning On/Off

This led work light has an On/Off switch that can also be used to 

adjust the LED work light brightness:

1.  Press once to turn the light on in its low mode (1200 lm)

2.  Press twice to turn the light on in its high mode (2400 lm)

3. 

Press three times to flash.

4. 

Press four times to turn the light off.

NOTE! Do not stare directly at the light beam or point the beam 

at any person. 

NOTE! If the battery is out of power, you can connect the power 

cord into the slot at the rear side of the work light and plug it into 

the 230V power supply.

MAINTENANCE

• 

Always be sure that the tool is switched off and the battery 

pack is removed from the tool before attempting to perform 

inspection or maintenance.

•  Do not use cleaning agents to clean the plastic parts of the 

tool, a mild detergent on a damp cloth is recommended 

instead.

TECHNICAL SPECIFICATIONS

Voltage .   .   .   .   .   .   .   .   .   .   .   .   .   .   .   .   .   .   .   .   .   .   .   .   .   DC-20V

Max output . . . . . . . . . . . . . . . . . 1200 lm (low mode)

2400 lm (high mode)

Weight  .   .   .   .   .   .   .   .   .   .   .   .   .   .   .   .   .   .   .   .   .   .   .   .   .    1.35 kg

NUM.

DESCRIPTION

1

Work light head

2

LED’s Lents

3

Side locking knob

4

On/Off switch

5

Battery release button

6

Battery

PARTS LIST

Содержание 60004

Страница 1: ...OLUMINISCENT 14 20 LAMPADADALAVOROALED 10 LED WERKLAMP 16 60004 MANUALDE INSTRUCCIONES INSTRUCTION MANUAL GUIDE D UTILISATION BEDIENUNGSANLEITUNG MANUALE D USO MANUALDE INSTRU ES MANUALDE INSTRUC IUNI...

Страница 2: ...protecci n visual y respiratoria cuando sea necesario No use la herramienta si el interruptor no funciona adecua damente y rep relo de inmediato No exponga la herramienta a la lluvia o condiciones h m...

Страница 3: ...e un circuito de protecci n 2 No siga presionando el interruptor de encendido apagado despu s del cierre autom tico de la he rramienta Instalaci n de la bater a 1 Alinee las costillas realzadas de la...

Страница 4: ...and use a dust mask non skid safety shoes safety helmet or hearing protection when necessary Do not use the tool if the switch does not longer work and repair it immediately Store the tool out of rea...

Страница 5: ...ly switches off by means of a protecti ve circuit 2 Do not continue to press the On Off button after the automatic shutdown of the power tool Installing the battery 1 Align the raised ribs on the batt...

Страница 6: ...ection ou une protection de l ou e si n cessaire N utilisez pas l outil si l interrupteur ne fonctionne pas Un outil avec un interrupteur d fectueux n cessite une r pa ration opportune Gardez l outil...

Страница 7: ...s hors tension l aide d un circuit de protection 2 Apr s le d branchement automatique de l outil lectrique n appuyez pas sur le bouton marche arr t Installation de la batterie 1 Alignez les nervures d...

Страница 8: ...enn der Schalter nicht betriebsf hig ist Das Werkzeug mit einem defekten Schalter muss rechtzeitig repariert werden Bewahren Sie das Ger t au erhalb der Reichweite von Kindern auf Vermeiden Sie das Ei...

Страница 9: ...nt laden ist wird das elektrische Werkzeug durch eine Schutzschaltung automatisch ausgeschaltet 2 Nachdem das elektrische Werkzeug automatisch aus geschaltet ist dr cken Sie keine Ein Aus Taste Einbau...

Страница 10: ...protezioni per l udito se necessario Non utilizzare lo strumento se l interruttore non funziona Lo strumento con l interruttore difettoso richiede una ripa razione tempestiva Tenere lo strumento fuori...

Страница 11: ...i spegne automaticamente per mezzo di un circuito di protezione 2 Dopo la disabilitazione automatica dell utensile elettrico non premere il pulsante di accensione disinserzione Installazione della bat...

Страница 12: ...e o auditi va se necess rio N o use a ferramenta se o interruptor n o funcionar Uma ferramenta com uma chave defeituosa requer reparo opor tuno Mantenha a ferramenta fora do alcance de crian as N o pe...

Страница 13: ...um circuito de prote o 2 N o continue a pressionar o bot o On Off ap s o desligamento autom tico da ferramenta el trica Instala o da bateria 1 Alinhe os cumes levantados na bateria com as ran huras n...

Страница 14: ...rerup torul nu func io neaz Instrumentul cu ntrerup torul defect necesit re para ii n timp util Nu p stra i instrumentul la ndem na copiilor Nu l sa i apa sau umiditatea s p trund n instrument Nu modi...

Страница 15: ...ia litiu ion este complet desc rcat scu la electric se opre te automat prin intermediul cir cuitului de protec ie 2 Dup oprirea automat a sculei electrice nu ap sa i butonul de pornire oprire Instalar...

Страница 16: ...lm of indien nodig gehoorbescherming Gebruik het gereedschap niet als de schakelaar niet werkt Een gereedschap met een defecte schakelaar behoeft een tijdige reparatie Houd het gereedschap buiten bere...

Страница 17: ...isch gereedschap automatisch uitgeschakeld door middel van een beschermingscircuit 2 Druk niet op de aan uitknop nadat het elektrisch gereedschap automatisch is uitgeschakeld Batterij installatie 1 Li...

Страница 18: ...lkez szersz m id ben t rt n jav t st ig nyel Tartsa a szersz mot gyermekekt l elz rva Ne engedje hogy v z vagy nedvess g ker lj n a m szer be Ne v ltoztassa a szerkezetet s ne nyissa ki a m k d l mp t...

Страница 19: ...jesen lemer lt az elektromos k ziszersz m egy v d ramk rnek k sz nhet en automatikusan kikapcsol 2 Miut n a szersz m automatikusan kikapcsolt ne nyomja meg a be ki gombot Az akkumul tor beszerel se 1...

Страница 20: ...20 REF 60004 RU 230 1200 2400 360 360 1 2 3 1 1200 2 2400 3 4 230 20 1200 2400 1 35 N 1 2 3 4 5 6...

Страница 21: ...21 REF 60004 10 C 40 C 40 C 1 2 1 2 3 1 2 1 2 3 5 4 5...

Страница 22: ...i prze cznik nie dzia a Nar z dzie z wadliwym prze cznikiem wymaga terminowej naprawy Trzymaj narz dzie w miejscu niedost pnym dla dzieci Nie dopuszczaj przedostania si wody lub wilgoci do nar z dzia...

Страница 23: ...ych 1 Je li akumulator litowo jonowy jest ca kowicie roz a dowany elektronarz dzie jest automatycznie wy c zane za pomoc obwodu ochronnego 2 Po automatycznym wy czeniu narz dzia elektrycz nego nie nal...

Страница 24: ...aca base PC control board 1 13 Interruptor Switch 1 14 Bot n del interruptor Switch button 1 15 Tornillo ST3x8 Screw ST3x8 2 16 Cubierta trasera Rear cover 1 17 Tornillo M3x12 Screw M3x12 5 18 Enchufe...

Отзывы: