background image

19

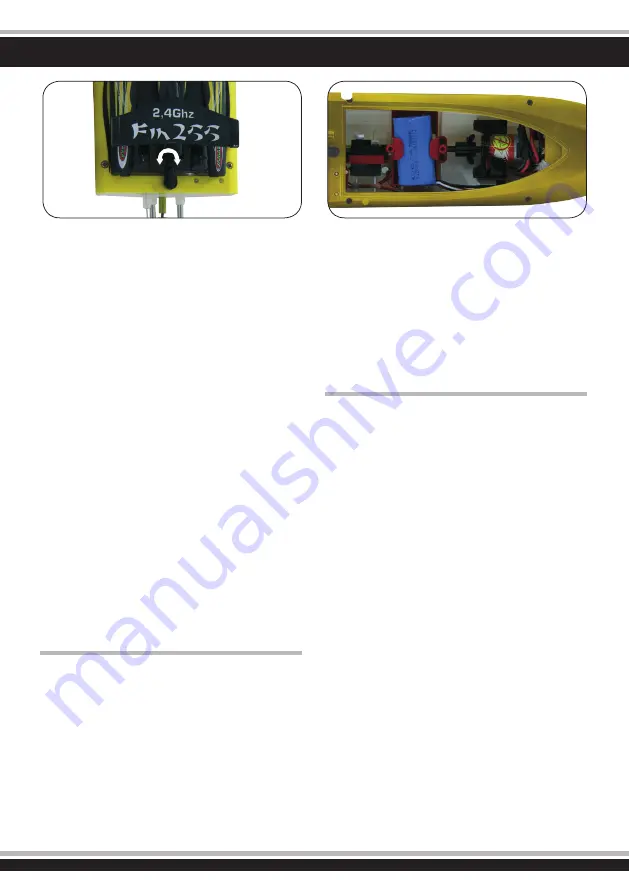
DE - Einlegen das Fahrakkus

1.  Öffnen Sie die Verriegelung der Bootsabdeckung und nehmen

  diese ab.

2.  Verbinden Sie die Akkukabel mit dem Modell und legen den 

  Akku in die Halterung im Rumpf ein.

3. Stecken Sie den kleinen Haken vorne an der Bootsabdeckung, 

  unter den Rand der Luke auf dem Schiffsdeck. Nun können Sie 

  die Bootsabdeckung richtig auflegen und fixieren.

Wichtige Information!!

Hinweis zur Inbetriebnahme

Den Akku am Boot anstecken, den Bootsdeckel schließen und 

das Boot zu Wasser lassen. Anschließend den Sender einschal-

ten und warten bis die  grüne LED zu Blinken aufhört, dann ist 

das Boot Initialisiert und kann betrieben werden!

Hinweis zur Einschaltsicherung:

Ihr Boot besitzt eine automatische Einschaltsicherung. Das Boot 

funktioniert nur wenn es im Wasser liegt. Im Trockenen sind Mo-

tor und Lenkung deaktiviert um Beschädigungen zu vermeiden. 

Sollte das Modell also beim Anstecken des Fahrakku´s und nach 

Einschalten der Fernsteuerung nicht reagieren vergewissern Sie 

sich dass das Boot richtig im Wasser liegt.

Hinweise zur Pflege:

Sie können Ihr Modell so wohl in Süß als auch in Salzwasser be-

treiben. Beachten Sie allerdings,  dass Metallische Teile und die 

Elektronik nach dem Betrieb insbesondere in Salzwasser schon 

nach sehr kurzer Zeit der Gefahr der Korrosion (Rosten) ausge-

setzt sind. Reinigen und trocknen Sie also Ihr Model sofort nach 

jedem Einsatz im Wasser. Die metallischen insbesondere die 

beweglichen Teile an Ihrem Modell sollten regelmäßig mit Mehr-

zweckfett und Kriechöl eingefettet bzw. geölt werden um Korrosion 

und Schwergängigkeit vorzubeugen. In das Boot eingedrungenes 

Wasser muss immer sofort entfernt werden und die Elektronik bei 

abgestecktem Akku sorgfältig getrocknet werden. Stecken Sie den 

Akku nach dem Betrieb immer sofort ab da der Akku sonst tiefen 

entladen werden kann und Schaden nehmen wird.

GB - Placing the battery pack in the model

1. Turn the switch of boat top cover left or right, and open the 

  boat top cover.

2. Connect the charged battery pack with the modell and place it in 

  the battery compartment

3. Plug the small hook at the front of the cockpit under the hatch of 

  the ship fuselage. You can hang up and fix the canopy properly. 

Important information!!

Getting started:

Plug in the battery into the boat, close the boat lid and set it on 

water. Then turn on the transmitter and wait until the green LED 

stops blinking. The boat is now ready to start.

Activation safety function:

The boat has a safety function that prevents it from running 

outside the water. Outside the water the motor and the steering 

is deactivated to avoid damages. So if the model don´t run after 

the battery is connected and the transmitter is powered on please 

check that the boat is set in the water properly.

Service notes:

You can use the boat in fresh and sea water. But pay attention of 

the fact that electric and mechanic parts can rust extremely fast 

especially in contact with salt water. Always clean and grease 

the parts after use with grease or oil. If water comes into the boat 

always dry it out and disconnect the battery after use. Always 

disconnect the battery after using the boat to prevent the battery 

from deep discharging.  

FR - Mise en place de l‘accu de propulsion

1.  Ouvrez le verrouillage du pont du bateau et enlevez-le.

2.  Branchez le câble de l’accu sur le modèle et placez l’accu dans 

  le système de maintien dans le fuselage.

3.  Mettez en place le petit crochet à l’avant en passant pas le 

  dessous du pont du bateau. Remettez en place le pont et fixez 

 le.

Informations importantes!!

Indication sur la mise en service

Attachez l’accu  au bateau, fermez le couvercle de bateau et 

laissez  le bateau à l‘eau. Ensuite, allumez  l‘émetteur et attendez 

jusqu’à  LED  vert arrête à clignoter. Ensuite le bateau est initiali

-

sé et on peut pratiquer !

Indication sur le régalage de l’enclenchement 

Votre bateau a un régalage de l’enclenchement. Le bateau ne fon-

ctionne  que quand il se trouve dans l’eau. Dans les environs secs 

le moteur et le pilotage sont inactivés pour éviter des dégâts. Si le 

modèle ne réagit pas après avoir mis l’accu conduite et enclenché 

la radiocommande, vérifiez que le bateau est vraiment dans l’eau.

Indication sur l’entretien

Vous pouvez pratiquer votre modèle dans l’eau douce et salée. 

Mais respectez que les parts métalliques et l’électronique sont 

exposées au risque de corrosion (rouille) après l’utilisation dans 

l’eau salée en particulière – même après peu de temps. Nettoyez 

et séchez le modèle après chaque mise en action dans l’eau toute 

suite.   Les parts métalliques et bougées devraient être lubrifiées/

graissées avec de l’huile et de graisse polyvalente pour prévenir 

la corrosion  et serrage. Il faut dénouer de l’eau pénétrée de votre 

bateau toute suite et vous devriez sécher l’électronique soigneu-

sement après avoir enlevé l’accu. Après l’utilisation enlevez tou-

jours l’accu, autrement il peut être déchargé à fond ou et il risque 

de dégât.  

1

2

Содержание FIN255

Страница 1: ...lisable en Omologato in Autorizado en EU CH DE Gebrauchsanleitung GB Instruction FR Notice d utilisation IT Istruzioni di montaggio ES Instrucciones de montaje FIN255 Speed Boot Art Nr Ord No R f Cod...

Страница 2: ...accus 13 Contenu du kit Accessoires 16 Fonctions Highlights 16 Donn es t chniques 17 El ments de commandes 17 Mise en place de la pile pour l metteur 18 Charge de l accu de propulsion 18 Mise en plac...

Страница 3: ...utilisation conforme du mat riel cela va de l assemblage en passant par la charge des accus et allant jusqu au domaine d utilisation Pour cela veillez lire atten tivement la notice d assemblage et d...

Страница 4: ...9412 0 Fax 49 0 7565 9412 23 www jamara com info jamara com Vos pourrez galement trouver des informations sur notre site Internet www neuershop jamara com Conformite Textes de la directive europ enne...

Страница 5: ...ES Notas sobre el reciclado Respete la normativa vigente sobre la eliminaci n de residuos especialmente sobre bater as y pilas Lleve a reciclar las bater as solo si est n descargadas Cuando vea que s...

Страница 6: ...t Die elektronischen Bauteile in Ihrem Modell sind hochempfind lich setzen Sie es nicht gro er Hitze oder Feuchtigkeit aus Es besteht die Gefahr eines Kurzschluss Tauchen Sie das Modell nicht unter Wa...

Страница 7: ...ot dispose to high heat or moisture Risk of a short circuit Do not immerse the model under water If your model is dirty clean it carefully with a brush Do not use solvent based cleaning agents The tra...

Страница 8: ...niques de votre mod le sont tr s sensibles ne les exposez jamais une trop forte chaleur ou humidit Il y a danger de court circuit Ne jamais plongez jamais le mod le dans l eau Si votre mod le est sale...

Страница 9: ...modello rischio di ferirsi L elettronica del modello molto delicata non esporre il modello al sole oppure all umidit Si rischia il corto circuito Non immergere il modello in acqua In caso che il mode...

Страница 10: ...aci n no debe tomar el modelo y no la toque ya que podr a lastimarse El componente electr nico en el modelo son muy sensible no lo establece de alta temperatura o la humedad Existe el riesgo de un cor...

Страница 11: ...gfalt Die Firma JAMARA schlie t daher ausdr cklich jegliche Haftung f r Sch den aus die durch den fehlerhaften Umgang mit den Lithium Ionen Zellen entstehen Bei unsachgem er Verwendung des Akkus beste...

Страница 12: ...the battery incorrect there is a risk of getting fire or acid injuries Overcharging too high power or discharging at low level destroys the cell Protect from mechanical stress squeezing pushing bendin...

Страница 13: ...les l ments Prot gez les l ments contre des chocs m caniques pincement pression torsion per age N ouvrez ou ne d coupez en aucun cas les accus ne les jetez pas dans le feu et tenez les bonne distance...

Страница 14: ...particolare cura Per questo JAMARA e K declina ogni res ponsabilit sull impiego di queste batterie e dai danni che potreb bero derivare dal loro utilizzo Un uso non appropiato di queste batterie pu p...

Страница 15: ...nofensivos y necesitan de unos cuidados m nimos La empresa Jamara e K de manera explicita declina cualquier res ponsabilidad sobre los da os causado o derivados por un manejo err neo de las bater as L...

Страница 16: ...Sinistra Destra In avanti ES Funciones Izquierda derecha Adelante DE Highlights Einfach zu steuern Mit Sicherheitsfunktion Schiffs schrauben drehen sich nur im Wasser Anti Kenternfunktion Im Wasser um...

Страница 17: ...dienelemente am Sender Seitenansicht 1 Antenne 2 Abdeckung des Programmierfeldes 3 Batteriefach 4 Lenkrad 5 Gashebel Programmierfeld A Gas Trimmung B Power LED C Lenkungs Trimmung D Binde LED E Ein Au...

Страница 18: ...y conecte la bater a al conector del cargador El tiempo de carga para una bater ato talmente descargada oscilar entre 3 5 Horas Atenci n Para esto atenda los avisos de seguridad DE Senderbatterie einl...

Страница 19: ...green LED stops blinking The boat is now ready to start Activation safety function The boat has a safety function that prevents it from running outside the water Outside the water the motor and the s...

Страница 20: ...batteria dopo l uso immediatamente perch la batteria pu essere scarica ta e prender danni ES Inserir las pilas en el modelo 1 Abrir la tapa de la cerradura y quitarla 2 Conectar el cable de bater a co...

Страница 21: ...Adelante Si pone la palanca del modelo para atr s el ir para adelante DE R ckw rts Wenn der Gashebel nach vorne gedr ckt wird f hrt das Fahrzeug r ckw rts GB Backward If the lever is pulled back towa...

Страница 22: ...gire el volante en el sentido antihorario el modelo va a girar delante por la izquierda DE Rechtskurve Ziehen Sie den Gashebel der Fernsteuerung zur ck und drehen das Steuerrad im Uhrzeigersinn wird i...

Страница 23: ...gera deaus f hrt GB Fine adjustment towards left right In case the boat model is automatically turned towards left or right slowly rotate the fine adjustment knob of the remote controller clockwise or...

Страница 24: ...on afin d viter de trop d char ger l accu Lithium Si vous remarquez que votre mod le ralenti ou r agit mollement il est conseill de revenir sans tarder la rive afin d viter de perdre celui ci Apr s qu...

Страница 25: ...r No 04 0633 Ruder Rudder Gouvernail Timone Tim n No 04 0637 Antriebswelle Drive shaft Axe d entrainement Semiassi Unidad del eje No 04 0634 Motor Motor Moteur Motore Motor No 04 0638 Schiffsschraube...

Страница 26: ...26...

Страница 27: ...Web www extra trade de Spielwaren und Modellbau B ckle Dr A Heinzlestr 3 AT 6840 G tzis Tel 0043 0 5523 52220 Fax 0043 0 5523 522204 E Mail modellbau boeckle aon at Web www modellbau boeckle com Mode...

Страница 28: ...ch h ndler Ihr Fachh ndler _____________________________________________ _____________________________________________ _____________________________________________ ___________________________________...

Отзывы: