


CN70 Barcode Scanner
Knowledge Guide
20 of 25
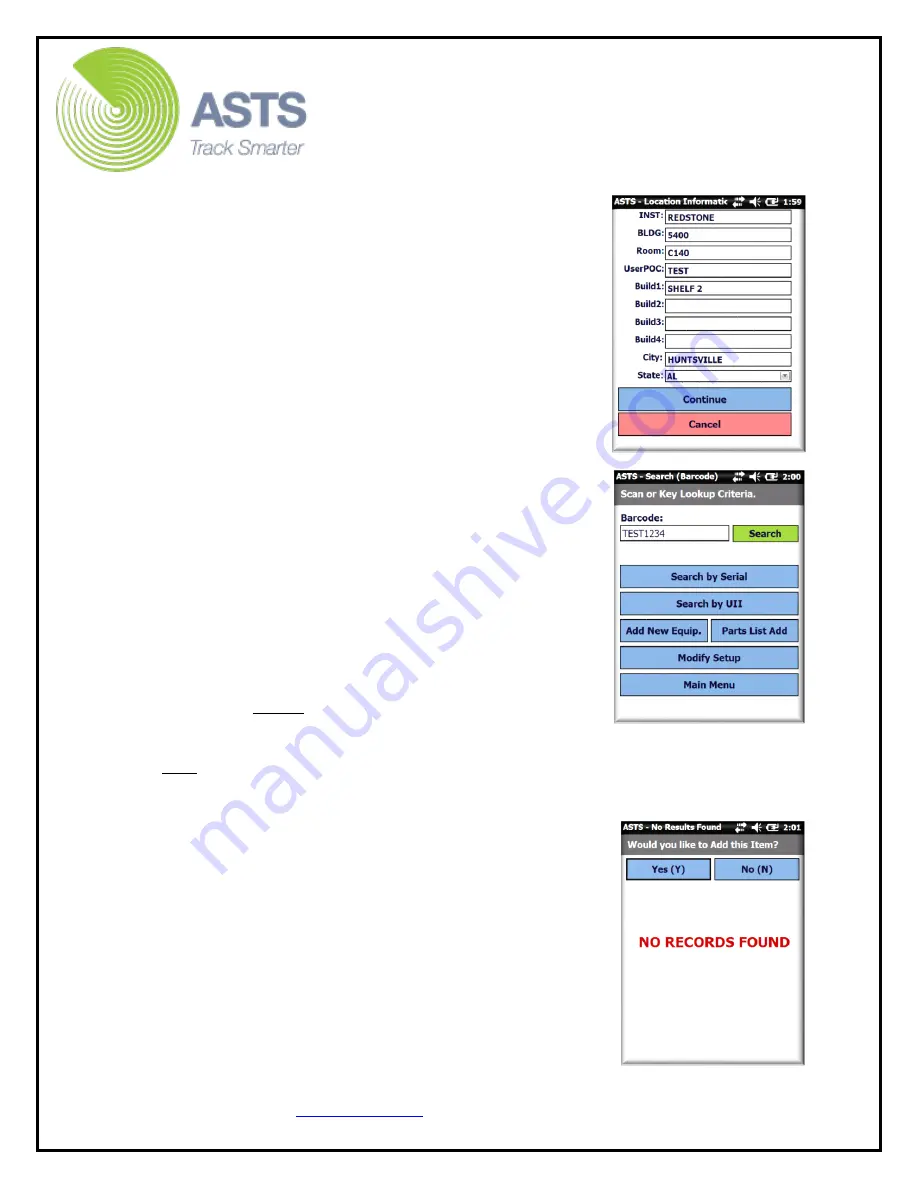
5.
Enter the appropriate location information for the
items to be scanned using the scanner keypad and
Stylus wand. Toggle between fields by pressing
the “Enter” button on the keypad (blue button on
bottom right hand side), or by selecting (using the
Stylus wand) the desired field via the touch screen.
6.
Once the desired information has been entered,
select the Enter key on the keypad or touch the
“Continue” button at the bottom of the screen to
continue to the “Barcode search” screen.
7.
From the “Barcode Search” screen, manually enter
the new (add) item’s barcode number in the field,
or scan (utilizing scan button on keypad) the
barcode number with the scanner’s laser imager.
To use the scanner’s laser imager function: Press
and hold the blue button located at the top center
of the scanner keypad. While doing so, tilt the
scanner so the red laser (or light) shines across the
center of the barcode (being scanned) while holding
the scanner approximately 4 to 10 inches away
from the barcode label. When the scanner
successfully scans (and captures) the barcode
number, it will make a noise (beep), if not muted.
The barcode number (once captured) will appear in
the Barcode Search field. Select “Search” button to
proceed.
[
Note:
Control the volume of the beep
via the (Up/Down) buttons on the right side of the
scanner].
Tip:
When preparing to inventory a new office, location, or area, ensure to
select the “Modify Setup” button to edit this information prior to scanning
items.
8.
Because the item being scanned is new (not yet in
ASTS), the “NO RECORDS FOUND” screen will be
displayed. Select the “Yes (Y)” button to proceed
with adding the new item.
9.
The “Add New Item” screen will be displayed. Enter
all of the appropriate information for the new item:
Serial, Model, MFG, Part Number, etc. Once the
data has been entered, click the “Continue” button.


