background image

44

9

INSTALLATION AND CONNECTIONS 


D

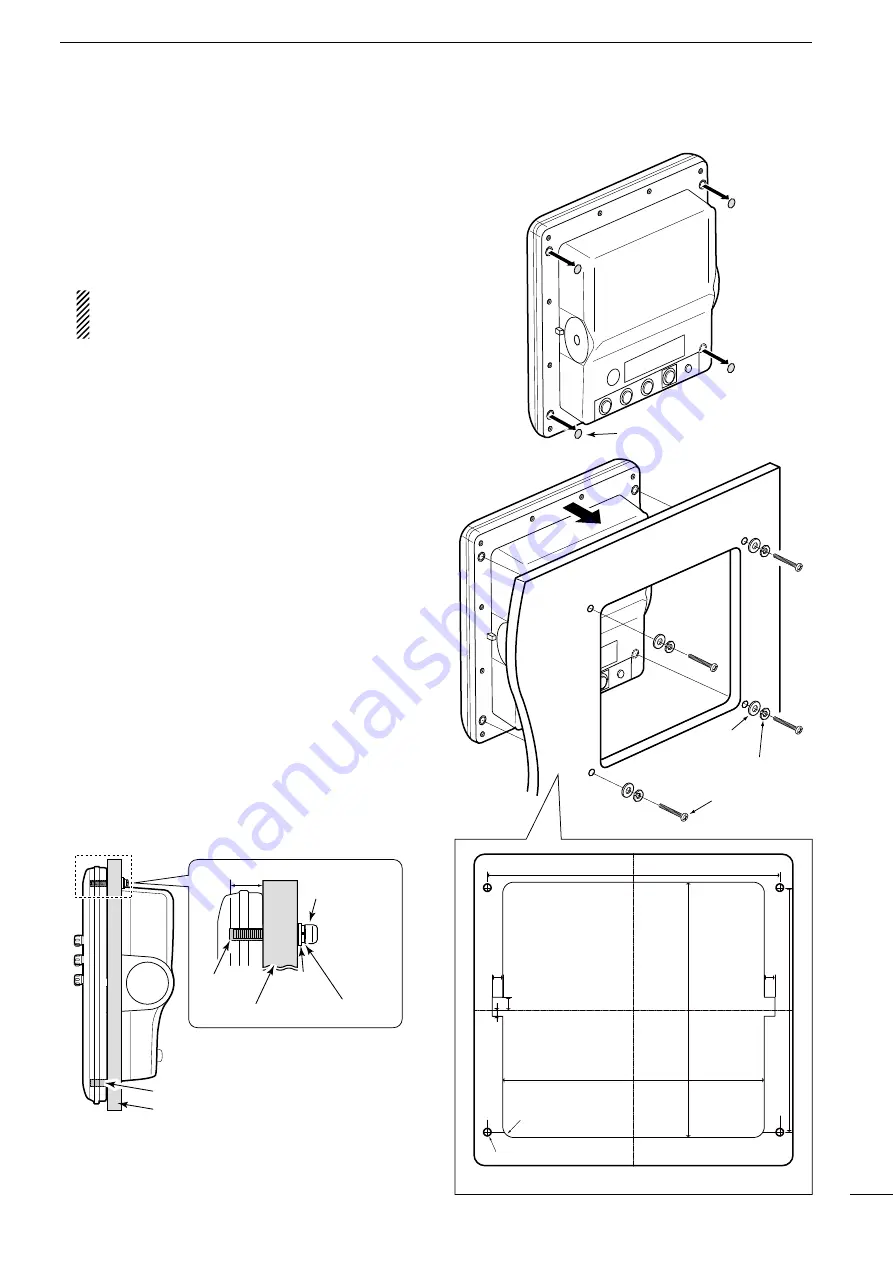
Wall Mounting 

The display unit can be mounted to a flat surface, such 
as an instrument panel, using the M6 mounting bolts. 
The screw hole depth is 14.5 mm (0.57 inches).


q

 Remove the four screw hole seals from the four cor-
ners of the display unit. 

 • 

The template is supplied with the display unit.

BE CAREFUL!


NEVER

 use your finger nail to re-

move the seal. Otherwise, you may injure your 
nail.


w

 Carefully cut a hole in the instrument panel, or wher-
ever you plan to mount the display unit.


e

Drill four holes for the mounting screw.


r

Slide the display unit through the hole.


t

 Attach the four corners of the display unit using the 
flat washers, spring washers, and M6 mounting 
bolts.

Screw hole seal

M6 mounting bolt

Spring washer

Flat 
washer

Unit: mm (inch)

246 (9.69)

275 (10.83)

230 (9.06

)

240 (9.45

)

12 (0.47)

10 (0.39)

6 (0.24)

10 (0.39)

ø7 (0.28)

R10 (0.39)

Screw hole depth: 14.5 (0.57)

Instrument panel

Screw hole

Side view

Instrument panel

Screw hole

Spring washer

Flat 

washer

M6 mounting bolt

Unit: mm (inch)

• M6 Mounting bolt

Select the mounting bolts of 
the length that fits the thick-
ness of the instrument panel.

Содержание MR-1210RII

Страница 1: ...INSTRUCTION MANUAL MARINE RADAR MR 1210R Radome type MR 1210T Open array type 4 kW MR 1210T Open array type 6 kW ...

Страница 2: ...pe unit Quantity q System cable 15 m 1 w Installation bolts M10 50 4 e Installation bolts M10 25 4 r Installation nuts M10 4 t Flat washers M10 4 y Spring washers M10 4 EX 2780 Open array type unit Quantity q System cable 20 m 1 w Installation bolts M10 40 4 e Installation nuts M10 4 r Flat washers M10 4 t Spring washers M10 4 y Allen wrench 1 u Cap bolts M8 18 mm 4 i Belleville washers 8L 4 o Sea...

Страница 3: ...and the Icom logo are registered trade marks of Icom Incorporated Japan in Japan the United States the United Kingdom Germany France Spain Russia Australia New Zealand and or other countries BE CAREFUL SART signals may not be detected and may not be displayed on the screen depending on the SEA RAIN or IR settings Follow the settings as below to detect the SART signals on the screen q Select the sc...

Страница 4: ...play unit meets IPX4 requirements for splash resistance when the supplied connection cable scanner unit are connected However if it is dropped splash resistance cannot be guaranteed because of possible damage to the case or the waterproof seals The LCD display may have cosmetic imperfections that is displayed as small dark or light spots This is not a malfunction or defect but a normal characteris...

Страница 5: ...ings 31 Related settings 32 ATA operation 32 Plotting marks 33 Course and speed vector 33 Plots ATA 33 7 AIS OPERATION 34 38 AIS Automatic Identification System 34 The AIS Display ON or OFF 34 AIS settings 34 Related settings 35 Description of the AIS display 36 AIS operation 37 Status of the vessel icon 38 Plots AIS 38 8 BASIC RADAR THEORY 39 Sidelobe echoes 39 Indirect echoes 39 Multiple echoes ...

Страница 6: ... 1 second to change the sleeping AIS target to an activated target Hold down for 1 second to release the ATA target or delete the TLL mark pp 32 52 yTRAILS KEY TRAILS p 21 Simultaneously push ENTER and CLEAR to turn the trail function ON or OFF This is useful for watching other vessel s tracks and approximate relative speed The Trail settings can be changed in the Trail menu Hold down ENTER and CL...

Страница 7: ... maximum bril liance 4 EBL1 VRM1 KEY EBL1 VRM1 pp 26 28 Push to display the EBL1 Electronic Bearing Line 1 and the VRM1 Variable Range Marker 1 Push t or u to adjust the EBL selector or push p or q to adjust the VRM selector Then push ENTER to set the point The EBL1 bearing and the VRM1 distance are dis played in the lower left corner of the screen When the EBL1 and the VRM1 are displayed the begi...

Страница 8: ...e cursor on the indicator then push ENTER to select the Head up H UP Stabilized Head up SH UP Course up C UP North up N UP or True motion TM screens tVECTOR INDICATOR p 7 Shows the ATA AIS and Own vector type T True vector R Relative vector Shows the vector time Select the vector time in the Vector Time item of the Target menu yTRAILS INDICATOR p 21 Shows the trail time The echo remains with grada...

Страница 9: ... the distance of the VRM2 Variable Range Marker when the EBL2 and the VRM2 are used Nautical miles NM kilometers km or miles SM can be selected as the distance unit in the Initial menu The PI indicator is displayed instead when the PI Paral lel Index lines function is ON p 26 9 EBL1 pp 26 28 0EBL2 pp 26 28 Used to measure bearing When a target is selected the EBL VRM1 readouts 5 or the EBL VRM2 re...

Страница 10: ...ark the same as 1 dark 1 to 3 The circles and scale are displayed in 1 dark 2 normal or 3 bright D D ATA AIS Brill Sets the Brilliance of the ATA or AIS symbols to 1 dark 2 normal or 3 bright ATA Automatic Tracking Aid AIS Automatic Identification System D D EBL VRM Brill Sets the Brilliance of the EBL or VRM to 1 dark 2 normal or 3 bright EBL Electronic Bearing Lines VRM Variable Range Markers D ...

Страница 11: ...l D D Fine Trail Selects the thinness of the trail The Fine trail function makes the trail thin OFF Normal trail 1 Fine trail 2 Extra fine trail D D Color Sets the trail color to between Blue Yellow Green Red Orange and White Display menu D D Own Vector OFF Does not display your own ship s vector ON Displays your own ship s vector Bearing data and ship speed data are required D D PPI Area Selects ...

Страница 12: ...e set to give a warning when a target or targets enter those limits around your own vessel D D CPA TCPA Alarm Sets whether or not to sound the CPA TCPA alarm A CPA TCPA alarm sounds when both the CPA and TCPA reach the limit ATA menu D D Function OFF Turns OFF the ATA Automatic Tracking Aid function ON Turns ON the ATA function D D Track The plot displays the target s past positions as 5 dots duri...

Страница 13: ...F Does not give a warning when the Auto Acti vate function activates the target ON Gives a warning when the Auto Activate func tion activates the target D D Display Range Sets the AIS targets display range to between 0 1 and 36 0 NM or 0 1 to 36 0 NM Selects the range from your vessel in 0 1 NM steps Displays all range from your vessel D D Number of AIS Selects the maximum number of AIS targets th...

Страница 14: ...30 sec 15 sec 180 sec 90 sec 7 Vessel is moving faster than 23 knots 2 sec 30 sec 30 sec 5 sec 180 sec 30 sec 8 Vessel is moving faster than 23 knots while changing course 2 sec 30 sec 30 sec 5 sec 180 sec 30 sec 1 AIS Class B does not provide information about the navigation status anchored or moored 2 CS Carrier sense 3 SO Self organized Others Category Nominal reporting interval Lost target max...

Страница 15: ...rns OFF the echo stretch function ON Turns ON the echo stretch function ES is displayed in the upper right corner of the screen D D Pulse Width SP Sets the pulse width to narrow LP Sets the pulse width to wide is displayed in the upper left corner of the screen D D SEA Curve The SEA knob can be used to fine tune the sea clut ter of the display after one of four main levels are se lected depending ...

Страница 16: ...1 D D Zone Alarm2 Sets the Zone Alarm1 and Zone Alarm2 settings IN An alarm sounds when the target comes into the zone OUT An alarm sounds when the target goes out of the zone D D Zone Alarm Level Selects the target detection parameter of zone alarm 1 and 2 Selectable parameters are Low Middle and High D D OFF Center Mode Sets the OFF Center setting when the OFF Center function is ON 25 50 75 The ...

Страница 17: ...less than 3 knots NOTE If this item is set to GPS or GPS L COG Course Over the Ground data is used as the bearing However If the vessel s speed is less than 3 knots direction accuracy falls Moreover the po sition accuracy or the current actual course may vary and therefore display an incorrect direction D D TX Inhibit Selects whether or not to use the TX inhibit D D TX Inhibit Start 0 to 359 Enter...

Страница 18: ... Push p or q to select the option Select Set to the Selected AIS Target Add Favorite1 2 or 3 Register to the Favorite AIS D D Setting Reset Resets the settings in the Menu screen other than the settings in the Initial menu You can reset only in the Standby mode p 58 q Push ENTER The dialog box Sure is displayed w Push ENTER again to reset the settings D D Factory Reset Resets the settings to the f...

Страница 19: ...ut ports q Push p or q to select a desired port w Push ENTER to open the detail window The display is automatically updated by new status Push ENTER to pause the display update Push again to restart Push p or q to scroll the window e Push CLEAR to close the window Scanner Monitor menu Displays the scanner status When the status is fail the title and value change to red color Safety Message menu Di...

Страница 20: ...ar of the display unit have been connected correctly and securely See page 42 for details Turning power ON OFF q Push to turn ON the power The opening screen is displayed The initial screen is displayed and the magnetron warm up time is counted down on the screen The magnetron inside the scanner unit warms up for 90 seconds w When the countdown is completed the Standby screen is displayed e Push T...

Страница 21: ... D D Fixed range rings The fixed range rings can be used for rough distance measurements p 25 The Brilliance of the fixed range rings can be adjusted or turned OFF MENU Color Ring Brill q q Push MENU to enter the Menu screen w w Push t or u to select the Color menu e e Push p or q to select the Ring Brill item The selected item is highlighted r r Push ENTER to enter the option selection mode t t P...

Страница 22: ...L to open the Brilliance Color box w w Push q one time to select the Key item e e Push t or u to adjust a desired Key illumination r r Push CLEAR to close the box The display automatically closes the box if you don t push any keys for 5 seconds D D Selecting the Display color Three display colors can be memorized and selected between the Day Night and User settings q q Push BRILL to open the Brill...

Страница 23: ...utomatic control function The SEA icon is displayed in the upper left corner of the screen AUTO is displayed below the SEA icon when the automatic control function is active R WARNING The SEA control re duces the receiver sensitivity of objects within ap proximately 8 NM Therefore caution and careful adjustment are necessary when using the SEA control Small objects may not be displayed on the scre...

Страница 24: ...irection of the intersection This function is selectable in 24 NM or shorter ranges This function is not selectable in the TM screen q Push MENU and MODE simulta neously to shift the screen w Push MENU and MODE simulta neously again to return to the normal screen The OFF center mode setting can be changed in the OFF Center Mode item of the System menu 25 50 75 and Cursor are selectable With OFF CE...

Страница 25: ...ong pulse and echo stretch p 19 functions are usable When the long pulse is used in the 3 4 to 3 NM range this function magnifies target echoes behind the target Pulse selection q q Push MENU and then push t or u to select the Video menu w w Push p or q to select the Pulse Width item e e Push ENTER to enter the option selection mode r r Push p or q to select SP Short Pulse or LP Long Pulse When LP...

Страница 26: ...l disappear Trail time Trail indicator Trail interval counter D D Customizing the trail settings You can customize the trail settings in the Trail menu in the Menu screen q qPush MENU to enter the Menu screen w wPush t or u to select the Trail menu e e Push p or q to select the item r r Push ENTER to enter the option selection mode t t Push p or q to select the option y y Push ENTER to save the se...

Страница 27: ...tting y yPush MENU to exit the Menu screen D D Using the power save function q q Hold down TX SAVE for 1 second to turn ON the power save function The save indicator is displayed in the upper right of the screen w w After the scanning rotations are finished transmis sion and rotation are suspended until the selected standby time elapses SAVE and standby time appear in the upper right of the screen...

Страница 28: ...ssary p 63 q q Push MENU and then push t or u to select the Display menu w w Push p or q to select the WPT Display item e e Push ENTER to enter the option selection mode r r Push p or q to turn the setting ON or OFF t t Push ENTER to save the setting y yPush MENU to exit the Menu screen Waypoint marker MENU Initial Speed Unit MENU Display WPT Display Information box Move the cursor on the title ba...

Страница 29: ...U and then push t or u to select the System menu w w Push p or q to select the Variation item e e Push ENTER to enter the option selection mode r r Push p or q to select the bearing variation Auto and Manual are selectable t t Push ENTER to save the setting y y When the Manual option is selected in step r push q to select the Manual Variation then push ENTER u uPush p or q to set the bearing varia...

Страница 30: ...n ON the Ring function and display the fixed rings 1 to 3 and OFF are selectable The ring range is fixed depending on the screen range See the tables below t t Push ENTER to save the setting y yPush MENU to exit the Menu screen To clear the fixed rings select OFF in step e above 4 Fixed rings in each screen range Range NM Ring range NM Number of rings Range km Ring range km Number of rings Ring1 R...

Страница 31: ...he parallel index lines D D Using the variable range marker q q Push EBL1 VRM1 to display the VRM1 and EBL1 then push p or q to set the marker The range between the vessel and the target is indicated in the EBL VRM1 readout w w Push ENTER to set the EBL VRM1 setting e e Push EBL2 VRM2 to display the VRM2 and EBL2 then push p or q to set the marker The range between the vessel and the target is ind...

Страница 32: ...s EBL to indicate the target direction from your ship or a target D D Using both the EBL and VRM q q Push p q t or u to move the cursor onto the desired target w w Push EBL1 VRM1 to display the EBL1 and VRM1 Push t or u to rotate the Electronic Bearing Line Push p or q to increase or decrease the Variable Range Marker s ring size The EBL VRM1 readout indicates the target bearing and distance The E...

Страница 33: ...ur vessel is stationary during the plotting time the converted speed and direction become absolute The converted speed unit is knots kilometers or miles depending on the Distance Unit in the Initial menu y y The EBL2 displays the course direction of the target D D Measuring the relative speed and course of a target qDisplay a waypoint as described on page 23 w w Push EBL1 VRM1 to display the EBL1 ...

Страница 34: ... p or q to set the distance of the alarm zone The selected alarm zone is displayed t t Push ALM to set the alarm zone and acti vate the alarm function is displayed on the upper right of the screen The selected alarm zone remains y y If a target comes into or goes out of the alarm zone an alarm sounds Push CLEAR to stop the alarm or push ALM to cancel the alarm signal and function u u To deactivate...

Страница 35: ...q q Push MENU and then push t or u to select the System menu w w Push p or q to select the Zone Alarm1 or Zone Alarm2 item e e Push ENTER to enter the option selection mode r r Push p or q to select IN or OUT IN Alarm sounds when the target comes into the zone OUT Alarm sounds when the target goes out of the zone t t Push ENTER to save the setting y y Push MENU to exit the Menu screen MENU System ...

Страница 36: ...or u to select the ATA menu e Push p or q to select the Function item r Push ENTER to enter the option selection mode t Push p or q to select ON or OFF to turn the ATA function ON or OFF y Push ENTER to save the setting uPush MENU to exit the Menu screen MENU ATA Function ATA settings Set the menu items before using the ATA function q q Push MENU and then push t or u to select the ATA menu w w Pus...

Страница 37: ...econds progressing time has passed the dot ted vector is displayed on the target After 1 minute progressing time has passed it changes to a solid circle with a dotted vector line and tracking operation starts When the target disappears red crosses blink on the target and then the mark disappears after 1 minute When a target advances within the CPA and TCPA limits the mark changes its color to red ...

Страница 38: ...ctor time Target s predicted positon Going straight Turning right Decelerating Accelerating ATA operation Continued D D All Clear Target Releases all of the ATA targets at the same time q q Push MENU and then push t or u to select the ATA menu w w Push p or q to select the All Clear Target item e e Push ENTER The dialog box Sure is displayed r r Push ENTER again to release all ATA tar gets The All...

Страница 39: ...sh MENU and then push t or u to select the AIS menu w w Push p or q to select the item e e Push ENTER to enter the option selection mode r r Push p or q to select an option t t Push ENTER to save the setting y y Push MENU to exit the Menu screen D D Track The plot displays the AIS target s past positions as 5 dots during each specified tracking interval You can set the track interval in the Track ...

Страница 40: ...is no lost target this setting grays out q Push ENTER The dialog box Sure is displayed w Push ENTER again to clear all of the Lost targets on the screen About Lost Target A vessel is regarded as a Lost target after a specified period of time has passed since the vessel last transmitted data as described on page 9 The Lost target icon disappears from the screen 6 minutes and 40 seconds after the ve...

Страница 41: ... AIS target The corners of a square are displayed when a target is selected The information of the selected AIS target is displayed in the AIS box AIS icon Displayed when a valid VDM sentence is input from the NMEA1 AIS port The indicator disappears if the AIS signal is not re ceived for 6 minutes Your vessel icon Your vessel icon is displayed in the center of the stand by screen when a valid VDM ...

Страница 42: ...second to manually change the selected target to activated When the activated target is selected hold down CLEAR for 1 second to change the selected target to sleeping When the target disappears red crosses blink on the target and then the mark disappears after 6 minutes and 40 seconds When a target advances within the CPA and TCPA limits mark changes its color to red blinks and sounds an alarm To...

Страница 43: ...angerous target Even if the target s status is sleeping or acti vated when it enters your CPA and TCPA limit settings the target is displayed with a thick line and changes its color to red Selected target The target information is displayed in the AIS information box Lost target When the AIS signal has not been updated received for a specific time period the target triangle is marked with a red cr...

Страница 44: ...m inside the sidelobes If a target reflects this radiation it will be displayed on the screen as an echo Main beam Sidelobes Sidelobe echoes usually occur at short ranges and as a result of large strongly reflective targets They can be reduced with proper adjustment of the SEA control See page 18 for details of the SEA control False echoes True echo Radar uses a form of electromagnetic radiation t...

Страница 45: ...ange Detection at short range is very important Minimum range is determined primarily by transmitter pulse length vertical beam width and height of the scanner unit The shorter the transmission time the quicker the return echoes can be received and their distance mea sured The ability to see targets very close to the vessel is decreased if the scanner is mounted too high off the water because the ...

Страница 46: ...Your vessel Large island Small island Target resolution Target resolution is determined by the horizontal beam width and transmit pulse width Sometimes it is difficult to detect two targets that are separated by short dis tances or that are in the same direction D D Distance resolution When two targets are separated by more than the pulse width they appear as two echoes When two targets are not se...

Страница 47: ...boat The distance between the GND terminal and the ground point should be as short as possible Power source requirement D D DC power source The display unit is designed for connection to any power source if the voltage is 10 2 42 V DC so that a 12 24 or 32 V DC battery can be used without a DC DC converter or any internal modifications DC power cable connection Connect the supplied DC power cable ...

Страница 48: ...SS SAFE DISTANCE stated in the se rial number label on the rear panel away from the compass and navigation receiver Select a position where there is no danger of salt or fresh water spray or immersion Select a location where it is easy to perform mainte nance or adjustment after installation Select a location that can support the weight of the display unit DO NOT select areas subject to extreme he...

Страница 49: ...ent panel or wher ever you plan to mount the display unit e eDrill four holes for the mounting screw r rSlide the display unit through the hole t t Attach the four corners of the display unit using the flat washers spring washers and M6 mounting bolts Screw hole seal M6 mounting bolt Spring washer Flat washer Unit mm inch 246 9 69 275 10 83 230 9 06 240 9 45 12 0 47 10 0 39 6 0 24 10 0 39 ø7 0 28 ...

Страница 50: ...e placed as high as possible on the boat to obtain best performance with maximum range If you install two or more radar in one boat install one above and the other s below The mounting surface must be parallel with the boat s waterline If the height is insufficient to install the scanner unit build a special frame for installation D D Mounting R WARNING BE SURE is OFF whenever you are working with...

Страница 51: ...to clamp it tightly r y y Connect the power cable black and red to the pow er connector t u u Tighten the sealing nut then replace the radome cover over the scanner unit DO NOT stretch the system cable too much other wise a miss contact of the connector may occur i i Tighten the four bolts on the bottom of the scan ner unit Use a torque wrench until the scale on the wrench reads 5 0 N m 3 69 lbf f...

Страница 52: ...ossible on the boat to obtain best performance with maximum range If you install two or more radar in one boat install one above and the other s below The mounting surface must be parallel with the boat s waterline If the height is insufficient to install the scanner unit build a special frame for installation D D Mounting R WARNING BE SURE is OFF whenever you are working with the scanner unit q q...

Страница 53: ...nnect the shielded cable ground wire to the chas sis with the screw as shown in the diagram u y y Clamp the system cable with the cable clamp metal fitting using a screw near the sealing connector i Be sure to clamp it tightly u u Clamp the system cable with the ferrite EMI filter at tached near the sealing connector o Be sure to clamp it tightly Secure the ferrite EMI filter with cable tie i i Ti...

Страница 54: ... the direc tion shown below NOTE When using the optional system cable Peel back the outer sheath of the system cable when using the optional OPC 2340 system cable BE CAREFUL DO NOT cut the inner shield wire when peeling back the outer sheath Unit mm inch Peel back the sheath To the display To the scanner 18 2 0 71 0 08 410 5 16 14 0 2 Scanner unit Stay Sealing washer T Flat washer M8 Flat washer A...

Страница 55: ...ve the seal Otherwise you may injure your nail w w Remove the 12 screws from the display unit s rear panel Fig 1 e e Slowly open the rear case and disconnect the four connectors from the display s main board Fig 1 CAUTION DO NOT pull the cables when open ing the rear case This could damage the cables and or display unit One connector is lock type Hold the release on connec tor head to disconnect t...

Страница 56: ... the UX 234 Fig 5 Be sure to clamp it tightly o o Reconnect the four connectors to the display s main board 0 Replace the gasket rear case and screws their original position Make sure the gasket is properly seated CAUTION DO NOT pinch the cables when clos ing the rear case This could damage the cables 1 Adjust the video output cable length and then tight en the sealing nut Fig 6 Installing the UX ...

Страница 57: ... time Day Time are displayed To close the information box move the cursor to the point where no mark is displayed Then push ENTER MENU System TLL Mode D D Operation Select a target on the screen that you want to mark q q Push p q t or u to move the cursor onto a desired place w w Hold down MENU TLL TLL for 1 second to mark the point When the Output or Output Symbol is selected in the TLL Mode of t...

Страница 58: ...n Simulation Mode is dis played r To return to normal operating mode turn OFF the power then ON again Select the language qPush MENU to enter the Menu screen wPush t or u to select the Initial menu e Push p or q to select the Language item r Push ENTER to enter the option selection mode t Push p or q to select the display language English or the other y Push ENTER to save the setting uPush MENU to...

Страница 59: ...Adjust item u u Push ENTER to enter the option selection mode i i Push t or u to adjust the echo until it becomes straight See below o o Push ENTER to save the setting 0Push MENU to exit the Menu screen Proper adjustment Improper pulling inward Improper pushing outward Antenna rotation speed The antenna rotation speed can be selected between Normal 36 rpm and Slow 24 rpm in the 1 2 1 4 or 1 8 rang...

Страница 60: ...h an identifiable tar get w w Push TX SAVE to display the target on the screen e ePush MENU to enter the Menu screen r rPush t or u to select the Initial menu t t Push p or q to select the Heading Adjust item y y Push ENTER to enter the option selection mode u u Push p or q to adjust the heading until the tar get matches the heading marker The difference can be readout on the menu screen i i Push ...

Страница 61: ...nge the setting y y Push t to set the range OFF or push u to set it ON u u Repeat steps t and y until you complete the range selection i i Push ENTER to save the setting Do not push CLEAR that exists the range selec tion screen without saving the settings o oPush MENU to exit the Menu screen Selectable ranges 1 8 1 4 1 2 3 4 1 1 5 2 3 4 6 8 12 16 24 32 36 48 1 64 2 72 2 NM 1 48 NM range is selecta...

Страница 62: ... The setting item displayed in bold face has already been saved r r Push ENTER to enter the option selection mode The confirmation Sure is displayed t t Push ENTER to save the settings y yPush MENU to exit the Menu screen D D Loading settings After the setting is saved you can recall it q qPush MENU to enter the Menu screen w wPush t or u to select the Initial menu e e Push p or q to select either...

Страница 63: ...n selection mode The confirmation Sure is displayed t t Push ENTER to reset the settings y yPush MENU to exit the Menu screen D D Factory Reset q qPush MENU to enter the Menu screen w wPush t or u to select the Initial menu e e Push p or q to select the Factory Reset item The Reset items are grayed out if the TX mode is se lected Push TX SAVE in this case r r Push ENTER to enter the option selecti...

Страница 64: ...ed Communication error Scanner The data from the Scanner unit can be received but it is incorrect data This is possibly a bad cable or bad connection or a malfunction from other equipment noise Trigger Signal Fail 2 If the Trigger signal is interrupted for more than 15 seconds while in the TX mode an alarm sounds SHM Signal Fail 3 If the SHM signal is interrupted for more than 15 seconds while in ...

Страница 65: ...m of contami nates that tend to dim the picture q q Wipe the surface of the display unit with a clean soft cloth DO NOT use harsh solvents such as benzine or alco hol w w If the picture is still dim clean the LCD screen Scanner unit maintenance R WARNING BE SURE is OFF whenever you are working with the scanner unit D D Cleaning q q Wipe the surface of the scanner with a clean soft cloth DO NOT use...

Страница 66: ...imately 80 W MR 1210TII 16 17 MR 1210TIII 21 22 Approximately 90 W MR 1210TIII 31 32 Usable temperature range 15 C to 55 C 5 F to 131 F Dimensions Mounting bracket is included 300 W 323 H 119 2 D mm Projections are not included 11 8 W 12 7 H 4 7 D in Weight Mounting bracket is included Approximately 4 6 kg 10 1 lb Scanner unit D D EX 2714 Radome Type 60 cm 2 ft Slotted Waveguide Array enclosed in ...

Страница 67: ...r FET switching Duplexer Circulator Tuning system Automatic manual selectable Intermediate frequency 60 MHz IF Band width 10 MHz 3 MHz Diameter of rotation height 1217 395 mm 48 16 in Usable temperature range 25 C to 70 C 13 F to 158 F Relative Humidity Less than 95 at 40 C 104 F Weight Approximately 18 kg 39 7 lb without cable 6 5 feet model Type 200 cm 6 5 ft Slotted Waveguide Array Rotation spe...

Страница 68: ...r GNS AIS OWN MENU VDO Alarm status 3 ALR EXTERNAL DATA OUTPUT NMEA2 1 connector RMC GGA GLL VTG TTM TLL RSD OSD 1 NMEA1 and NMEA2 connectors See page 28 2 AIS input also receives RMC GGA GLL VTG and GNS sentences If the NMEA2 input does not receive these the sentences from the AIS input are used 3 The system error is displayed from the AIS unit 4 Either an HDG to NMEA1 connector or an RMC to NMEA...

Страница 69: ...99 8 mm 3 15 16 inch 199 6 mm 7 27 32 inch 256 mm 10 3 32 inch 7 mm d 1 4 inch d 7 mm d 1 4 inch d 31 mm 1 7 32 inch 62 mm 2 7 16 inch 92 mm 3 5 8 inch Display mounting bracket template ...

Страница 70: ......

Страница 71: ...inal charge for shipping and handling Icom Support Center 1 6 19 Kamikuratsukuri Hirano ku Osaka 547 0004 Japan The user acknowledges and agrees that Icom Inc shall not be responsible for any support details or explanation of the source code The MR 1210 equipment purchased is covered under Icom Inc s standard product guarantee However as to the software components or any source code covered under ...

Страница 72: ...lib h volunteer to write man pages welcome contact zlib gzip org A usage example of the library is given in the file test example c which also tests that the library is working correctly An other example is given in the file test minigzip c The compression library itself is composed of all source files in the root directory To compile all files and run the test program follow the instructions give...

Страница 73: ...DVISED OF THE POSSIBILITY OF SUCH DAMAGE About libevent Copyright 2000 2003 Niels Provos provos citi umich edu All rights reserved Redistribution and use in source and binary forms with or without modification are permitted provided that the following conditions are met 1 Redistributions of source code must retain the above copyright notice this list of conditions and the following disclaimer 2 Re...

Страница 74: ...on ductor Inc Freescale and its Affiliates It concerns your rights to use this software and any accompanying written documentation the Licensed Software In consideration for Freescale allowing you to access the Licensed Software you are agreeing to be bound by the terms of this Agreement If you do not agree to all of the terms of this Agreement do not download the Licensed Software If at any point...

Страница 75: ...charge Section 3 Intellectual Property Rights 3 1 Subject to Freescale s ownership interest in the underlying Licensed Software all intellectual property rights associated with and title to your Authorized System will be retained by or will vest in you 3 2 Your modifications to the Licensed Software and all intellec tual property rights associated with and title thereto will be the property of Fre...

Страница 76: ...unterparts all of which together will constitute one agree ment and facsimile signatures will have the same effect as original signatures 8 5 Entire Agreement This Agreement including its attachments constitutes the entire agreement between the parties regarding the subject matter hereof and supersedes all prior communications ne gotiations understandings agreements or representations either writt...

Страница 77: ...in rights beyond evaluation and demonstra tion in connection with the CTS software from Dolby Laboratories Microsoft If the Licensed Software includes software owned by the Microsoft Corporation Microsoft it is subject to the terms of your license with Microsoft the Microsoft Underlying Software and as such Freescale grants no license to you beyond evaluation and demon stration in connection with ...

Страница 78: ...MEMO ...

Страница 79: ...MEMO ...

Страница 80: ...1 1 32 Kamiminami Hirano ku Osaka 547 0003 Japan A7155H 1EX 2 Printed in Japan 2014 2017 Icom Inc ...

Отзывы: