8.
Repeat step 1 on page 5 - 7 on page 7 to install the right rail into the rack.
9.
Continue with “Installing the 8231-E1C or 8231-E2C system into the rack.”
Installing the 8231-E1C or 8231-E2C system into the rack
Use the procedure in this section to install the 8231-E1C or 8231-E2C system into the rack.
CAUTION:
This system requires two persons to install the system into the rack.
To install the 8231-E1C or 8231-E2C into the rack, complete the following steps:
1.
Remove the shipping cover on the rear and the front of the system, if present.
2.
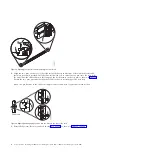
Extend the slide rails forward
(1)
until they click twice into place. Carefully lift the server and tilt it
into position over the slide rails so that the rear nail heads
(2)
on the server line up with the rear slots
(3)
on the slide rails. Slide the server down until the rear nail heads slip into the two rear slots, and
then slowly lower the front of the server
(4)
until the other nail heads slip into the other slots on the
slide rails. Make sure that the front latch
(5)
slides over the nail heads, as shown in Figure 8.
3.
Lift the blue release latches
(1)
on the slide rails and push the server
(2)
all the way into the rack until
it clicks into place, as shown in Figure 9 on page 9.
Figure 8. Extending slide rails and aligning server nail heads with the slots on the rail
8
Power Systems: Installing the IBM Power 710 Express (8231-E1C) or IBM Power 730 Express (8231-E2C)
Содержание POWER 730
Страница 2: ......
Страница 6: ...iv Power Systems Installing the IBM Power 710 Express 8231 E1C or IBM Power 730 Express 8231 E2C...
Страница 36: ...24 Power Systems Installing the IBM Power 710 Express 8231 E1C or IBM Power 730 Express 8231 E2C...
Страница 57: ......
Страница 58: ...Part Number 00L5066 Printed in USA GI11 9861 03 1P P N 00L5066...


