3.
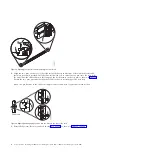
Align the two pins on the rear of the slide rail with the top and bottom holes within the selected U
that were previously marked. Pull the slide rail toward you to insert the two pins into the rack holes
(1)
, and lower the slide rail down
(2)
to engage the hook feature on the top pin, as shown in Figure 4.
Ensure the two pins protrude through the rack holes before proceeding to the next step.
Note:
The pin fixtures of the slide rails support either round-hole or square-hole rack models.
4.
Reinstall the screw that was removed in step 2 on page 5, as shown in Figure 5 on page 7.
Figure 3. Opening the front latch and removing the rear screw
Figure 4. Aligning and engaging the pins into the holes in the rear of the rack
6
Power Systems: Installing the IBM Power 710 Express (8231-E1C) or IBM Power 730 Express (8231-E2C)
Содержание POWER 730
Страница 2: ......
Страница 6: ...iv Power Systems Installing the IBM Power 710 Express 8231 E1C or IBM Power 730 Express 8231 E2C...
Страница 36: ...24 Power Systems Installing the IBM Power 710 Express 8231 E1C or IBM Power 730 Express 8231 E2C...
Страница 57: ......
Страница 58: ...Part Number 00L5066 Printed in USA GI11 9861 03 1P P N 00L5066...


