background image

                  Pocket PC Phone User Manual

 128

Applications

Pocket PC Phone User Manual          129

Applications

Other options

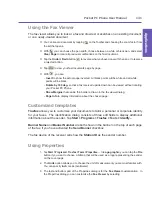
You can set the 

Pictures

 application to be launched automatically when a digital camera 

storage card is inserted.

1.  Tap 

Tools >


Options >

 the 

General

 tab.

2. Check the 

Detect digital camera storage cards

 checkbox.

You can also set the length of the time delay between slides during Slide Show playback.

1.  Tap 

Tools >


Options >

 the 

Slide Show

 tab.

2.  Select a number of seconds, then tap 

OK

.

9.5 Truefax

Truefax

 is a utility that allows you to send and receive faxes on your Pocket PC Phone.

Before you send or receive a fax, make sure that the device is connected to a 

GPRS

 network.  

The GPRS network status is confirmed by an antenna symbol 

G

 on the status bar.  Please 

note that the performance of fax communication is determined by the relative strength of 

the GPRS network signal.

Sending a fax

1.  Tap 

Start

 menu

 >


Programs >


Truefax >


New

.

2.  In the 

Recipient

 dialog screen, enter the recipient's name and fax number.  Alternatively, 

you can also choose a contact from 

Contacts

 by tapping 

 next to the 

To:

 field.  As a 

shortcut, 

Truefax

 enables you to access the 

Contacts

 to compose the recipient's data.  

While working on 

Contacts

, you can select up to 10 names to send the fax to.  Check the 

Multiple recipients

 box to list the selected contacts with the Multiple Recipient mode.

3.  To attach a cover page to your fax document, choose the available type of cover pages from 

the drop-down list and tap 

Next

.  A 

Note

 dialog box will appear if you choose a coverage 

template.

4.  Enter a subject of the fax in the 

Subject

 field.  (Entering a subject in the 

Subject

 field may 

help you to manage your faxes later on.)  In the lower edit field, you can enter more text that 

will also appear on the cover page.  Tap 

Next

 to continue, or tap 

Back

 to modify settings in 

a previous dialog.  A warning message will appear if you didn't enter the 

Owner Information


on your device.  This information will be shown on the cover page if you entered it in 

Start 

> Settings > Owner Information

.

5.  To attach a document, tap the 

Add

 button, which will display all available documents stored 

on your Pocket PC Phone.  Find the file you want to attach.  Tap 

OK

.  Repeat this procedure 

until you have completed your selection.  Or, you can create a new fax note by tapping 

New

.  You can modify the order in which the documents are to be attached.  Tap the 

Up 

or 

Down

 arrow next to the attachment list to move the document you have selected.  To 

remove an item from the list, select the document and tap 

Delete

.

Содержание PDA2

Страница 1: ...Pocket PC Phone...

Страница 2: ...n death Users are advised not to use the equipment at refueling points such as service or gas stations and are reminded of the need to observe restrictions on the use of radio equipment in fuel depots...

Страница 3: ...sive atmospheres such as fuelling areas below deck on boats fuel or chemical transfer or storage facilities and areas where the air contains chemicals or particles such as grain dust or metal powders...

Страница 4: ...essories 15 Chapter 2 Knowing Your Pocket PC Phone 17 2 1 Starting Up 18 2 2 Entering Information 25 2 3 Phone Pad 29 2 4 Writing on the Screen 32 2 5 Drawing on the Screen 34 2 6 Recording a Message...

Страница 5: ...9 Securing Your Pocket PC Phone 57 Chapter 4 Synchronizing 59 4 1 Using ActiveSync 60 4 2 Synchronizing Outlook Information 62 4 3 Infrared and Bluetooth Connection 64 4 4 ActiveSync Errors 64 Chapter...

Страница 6: ...Settings 81 6 6 Terminal Services Client 82 6 7 Bluetooth 83 6 8 Wireless Modem 93 6 9 Wireless LAN Manager 96 Chapter 7 Using Outlook 101 7 1 Calendar 102 7 2 Contacts 104 7 3 Tasks 106 7 4 Notes 107...

Страница 7: ...9 4 Pictures 127 9 5 Truefax 129 9 6 MIDlet Manager 132 9 7 ZIP 137 Chapter 10 Using Camera and Album 139 10 1 Using the Camera application 140 10 2 Using the Album application 152 Appendix A Maintain...

Страница 8: ...Phone User Manual 8 Contents Appendix B Regulatory Notices 167 Regulatory Agency IDs 168 European Union Notice 168 Important Health and Safety Information 169 Troubleshooting 171 Specifications 175 I...

Страница 9: ...Chapter 1 Getting Started 1 1 Knowing Your Device 1 2 Inserting the SIM Card 1 3 Battery 1 4 Accessories...

Страница 10: ...ories slot Insert either MMC SD cards or SDIO accessories in this slot Infrared port Enables you to exchange file s or data with other devices without cables wires Speaker Listen to audio media or a p...

Страница 11: ...Lock Press to release the back cover Earphone Jack Allows you to listen to audio media or use the phone s hands free kit Stylus and Stylus Slot Notification LED Bi color LED on the right side For GSM...

Страница 12: ...y pack The battery can then easily be removed 4 Insert the SIM card with its gold contacts face down Its cut off corner should match the cut off corner in the slot Push down lightly to snap it into pl...

Страница 13: ...tteries as stipulated by local regulations Data retention It is vital to keep your battery charged Because your Pocket PC Phone does not have a hard drive all data and any new programs you install are...

Страница 14: ...ng the Sync cable into your PC s USB port When the battery is low When the low battery warning message appears immediately save any data you are work ing on perform a synchronization with your PC and...

Страница 15: ...C Adapter The AC adapter allows you to recharge your Pocket PC Phone USB Cable The optional USB cable allows you to synchronize with a PC Headset The stereo wired headset has a volume control jog dial...

Страница 16: ...Pocket PC Phone User Manual 16 Getting Started...

Страница 17: ...Chapter 2 Knowing Your Pocket PC Phone 2 1 Starting Up 2 2 Entering Information 2 3 Phone Pad 2 4 Writing on the Screen 2 5 Drawing on the Screen 2 6 Recording a Message 2 7 Finding Information...

Страница 18: ...the phone off select the GSM icon and select Turn on flight mode Screen tapping and calibration When you first start up your Pocket PC Phone you will be asked to calibrate the screen by tapping the c...

Страница 19: ...orientation Or alternatively you can tap Start menu Settings System Screen then select the orientation you want The Portrait mode allows you to get a better view or better opera tion of certain progr...

Страница 20: ...lance reminders Tap to open the related program 8 Tap to open a menu that lets you create a new Appointment Contact Excel file Message Note Task or Word document 9 Left to right Tap to disconnect USB...

Страница 21: ...our Pocket PC Phone is roaming in a different network area Notification that one or more instant messages were received Notification that one or more mobile e mail text messages were received Indicate...

Страница 22: ...on the screen n A sound which you can specify is played n A light flashes on your Pocket PC Phone n The Pocket PC Phone vibrates To choose reminder types and sounds for your device go to Start menu S...

Страница 23: ...xBackup backs up your Pocket PC Phone files to the ROM or an SD card or re stores Contacts keeps track of your friends and colleagues contact information Messaging sends and receives Email SMS and MMS...

Страница 24: ...ng JPG BMP GIF files including animated GIF Photo Contacts lets you assign images to the entries in your Contacts or to Groups providing a visual Caller ID during incoming calls Notes creates handwrit...

Страница 25: ...a stand alone recording or embed a recording into a document or note Using the Input Panel Use the Input Panel to enter information in any program on your device You can enter characters by tapping th...

Страница 26: ...key and then drag the stylus to the left across at least two other characters 3 To insert a carriage return tap and hold the stylus anywhere on the keyboard and drag down When you use the input panel...

Страница 27: ...text that appears on the screen For specific instructions on using Block Recognizer tap the question mark next to the writing area Using Transcriber With Transcriber you can write anywhere on the scr...

Страница 28: ...using that method When you finish selecting all the letters you can save these as a profile by tapping File Save and enter a name for the profile Initially there are two profiles n Master is typically...

Страница 29: ...ped icon in the lower right corner of the screen This opens the menu illustrated in the figure below on the left Select Phone Pad from the menu Using T9 to Input Text By default Phone Pad is in T9 mod...

Страница 30: ...l the possible combinations of letters or try to guess at a partial word s completion You need to manually enter all letters yourself to form words For example If you want to enter two consecutive d l...

Страница 31: ...he Options button Checkboxes in the Options tab are n Turn on one touch symbol entry Check this box to select one symbol at a time n Auto hide matching Wordlist Check this box to hide the Wordlist aft...

Страница 32: ...screen tap Edit Undo and try again You can cut copy and paste written text in the same way you work with typed text That is tap and hold on the selected words and then select an editing command from...

Страница 33: ...ine 3 For better recognition use a zoom level of 150 or higher by tapping Tools Zoom to change the zoom level 4 Write the letters of a word closely and leave big gaps between words so that the device...

Страница 34: ...in the example below to notify you that the program considers this to be a drawing and not text To select a drawing If you want to edit or format a drawing you must select it first 1 Tap and hold the...

Страница 35: ...o a note open the note before recording in Start menu Programs Notes 2 If there is no Record Playback toolbar near the bottom of the screen tap in the Command Bar 3 Hold your device s microphone near...

Страница 36: ...mat drop down list Note PCM Pulse Code Modulation is one of the Voice Recording Format choices Although it provides slightly better sound quality it cannot be used to create recordings that are embedd...

Страница 37: ...reparing to use the Phone features of your Pocket PC 3 2 Making a Call 3 3 Smart Dialing 3 4 Receiving a Call 3 5 In Call Options 3 6 Contacts Information 3 7 Photo Contacts 3 8 Additional Dialing Inf...

Страница 38: ...From this screen you can access Call History Speed Dial and Phone Settings Components of this screen related to phone operation are 1 Indicates the strength of the signal 2 The contact name or the nu...

Страница 39: ...Call History 3 End Call Press to end a call to close the Phone Dialer screen or to end a GPRS connection 4 Call History After launching the Phone Dialer screen press the right side of the Navigation...

Страница 40: ...e strength of the signal diminishes so will the number of vertical bars in the icon with no bars indicating no signal LEGAL NOTICE In many countries you are required by law to turn off your phone on b...

Страница 41: ...icate that Vibration mode has been set To adjust the conversation phone volume you must do it during a call Adjusting the volume at another time will affect the ring notification and MP3 sound levels...

Страница 42: ...act with a dot next to the priority default number n In the pop up menu select the item you want to set as the default For example if you selected a mobile number m will be shown in the right column n...

Страница 43: ...sition number By default the Location function will give you the next available position in the Speed Dial setting screen If you want to put a number in a position that is already occupied the new num...

Страница 44: ...them in the Smart Dialing window in the upper left area of your screen Both Portrait and Landscape orientations are supported Starting Smart Dialing and basic usage Smart Dialing starts running along...

Страница 45: ...nt of your device If a contact number has displayed then this contact has more than one phone number assigned to it To call a different phone number associated with the selected contact n Tap and hold...

Страница 46: ...l be restored Enable drag scroll If this checkbox is checked you will be able to scroll the list of matched items simply by dragging your stylus up or down within the list Enable double click for dial...

Страница 47: ...Pocket PC Phone or tap the End button in the Phone Dialer screen to hang up 3 5 In Call Options Putting a call on hold Your Pocket PC Phone notifies you when you have another incoming call and gives...

Страница 48: ...y folders 1 During a call tap the icon at the bottom of the screen 2 Use any of the input methods to record your note and then tap OK You can finish your note during or after the call Viewing a note n...

Страница 49: ...o create more detailed records n The same data in your Pocket Contacts is used when in the Photo Contacts utility SIM Manager Creating a SIM contact 1 To invoke SIM Manager select Start menu Programs...

Страница 50: ...own list can be accessed by tapping on the downward pointing triangle Select a category from the drop down list Calls are categorized as follows n All Calls Displays all calls made to and from the Poc...

Страница 51: ...ap a picture file then OK in the upper right corner of the screen and OK again in the next screen You will be returned to the initial Caller ID screen You can see the image at the bottom of the screen...

Страница 52: ...he Edit Menu Delete the selected Contact entry same as Delete on the Edit Menu Assign a Photo ID to a Contact entry same as Assign Photo on the Edit Menu Remove a Photo ID assignment same as Unassign...

Страница 53: ...hoto Dialer View from the View menu This will display the Photo IDs you have assigned in a thumbnail view Contacts for whom no Photo ID has been assigned will not be listed In the Photo Dialer view mo...

Страница 54: ...uring incoming calls when this checkbox is not checked How ever the Photo Contacts application still functions normally on your device and displays Photo IDs in the Contact list Managing your groups a...

Страница 55: ...u assign unassign and preview all three of these default Photo IDs Just select a photo type Unknown Photo Not found Photo and Default Photo then use the Assign Unassign or Preview buttons which operat...

Страница 56: ...appears The replaces the international prefix of the country where you are calling 2 Enter the full phone number you want to dial It includes country code area code without the leading zero if any an...

Страница 57: ...is granted Select Settings from the Start menu In the Personal tab tap Password In the Password screen check the Prompt if device unused for checkbox In the drop down list select the desired incremen...

Страница 58: ...m unauthorized use by requiring a PIN Personal Identification Number in conjunction with phone usage Your first PIN is assigned by your operator To enable or change it 1 In the Phone Dialer screen sel...

Страница 59: ...Chapter 4 Synchronizing 4 1 Using ActiveSync 4 2 Synchronizing Outlook Information 4 3 Infrared and Bluetooth Connection 4 4 ActiveSync Errors...

Страница 60: ...e all types of information Use ActiveSync Options to turn synchronization on and off for specific information types You can synchronize information between your Pocket PC Phone and a server if your co...

Страница 61: ...on 1 Set up an infrared connection Install and configure an infrared port on your PC according to the manufacturer s instructions 2 Switch to the infrared port on your desktop computer On the File Men...

Страница 62: ...nts of less than 100 KB in size n Messages in the Outbox folder on your device are transferred to Exchange or Outlook and then sent from those programs n The messages on the two computers are linked W...

Страница 63: ...nchronize your Notes through Notes synchronization first select the Notes information type for synchronization in ActiveSync The next time you synchronize all Notes in My Documents and its subfolders...

Страница 64: ...e Beam screen Bluetooth 1 Make sure that your Pocket PC Phone is configured to receive incoming beams 2 Make sure that your Pocket PC Phone is turned on Bluetooth discoverable and within 10 meters abo...

Страница 65: ...Chapter 5 Personalizing Your Pocket PC Phone 5 1 Device Settings 5 2 Phone Settings...

Страница 66: ...rdware button on your Pocket PC Phone Input Sets up the input functions of your device Menus Lets you decide what items will reside on the Start menu and lets you enables a pop up menu from the New bu...

Страница 67: ...rmation Find information about version hardware identity and call duration Memory Displays Main memory allocation status Storage card memory and current running programs Running programs can also be s...

Страница 68: ...pplication you want to assign to this button 4 Tap OK in the upper right corner of the screen After this whenever you press the hardware button you specified in Step 2 the application you specified in...

Страница 69: ...n the Personal tab of Settings you can use the Start Menu screen to add the programs you use most often to the Start menu if desired In the New Menu tab you can check the Turn on New button menu check...

Страница 70: ...se all files and data you have created and programs you have installed For more information about clearing memory please see Appendix A n If you ve used ActiveSync to create a backup file all of your...

Страница 71: ...the System tab The Version tab of the About screen displays important device information including the amount of memory installed In the Device ID tab you may need to change the device name if you ar...

Страница 72: ...o displays the amount of memory in use versus the available memory You can drag the indicator on the Slider Bar to easily adjust this For other information about making memory available see Appendix A...

Страница 73: ...manent Save in the System tab To back up to Flash ROM Check the desired checkboxes then tap OK NOTE When you elect to back up Contacts Appointments and Tasks your Pocket PC Phone will automatically ba...

Страница 74: ...e to the Windows Rings folder on your device Select the sound from the Ring tone list n To download ring tones you can make a connection to the Internet and then download ring tones that are compatibl...

Страница 75: ...atically The current network will remain active until you change it lose your signal or change your SIM card n The network currently in use will be listed at the top of the screen n When your current...

Страница 76: ...More tab you can access the settings for Automatic Pickup and Broadcast Channels You can choose to receive real time news and information such as traffic and weather reports by enabling the Broadcast...

Страница 77: ...nected 6 1 About Connections 6 2 Connecting to the Internet 6 3 CSD Line Type 6 4 Pocket Internet Explorer 6 5 Network Cards Settings 6 6 Terminal Services Client 6 7 Bluetooth 6 8 Wireless Modem 6 9...

Страница 78: ...SP and My Work Network as shown in the illustration at right My ISP settings are used to connect to the Internet and My Work Network settings can be used to connect to any private network such as a co...

Страница 79: ...twork administrator n Server phone number n User name n Password 2 Tap the Start menu Settings the Connections tab Connections 3 In My Work Network follow the instructions for each type of connection...

Страница 80: ...zation with your PC download your favorite links and mobile favorites that are stored in the Mobile Favorites folder in Internet Explorer on the PC To synchronize and download your favorite links from...

Страница 81: ...ards 2 In the My network card connects to drop down box tap either The Internet or Work If you are connecting to your ISP at home tap The Internet If you are connecting to a private network such as a...

Страница 82: ...ending the session the Terminal Services Client reconnects to that session Navigating within Terminal Services Client Once connected to the server the PC s screen may more than fill your mobile devic...

Страница 83: ...ters n Exchange information such as files calendar items tasks and contacts or business cards n Synchronize with a PC with Bluetooth capability through an ActiveSync connection Using Bluetooth The Blu...

Страница 84: ...le and reloads that profile the next time your Pocket PC Phone is turned on Setting the profiles allows n Different users to quickly re configure the Pocket PC Phone to the personal preferences For ex...

Страница 85: ...urrently in use select the new profile and then make the changes while the new profile is active Setting Accessibility Properties You can enter or change the accessibility properties to define how you...

Страница 86: ...Bluetooth icon in the lower right corner of the Today screen then selecting Bluetooth Settings the Services tab 1 In the Services field select the service to be configured 2 In the Service settings ar...

Страница 87: ...corner of the Today screen and then Bluetooth Manager Opening Bluetooth Manager automatically turns on Bluetooth Exchanging Information or Business Cards To exchange information or business cards choo...

Страница 88: ...en will vary depending on the type of connection being created Tap Next to move to the next page or Back to return to the previous page Some of the connection types that the wizard can help you perfor...

Страница 89: ...ort from the services area and then tap Advanced 3 The Outbound COM Port is the lower listing on the screen You must configure the application that will use the Bluetooth Serial Port to send data to t...

Страница 90: ...PC Dial up Networking DUN allows you to connect to a remote computer via a phone line Once connected you can browse the Internet or check your E mail The remote Bluetooth device that will provide the...

Страница 91: ...easy to exchange information that would normally require a TCP IP network For example most chat utilities and multi player games are fully functional in a Bluetooth personal area network environment...

Страница 92: ...es a network connection can use the Personal Area Network connection My Shortcuts The default tab on the Bluetooth Manager is My Shortcuts This screen displays the icons that have been created for con...

Страница 93: ...nt Name Before you start using your Wireless Modem with an IrDA connection you need to create a new modem on your PC first 1 Click Start menu Settings Control Panel Phone and Modem Options 2 Add a new...

Страница 94: ...d then click Next 10 After the installation is completed click Finish Connecting via USB Port As with the connection via IrDA you need to check the following before you start using the Wireless Modem...

Страница 95: ...on Connecting via Bluetooth Before starting to use your Pocket PC Phone as a Bluetooth modem you must be sure that your PC is a Bluetooth enabled device In addition you still need to check the followi...

Страница 96: ...depend on the number thickness and location of walls ceilings or other objects that the wireless signal must pass through Checking for a Wireless LAN Signal Before starting WLAN Manager verify that yo...

Страница 97: ...Command Bar there are two icons The leftmost icon Network Cards is a shortcut to the Start menu Settings Connections tab Network Cards utility Tapping the rightmost icon Wireless Manager will switch t...

Страница 98: ...device Mode Indicates whether the network is in Infrastructure mode or Adhoc mode Channel Indicates which channel the network occupies BSSID BSSID is Basic Service Set ID displays the unique WLAN MAC...

Страница 99: ...minutes LEAP screen LEAP is Lightweight Extensible Authentication Protocol This feature of the Wireless LAN Manager allows you to increase the security of your device to ensure that no one can ac ces...

Страница 100: ...Pocket PC Phone User Manual 100 Getting Connected...

Страница 101: ...Chapter 7 Using Outlook 7 1 Calendar 7 2 Contacts 7 3 Tasks 7 4 Notes...

Страница 102: ...appointment 2 Tap to display or edit the appointment details 3 Tap to create a new appointment 4 Tap to display appointments calendars in various views Creating or changing an appointment n To create...

Страница 103: ...the meeting request through a con nection to an ISP or the network rather than through synchronization with your PC tap the Tools Options Appointments tab In the Send meeting requests via field tap th...

Страница 104: ...n entered for that contact n Tap a contact name in the main list to display or edit that contact s details n Tap and hold to display a pop up menu of available actions To change the way information ap...

Страница 105: ...k for that company will be displayed to the right of the company name n Press and hold the top of the navigation pad until alphabetical letters appear on the screen in large type Then use the navigati...

Страница 106: ...don t see this box tap Tools Entry Bar toggles the Entry Bar off and on n By default all tasks are displayed To display tasks by Category in the main Tasks screen tap the arrow near the upper left cor...

Страница 107: ...screen and creating recordings TIP You can insert the date in a note First de select the Pen Tool icon in the Com mand Bar and make sure that no drawings are selected Next tap and hold anywhere on th...

Страница 108: ...gs on a storage card you can select Storage Card in the Save To field Default is Main Memory By default pressing the Notes hardware button on the upper left side of your Pocket PC Phone illustrated in...

Страница 109: ...Chapter 8 Messaging Features 8 1 E Mail and Text Messages 8 2 MSN Messenger 8 3 MMS Messages...

Страница 110: ...instructions on the next page under Downloading messages from a server n If you receive E mail messages through ActiveSync begin synchronization For more information please refer to Chapter 4 n Text...

Страница 111: ...s Connect to open a connection to the Internet or your cor porate network depending on the account For more information please see Chapter 6 1 Tap Accounts and ensure that the account you want to use...

Страница 112: ...mation and then tap Options 3 Tap Next twice select Get full copy of messages and then When getting full copy get attachments Embedded images and objects cannot be received as attachments An embedded...

Страница 113: ...messages in the Inbox folder in Outlook E Mail will automatically be synchronized with your device You can elect to synchronize additional folders by designating them for ActiveSync The folders you c...

Страница 114: ...ount s to use For MSN Messenger Service you must have a Passport or Hotmail account For Exchange Instant Messaging you must have an Exchange account 1 To use MSN Messenger Service set up a connection...

Страница 115: ...ately send the newly captured file with the message Launching the MMS Composer screen MMS is incorporated into the Pocket PC Phone s Messaging function You can access MMS directly by selecting Start M...

Страница 116: ...n New Creates a new message Delete Removes the message Move Moves the selected message to another folder Reply Lets you respond to the message by sending one of your own Reply All Responds to everyone...

Страница 117: ...ct a specific location if you need to navigate to other locations containing photos videos 2 Tap the file that you want to add 3 After tapping a file in this screen tap to select You will then be retu...

Страница 118: ...anned Text screen to open a pop up menu Select Delete to delete that item Edit to modify the selected item or New to create a new item to be added to the canned text Adding audio clips Single audio cl...

Страница 119: ...you take a new picture and attach it to the message Capture Video Lets you capture a new video file and attach it to the message Cancel Cancels the message creation and returns you to your message box...

Страница 120: ...of network connection from the drop down list n Retrieve Messages Immediately Typically you receive a notification whenever a new message is available Checking this box downloads new messages automati...

Страница 121: ...e other Send commands no matter what application you are using Example 1 1 Select Start Messaging Accounts MMS 2 Invoke the File Explorer utility Tap and hold on an image file or video file 3 From the...

Страница 122: ...Pocket PC Phone User Manual 122 Messaging Features...

Страница 123: ...Chapter 9 Applications 9 1 Pocket Word 9 2 Pocket Excel 9 3 Windows Media Player 9 4 Pictures 9 5 Truefax 9 6 MIDlet Manager 9 7 ZIP...

Страница 124: ...chronized Pocket Word files that are stored in My Documents and its subfolders are synchronized with the PC ActiveSync will convert the documents during synchronization When you delete a file on your...

Страница 125: ...ronized Pocket Excel files that are stored in My Documents and its subfolders are synchronized with the PC ActiveSync converts documents during synchronization When you delete a file on your PC or you...

Страница 126: ...ongs by a particular artist or a playlist of work related video clips Playing a file on a network To play streaming media a song or video that is stored on the Internet or on a network server your Poc...

Страница 127: ...uments directory on the memory card If the memory card does not have a My Documents folder you must create one first Transferring pictures Picture files stored on your PC can be synchronized with Pict...

Страница 128: ...contrast of your JPEG pictures Tap the desired picture then n Tap to rotate a picture 90 degrees counter clockwise n Tap to crop a picture by dragging and selecting the crop area Tap outside of the bo...

Страница 129: ...e working on Contacts you can select up to 10 names to send the fax to Check the Multiple recipients box to list the selected contacts with the Multiple Recipient mode 3 To attach a cover page to your...

Страница 130: ...through your Pocket PC Phone with a standard mobile phone number Contact your mobile operator for the availability of this service To receive a fax 1 Tap Start Programs Truefax 2 Tap in the menu bar...

Страница 131: ...n the fax viewer dialog Page Info to display information about the chosen page Customized templates Truefax allows you to customize your documents to tailor a personal or corporate identity for your f...

Страница 132: ...odify these values by choosing one of the given values from the list The standard measurement unit can be set in the Properties options Setting Fax Options Select Start Programs Truefax Tool Fax n The...

Страница 133: ...hments are automatically saved in the My Documents directory To install MIDlets via a physical connection such as USB sync cable or cradle use Win dows Explorer to copy your MIDlet file s from your PC...

Страница 134: ...Phone You can also return to a running MIDlet by selecting it from this screen You can also tap the Show Recent option to display the most recently used MIDlets up to a maximum of nine Stopping MIDle...

Страница 135: ...he dialog box then tap OK Un installing MIDlets MIDlet suites You can remove MIDlets MIDlet suites from your Pocket PC Phone s memory First ensure that the MIDlets MIDlet suite you want to remove is n...

Страница 136: ...s MIDlet suite to record sounds and images Error Messages Message Meaning Either RAM shortage or insufficient space on the file system Insufficient memory available on your Pocket PC Phone Network out...

Страница 137: ...are displayed by selecting either Large Icons Small Icons List or Details from the View menu The tabs in the Tools Menu Options screen also allow you to set various ZIP behaviors to your own prefer e...

Страница 138: ...er without being prompted check the Overwrite Existing Files checkbox If you do not check this checkbox and files are found in the destination folder with the same name you will be asked to confirm If...

Страница 139: ...Chapter 10 Using Camera and Album 10 1 Using the Camera application 10 2 Using the Album application...

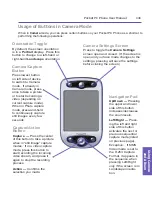
Страница 140: ...other capture modes by pressing the Right and Left buttons on your Pocket PC s navigation pad see next page or by tapping the Left Right triangular buttons in the lower right corner of the screen The...

Страница 141: ...ording the incoming video stream and press it again to stop the recording process Action Confirms the selection you made Navigation Pad Up Down Pressing the upper and lower side of this button increas...

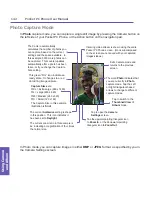
Страница 142: ...ure Size setting Capture Sizes are nXL Extra Large 960 x 1280 nL Large 480 x 640 nM Medium 240 x 320 nS Small 120 x 160 The Capture Size in this example illustration is Small Exits Camera mode and ret...

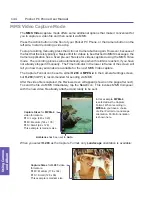
Страница 143: ...nter that shows how much time has elapsed during the current recording This blinking red circle indicates that recording is in progress A green filmstrip icon will display here when the camera is in a...

Страница 144: ...or the next MMS Video capture The Capture Format can be set to either H 263 or MPEG 4 in the Camera Settings screen but H 263 3GPP is recommended for sending via MMS After the video file is captured t...

Страница 145: ...xt sequential template n Tap then select a template from the drop down list in the Template field n Tap then tap the Browse button to preview the actual templates as well as filename and resolution Ta...

Страница 146: ...ng overrides Exception Contact Photo capture mode If you are using the Contact Photo capture mode the Assign to Contact icon will display in this second position instead of the Send icon Tap this icon...

Страница 147: ...The table below summarizes the Zoom function availability Capture Mode Capture Size setting Zoom available Video and MMS Video Large 240 x 320 1 0x to 2 0x Medium 144 x 176 1 0x to 4 0x Small 96 x 12...

Страница 148: ...er table Capture Size The choices for Capture Size will be different according to the selected capture mode and capture format as shown on the previ ous page Higher Capture Size settings produce large...

Страница 149: ...is not checked meaning that an audible shutter sound effect will be played every time you capture a still image and a beep will sound every time you start and stop recording a video If you check this...

Страница 150: ...nto the Prefix String field For example entering party in the Prefix String field would produce the filename party_00001 jpg Alternatively you can choose Date or Date and Time as the Prefix Type Count...

Страница 151: ...0001 avi Alternatively you can choose Date or Date and Time as the Prefix Type Counter Index By default sequential numbers are automatically incorporated into each filename for all new video files you...

Страница 152: ...n Album File Type Formats Still image formats BMP GIF JPEG Animation format Animated GIF Video formats Motion JPEG AVI avi MPEG 4 Simple profile mp4 3GPP H 263 baseline 3gp Audio formats MPEG 4 AAC Ad...

Страница 153: ...n the left Large Small Tiny or List shown above on the right Tap the Sort By icon if you want to sort the display of the icons according to Name Size Date Type or to Reverse ascending descending To sw...

Страница 154: ...Pocket PC Phone s microphone tap to begin recording and tap to stop recording After audio annotation has been added will be shown in the thumbnail NOTE You cannot record an audio annotation for a vide...

Страница 155: ...ked The Contact entries in your Pocket Contacts will be displayed 3 Select the Contact entry to which you want to assign the Photo ID and assign the desired attributes as you normally would in Photo C...

Страница 156: ...speed at which animated GIF files are played By default this is set to Normal You can select Faster Slower or No Delay from the drop down list Keep backlight on while playing video If your Backlight h...

Страница 157: ...set colors and effects for text specify how long to display each slide and much more Detailed View Detailed View mode displays the selected file in an enlarged view and you can further manipulate the...

Страница 158: ...change the background image of the Today screen on your Pocket PC Phone to any image you want 1 In Album tap to open a video file or image you want to use as the background image of the Today screen...

Страница 159: ...shown below Tap once or repeatedly to jump to the next sequential files Tap to resume playing a Slide Show that has been paused Exits the Slide Show and enters the Detailed view Exits Slide Show mode...

Страница 160: ...shows Full Screen view Tap to switch to Full Screen View mode As with Detailed view if the image or video is currently displayed in a size that is too large to fit in its entirety on the screen you ca...

Страница 161: ...Appendix A Maintaining your Pocket PC Phone n Adding and Removing Programs n Managing Memory n Backing Up Files n Resetting Your Pocket PC Phone...

Страница 162: ...ket PC Phone before installing it 2 Read any installation instructions or documentation that came with the program Many programs provide their own installation instructions 3 Connect your Pocket PC Ph...

Страница 163: ...our device cannot be removed You can quickly return your device to the factory default configuration by clearing all memory All data except the installed ROM application will be lost Select Start Sett...

Страница 164: ...Tools Options 2 In the Storage tab check the Store attachments on storage card checkbox and then tap OK All existing and future attachments will be automatically stored on the storage card Save new it...

Страница 165: ...MMC Memory cards which are primarily used to back up or transfer files and data Inserting a memory card Push the memory card into its slot until it clicks into place The card is secure when it is not...

Страница 166: ...t reset If your Pocket PC Phone responds slowly stops responding or freezes you can soft reset it A soft reset causes the Pocket PC Phone to restart and re adjust memory allocation Unsaved data in any...

Страница 167: ...Appendix B Regulatory Notices n Regulatory Agency Identification n European Union Notice n Important Health and Safety Information n Troubleshooting...

Страница 168: ...following European Norms in parentheses are the equivalent international standards n EN 60950 IEC 60950 Safety of InformationTechnology Equipment n ETSI EN 301 511 Global system for mobile communicati...

Страница 169: ...service markings Except as explained elsewhere in the Operating or Service documentation do not service any product yourself Service needed on components inside these compartments should be done by a...

Страница 170: ...ions for Power Supply Unit n Use the correct external power source A product should be operated only from the type of power source indicated on the electrical ratings label If you are not sure of the...

Страница 171: ...r to the Power setting in Chapter 5 for more information 1 Tap at the right side of the Title Bar to check the volume status 2 Check the settings of Sound and Notifications on the Personal tab by tapp...

Страница 172: ...necessary programs you have installed to release more program memory space See the Managing Memory section in Appendix A Plug the AC power in to your device to charge it If you are having a hard time...

Страница 173: ...Problems Problem Solution n ActiveSync operation cannot be performed or connected n ActiveSync is connected but data cannot be synchronized 1 Make sure the ActiveSync cradle cable is connected securel...

Страница 174: ...reless connection to your mobile service provider is switched on and the signal is un obstructed 3 Verify with your Internet service provider that your username and password are correct See Chapter 6...

Страница 175: ...tenna Yes Camera Module Type Color CMOS camera module with dust proof cover Resolution 1 3M with JPEG encoder Camcorder QCIF Min 15 fps in live mode Physical Dimensions 69 mm w x 130 mm h x 19 mm l We...

Страница 176: ...Photo capture mode Camera 146 CSD Line Type 79 D Data retention 13 Drawing on screen 34 E E Mail 110 Receiving attachments 112 Earphones headset 15 Plug 11 Emergency calls 56 End call button 10 Enter...

Страница 177: ...ing programs 163 Resetting the device 166 Review screen Camera mode 146 149 Ringtone assigning to a con tact 55 Ring type 74 S Screen orientation 19 SD storage card 164 Securing your phone 57 Services...

Отзывы: