background image

September 1,

1997

P/N  401789

5 - 7

H

U

S

S

M

A

N

N

 C

O

R

P

O

R

A

T

IO

N

 •

 B

R

ID

G

E

T

O

N

, M

O

 6

3

0

4

4

-2

4

8

3

 •

 P

rin

te

d

 in

 U

S

A

L1

L2

L3

C

37

38 39

40 41

42

37

38

39

40

41

42

37

38

39

40

41

42

C

31

32 33

34

35 36

31

32

33

34

35

36

31

32

33

34

35

36

C

C

C

C

C

C

1

2

3

4

5

6

7

8

10

11

12

9

19

20

21

22

23

24

25 26

27

28

29 30

16

17

18

13

14

15

25 26

27

28

29

30

25

26

27

28

29

30

19

20

21

22

23 24

19

20

21

22

23

24

16

17

18

13

14

15

16

17

18

13

14

15

7

8

10

11 12

9

7

8

10

11

12

9

4

5

6

4

5

6

1

2

3

2

3

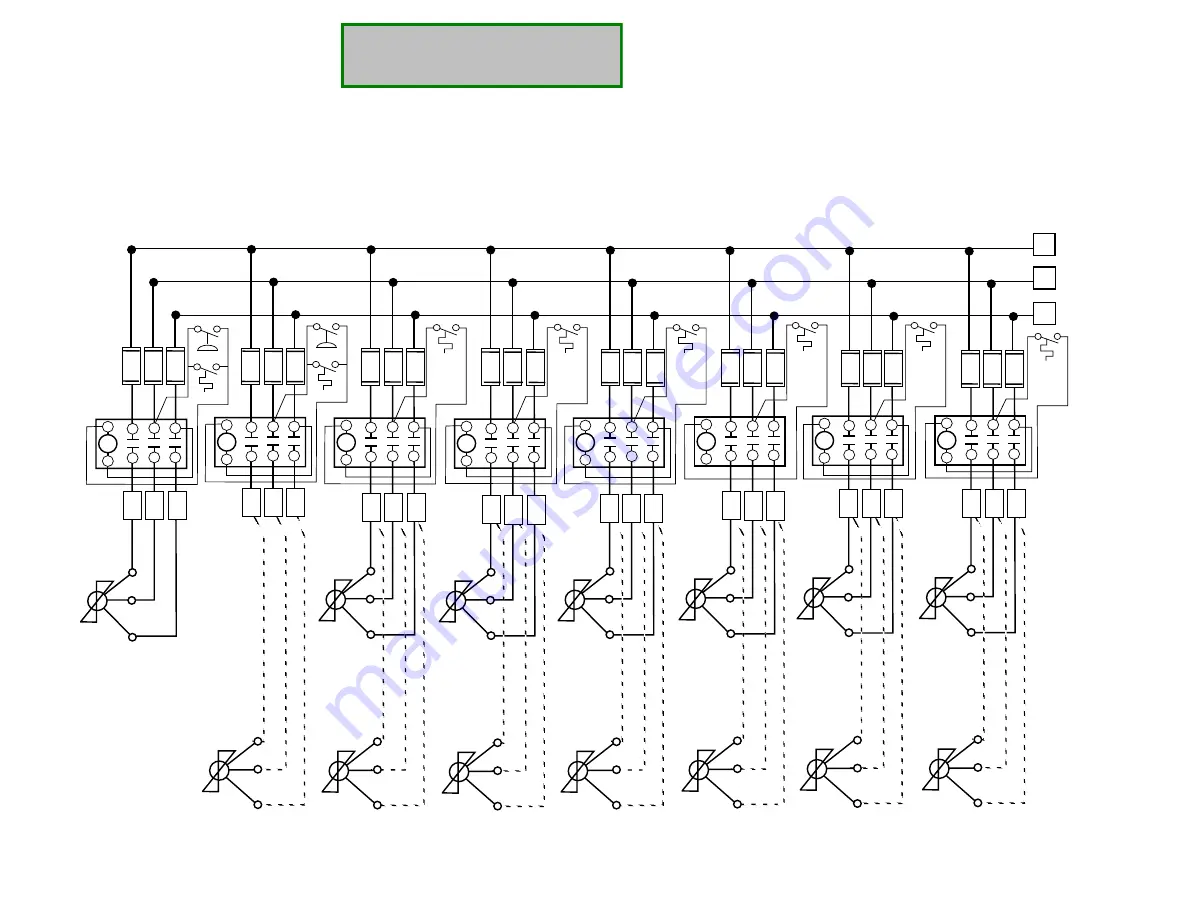
Ambient Temperature Control of All Banks With Pressure Override of the First Fan Bank

208/3/60   230/3/60   460/3/60

1

Figure 5-3 — Ambient Control of All Banks With Pressure Override of the First Fan Bank

208/3/60     230/3/60     460/3/60

Return to Contents

Содержание Scroll Plus Fibertronic 401789

Страница 1: ...Scroll Plus Fibertronic P N 401789 Installation and Service Manual Contents Tables Figures ...

Страница 2: ...xceed 150 pounds of pressure for leak testing low side Use only a striker to light torch Know whether a circuit is open at the power supply or not Remove all power before opening control panels Always supply proper ventilation Refrigerants and nitrogen can displace oxygen causing suffocation Refrigerants exposed to flame can produce phosgene a poisonous gas Be sure refrigeration lines are free of ...

Страница 3: ...r adjustment are the keys to customer satisfaction The information presented in this manual includes many details resulting from our experience over many years Its use will guide the contractor to a successful installation Time taken to read and to understand this information will pay off in reducing lost time and duplication work Should there be questions concerning this information do not hesita...

Страница 4: ...oll Plus Fibertronic Installation and Service Manual Hussmann Corporation 12999 St Charles Rock Road Bridgeton MO 63044 2483 Printed in USA P N 401789 September 1997 Contents Tables Figures Tables Figures ...

Страница 5: ...tting Without a Crane 1 5 Scroll Plus Refrigeration Process 2 1 Oveview 2 1 Scroll Plus Fibertronic Refrigeration System 2 2 Basic Refrigeration Cycle 2 4 Heat Reclaim Cycle 2 6 Receiver Pressure and Vapor Temperature Regulation 2 6 Koolgas Defrost Cycle 2 7 Oil Cycle 2 8 Subcooling 2 9 Mechanical Subcooling 2 9 Component Piping 3 1 Overview 3 1 Refrigeration Line Runs 3 1 Rack to Condenser Piping...

Страница 6: ... Other Controls 4 28 Power Monitor 4 29 Remote Satellite Remote Condenser 5 1 Overview 5 1 Remote Satellites Remote Satellite Components 5 1 Shipping Damage 5 1 Lifting and Leveling 5 2 Remote Satellite Dimensions and Weights 5 2 Remote Condensers 5 3 General Description 5 3 Air Cooled Application 5 3 Shutoff Valves 5 3 Lifting and Leg Assembly 5 4 Location 5 4 Leveling and Mounting 5 4 Preliminar...

Страница 7: ...ling 6 15 Oil Cycle 6 16 Control Settings 7 1 Overview 7 1 Compressor Oil Failure 7 1 Pressure Settings 7 1 Plate Subcooling Controls 7 1 EPR Settings 7 1 Winter Condensing Pressure Controls 7 2 Mechanical Low Pressure Controls 7 2 Condenser Pressure and Temperature Settings 7 8 Merchandiser Settings 7 9 Start Up and Maintenance 8 1 Start Up 8 1 Leak Testing 8 1 Test Charge 8 1 Oil Levels 8 2 Evac...

Страница 8: ...roubleshooting EPC Control 4 11 4 5 Troubleshooting Defrost Board with Fibertronic Time Clock 4 23 5 1 Remote Air Cooled Condenser Physical Data 5 6 6 1 Troubleshooting EPR Valves 6 2 6 2 Troubleshooting Koolgas Valves 6 3 6 3 Troubleshooting Branch Liquid Line Solenoid Valves 6 6 6 4 Troubleshooting the TEV 6 8 6 5 Troubleshooting Flooding Valve 6 10 6 6 Troubleshooting Receiver Pressure Regulato...

Страница 9: ...ve 2 5 2 8 TEV 2 5 2 9 EPR Valve 2 5 2 10 Heat Reclaim Cycle 2 6 2 11 Receiver Pressure Regulation 2 6 2 12 A9 and A9B Valves 2 6 2 13 Koolgas Defrost Cycle 2 7 2 14 Koolgas Defrost with Valve 2 7 2 15 Scroll Plus Oils Return System 2 8 2 16 Liquid Injection Schematic 2 9 2 17 Autosurge for Ambient Cooling 2 10 2 18 Mechanical Subcooling 2 10 3 1 Supporting Refrigeration Lines 3 1 3 2 Insulating a...

Страница 10: ... 4 19 Suction Stop Koolgas Defrost 4 25 4 20 Electric Defrost 4 26 4 21 Off Cycle Defrost 4 27 4 22 Refrigeration Thermostat with Heater Mounted Solenoid 4 28 4 23 Wiring Defrost Termination Thermostats 4 28 4 24 Power Monitor and Slave Contactor 4 29 4 25 Electrical Hook up 4 29 5 1 Satellite Rigging and Lifting 5 2 5 2 Lifting the Condenser 5 4 5 3 Ambient Control of All Banks with Pressure Over...

Страница 11: ...iquid Line Solenoid 6 5 6 7 Branch Liquid Line with Back Flow 6 6 6 8 Probe Locations for Setting TEV 6 7 6 9 TEV 6 7 6 10 3 Way Heat Reclaim Valve 6 9 6 11 Condenser and Receiver Pressure Regulation 6 10 6 12 A8 Flooding Valve 6 10 6 13 A 9 Receiver Pressure Regulator 6 11 6 14 A9B Receiver Pressure Regulator with Solenoid and Pilot Port 6 11 6 15 Autosurge Cycle 6 12 6 16 Autosurge Valve Connect...

Страница 12: ...ntrol c Primary Overload Protection 2 Factory piping with a Suction Discharge and Liquid Headers b Turbashed Oil Separator c Vertical Receiver per Tier of Compressors d Suction Filters on each Compressor e Liquid Drier and Sight glass f Liquid Level Indicator 3 Factory wired control panel s with a Pre wired Distribution Power Block b Individual Compressor Integral Breaker Contactors c Compressor T...

Страница 13: ...tain all packing The carrier will supply inspection report and required claim forms SCROLL PLUS FRAME DIMENSIONS Rack Assembly Length Height Depth Nomenclature in in in 22YU 123 50 35 01FY 99 76 35 03FY 123 76 35 Piping stubs and shipping crate may extend 6 inches beyond the frame SYSTEM WEIGHTS Base Rack Weight Rack or Receiver Nomenclature Weight lbs 22YU 500 01FY 600 03FY 700 05FY 06FY 300 07FY...

Страница 14: ...om to provide enough working space for service personnel and to meet electrical codes Consult NEC National Fire Handbook particu larly Installation of Switch Boards and Working Space Requirements The figure below demonstrates some suggested distances Refer to local codes for each installation SCROLL PLUS LOAD POINTS Rack Assembly Load Point Dimensions Nomenclature Length Width in in All 62 7 30 UN...

Страница 15: ...ttom of the Satellite to the bottom of the Rack When piping from the Rack to a Remote Satellite the maximum allowable piping equivalent is 50 feet When piping from the Rack to a Remote Header the maximum allowable piping equivalent is 50 feet When piping from the Rack to a Condenser the maximum allowable piping equivalent is 100 feet When piping from the Rack to a Heat Reclaim coil the maximum all...

Страница 16: ... A CRANE In many locations crane lifting may not be prac tical Where possible use equipment dollies centered under each foot or Johnny Bars Do not push or pull on any of the pipes valves accessories or control panels when moving the Scroll Plus System For mezzanine installations a fork lift operated within its height and weight limits may be used to raise the Rack into position Caution The unit is...

Страница 17: ...for maintenance and service from the front or sides of the unit Because of the use of Scroll Compressors vibration characteristics are greatly reduced extending system life and mini mizing chances for fatigued line breakage In this instruction the following criteria is main tained to assist the reader Electrical solenoid valves carry the same initial abbreviations as in the electrical schematics R...

Страница 18: ... Plus Fibertronic Refrigeration System Heat Exchanger Evaporator Condenser HS Heat Reclaim Coil Discharge Manifold Heat Exchanger Evaporator Heat Exchanger Evaporator Satellite Turba Shed Satellite Compressor Suction Manifold Koolgas Manifold A8 Liquid Manifold MS S S S EPR A9B Valve BP 3W 3W Receiver Return to Contents ...

Страница 19: ...ndenser A9 for Receiver EPR for Evaporator Main Liquid Line Pressure Differential Valve Autosurge Valve Optional Heat Exchanger Optional High Pressure Hot Vapor High Pressure Warm Vapor High Pressure Warm Liquid Reduced Pressure Warm Liquid Low Pressure Cool Vapor Cut away not shown Empty September 1 1997 P N 401789 2 3 HUSSMANN CORPORATION BRIDGETON MO 63044 2483 Printed in USA Return to Contents...

Страница 20: ...ondens ing surface Restricting liquid refrigerant flow from the Condenser the Flooding Valve prevents liquid refrigerant from leaving the condenser as fast as it is forming so the Condenser floods with its own condensate The Vertical Receiver acts as a vapor trap and supply the Main Liquid Pressure Differential Solenoid Valve with quality liquid refrigerant Sufficient liquid vapor and pressure are...

Страница 21: ...sion Valve located in the merchan diser meters liquid refrigerant through its orifice to the low pressure side of the system As the refrigerant passes through the evaporator coil it absorbs heat from the coil and flashes into vapor An Evaporator Pressure Regulating Valve may be used to control the evaporator temperature by preventing the evaporator pressure from dropping below a set point At criti...

Страница 22: ...nt the valve will modulate closed Receiver Temperature The receiver temperature is only controlled when the Autosurge system has been applied with Koolgas defrost During Koolgas defrost if the Koolgas Manifold temperature drops below 85 deg F the A9B Solenoid coil is energized forcing the valve to an open position This allows hot gas to enter the receiver thereby regulating the defrost gas tempera...

Страница 23: ...Evaporator Koolgas Vapor flows backward through the Evaporator giving up heat to the Evaporator for defrost The Koolgas Vapor condenses and flows into the reduced pressure liquid line through a Bypass Check Valve around the TEV From there it is returned to the Liquid Line Manifold If a Suction Stop EPR Valve is used to control Evaporator temperature the 3 Way Valve is not used When defrost is call...

Страница 24: ...he unit is powered by a 24V power sup ply When the oil level drops below 1 2 sightglass the oil fill light comes on and the oil solenoid is energized After 90 seconds if the oil level does n t rise above 1 2 sightglass the Traxoil relay contacts open the compressor control circuit It is possible after an Oil Level Failure that oil will refill the compressor crankcase causing the oil fill and oil f...

Страница 25: ...he liquid refrigerant returning from the Condenser through a bulb mounted on the Liquid Return Line up stream of the Flooding Valve When the refrigerant temperature returning from the condenser drops below its condensing temperature the system has ambient subcooling The valve is factory set at 10Þ F of subcooling and is not field adjustable MECHANICAL SUBCOOLING By lowering the temperature of the ...

Страница 26: ...al Valve Liquid Manifold Optional Plate X1 X2 Thermostat Liquid Line Solenoid Auxiliary Contactors One per Compressor Receiver Figure 2 18 Mechanical Subcooling Discharge Manifold Turba Shed Condenser MS BP Flooding Valve A 7 Autosurge Valve High Pressure Hot Vapor Cut Away Not Shown Empty High Pressure Warm Vapor High Pressure Warm Liquid A9B Valve Receiver Figure 2 17 Autosurge for Ambient Cooli...

Страница 27: ...se of all suction risers Use long radius elbows to reduce line resistance and breakage Avoid completely the use of 45Þ elbows Install service valves at several locations for ease of maintenance and reduced service costs These valves must be UL approved for 450 psig minimum working pres sure HUSSMANN CORPORATION BRIDGETON MO 63044 2483 Printed in USA September 1 1997 P N 401789 3 1 COMPONENT PIPING...

Страница 28: ...downstream of the P Trap Factory Supplied Stubs Stub sizes provided from the Manifolds do not automatically correspond to the line sizes neces sary It is the installer s responsibility to supply reduction couplings Protecting Valves and Clamps When brazing near factory installed clamps or valves be sure to protect them with a wet rag to avoid overheating HUSSMANN CORPORATION BRIDGETON MO 63044 248...

Страница 29: ... of an inverted P trap with at least a 6 inch rise Use with approved recovery vessel HUSSMANN CORPORATION BRIDGETON MO 63044 2483 Printed in USA September 1 1997 P N 401789 3 3 Turbashed Condenser Manifold Heat Reclaim Valve Purge Valve 6 Inch Minimum Rise 6 Foot Minimum Drop before Tee to Main Liquid Line Return 12 Inch Minimum Drop after Tee from Main Discharge Line From Heat Reclaim Flooding Va...

Страница 30: ...Install Ball Valves to isolate Condenser All Inter connecting Valving to be Field Supplied and Installed Service Valve Equalizing Line Ball Valve Valve Solenoid Check Valve Condenser Manifold Discharge Lines Liquid Return Lines PD Pump Down Purge Valve 1 4 Tubing PD 6 Foot Minimum Drop before Tee to Main Liquid Line Return Without Split Condenser Piping 3 Foot Minimum Drop Suction Manifold Turba S...

Страница 31: ...ofCondenser Bleed Line Split Condenser Valve Heat Reclaim Valve FromHeat Reclaim Flooding Valve Without split condenser piping 6 ft minimum drop is reduced to 3 ft Note Liquid Return Lines must be free draining with no Traps and be sized for a maximum of 100 FPM Install Solenoid Valves inside Equipment Room Pump Down Line should not enter the Suction Manifold over a Compressor Inlet Install Ball V...

Страница 32: ...ater than the product in step one from Table 3 1 Follow that column down until it intersects the OD line size of the run The number listed at the intersection is the L value for figur ing offset and expansion loop sizes Example The smallest Inches Expansion equal to or greater than 1 4196 is 1 5 The 1 5 column inter sects with the 1 3 8 line at 21 Use L value 21 STEP 3 For an offset multiply the L...

Страница 33: ...he evaporator s The installer is responsi ble for proper adjustment of the Valve see Control Valve Section for adjustment proce dures CONNECTING PARALLEL 3 WAY VALVES Due to the size limitations of 3 Way Valves some of the larger Koolgas systems will require parallel connection to two suction stubs at the header using an offset tee construction Do not use a bull head tee RUN LENGTHS AND EQUIVALENT...

Страница 34: ... the bottom of the liquid line Provide an expansion loop for each evaporator take off Minimum 3 inch diameter KOOLGAS DEFROST Maximum of 6 evaporators per Branch System Increase the liquid line size inside the case by two sizes over the branch size Branch Size In Case Size 1 2 7 8 5 8 1 1 8 7 8 1 3 8 1 1 8 1 5 8 1 3 8 2 1 8 Take offs to evaporators exit the bottom of the liquid line Provide an exp...

Страница 35: ... by governing elec tric codes will be the responsibility of the installer The lugs on the circuit breaker package in the compressor control panel are sized for copper wire only with 75O C THW insulation All wiring must be in compliance with governing electrical codes For Remote Header Defrost Assembly To the remote defrost control panel provide one 120V 1PH 15A branch circuit Between the remote de...

Страница 36: ...store legend for door switch kits M115 or M116 The switch must be mounted to the cooler door frame and must be wired to control the field installed liquid line solenoid and the fan circuit For Koolgas applications kit M116 includes a check valve to bypass the liquid line solenoid valve Sizing Wire and Overcurrent Protectors Check the serial plate for Minimum Circuit Ampacity MCA and Maximum Overcu...

Страница 37: ...and 35 AR Contacts close between Terminals 34 and 36 after Fuse F1 Energizing Alarm Light Bell Stop Switch Terminals 31 and 32 WithA9 or T9A the Board will remain inAlarm until the Reset is pressed or power turn off turn on is used The Bell Stop Relay BSR circuit may operate only duringAlarm Conditions When the Bell Stop Switch is closed BSR Electronic Circuit energizes BSR Coil BSR Contacts open ...

Страница 38: ...BELL STOP COMP A9 33 31 35 34 36 32 T9A X2 PUSH TO RESET RACK ALARM A9 T9A 5 AMP HUSSMANN Fuse Power All schematics are shown DE energized X1 X2 COMP A9 T9A 33 31 35 34 36 32 AR AR BSR BSR Electronic Circuit Alarm Reset AR Electronic Circuit A9 T9A BSR Coil AR Coil R R R Fuse F1 ALARM LIGHT BELL STOP Figure 4 2 Alarm Board Return to Contents ...

Страница 39: ...o 6 0V Alarm Board Failure 6 Alarm Light Not Lit Close Jumper Circuit from X1 to A9 Go to 7 Lit Alarm Board Failure 7 A9 Light Lit Go to 8 Not Lit Alarm Board Failure 8 3 Min Delay Lit Open Jumper Circuit from X1 to A9 Go to 9 Alarm Light Not Lit Alarm Board Failure 9 Alarm Light Lit Go to 10 Not Lit Alarm Board Failure 10 32 X2 120V Press Bell Stop Switch Go to 11 0V Alarm Board Failure 11 32 X2 ...

Страница 40: ... that this compres sor has had an alarm failure and the alarm relay is energized This light will go off when the alarm condition is corrected and the control switch is reset Fuse Failure Red LED lights if the fuse has blown Fuse is on board High Pressure Failure Red LED lights under high pressure failure condition Oil Failure Red LED lights under oil failure condition ELECTRICAL September 1 1997 4...

Страница 41: ... T3 provides power to the K2 Relay Circuit T1 and T2 provide input to the board from EPC compressor contacts for the K2 Relay T5 and T6 provide output to the Alarm Board Compressor Relay T8 provides common for all board circuits T4 is the power input from a switchback control contact T7 is the power input during normal operation when the EPC is in control HUSSMANN CORPORATION BRIDGETON MO 63044 24...

Страница 42: ... S1 L1 L4 L2 L5 Q1 L3 L6 C1 R10 K1 B A D C 8 K2 FUSE1 R5 D7 D2 D10 D9 D6 D5 R7 Q3 D12 R8 R9 R6 R14 R4 R7 R13 R2 R1 R12 R3 ALM D4 Q2 D11 D14 D13 D1 T2 T1 T3 T7 T4 T5 T6 T8 S1 T10 T9 P1 1 P1 2 P1 3 P1 4 P1 6 P1 7 P2 3 P2 5 K1 K2 Alarm LED H Press LED Run LED Alm G Y R R R R Y P P1 8 T P1 5 BL BR B O R W K2 K1 K1 K1 Fuse LED Circuit R P2 2 Y F1 P2 1 O K1 Oil LED Circuit Power LED Figure 4 5 Compresso...

Страница 43: ...witch and connections to Board If OK Board Failure 6 P1 2 T8 120 Low Pressure Control closed Go to 7 0 Low Pressure Control opened Should be closed to continue Board check 7 P1 3 T8 120 Go to 8 0 Board Failure 8 P1 8 T8 120 Go to 9 0 Compressor Protector open 9 P2 2 T8 120 Go to 10 0 Board Failure 10 P1 5 T8 120 Go to 11 0 Check Fuse and connections If OK Board Failure 11 P1 6 T8 120 Go to 14 0 Al...

Страница 44: ...R10 K1 B A D C 8 K2 FUSE1 R5 D2 D7 D10 D9 D6 D5 R7 Q3 D12 R8 R9 R6 R14 R4 R7 R13 R2 R1 R12 R3 ALM D4 Q2 D11 D14 D13 D1 T2 T1 T3 T7 T4 T5 T6 T8 S1 T10 T9 P1 1 P1 2 P1 3 P1 4 P1 6 P1 7 P2 3 P2 5 K1 K2 Alarm LED H Press LED Run LED Alm G Y R R R R Y P P1 8 T P1 5 BL BR B O R W K2 K1 K1 K1 Fuse LED Circuit R P2 2 Y F1 P2 1 O K1 Oil LED Circuit Power LED Figure 4 6 Compressor Board EPC Control Return t...

Страница 45: ...0 Go to 6 0 Check Power Supply to T3 from X1 6 T1 T8 120 Go to 7 0 Board Failure 7 T2 T8 120 Go to 8 0 EPC not calling for compressor run 8 P1 3 T8 120 Go to 9 0 Board Failure 9 P1 8 T8 120 Go to 10 0 Compressor Protector open 10 P1 5 T8 120 Go to 11 0 Check Fuse and connections If OK Board Failure 11 P1 6 T8 120 Go to 14 0 Alarm tripped Go to 12 12 P1 4 T8 0 Go to 13 120 High Pressure Alarm Corre...

Страница 46: ...BRIDGETON MO 63044 2483 Printed in USA X1 R R Y Y X1A Y Y1 Jumper to all Non Sat Boards Jumper to all Boards Y2 R R Jumper to all Boards C Aux Cont C TD NO 4 1 BL BL B BR 120 O GY GY HP Oil Failure O W R T2 T1 T3 T7 T4 T5 T6 T8 S1 T10 T9 P1 1 P1 2 P1 3 P1 4 P1 6 P1 7 P2 3 P2 5 K1 K2 Alarm LED H Press LED Run LED Alm G Y R R R R Y P P1 8 T P1 5 BL BR B O R W X2 R W W Jumper from all Boards W Y2 Com...

Страница 47: ...SMANN CORPORATION BRIDGETON MO 63044 2483 Printed in USA Figure 4 8 K1 Compressor Alarm Circuits C Aux Cont C TD NO 4 2 1 BL BL B BR 120 O GY GY HP Oil Failure O W R T2 T1 T3 T7 T4 T5 T6 T8 S1 T10 T9 P1 1 P1 2 P1 3 P1 4 P1 6 P1 7 P2 3 P2 5 K1 K2 Alarm LED H Press LED Run LED G Y R R R R Y P P1 8 T P1 5 BL BR B O R W X1 X2 R R W W Y Y X1A Jumper to all Non Sat Boards Jumper to all Boards Jumper fro...

Страница 48: ...ATION BRIDGETON MO 63044 2483 Printed in USA EPC Compressor Controller Contacts O P C Aux Cont C TD NO 4 2 1 BL BR 120 O GY GY HP Oil Failure O W R T2 T1 T3 T7 T4 T5 T6 T8 S1 T10 T9 P1 1 P1 2 P1 3 P1 4 P1 6 P1 7 P2 3 P2 5 K1 K2 Alarm LED H Press LED Run LED Alm G Y R R R P P1 8 T P1 5 BL BR B O R W K2 K1 K1 K1 C Protector Motor Cont Coil Fuse LED Circuit R P2 2 Y F1 P2 1 O K1 Oil LED Circuit Power...

Страница 49: ...Controls C Aux Cont C TD NO 4 2 1 BL BR 120 O GY GY HP Oil Failure O W R T2 T1 T3 T7 T4 T5 T6 T8 S1 T10 T9 P1 1 P1 2 P1 3 P1 4 P1 6 P1 7 P2 3 P2 5 K1 K2 Alarm LED H Press LED Run LED Alm G Y R R R P P1 8 T P1 5 BL BR O R W K2 K1 K1 K1 C Protector Motor Cont Coil Fuse LED Circuit R P2 2 Y F1 P2 1 O K1 Oil LED Circuit Power LED LP R Y BL B BL X1C X1 T4 T4 T4 T4 T4 TD X24 X2D W W W Compressor Board 1...

Страница 50: ...RIDGETON MO 63044 2483 Printed in USA C Aux Cont C TD NO 4 2 1 BL BR 120 O GY GY HP Oil Failure O W R T2 T1 T3 T7 T4 T5 T6 T8 S1 T10 T9 P1 1 P1 2 P1 3 P1 4 P1 6 P1 7 P2 3 P2 5 K1 K2 Alarm LED H Press LED Run LED Alm G Y R R R P P1 8 T P1 5 BL BR B O R W K2 K1 K1 K1 C Protector Motor Cont Coil Fuse LED Circuit R P2 2 Y F1 P2 1 O K1 Oil LED Circuit Power LED R Y R Y R Y TD X2 LP BL Y W LP Low Pressu...

Страница 51: ...ON MO 63044 2483 Printed in USA C Aux Cont C TD NO 4 2 1 BL BR 120 O GY GY HP Oil Failure O W R T2 T1 T3 T7 T4 T5 T6 T8 S1 T10 T9 P1 1 P1 2 P1 3 P1 4 P1 6 P1 7 P2 3 P2 5 K1 K2 Alarm LED H Press LED Run LED Alm G Y R R R R Y P P1 8 T P1 5 BL BR B O R W K2 K1 K1 K1 C Protector Motor Cont Coil Fuse LED Circuit R P2 2 Y F1 P2 1 O K1 Oil LED Circuit Power LED P O P O KR X23 X2E T4 on Branch Defrost Boa...

Страница 52: ... Printed in USA BL B BL C Aux Cont C TD NO 4 2 1 BL BR 120 O GY GY HP Oil Failure O W R T2 T1 T3 T7 T4 T5 T6 T8 S1 T10 T9 P1 1 P1 2 P1 3 P1 4 P1 6 P1 7 P2 3 P2 5 K1 K2 Alarm LED H Press LED Run LED Alm G Y R R R R Y P P1 8 T P1 5 BL BR B O R W K2 K1 K1 K1 Motor Cont Coil Fuse LED Circuit R P2 2 Y F1 P2 1 O K1 Oil LED Circuit Power LED M1 M2 G S1 S2 S3 T1 T2 Copeland Solid State Protector To Sensor...

Страница 53: ...MANN CORPORATION BRIDGETON MO 63044 2483 Printed in USA Figure 4 14 Circuits Parallel to the Compressor Motor Contactor Coil C T2 T1 T3 T7 T4 T5 T6 T8 S1 T10 T9 P1 1 P1 2 P1 3 P1 4 P1 6 P1 7 P2 3 P2 5 K1 K2 Alarm LED H Press LED Run LED Alm G Y R R R R Y P P1 8 T P1 5 BL BR B O R W K2 K1 K1 K1 Motor Cont Coil Fuse LED Circuit R P2 2 Y F1 P2 1 O K1 Oil LED Circuit Power LED C R W CH Crankcase Heate...

Страница 54: ... terminated due to time or temperature and if the branch is in drip cycle EPR Solenoid Green LED indicates the suc tion stop solenoid is energized which means the valve is open Liquid Branch Solenoid Green LED indi cates the liquid branch solenoid is energized It will turn off when the thermostat no longer calls for refrigeration ELECTRICAL September 1 1997 4 20 HUSSMANN CORPORATION BRIDGETON MO 6...

Страница 55: ...o Koolgas Relay KG 3W SOL is output to the Koolgas or 3 Way Valve Solenoid depending on which is applied EPR CNTR is input from case thermostat when controlling the suction stop solenoid for tempera ture J1 must be cut EPR SOL is output to the suction stop solenoid valve LIQ BRANCH SOL is output to the liquid branch solenoid valve Q2 is fiber optic input from Fibertronic Defrost Clock 1000 Septemb...

Страница 56: ... T3 ES KOOL GAS RELAY EPR SOL W W Y Y TEMP TERM J3 2 1 2 1 2 1 T1 T11 T10 T5 T6 T7 T3 T2 T9 T8 Q2 T4 F1 5 AMP J1 J2 J3 J4 J5 120 VAC X2 X1 KOOLGAS 3W SOL EPR CNTR EPR SOL LIQ BRANCH SOL T STAT MECH DEFR CLOCK TEMP TERM K R TEMP TERMINATION L1 L2 L3 L4 L5 C1 C2 C4 R1 Q3 R12 D1 D7 R11 D8 D6 K1 K2 R8 Q1 Q4 R9 C5 R10 D5 R6 R5 C3 R2 R3 R4 D2 D3 D4 R7 ASSY 0340132 Z1 Figure 4 20 Defrost Board Electronic...

Страница 57: ...Board Failure 3 P2 2 T11 X2 0 End Test 120 Defrost timer contacts closed Correct and reset system Defrost Mode Voltmeter Voltmeter Action Lead Placement Reading Lead 1 Lead 2 1 T1 X1 T11 X2 120 Go to 2 0 Check Power Supply to Board 2 P2 1 T11 X2 120 Go to 3 0 Check Fuse F1 5 Amp If OK Board Failure 3 P2 2 T11 X2 120 Go to 4 0 Defrost timer circuit open Check and correct 4 T4 T11 X2 120 Go to 5 0 B...

Страница 58: ... 2R1 normally open NC 1R1 controls refrigeration components NO 2R1 s con trol defrost components As the system require ments vary so will the components controlled by the contacts Once begun defrost continues until the defrost termination thermostat or defrost clock opens the defrost circuit de energizing relay coil R1 ELECTRICAL September 1 1997 4 24 HUSSMANN CORPORATION BRIDGETON MO 63044 2483 P...

Страница 59: ... P3 2 S T2 T8 T5 R__ F__ T10 KS LIQ SOL KS T11 X2 T4 T9 T3 ES Kool Gas Relay EPR SOL W W Y Y Temp Term Fibertronic Defrost Clock J3 J1 Suction Stop Koolgas Defrost When the defrost clock energizes Defrost Relay Coil R1 Contact 1R1 will turn OFF the EPR Solenoid ES Contacts 2R1 will turn ON the Koolgas Solenoid KS and Koolgas Relay KR power to T4 thru Yellow wire to KR terminal thru Red wire to Koo...

Страница 60: ...ric Defrost Panel power to T4 thru Orange wire to D__ terminal thru field wiring to corresponding D__ terminal in Electric Defrost Panel O D__ T B R R J2 SW1 ON OFF FUSE 5AMP 1R1 2R1 BL P T STAT P1 1 P1 2 T6 T7 J1 J4 J5 Defrost Branch Board P2 1 P2 2 R O Mech Def Clock Q2 B P P3 1 P3 2 S T2 T8 T5 R__ F__ T10 LIQ SOL KS T11 X2 T4 T9 T3 Kool Gas Relay EPR SOL W W Temp Term Fibertronic Defrost Clock ...

Страница 61: ...l turn OFF Liquid Line Solenoid Valve S T B R R J2 SW1 ON OFF FUSE 5AMP 1R1 2R1 BL P T STAT P1 1 P1 2 T6 T7 J4 J5 Defrost Branch Board P2 1 P2 2 R O Mech Def Clock Q2 B P P3 1 P3 2 S T2 T8 T5 R__ F__ T10 LIQ SOL KS T11 X2 T4 T9 T3 Kool Gas Relay EPR SOL Figure 4 24 Off Cycle Defrost W W Temp Term Fibertronic Defrost Clock J3 J1 Figure 4 21 Off Cycle Defrost Return to Contents ...

Страница 62: ...id state Delay Copeland compressors equipped with an internal solid state protector cycle 120 seconds after power break Thermostats EVAPORATOR MOUNTED LIQUID LINE SOLENOID Wire the thermostat in series with the liquid line solenoid Any 120V uninterrupted power supply may be used HEADER MOUNTED LIQUID LINE SOLENOID Wire the thermostat in the following manner Determine the system number from the sto...

Страница 63: ...This should be adjust ed to 15 below the nominal line voltage at power source A voltmeter should be used to establish actual supply voltage The monitor controls a two pole bypass relay BP making and breaking power to the control panel September 1 1997 P N 401789 4 29 HUSSMANN CORPORATION BRIDGETON MO 63044 2483 Printed in USA L1 L2 L3 NC NO C 380 400 420 440 460 OUTPUT ON CONTACTS 7 A 240VAC SUPPL...

Страница 64: ...the carrier has assumed responsibility for safe arrival If damaged either apparent or concealed claim must be made to the carrier Apparent Loss or Damage If there is an obvious loss or damage it must be noted on the freight bill or express receipt and signed by the carrier s agent otherwise carrier may refuse claim The carrier will supply the necessary claim forms Concealed Loss or Damage When los...

Страница 65: ...mpressor Weights 115 pounds REMOTE SATELLITES CONDENSERS September 1 1997 5 2 HUSSMANN CORPORATION BRIDGETON MO 63044 2483 Printed in USA Figure 5 1 Satellite Rigging and Lifting HUSSMANN This Drawing was rendered on a Macintos h IIcx by Dan Bodenst ab in the year of Our Lord 1990 August the third day HUSSMANN This Drawing was rendered on a Macintos h IIcx by Dan Bodenst ab in the year of Our Lord...

Страница 66: ... Application Split condenser valving is recommended if any of the following conditions exist 1 The difference between summer and winter dry bulb temperatures is greater than 90O F 2 The local climate conditions are anticipated to be more severe than those stated in the ASHRAE charts 3 The heat reclaim coil is sized for more than 50 of the heat of rejection for the unit 4 The condenser liquid retur...

Страница 67: ...ate the condenser with at least six feet of clearance on all sides to provide adequate air circulation If roof mounted place on column supported beams or load bearing walls The mounting surface for the condenser should be at least six feet higher than the flooding valve Leveling and Mounting Cross level the coil section carefully then bolt the condenser legs to the support beams For multi circuit ...

Страница 68: ...away from the manifolds Do not route the dis charge line directly in front of the control panel 2 Liquid return line Route each liquid return line downward at least 6 feet between outlet stubs before teeing into the main liquid return line Note If split condenser valving is not used drop may be reduced to 2 feet After the tee route the main liquid return line in a manner providing free trapless dr...

Страница 69: ...8V 230V 460V R22 R507 R22 R507 1x1 2 8 2 6 1 3 205 221 19 35 1 1 8 HLCVB 1x2 5 6 5 2 2 6 410 445 40 75 1 3 8 1x3 8 4 7 8 3 9 615 666 59 110 1 3 8 1x4 11 2 10 4 5 2 925 1002 88 165 1 5 8 1x5 14 0 13 0 6 5 1039 1125 99 185 2 1 8 1x6 16 8 15 6 7 8 1239 1343 119 223 2 1 8 1x7 19 6 18 2 9 1 1551 1679 147 275 2 5 8 1x2 8 8 8 0 4 0 1081 1137 64 120 1 5 8 HLCVF 1x3 13 2 12 0 6 0 1574 1658 96 180 2 1 8 1x4...

Страница 70: ... 20 21 22 23 24 25 26 27 28 29 30 16 17 18 13 14 15 25 26 27 28 29 30 25 26 27 28 29 30 19 20 21 22 23 24 19 20 21 22 23 24 16 17 18 13 14 15 16 17 18 13 14 15 7 8 10 11 12 9 7 8 10 11 12 9 4 5 6 4 5 6 1 2 3 2 3 Ambient Temperature Control of All Banks With Pressure Override of the First Fan Bank 208 3 60 230 3 60 460 3 60 1 Figure 5 3 Ambient Control of All Banks With Pressure Override of the Fir...

Страница 71: ...0 21 22 23 24 25 26 27 28 29 30 16 17 18 13 14 15 25 26 27 28 29 30 25 26 27 28 29 30 19 20 21 22 23 24 19 20 21 22 23 24 16 17 18 13 14 15 16 17 18 13 14 15 7 8 10 11 12 9 7 8 10 11 12 9 4 5 6 4 5 6 1 2 3 1 2 3 37 38 39 40 41 42 37 38 39 40 41 42 Pressure Control and Gravity Dampers for all Fan Banks 208 3 60 230 3 60 460 3 60 Figure 5 4 Pressure Control and Gravity Dampers for all Fan Banks 208 ...

Страница 72: ... Receiver 1 2 3 H4 H3 W P Split Condenser Bleed Line Solenoid N C Condenser Solenoid or 3 Way Valve N O Solenoid Relay X2 R R R R B B B B P SR Condenser Fan Relay Ambient Thermostat CO 45 CI 40 1 2 3 X1 High Pressure Side BL 1 2 3 Figure 5 5 Split Condenser Piping Method Figure 5 6 Split Condenser Wiring Diagram Factory and Field Installed Kits Note Units with Heat Reclaim should have the lockout ...

Страница 73: ...e control has been applied as follows a When more than one compressor unit is connected to the same condenser all fan banks except the one nearest the discharge and liquid manifolds must be cycled by thermostats each compressor unit must also be equipped with condenser flooding valves b When only one compressor unit is con nected to a condenser either of two types of controls can be used 1 thermos...

Страница 74: ...enser 1 Terminal Block Heavy Duty Fuse Holder Terminal Block Medium Duty Thermostat Control Motor Inherently Protected Replacement Parts Figure A 6 Line Voltage Thermostatic Fan Control Control Settings Number of Thermostats Cut In Settings for Thermostats Deg F 1 2 3 4 5 TC 1 75 63 50 40 40 TC 2 75 70 60 57 TC 3 75 71 65 TC 4 75 71 TC 5 75 Individual Motor FLA HP 3 4 1 208 3 60 3 5 4 4 230 3 60 3...

Страница 75: ...ature Control of All Banks of Fans Except The One Nearest the Header for 2 3 4 or 5 Fan Bank Condenser 4C1 4C2 4C3 1 Terminal Block Heavy Duty Fuse Holder Terminal Block Medium Duty Thermostat Control Motor Inherently Protected Replacement Parts Figure A 7 Pilot Operated Thermostatic Fan Control Control Settings Number of Thermostats Cut In Settings for Thermostats Deg F 1 2 3 4 5 TC 1 75 63 50 40...

Страница 76: ...y Thermostat Control Motor Inherently Protected Replacement Parts Figure A 8 Line Voltage Thermostatic with Pressure Override Fan Control Control Settings Number of Thermostats Cut In Settings for Thermostats Deg F 2 3 4 5 TC 1 80 80 80 80 TC 2 75 75 75 75 TC 3 55 65 70 TC 4 50 55 TC 5 40 Refrig R 404A R 22 R 507 Cut In 229 193 236 Cut Out 203 168 210 PC 1 Settings psig Individual Motor FLA HP 3 4...

Страница 77: ...ected Replacement Parts Pressure Control Figure A 9 Pilot Operated Thermostatic with Pressure Override Fan Control Individual Motor FLA HP 3 4 1 208 3 60 3 5 4 4 230 3 60 3 2 4 0 460 3 60 1 6 2 0 Set Cut Out 5 Deg Below Cut In Total FLA Nunber of Motors Applicable Motor FLA Control Settings Number of Thermostats Cut In Settings for Thermostats Deg F 2 3 4 5 TC 1 80 80 80 80 TC 2 75 75 75 75 TC 3 5...

Страница 78: ...ttings Number of Fans Single Double Pressure Switch Cut In Settings psig PC 1 222 185 230 222 185 230 222 185 230 222 185 230 222 185 230 PC 2 264 217 273 242 201 250 260 193 268 235 191 244 PC 3 64 217 240 249 205 258 242 199 250 PC 4 236 217 244 225 207 233 PC 5 260 217 270 1 2 3 4 5 Refrigerant R 404A R 22 R 507 R 404A R 22 R 507 R 404A R 22 R 507 R 404A R 22 R 507 R 404A R 22 R 507 N A 2x4 2x3...

Страница 79: ...gle Double Pressure Switch Cut In Settings psig PC 1 222 185 230 222 185 230 222 185 230 222 185 230 222 185 230 PC 2 264 217 273 242 201 250 260 193 268 235 191 244 PC 3 64 217 240 249 205 258 242 199 250 PC 4 236 217 244 225 207 233 PC 5 260 217 270 1 2 3 4 5 Refrigerant R 404A R 22 R 507 R 404A R 22 R 507 R 404A R 22 R 507 R 404A R 22 R 507 R 404A R 22 R 507 N A 2x4 2x3 2x4 2x5 Individual Motor...

Страница 80: ...al of at least 50 psig above the down stream side of the valve Lower pressure differentials may cause valve malfunction Basically all evaporator pressure regulator valves open on upstream suction pressure rise Achieve the desired suction pressure by balancing Adjustment Spring against Upstream Suction Pressure and Fixed Pressure Counter Spring As upstream pressure rises it closes the high pressure...

Страница 81: ...ct defrost clock problem Fails to close High pressure inlet strainer plugged Clean or replace High pressure line pinched shut off Clean or replace If oil filled re pipe or plugged so high pressure line is not an oil trap Sleeve or piston scored allowing Replace high pressure leak from piston chamber Dirt in piston chamber causing drag Clean or replace High pressure supply lower than defrost vapor ...

Страница 82: ...6 2 Troubleshooting Koolgas Valves September 1 1997 P N 401789 6 3 HUSSMANN CORPORATION BRIDGETON MO 63044 2483 Printed in USA From Koolgas Manifold To Evaporator To Suction Manifold Defrost Refrigeration Figure 6 4 3 Way Solenoid Valve Malfunction Cause Action Fails to Open Dirt plugging pilot port Disassemble and clean Solenoid not energized bad solenoid Replace solenoid circuit open Find and re...

Страница 83: ...et closed The Main Valve Chamber starts to empty and upstream pressure forces the main valve towards open Differential Mode Quick Test 1 Connect pressure gauges up and downstream of the valve 2 All branches on the rack must be in refrigeration mode 3 Disconnect power to Solenoid 4 Check gauges for differential NOTE Low refrigerant demand may prevent the differential from building up to the valve s...

Страница 84: ...onnect pressure gauges up and downstream of the valve 2 All branches on the rack must be in refrigera tion mode 3 Disconnect power to Solenoid 4 Check gauges for differential NOTE Low refrigerant demand may prevent the differential from building up to the valve s real setting September 1 1997 P N 401789 6 5 HUSSMANN CORPORATION BRIDGETON MO 63044 2483 Printed in USA Downstream pressure spring pres...

Страница 85: ...llows Valve Chamber pressure to escape upstream Note The Solenoid of the branch valve is ener gized during refrigeration and for back flow during defrost Table 6 3 Troubleshooting Branch Liquid Line Solenoid Valves CONTROL VALVES September 1 1997 6 6 HUSSMANN CORPORATION BRIDGETON MO 63044 2483 Printed in USA Malfunction Cause Action Fails to Open Dirt plugging valve port Disassemble and clean or ...

Страница 86: ...orator Inlet While the valve is hunting the temperature differ ence between the two probes should not exceed 3 5ÞF The differential may fall to zero To reduce differential turn the adjusting stem counter clock wise and wait at least 15 minutes before checking results Valve Recommended Body Adjustment G 1 2 turn BF 1 4 turn September 1 1997 P N 401789 6 7 HUSSMANN CORPORATION BRIDGETON MO 63044 248...

Страница 87: ...nch line from bottom re pipe Liquid supply line too small re pipe Insufficient pressure Raise head pressure drop across valve Install valve with adequate capacity at reduced pressure Dead Bulb Replace Undersized TEV Install correct size Evaporator Superheat adjusted Adjust to proper superheat Flooded too low Bulb not getting Check bulb and correct for good contact location good thermal pickup and ...

Страница 88: ...he passage between high pressure and the valve chamber is open B version of the valve has a bleed port through the drive piston to the suction manifold The bleed port provides a vent for fluids trapped in the Heat Reclaim circuits during normal operation September 1 1997 P N 401789 6 9 HUSSMANN CORPORATION BRIDGETON MO 63044 2483 Printed in USA To Heat Reclaim To Condenser From Discharge Manifold ...

Страница 89: ...ure from the condenser must be sufficient to hold Diaphragm off Valve Port so main Valve Chamber stays filled and holds Main Valve open When upstream pressure falls below Adjustment Spring set point the valve port closes the main Valve Chamber empties through the bleed port closing the main valve 1 2 Turn 35 psig change Table 6 5 Troubleshooting Flooding Valve CONTROL VALVES September 1 1997 6 10 ...

Страница 90: ... is energized the Solenoid Port opens filling the Valve Chamber and opening the Main Valve one full turn 25 psig change Table 6 6 Troubleshooting Receiver Pressure Regulator September 1 1997 P N 401789 6 11 HUSSMANN CORPORATION BRIDGETON MO 63044 2483 Printed in USA Figure 6 13 A9 Receiver Pressure Regulator Figure 6 14 A9B Receiver Pressure Regulator with Solenoid and Pilot Port Malfunction Cause...

Страница 91: ...a bulb mounted on the Liquid Return Line up stream of the Flooding Valve When the refrigerant temperature returning from the condenser drops below its condensing temperature the system has ambient subcooling The valve is factory set at 10Þ F of subcooling and is not field adjustable Note A thermostat and solenoid valve are used to deactivate surge operation when the outside temperature falls to 40...

Страница 92: ...ill be forced into Surge flow around the Receiver To achieve Flow through the Receiver follow the steps below 1 Valve off the high pressure pilot line at Discharge Manifold 2 Disconnect flex hose at Surge Valve A and plug hose with a 1 4 inch flare plug finger tighten 3 Valve off the suction pressure pilot line at Suction Manifold 4 Disconnect flex hose at Pilot Valve B and reconnect to Surge Valv...

Страница 93: ...rection When the Autosurge Valve Chamber Pressure Reading 3 is five pounds or more below the High Side Pressure Reading 2 the valve is in Flow through the Receiver For example a pressure reading at the Liquid Return Line of 220 psig Reading 2 and an Mechanical Surge Valve Chamber Pressure of 215 psig should place the system in Flow through the Receiver Main Valve To test the Main Valve isolate the...

Страница 94: ...he Plate Heat Exchanger An EPR on the return suction line prevents the sub cooler temperature from dropping below desired liquid temperature Plate Subcooler Controls Thermostat setting is 50ÞF with minimum differ ential or customer specifications The TEV should be set with the highest possible superheat that will still maintain the desired liquid temperature EPR setting is listed on the store lege...

Страница 95: ...r The unit is powered by a 24V power supply When the oil level drops below 1 2 sight glass the oil fill light comes on and the oil solenoid is energized If the oil level doesn t rise above 1 2 sightglass after 120 seconds the Traxoil relay contacts open the compressor con trol circuit It is possible that oil will refill the compressor crankcase after an Oil Level Failure causing the oil fill and o...

Страница 96: ...sign setpoint minimum of 10 psi or to customer specification Satellite Low Pressure Controls Low end Temperature Satellites Cut out 1 psig High end Medium Temperature Satellites REFRIGERANT CUT OUT CUT IN R 404a 507 36 59 R22 29 49 PLATE SUBCOOLING CONTROLS Thermostat setting is 50 deg F with minimum dif ferential or customer specification The TEV should be set with the highest possible superheat ...

Страница 97: ...w pressure control comes with a fac tory set cut in pressure of 15 psig Since the dif ferential is fixed at 10 psig the cut out is 5 psig which is the lowest possible cut out for this con trol The adjustment screw is located next to the pressure connection Turn the screw clockwise to increase cut in pressure Note 3 1 2 rotations of the screw represents the entire 70 psi adjustment range or 1 turn ...

Страница 98: ...7 18 19 20 15 16 17 18 19 20 21 10 20 21 22 23 24 25 7 35 36 37 38 39 40 10 38 39 40 41 42 43 12 40 41 42 43 44 45 14 43 44 45 46 47 48 15 44 45 46 47 48 49 16 45 46 47 48 49 50 20 50 51 52 53 54 55 23 53 54 55 56 57 58 25 56 57 58 59 60 61 R22 Design Compressor Capacity Suction Largest to Smallest Temp 1 2 3 4 5 6 ÞF psig 33 5 6 7 8 9 10 30 5 6 7 8 9 10 28 5 6 7 8 9 10 25 5 6 7 8 9 10 23 5 6 7 8 ...

Страница 99: ...7 18 20 21 24 25 29 CO psig 8 10 11 13 14 16 17 20 21 25 Compressor Number 2 CI psig 10 12 13 15 16 18 19 22 23 27 CO psig 6 8 9 11 12 14 15 18 19 23 Compressor Number 1 CI psig 9 11 12 14 15 17 18 21 22 26 CO psig 5 7 8 10 11 13 14 17 18 22 Design Suction Temp ÞF 33 30 28 25 23 21 20 16 15 10 R 404A R507 Low Temperature Compressor Number 6 CI psig 14 16 17 19 20 22 23 26 27 31 CO psig 10 12 13 15...

Страница 100: ...Number 2 CI psig 38 41 43 45 46 48 53 58 62 CO psig 32 35 37 39 40 42 47 52 56 Compressor Number 1 CI psig 36 39 41 43 44 46 51 56 60 CO psig 30 33 35 37 38 40 45 50 54 Design Suction Temp ÞF 7 10 12 14 15 16 20 23 25 R 404A Medium Temperature Compressor Number 6 CI psig 44 47 49 52 53 54 60 64 66 CO psig 40 43 45 48 49 50 56 60 63 Compressor Number 5 CI psig 43 46 48 51 52 53 59 63 65 CO psig 39 ...

Страница 101: ...48 51 57 63 70 78 CO psig 26 29 31 33 34 35 39 42 45 51 57 64 72 Compressor Number 2 CI psig 30 33 35 37 38 39 43 46 49 55 61 68 76 CO psig 24 27 29 31 32 33 37 40 43 49 55 62 70 Compressor Number 1 CI psig 28 31 33 35 36 37 41 44 47 53 59 66 74 CO psig 22 25 27 29 30 31 35 38 41 47 53 60 68 Design Suction Temp ÞF 7 10 12 14 15 16 20 23 25 30 35 40 45 R22 Medium Temperature Compressor Number 6 CI ...

Страница 102: ...7 Compressor Number 3 CI psig 7 8 9 10 11 12 13 15 16 20 CO psig 3 4 5 6 7 8 9 11 12 16 Compressor Number 2 CI psig 5 6 7 8 9 10 11 13 14 18 CO psig 1 2 3 4 5 6 7 9 10 14 Compressor Number 1 CI psig 4 5 6 7 8 9 10 12 13 17 CO psig 0 1 2 3 4 5 6 7 9 13 Design Suction Temp ÞF 33 30 28 25 23 21 20 16 15 10 R22 Low Temperature Compressor Number 6 CI psig 9 10 11 12 13 14 15 17 18 22 CO psig 5 6 7 8 9 ...

Страница 103: ... 200 215 40 50 60 65 70 75 50 190 165 2 X 7 CI 195 200 205 210 215 220 225 200 215 40 50 60 65 70 75 80 50 190 165 1 X 6 CI 195 200 205 210 215 220 215 40 50 60 65 70 75 50 190 165 1 X 7 CI 195 200 205 210 215 220 225 215 40 50 60 65 70 75 80 50 190 165 2 X 3 CI 195 200 210 200 215 40 50 75 50 190 165 2 X 4 CI 195 200 205 215 200 215 40 50 70 75 50 190 165 2 X 5 CI 195 200 205 210 215 200 215 40 5...

Страница 104: ...rs 43 F 40 Min M3 M4G M5 28 F 18 F 6 Hrs 48 F 30 Min M3E M5GE 28 F 21 F 6 Hrs 48 F 35 Min M3G 27 F 18 F 6 Hrs 48 F 30 Min M3GE 28 F 21 F 8 Hrs 48 F 35 Min Application MEAT Models Refrigeration DischargeAir TemperatureÞF Evaporator TemperatureÞF Fan Cycling CI CO ÞF Defrost Frequency Hrs Electric Temp TermÞF Failsafe Min Reverse Air Temp TermÞF Failsafe Min Koolgas Duration Min Offtime Temp TermÞF ...

Страница 105: ...eratureÞF Fan Cycling CI CO ÞF Defrost Frequency Hrs Electric Temp TermÞF Failsafe Min Reverse Air Temp TermÞF Failsafe Min Koolgas Duration Min Offtime Temp TermÞF Duration Min P4E 31 F 24 F 6 Hrs 48 F 30 Min PW End 32ÞF 21ÞF 8 Hrs 45 Min P4 29 F 21 F 6 Hrs 48 F 30 Min PW 34ÞF 21ÞF 8 Hrs 45 Min PWE 34ÞF 24ÞF 8 Hrs 45 Min PWE End 32ÞF 24ÞF 8 Hrs 45 Min Application PRODUCE Return to Contents ...

Страница 106: ...Reverse Air Temp TermÞF Failsafe Min Koolgas Duration Min Offtime Temp TermÞF Duration Min C2LE C2E C2LGE 27ÞF 21ÞF 6 Hrs 48ÞF 30 Min C2XLE C2XE C2XLGE 29ÞF 21ÞF 6 Hrs 48ÞF 30 Min D5L D5 D6L D6 D5LR D5R D5HR 31ÞF 21ÞF 6 Hrs 48ÞF 30 Min D5LE D5E D5HE D6LE D6E D5LRE D5RE D5HRE D5NLE D5NE 32ÞF 24ÞF 6 Hrs 48ÞF 35 Min D5G D5H 31ÞF 21ÞF 6 Hrs 48ÞF 35 Min D5GE D5NHE D5NGE 32ÞF 24ÞF 6 Hrs 48ÞF 40 Min Appl...

Страница 107: ...frost Frequency Hrs Electric Temp TermÞF Failsafe Min Reverse Air Temp TermÞF Failsafe Min Koolgas Duration Min Offtime Temp TermÞF Duration Min RM 34ÞF 27ÞF 24 Hrs TBD TBD TBD RM 30ÞF 23ÞF 24 Hrs TBD TBD TBD RL 5ÞF 11ÞF 24 Hrs 48ÞF 40 Min 20 Min RL 12ÞF 19ÞF 24 Hrs 48ÞF 40 Min 20 Min Application DAIRY DELICATESSEN FROZEN FOOD ICE CREAM Preliminary Data Preliminary Data Preliminary Data Preliminar...

Страница 108: ...safe Min Reverse Air Temp TermÞF Failsafe Min Koolgas Duration Min Offtime Temp TermÞF Duration Min LNG 10ÞF 20ÞF 24 Hrs 48ÞF 60 Min 15 Min L LG LN LNG LI LIG LW LWG LWU LWUG LWE LWEG 12ÞF 20ÞF 24 Hrs 48ÞF 60 Min 15 Min LIG 12ÞF 20ÞF 24 Hrs 48ÞF 60 Min 18 Min L LG LN LI LW LWG LWU LWUG LWE LWEG 22ÞF 30ÞF 24 Hrs 48ÞF 60 Min 18 Min LNG 20ÞF 30ÞF 24 Hrs 48ÞF 60 Min 18 Min LIG 20ÞF 30ÞF 24 Hrs 48ÞF 60...

Страница 109: ...n G5C G5CH G6C G6CH NC6 NC6H 20ÞF 30ÞF 6 Hrs 54ÞF 36 Min 48ÞF 60 Min 22 Min GF GFI GG GTF GWI GWIT GWI6 NF1 NF1N NFN NFW NFCW NFFS NFWE NFCWE 10ÞF 20ÞF 24 Hrs 52ÞF 60 Min 48ÞF 90 Min 20 Min GC GCI GGC GTC GWIC GWIT GWI6 NC1 NC1N NCN NCW NFCW NCFS NCWE NFCWE 20ÞF 30ÞF 24 Hrs 52ÞF 60 Min 48ÞF 90 Min 24 Min RCA RCH NRC NRCV 12ÞF 19ÞF 24 Hrs 54ÞF 40 Min 20 Min FML FMLG 10ÞF 25ÞF 12 Hrs 50ÞF 46 Min 14 ...

Страница 110: ...DD3G NDD4 NDD4G 22ÞF 11ÞF 28 38ÞF 6 Hrs 48ÞF 46 Min 14 Min 46 Min CGDMG CGDMGT CSDMG NEGDF NEGSF NEGDT NEGDH 24ÞF 21ÞF 24 Hrs 48ÞF 90 Min 14 Min 90 Min CGDM CSDM NEBDH NEBSH 24ÞF 20ÞF 24 Hrs 54ÞF 40 Min 24 Min 90 Min FM FMG FMV FMGV FMGC VFMGC FMGCD NM1 NM1G 22ÞF 17ÞF 28 38ÞF 12 Hrs 48ÞF 46 Min 48ÞF 70 Min 14 Min 70 Min FMR FMRV FMRG FMRGV FMRGC 22ÞF 9ÞF 28 38ÞF 12 Hrs 48ÞF 46 Min 48ÞF 70 Min 14 M...

Страница 111: ...n DMD DMDH DMDA NDD5 NDD5H NDD5A 32ÞF 18ÞF 6 Hrs 48ÞF 40 Min 14 Min 40 Min RDM RDMH 30ÞF 20ÞF 24 Hrs 12 Min 60 Min CWI CWI6 MWI MWI6 30ÞF 20ÞF 6 Hrs 14 Min 56 Min FHM FHMG FHMH FHMGH FHMS FHMSG MHF MHFG MHFGH NM3 NM3G NM4 NM4G NDD3 NDD3G NDD4 NDD4G 32ÞF 20ÞF 28 38ÞF 6 Hrs 48ÞF 40 Min 14 Min 40 Min FM FMG FMV FMGV FMGC VFMGC FMGCD NM1 NM1G 30ÞF 25ÞF 28 38ÞF 12 Hrs 48ÞF 70 Min 14 Min 70 Min RMA RMFA...

Страница 112: ...Koolgas Duration Min Offtime Temp TermÞF Duration Min JVMR JVMRS 29ÞF 15ÞF 6 Hrs 60 Min RMFA NRFL NRFLV 30ÞF 23ÞF 24 Hrs 12 Min 60 Min DMZ DMZA DMZH DMX DMXA DMXH ND5LZ ND5Z ND5HZ ND5LX ND5X ND5HX 32ÞF 21ÞF 8 Hrs 48ÞF 40 Min 14 Min 40 Min RDM 32ÞF 25ÞF 24 Hrs 12 Min 60 Min RMA RMFA NRD NRDV NRFL NRFLV 34ÞF 27ÞF 24 Hrs 12 Min 60 Min Bulk PRO PHSM PH PHRO P NP1 NP2 37ÞF 21ÞF 6 Hrs 12 Min 40 Min Pack...

Страница 113: ...an Cycling CI CO ÞF Defrost Frequency Electric Temp TermÞF Failsafe Min Reverse Air Temp TermÞF Failsafe Min Koolgas Duration Min Offtime Temp TermÞF Duration Min CGFMG CSFMG 36ÞF 20ÞF 24 Hrs 90 Min Cheese DSRP 30ÞF 18ÞF 8 Hrs 12 Min 50 Min CGFM CSFM NESDH NESSH 24ÞF 20ÞF 24 Hrs 100 Min VFL VFS VFK VFT NVSA NVSB NVSC 34ÞF 27ÞF 24 Hrs 110 Min Meat DSRP 26ÞF 12ÞF 8 Hrs 48 F 50 Min 14 16 Min Produce ...

Страница 114: ... CO ÞF Defrost Frequency Electric Temp TermÞF Failsafe Min Reverse Air Temp TermÞF Failsafe Min Koolgas Duration Min Offtime Temp TermÞF Duration Min Frozen Food Return 5ÞF 12 Hrs 54 F 24 Min 16 Min Produce Return 41ÞF 12 Hrs 16 Min 60 Min Ice Cream Return 15ÞF 12 Hrs 54 F 24 Min 16 Min Meat Deli 28ÞF 12 Hrs 54 F 24 Min 16 24 Min 90 Min Dairy Beverage Return 36ÞF 12 Hrs 16 Min 60 Min Prep Areas Re...

Страница 115: ...supply and component requirements Test Charge Use properly regulated dry nitrogen and R22 to pressurize the system with vapor only Charge about 25 pounds of R22 through a dehydrator Through another line add dry nitrogen to bring the system pressure up to 150 psig Use an elec tronic leak detector to inspect all connections If a leak is found isolate repair and retest Be sure system is at 150 psig a...

Страница 116: ...he rack Connect one micron vacuum gauge at the pump and one at the furthest point in the system from the rack Plan procedures so breaking the vacuum with refrigerant will not introduce contaminates into the system The vacuum pump must be in good condition filled with fresh oil to achieve desired results Procedure Pull a vacuum to 1500 microns If the vacuum fails to hold determine the cause and cor...

Страница 117: ...ired control settings for the system A copy of the equipment legend will be needed to determine the system s design operating points High and low pressure heat reclaim lockout winter control settings and other controls on the system should be noted Charging Open Compressors Backseat Service Valves on Suction and Discharge Open oil supply line immediately downstream of the Turba shed Pressure Trans...

Страница 118: ...s receiver liquid level and possible flood back from evaporator Shut off all compressors and recheck oil levels in each compressor and the Turba shed Leak testing evacuation and initial charging are now completed Compressor Motor Rotation To check compressor rotation use the following procedure 1 Install gauges on suction and discharge headers Be aware of Satellite and Split Suction Scroll Plus un...

Страница 119: ...un at this time Replace acid oil MAINTENANCE Compressor Replacement Since each machine room tends to be unique plan carefully as to how you will move the compres sors without harming personnel equipment or the building Before beginning removal of old compressor make replacement unit ready to install Verify Replacement compressor Electrical requirements Refrigerant application Capacity Piping hooku...

Страница 120: ...king may occur when a deep vacuum is pulled Cleaning the Turba shed Should the Turba shed require cleaning first shut down the system Isolate the Turba shed and bleed off pressure into an approved recovery vessel Remove the top and bottom sight glasses and the oil supply line With a clean dry regulat ed pressure source like nitrogen blow out any sludge or dirt Install the sight glasses using new O...

Страница 121: ... exceed five years from date of factory shipment On Hussmann refrigeration systems Atlanta Bridgeton Brantford Chino and self contained display cases Bridgeton Brantford Chino Denver an additional 4 year extended warranty for the motor compressor assembly is available but must be purchased prior to shipment to be in effect Hussmann reserves the right to inspect the job site installation and reason...

Отзывы: