56
Introduction to Navigation
NOTE:
Only one waypoint can have either a target or a grid applied to it at one
time. If you apply a target or a grid to a new waypoint, the original waypoint will
lose its target or grid.
NOTE:
The spacing of the rings on the waypoint target and the spacing of the
grid lines on the trolling grid are the same as the length of the scale bar on the
left edge of the display. Zooming in or out will decrease or increase the spacing,
respectively.
Routes
Save the Current Route:
While you are navigating, the current route can be
saved. From the Navigation X-Press™ Menu, select Save Current Route, and
press the RIGHT Cursor key. Navigation will continue.
Create a New Route:
Open the Waypoint Management dialog box. Select
Options > New > New Route.
•
New Route Dialog Box:
Use the 4-WAY Cursor Control key to set the
available fields (see
Edit your Waypoints, Routes, Tracks, and
Groups
for details).
•
Plan Route:
Select Plan Route, and press the RIGHT Cursor key. The
New Route dialog box closes so that you can select waypoints from
the Waypoint Management dialog box. To add a selected waypoint
to the route, press the RIGHT Cursor key. Repeat as needed. Select
Save and press the RIGHT Cursor key.
Travel a Saved Route:
Open the Waypoint Management dialog box. Select
a saved route, and press the RIGHT Cursor key. Select Travel, and press the
RIGHT Cursor key. Select Forward to travel the route in order. Select Reverse
to travel the route in reverse order.
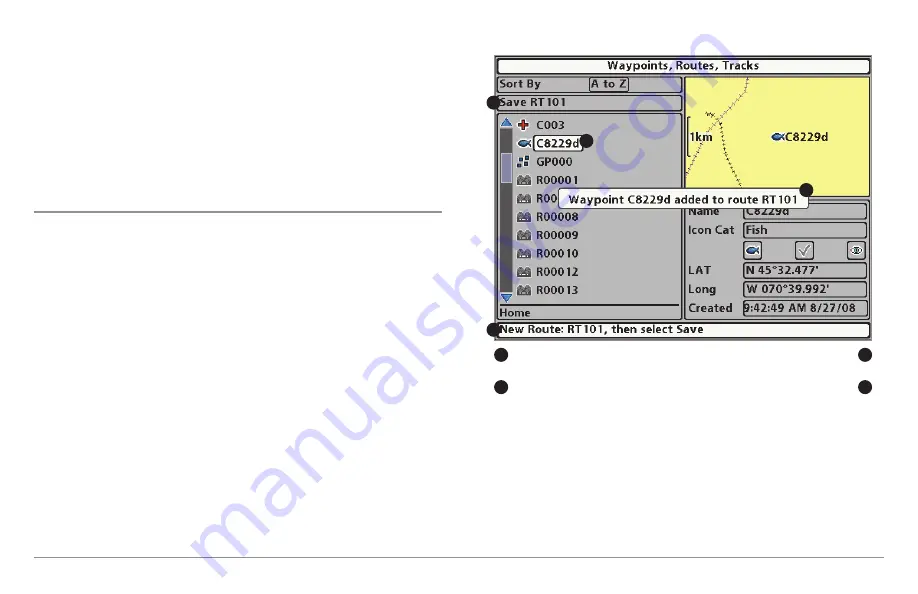
Adding Waypoints to a Route
A
confirmation
displays each time
you add a waypoint to the Route.
New Route Information:
Shows
the Route’s name and next steps.
Save:
Press the EXIT key to choose Save.
Press the RIGHT Cursor key to confirm the save.
Selected Waypoint:
Press the RIGHT
Cursor key to add it to the Route.
C
D
B
A
A
B
C
D
Содержание 858 HD DI
Страница 1: ......


