background image

52

Introduction to Navigation

A route represents your intended navigation and shows the shortest path from
each waypoint to the next. As you travel a route, staying on the route line is the
most efficient way to get to your destination, although you should always look
out for obstacles not shown on the chart. A

Route Leg

is the path between

each waypoint in a route. The color of each route leg is displayed as follows:

• Completed Route Leg = Gray.

• Current Route Leg = Green.

• Future Route Leg = Gold.

Tracks

consist of detailed position history and are displayed as a

breadcrumb trail of trackpoints. The Current Track shows the position history
since the unit was powered up. You can clear the Current Track or save it at
any time. Your Fishing System can store up to 50 saved tracks, each
containing 20,000 trackpoints. The current track represents your actual path
so far.

Open the Waypoint
Management Dialog Box

The

Waypoint Management dialog box

allows you to organize your waypoints,
routes, and tracks on your Humminbird®
control head.

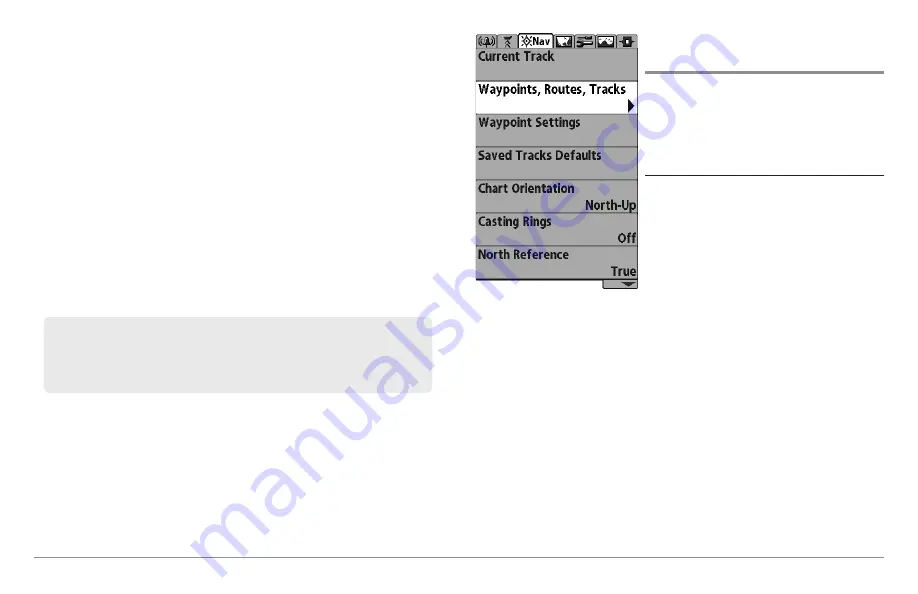
Open the Waypoint Management Dialog Box

1. Press the MENU key twice to open the

Main Menu.

2. Press the RIGHT Cursor key until the

Navigation Menu Tab is selected.

3. Press the DOWN Cursor key to choose

Waypoints, Routes, Tracks. Press the
RIGHT Cursor key to open the
Waypoint Management dialog box.

Opening the Waypoint

Management Dialog Box

NOTE:

The maximum number of waypoints and routes may vary due to the setup

of your Waypoint Management directory. Groups and sub-groups also use
storage, and the storage limit is influenced by the complexity of your Waypoint
Management directory.

Содержание 858 HD DI

Страница 1: ......

Страница 2: ...e personnel Any modification of the serial number or attempt to repair the original equipment or accessories by unauthorized individuals will void the warranty WARNING This product contains chemicals...

Страница 3: ...ademarks of Navionics XM WX is a registered trademark of XM Satellite Radio and Weather to the Power of X is a registered trademark of XM Satellite Radio Inc All rights reserved 2012 Johnson Outdoors...

Страница 4: ...Connector 8 Power On 8 What s on the Control Head 9 Key Functions 9 POWER LIGHT Key 9 VIEW Key 10 MENU Key 10 4 WAY Cursor Control Key RIGHT LEFT UP or DOWN Cursor Keys 10 VIEW PRESET Keys 11 EXIT Ke...

Страница 5: ...bo View 45 Chart Sonar Combo View 46 Chart Side Imaging Combo View 898c HD SI and 998c HD SI only 46 Down Imaging Side Imaging Combo View 898c HD SI and 998c HD SI only 47 Chart Down Imaging Combo Vie...

Страница 6: ...y when Bottom Lock is On 70 Side Imaging X Press Menu Side Imaging Views only 898c HD SI 998c HD SI 70 Cancel Navigation only when Navigating 71 Active Side Combo Views only 71 Split Position Combo Vi...

Страница 7: ...mory Card Snapshot and Recording View only 81 Delete All Images optional purchase SD Memory Card Snapshot and Recording View only 81 Delete Recording optional purchase SD Memory Card Snapshot and Reco...

Страница 8: ...models with optional purchase transducers only 858c HD DI and 958c HD DI 95 Connected Transducer 96 DI Pings Advanced Down Imaging View and Chart Down Combo View only 96 Color Bar 97 Temperature Grap...

Страница 9: ...Highlight optional purchase LakeMaster charts only 107 Lake List optional purchase LakeMaster charts only 107 Setup Menu Tab 108 Units Depth 109 Units Temp International Models only 109 Units Distanc...

Страница 10: ...aging Transducer Mounting Template XHS 9 HD SI 180 T 131 Contact Humminbird 132 NOTE Entries in this Table of Contents which list International Only are only available on products sold outside of the...

Страница 11: ...epth Sonar and Chartplotting GPS Receiver included Humminbird 998c HD SI Combo Ultra wide screen Fishing System with Side Imaging Sonar DualBeam PLUS Sonar Down Imaging Sonar and Chartplotting GPS Rec...

Страница 12: ...ovide a good balance between depth performance and resolution Low frequencies 83 kHz are typically used to achieve greater depth capability The power output is the amount of energy generated by the so...

Страница 13: ...ucer installation Down Imaging Sonar Down Imaging models only 858c HD DI and 958c HD DI The 858c HD DI 958c HD DI Combo Fishing System uses Down Imaging technology The Down Imaging transducer scans th...

Страница 14: ...Imaging Display and Understanding Side Imaging for more information The Side Imaging transducer also provides down imaging displays on the screen See What s on the Down Imaging Display for more inform...

Страница 15: ...niversal Sonar 2 all wiring is concealed inside the indestructible composite shaft out of sight and out of harm s way with no clamps ties or exposed wires Universal Sonar 2 features new temperature se...

Страница 16: ...es if they are available in your area The following GPS functionality is currently supported by the Fishing System when it is connected to the included GPS receiver View current position View current...

Страница 17: ...this manual as well as your accessory s Operations Manual for additional details NOTE Accessories to enable WeatherSense SmartCast and the AS WX 1 Satellite Weather Receiver require separate purchases...

Страница 18: ...to access the Start Up Options Menu 3 If a functioning transducer is connected Normal operation will be selected automatically and your Fishing System can be used on the water See Start Up Options Me...

Страница 19: ...e unit When the Title screen is displayed press the MENU key to access the Start Up Options Menu Power Off Press and hold the POWER LIGHT key for 3 seconds A message will appear to indicate how many s...

Страница 20: ...cific menu item quickly 4 WAY Cursor Control Key RIGHT LEFT UP or DOWN Cursor Keys The 4 WAY Cursor Control key has multiple functions which depend on the view menu or situation Menu Selection Press t...

Страница 21: ...t or Combo View to display information about objects that are near an active cursor If the cursor is not active the Chart Info submenu will be displayed See Views Viewing Cartography for more informat...

Страница 22: ...Zoom key to decrease the scale NOTE The cursor must be active for the zoom feature to work in the Side Imaging or Down Imaging View SD Memory Card Slots The two SD memory card slots on your control h...

Страница 23: ...s routes tracks or groups into your Humminbird unit Import Humminbird Navigation Data Insert a loaded SD card into the control head card slot and follow the on screen prompts to import the waypoints r...

Страница 24: ...r key until the Navigation tab is selected Select Waypoints Routes Tracks Press the RIGHT Cursor key 3 From a selected group directory in the Waypoint Management dialog box select Options Select Multi...

Страница 25: ...into the card reader connected to your PC 2 Register your Fishing System Log on to humminbird com Click My Account Set up a new account 3 Download From My Account My Profile My Equipment click the fil...

Страница 26: ...colors moving across the display at the same depth 8 Barometric Pressure Requires optional purchase WeatherSense Bait Ball 5 9 RTS Real Time Sonar Window 10 11 4 1 2 3 5 6 7 Second Sonar Return When t...

Страница 27: ...rom the bottom structure and fish that are within the transducer beam The RTS Window plots the depth and intensity of a sonar return See Sonar Menu Tab Real Time Sonar RTS Window SwitchFire SwitchFire...

Страница 28: ...menu settings such as Sensitivity or Upper Range and the adjustments will be shown instantly on the screen Sonar Colors and Bottom View As the boat moves the unit charts the changes in depth on the di...

Страница 29: ...he strongest return as specified by the palette See Sonar Menu Tab Sonar Colors for more information WhiteLine highlights the strongest sonar returns in white resulting in a distinctive outline This h...

Страница 30: ...shadows You can use the shadow to interpret how close the fish is to the bottom Side Imaging Range Images shown on the right side of the screen are located on the right side of your boat and images sh...

Страница 31: ...er on the display to form the image that you see The rows closest to the boat icon at the top of the view are the most recent sonar data The information is scrolled down the screen as new data drawn a...

Страница 32: ...er also provides DualBeam PLUS at 200 83 kHz Selecting 800 kHz produces the sharpest image while selecting 455 kHz provides greater bottom coverage area Side Imaging Beams are extremely narrow from fr...

Страница 33: ...n i e wave induced etc This applies to navigation by either the main engine or the trolling motor Minimize turning time and avoid wave action that induces large side to side rocking of the boat For ex...

Страница 34: ...Ravine with Timber Possible drop off 1 1 Submerged Bridge A Closer Perspective Submerged Bridge 1 1 Submerged timber 2 Submerged tree 3 Submerged ravine 4 2 3 4 New bridge pilings 1 Creek channel 2 Su...

Страница 35: ...ing Pool Swimming pool 1 1 Submerged Barge with Dumped Logs 1 Dumped logs 1 Submerged barge 2 2 Submerged Bridge Alternative Perspective Submerged Bridge 1 1 Submerged Standing and Fallen Timber and B...

Страница 36: ...water becomes too shallow Timer Elapsed time with Speed accessory or GPS Receiver Structure 2 Distance Distance traveled with Speed accessory or GPS Receiver Average Speed Average speed reading with...

Страница 37: ...f a sonar return Objects standing on the bottom cause a sonar shadow to appear on the display The longer the shadow the taller the object Fish may also cast shadows You can use the shadow to interpret...

Страница 38: ...or hide any view to suit your fishing preferences See the following pages for more information about each View Views X Press Menu Press and hold the VIEW key Use the 4 WAY Cursor Control key to select...

Страница 39: ...to choose what will be displayed in that position To hide the data window select Off Sonar View Sonar View presents a historical log of sonar returns The most recent sonar returns are charted on the r...

Страница 40: ...of the screen As the depth changes the zoomed view updates automatically The Full Range View is displayed on the right side of the screen The Full Range View includes the Zoom Preview Box which shows...

Страница 41: ...ls 858c HD XD 958c HD XD display sonar returns from the 50 kHz wide beam on the left side of the screen and sonar returns from the 200 kHz narrow beam on the right side of the screen Depth is displaye...

Страница 42: ...and a cursor will appear on the screen Use the 4 WAY Cursor Control key to move the cursor over a sonar return and observe the following The depth of the sonar return you choose will be displayed in t...

Страница 43: ...e Navigation Menu Tab SI Navigation and Introduction to Navigation for more information Zoom Box Side Imaging View with Active Cursor and Zoom Depth Water Column 1 5 Triplog Shadows 2 6 Water Surface...

Страница 44: ...maging Beam Width Down Imaging X Press Menu Press the MENU key once to access the Down Imaging X Press Menu You can set the sensitivity of the sonar to see more or less detail the chart scrolling spee...

Страница 45: ...Tab Scroll and View Use the UP and DOWN Cursor keys to scroll through the saved Screen Snapshots and Recordings The active file is highlighted with arrows Press the RIGHT Cursor key to view the file S...

Страница 46: ...ew or Chart View The Screen Snapshot feature is available when an optional purchase SD memory card is installed and Screen Snapshot is On see Accessories Menu Tab Screen Snapshot Make a Screen Snapsho...

Страница 47: ...shot Icon a thumbnail preview of the Screen Snapshot will be displayed on the screen 2 Press the INFO key and select View Snapshot 3 Press the EXIT key to return to Chart View Notes about Screen Snaps...

Страница 48: ...once to open the Snapshot and Recording X Press Menu 2 Highlight Stop Recording and press the RIGHT Cursor key Notes about Recording While recording press the EXIT key to exit the Snapshot and Recordi...

Страница 49: ...screen to indicate that the control head is playing a saved recording and not a live view Navigation is not affected by the Sonar Recording feature but any active navigation is cancelled and thumbnail...

Страница 50: ...r to the down looking beam but the area covered is to the left and right which gives you a wider view of the bottom Distance The distance covered by the right and left side looking beams is controlled...

Страница 51: ...eam New information in the down beam panel scrolls from right to left The bottom portion of the display presents a historical log of sonar returns from the 455 kHz right and left looking sonar beams N...

Страница 52: ...e boat Press the RIGHT or LEFT Cursor keys to turn the eye point right or left Press the UP Cursor key to move the eye point forward and press the DOWN Cursor key to move the eye point backward Press...

Страница 53: ...ypoints and the current route when navigating are overlaid on the chart Shift Pan Use the 4 WAY Cursor Control key to shift pan the chart to another area Zoom Press the ZOOM keys to zoom in and out In...

Страница 54: ...ay Size Press the MENU key once and select Split Position from the X Press Menu Split Position allows you to adjust the size of the left side of the display Active Cursor Press any arrow on the 4 WAY...

Страница 55: ...the other See Chart View for more information Chart Chart Combo View with Active Cursor 1 2 3 4 5 6 7 8 9 10 11 4 5 9 Latitude and Longitude Position of Cursor 1 6 Distance to the Cursor 7 8 9 10 11...

Страница 56: ...een where the Side Imaging View is displayed on the left and the Chart View is displayed on the right For more information about each side of this combo view see Chart View and Side Imaging View Chart...

Страница 57: ...a combination split screen where the Down Imaging View is displayed on the left and the Chart View is displayed on the right For more information about each side of this combo view see Down Imaging V...

Страница 58: ...on the left side of the screen and Side Imaging on the right side of the screen If you use the active cursor on the left side of the screen a cursor will appear in both the Sonar and Down Imaging vie...

Страница 59: ...h Up Icon If it is turned on the North Up Icon displays the direction of True North It also displays the Chart Orientation and the icon will change as the orientation and the data source change see Na...

Страница 60: ...n Chart Info Press the INFO key to get detailed information about the chart If the cursor is active you will see information about the chart objects located near the cursor If the cursor is not active...

Страница 61: ...can also use the Waypoint Management dialog box to create new waypoints and routes from scratch You can edit your navigation data and organize it too This section will get you started See your Hummin...

Страница 62: ...ve it at any time Your Fishing System can store up to 50 saved tracks each containing 20 000 trackpoints The current track represents your actual path so far Open the Waypoint Management Dialog Box Th...

Страница 63: ...Options Options Provides a submenu so that you can set the default group create new navigation items groups waypoints routes and select and edit several items at once Select Search By to search by Na...

Страница 64: ...aypoint Save the Cursor Position as a Waypoint On the Chart or Chart Combo Views use the 4 WAY Cursor Control key to move the cursor to the position you want to save as a waypoint Then press the MARK...

Страница 65: ...ey Canceling navigation removes the route and any waypoints created using the GOTO key but it does not remove any saved routes from memory You will be prompted to save the current route when you cance...

Страница 66: ...4 WAY Cursor Control key to set the available fields see Edit your Waypoints Routes Tracks and Groups for details Plan Route Select Plan Route and press the RIGHT Cursor key The New Route dialog box...

Страница 67: ...ypoint Management dialog box Select a saved route and press the RIGHT Cursor key Select Delete from the submenu and press the RIGHT Cursor key To remove the route from the group choose Selected To del...

Страница 68: ...ckpoints See Navigation Menu Tab Current Track for more information Edit your Waypoints Routes Tracks and Groups Whether you are creating a new navigation item or editing it you can use the same steps...

Страница 69: ...roll through the available categories Select All to view all available icons All Geometry Alerts Supplies Navigation Recreation Fish Environment Icon Press the UP or DOWN Cursor keys to scroll through...

Страница 70: ...ew will switch to the Chart View and the elapsed time since MOB was activated will be displayed A line will be drawn from the boat s current position to the MOB waypoint and the MOB waypoint will be t...

Страница 71: ...of menu settings which are organized under the following tabbed headings Alarms Sonar Navigation Chart Setup Views and Accessories NOTE The X Press Menu s and the Main Menu options can also be expand...

Страница 72: ...ing System NOTE It is important to select Simulator manually from the Start Up Options Menu as opposed to letting the Fishing System enter Simulator automatically as it will if a transducer is not con...

Страница 73: ...being monitored but is not yet being used This view also reports the current position local time and date and other numeric information The current GPS Fix Type is reported as No Fix 2D Fix 3D Fix or...

Страница 74: ...provides the standard set of menu options including the settings that are changed less frequently The Main Menu is organized under the following tabs to help you find a specific menu item quickly Ala...

Страница 75: ...the Main Menu at a later time the menu will open to the same tab as the last time the Main Menu was displayed Note for all Menu Settings The settings in all menus are adjusted in the same way Simply...

Страница 76: ...1 Press the MENU key twice to access the Main Menu 2 Press the RIGHT Cursor key until the Setup tab is selected 3 Press the DOWN Cursor key to highlight User Mode on the Setup main menu 4 Press the L...

Страница 77: ...n will only appear when you are currently navigating a route This will not delete a previously saved route Active Side Combo Views only Settings Left Right Default Left Active Side allows you to selec...

Страница 78: ...arious see below Upper Range sets the shallowest depth range that will be displayed on the Sonar Split Sonar and Active Sonar Side Views Upper Range is often used with Lower Range NOTE A minimum dista...

Страница 79: ...fault 5 Chart Speed determines the speed at which the sonar information moves across the display and consequently the amount of detail shown A faster speed shows more information and is preferred by m...

Страница 80: ...Models only Default 15 feet Bottom Range allows you to control how much of the water column measured up from the bottom is shown in the Sonar Zoom View Choose a small value to see low lying bottom str...

Страница 81: ...left side of the Combo View Each Combo View can be set individually The Split Position menu option is only available when a Combo View is on the screen see Views Combo Views The number setting indicat...

Страница 82: ...trast Accents the light and dark parts of the Side Imaging data to provide greater definition 1 to 20 Default 10 Sharpness Filters the view and sharpens the edges of the Side Imaging data Low L Medium...

Страница 83: ...color palette you would like to use for the Side Imaging display Down Imaging X Press Menu Down Imaging Views only 858c HD DI 958c HD DI 898c HD SI and 998c HD SI The Down Imaging X Press Menu provid...

Страница 84: ...setting indicates the percentage taken up by the left side of the Combo View Selecting Left sets the left side of the screen to its smallest setting Down Sensitivity Settings 1 to 20 where Low 1 High...

Страница 85: ...between the Upper and Lower Range regardless of the manual settings entered Lower Range Settings Auto to 1500 feet Auto to 500 meters International Models only Default Auto Lower Range sets the deepes...

Страница 86: ...lue Amber 1 Amber 2 Brown Green Inverse Gray Green Red Default Amber 1 DI Colors allows you to select which color palette you would like to use for the Down Imaging display Navigation X Press Menu The...

Страница 87: ...u option will only appear when you are currently navigating a route Active Side Combo Views only Settings Left Right Default Left Active Side allows you to select a side of the screen in a Combo View...

Страница 88: ...he cursor to any saved waypoint so that you can locate it or edit it This X Press Menu option only appears if you have saved waypoints Chart Declutter Settings Press the RIGHT Cursor key to activate C...

Страница 89: ...tion to Navigation Add a Waypoint Target or Trolling Grid for more information Remove Grid only if a Grid is Active Settings Press the RIGHT Cursor key to activate Remove Grid removes the waypoint gri...

Страница 90: ...option will only appear when you are currently navigating a route This will not delete a previously saved route Start Recording optional purchase SD Memory Card Snapshot and Recording View only Settin...

Страница 91: ...al purchase SD memory card is installed Snapshot and Recording View is on the screen and you have selected a recording file Delete All Recordings optional purchase SD Memory Card Snapshot and Recordin...

Страница 92: ...g or end of a recording using these keys NOTE Sonar chart speed is increased during Fast Forward and reversed during Rewind This may result in a reduced quality sonar image since at higher speeds not...

Страница 93: ...ettings Off 1 to 100 feet or 0 5 to 30 meters International Models only Default Off Depth Alarm sounds when the depth becomes equal to or less than the menu setting Fish ID Alarm Settings Off All Larg...

Страница 94: ...System reaches the Temp Alarm setting which is either set in degrees Fahrenheit or Celsius International Models only Off Course Alarm Settings Off 25 to 3000 feet 10 to 1000 meters International Mode...

Страница 95: ...re the Arrival Alarm will sound Drift Alarm Settings Off 25 to 3000 feet 10 to 1000 meters International Models only Default Off Drift Alarm allows you to set the size of a perimeter around the boat s...

Страница 96: ...and press the RIGHT Cursor key Save and Close To save your settings and start the Timer at a later time select Save and Close and press the RIGHT Cursor key Also see Start Timer Digital Readout To di...

Страница 97: ...kHz the returns from both beams are blended by starting with the 83 kHz wide beam return dimming it and then overlaying it with the 200 kHz narrow beam return The darker 200 kHz narrow beam sonar retu...

Страница 98: ...ws The blended information is shown in the Sonar View and Sonar Zoom View The RTS Window in the Sonar View will only show the returns from the 200 kHz narrow beam When set to 200 kHz only the returns...

Страница 99: ...Settings Clear Mode Max Mode Default Clear Mode SwitchFire controls how the sonar returns are displayed in the Sonar Views Choose Max Mode to see only raw sonar returns on the display When Max Mode i...

Страница 100: ...ts detected in the 50 kHz wide beam are represented as blue fish symbols When Fish ID is turned off the Fishfinder shows only the raw sonar returns on the display These returns will often result in ar...

Страница 101: ...Dark Green weak to Light Green strong Inverse Black weak to White strong Original Palette Cyan weak to Red strong Palette 1 Navy Blue weak Purple medium Yellow strong Palette 2 Navy Blue weak Green m...

Страница 102: ...ns in the 200 83kHz Split Sonar View The 83 kHz sensitivity can be adjusted without affecting the sensitivity of the 200 kHz returns shown in the 200 kHz sonar window 455 kHz Sensitivity Advanced Down...

Страница 103: ...ch side beam range into four equal sections on the display SI Range Lines can be used to interpret the location of objects on the display You can turn SI Range Lines On visible or Off hidden NOTE The...

Страница 104: ...o Auto the Fishing System will acquire bottom readings as needed within the capacity of the unit When Max Depth is set to match your fishing maximum depth your Fishing System will not attempt to acqui...

Страница 105: ...window Auto is the default setting If an accessory transducer is connected to the control head select 2D Element For example if you connect an ice transducer to your Down Imaging unit change the digi...

Страница 106: ...n or Sidescan transducers 898c HD SI and 998c HD SI Hi Def Sidescan is the default selection The Compact Sidescan Sidescan QuadraBeam PLUS Dual Beam Dual 50 200 and Universal Sonar 2 require a separat...

Страница 107: ...SI only Settings Blue Amber 1 Amber 2 Brown Green Inverse Gray Green Red Default Amber 1 DI Colors allows you to select which color palette you would like to use for the Down Imaging display Down Ima...

Страница 108: ...allows you to save the current track Clear allows you to delete the current track Appearance allows you to change the style and color of the current track Breadcrumb Trail Dashed Line Solid Line or Wi...

Страница 109: ...you select an icon for all new waypoints To see the most icon choices set the Icon Category to All New Waypoint Icon Select Default and the system will automatically apply your settings to new waypoi...

Страница 110: ...ed to decluttered waypoints see Navigation Menu Tab Waypoint Decluttering North Reference Settings True Magnetic Default True North Reference allows you to have bearings displayed with one of two orie...

Страница 111: ...back further in time but will be less detailed Trackpoint Interval works in conjunction with Track Min Distance Both conditions must be met before a trackpoint is added to the current track During sl...

Страница 112: ...t set intervals from the boat The tick marks are based on the speed calculation 3D View Outline Settings Hidden Visible Default Visible 3D View Outline allows you to display or hide an outline on the...

Страница 113: ...al aids with an optional purchase SD card Chart Select Settings Auto Contour XD Left Chart Card Right Chart Card Default Auto Chart Select allows you to choose which chart to use if you have built in...

Страница 114: ...rk If the cursor was not active before you began this procedure an error message will appear Exit the menu set the cursor then try again Clear Map Offset Advanced Settings Follow screen instructions t...

Страница 115: ...pot Soundings allows you to display or hide spot soundings which are depth measurements shown on the chart NOTE Spot Soundings are only available with optional purchase SD cards Auto Zoom Advanced Set...

Страница 116: ...t Speed setting the boat icon will move to the edge of the view so that more of the Chart View is shown on screen Offset Speed with Vessel Offset turned on Settings 5 to 60 mph 5 to 50 kts or 8 to 95...

Страница 117: ...ional purchase LakeMaster charts only Settings Press the RIGHT Cursor key to activate Lake List allows you to view the list of lakes included on the installed SD card Sort By Highlight Sort By and use...

Страница 118: ...ill vary depending on which accessories are attached to the unit NOTE Menu options can be expanded or simplified by setting the User Mode to Advanced or Normal See Main Menu User Mode for details Setu...

Страница 119: ...y Settings Domestic Models mph kts International Models kph mph kts Default mph kph Units Speed selects the units of measure for speed related readouts and will appear in the menu if a Temp Speed Acce...

Страница 120: ...our control head s data files periodically Data files should also be saved to your PC before restoring the unit s defaults or updating the software See your Humminbird online account at humminbird com...

Страница 121: ...ive vertical measurement from the transducer to the waterline to read the depth from the waterline Enter a negative vertical measurement from the transducer to keel to read the depth from the keel Aux...

Страница 122: ...ay Time Format Advanced International Models only Settings 12 hour 24 hour Default 12 hour Time Format changes the time format used by the unit Time Format selects a 12 hour or 24 hour format for the...

Страница 123: ...point RMB Recommended Minimum Navigation Info Local Sonar Settings Off On Default On Local Sonar sets whether the Sonar views are shown in the View rotation Select Off to deactivate Sonar and remove t...

Страница 124: ...there are not accessories attached to the Accessory Bus Screen Snapshot will be the only menu choice available If an accessory is attached however additional menu choices that support the accessory w...

Страница 125: ...icon circle with a slanted line through it on the Snapshot and Recording View on the other unit AIS optional purchase AIS equipment only Settings Press the RIGHT Cursor key to activate Your Fishing S...

Страница 126: ...I Tag Maritime Mobile Service Identity will be displayed if it is available for each target Target Course Lines point in the direction of a vessel s course The length of the line can be adjusted in th...

Страница 127: ...ilable with each AIS update Press the RIGHT Cursor key to open the Target List Sort The list is sorted by MMSI number if available Targets without an MMSI will be shown at the bottom of the list Scrol...

Страница 128: ...vinegar WARNING Do not use a chemical glass cleaner on the screen Chemicals in the solution may cause cracking in the lens of the unit NOTE Do not wipe the screen while dirt or grease is on the scree...

Страница 129: ...battery terminals or wiring or actually replacing the battery if necessary Fishing System Defaults to Simulator with a Transducer Attached A connected and functioning transducer will cause the newly s...

Страница 130: ...air and water flowing around the transducer cavitation may be interfering with the interpretation of sonar data See your Installation Guide for suggestions on adjusting the transducer position Electr...

Страница 131: ...To determine whether the boat s engine is the source of the noise increase the RPMs while the boat is in neutral and stationary to see if the noise increases proportionately if noise appears when you...

Страница 132: ...m composition and slope 858c HD DI and 958c HD DI Specifications Depth Capability Down Imaging 250 ft 76 m Traditional Sonar 600 ft 183 m Power Output 500 Watts RMS 4000 Watts Peak to Peak Operating F...

Страница 133: ...stated depth in saltwater conditions however actual depth performance may vary due to transducer installation water type thermal layers bottom composition and slope 858c HD XD and 958c HD XD Specific...

Страница 134: ...ontact your dealer or distributor from which your product was purchased ROHS STATEMENT Product designed and intended as a fixed installation or part of a system in a vessel may be considered beyond th...

Страница 135: ...te products derived from this software without specific prior written permission THIS SOFTWARE IS PROVIDED BY THE COPYRIGHT HOLDERS AND CONTRIBUTORS AS IS AND ANY EXPRESS OR IMPLIED WARRANTIES INCLUDI...

Страница 136: ...ochrome fixed mount Humminbird products use FSTN technology Frequency A measure of the number of sound wave cycles per second of a sound impulse transmitted underwater A typical frequency for fishfind...

Страница 137: ...ffective tool Sonar is the basic technology behind all recreational and commercial fishfinding and depthfinding devices Sonar Update Rate The number of times per second that the transducer s transmitt...

Страница 138: ...at showing fish on or near the bottom and is preferred by many saltwater anglers Acquisition Time The length of time that a GPS receiver typically takes to determine a position from at least three sa...

Страница 139: ...rmat suitable for the marine environment but it is not waterproof MMC is the same format that many digital cameras use See SD North Magnetic The principle reference point of the compass i e North is 0...

Страница 140: ...ents the most efficient path between the two points because it is a straight line The TRK is measured in degrees i e 321 where 000 is North 090 East 180 is South 270 is West See Cross Track Error and...

Страница 141: ...file start with the following print settings Scale None Paper 8 5 x 11 inches Layout Landscape Confirm that the template matches the transducer bracket slots and adjust the print as needed 131 Append...

Страница 142: ...g ways By Telephone Monday Friday 8 00 a m to 4 30 p m Central Standard Time 1 800 633 1468 By e mail typically we respond to your e mail within three business days service humminbird com For direct s...

Отзывы:

Похожие инструкции для 858 HD DI