Installing or Replacing Parts and Accessories
Processor
Chapter 10
176
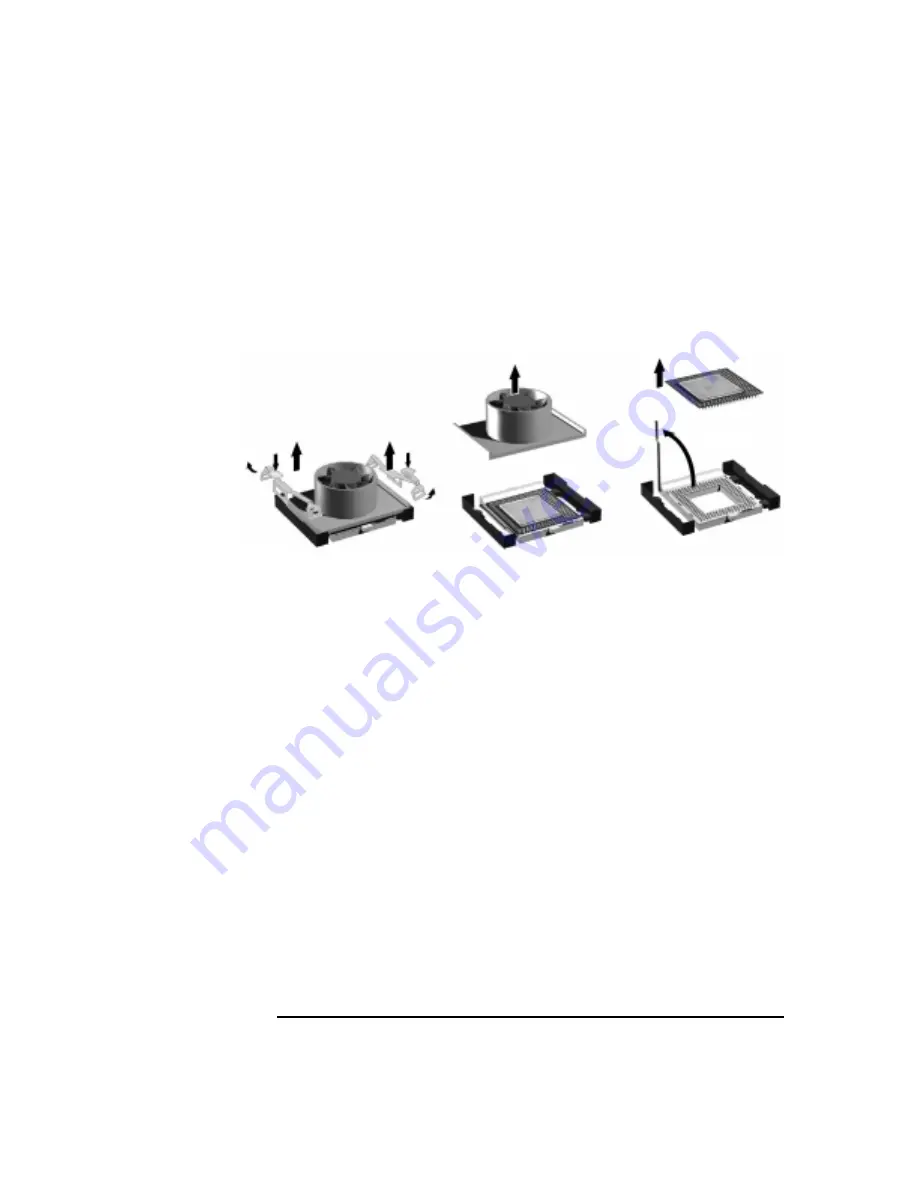
8. Remove the two heatsink clips by pressing the release lever on the
clips. Then lift off the heatsink. There is a thermal interface material
between the heatsink and the processor. This may cause the processor
to stick to the heatsink.
Figure 10-21
Removing a Processor
9. Remove the thermal interface material from the heatsink and discard
it. You can leave any residue that remains on the heatsink. This does
not impair the heat transfer.
10. Open the Zero Insertion Force (ZIF) lever, located at the side of the
processor socket, until it is in the vertical position (depending on the
socket design, the handle may need to go past vertical), then carefully
lift out the processor. To avoid bending the processor pins, keep the
processor perfectly flat when removing it.
11. Store the processor in an anti-static bag (such as the one provided
with the replacement processor).
12. If you are permanently removing a second processor, you must update
your operating system (see page 179). You should also store the
heatsink and clips in a safe place.
Step 8
Step 10
This manual downloaded from http://www.manualowl.com
Содержание Workstation x4000
Страница 11: ...Chapter 1 11 1 System Overview This manual downloaded from http www manualowl com ...
Страница 25: ...Chapter 2 25 2 System Board This manual downloaded from http www manualowl com ...
Страница 37: ...Chapter 3 37 3 System Memory and Processors This manual downloaded from http www manualowl com ...
Страница 42: ...System Memory and Processors Processor Chapter 3 42 This manual downloaded from http www manualowl com ...
Страница 43: ...Chapter 4 43 4 System BIOS and Resources This manual downloaded from http www manualowl com ...
Страница 68: ...System BIOS and Resources System Resources Chapter 4 68 This manual downloaded from http www manualowl com ...
Страница 69: ...Chapter 5 69 5 Hardware Management Monitoring and Reporting This manual downloaded from http www manualowl com ...
Страница 81: ...Chapter 6 81 6 Power Specifications This manual downloaded from http www manualowl com ...
Страница 93: ...Chapter 7 93 7 Connector Pin Outs This manual downloaded from http www manualowl com ...
Страница 120: ...Connector Pin Outs System Board Connectors Chapter 7 120 This manual downloaded from http www manualowl com ...
Страница 121: ...Chapter 8 121 8 Mechanical Specifications This manual downloaded from http www manualowl com ...
Страница 125: ...Chapter 9 125 9 Hardware Components This manual downloaded from http www manualowl com ...
Страница 145: ...Chapter 10 143 10 Installing or Replacing Parts and Accessories This manual downloaded from http www manualowl com ...
Страница 203: ...Chapter 11 203 11 Troubleshooting This manual downloaded from http www manualowl com ...
Страница 231: ...Chapter 12 231 12 Contacting Support This manual downloaded from http www manualowl com ...


