


NOTE:
Depending on your system, the following components might also be included:
•
Bezel, bezel brackets, and screws
•
Slide rail assembly
•
Tower-to-rack conversion kit
•
HP ProLiant Essentials Integrated Lights-Out 2 Advanced Pack
•
HP ProLiant Essentials Lights-Out 100i Advanced Pack
Powering on the server
Power on the server after connecting the cables. For more information on your storage system model's
hardware components, see “
Server components
” on page 35.
1.
Power on the server by pushing the power button. The power LED illuminates green.
2.
When the server powers on, an installation progress screen is displayed. The installation process
takes approximately 10 to 15 minutes to complete and the server will reboot twice. No user
interaction is required.
CAUTION:
Do not interrupt the installation process; when the installation sequence is complete, the
system prompt appears.
3.
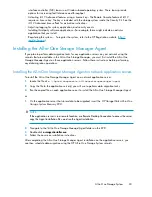
See “
Accessing the All-in-One Management Console
” on page 23 to set up server access.
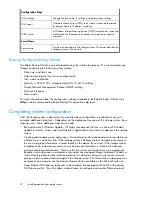
Factory image
The HP All-in-One Storage System is preconfigured with default storage settings and preinstalled with
the Windows Storage Server 2003 R2 operating system (OS). This section provides additional details
about the preconfigured storage.
Physical configuration
The DON’T ERASE logical disk supports the recovery process only and does not host a secondary
operating system. If the operating system has a failure that might result from corrupt system files, a
corrupt registry, or the system hangs during boot, see “
System recovery
” on page 121.
Data volumes are not carved at the factory or by the System Recovery DVD, and must be configured
manually by the end user. Be sure to back up your user data, and then use the System Recovery DVD
to restore the server to the factory default state as soon as conveniently possible.
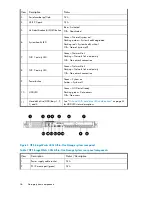
Table 4 AiO Configurations
Logical Disk 2
Logical Disk 1
•
DON'T ERASE Volume
•
Operating System Volume
•
AiO400r
•
RAID 5
•
RAID 5
•
AiO400t
•
Physical Drives 1–4
•
Physical Drives 1–4
Installing and configuring the server
22
Содержание STORAGEWORKS ALL-IN-ONE STORAGE SYSTEM
Страница 14: ...14 ...
Страница 34: ...Installing and configuring the server 34 ...
Страница 60: ...Storage management overview 60 ...
Страница 88: ...Data protection 88 ...
Страница 120: ...Troubleshooting servicing and maintenance 120 ...
Страница 122: ...System recovery 122 ...
Страница 172: ...Microsoft Services for Network File System MSNFS 172 ...
Страница 186: ...BSMI notice Japanese notice Korean notice A B Class A equipment Class B equipment Regulatory compliance and safety 186 ...
Страница 204: ...Index 204 ...


