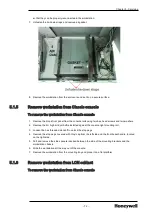
1. Loosen the hex threaded standoff to unlock the stop pegs.
2. Remove the stop pegs covered with Vinyl cap from the left side and the front bezel handle, located
on the right side.
3. Pull and remove the side spacers inserted between the side of the mounting brackets and the
workstation chassis.
4. Slide the workstation all the way out of the console.
5. Remove the workstation from the mounting tray and place it on a flat platform.
5.1.7
Open the enclosure
To simplify servicing when using the slide mount option, internal hardware components can be serviced
without having to remove the enclosure from the console or cabinet.
To open the enclosure
1. If this is a slide mount workstation, slide the tray from the furniture.
2. From the side of the workstation, slide the cover release latch up, to gently lift the cover.
3. Service the hardware components as required.
l
For servicing the LCNP4E / LCNP4e2 board, refer to section
LCNP4e.html#Servicing_the_LCNP4e
l
For servicing other Honeywell-installed options, refer to section
.
5.2
Servicing the LCNP4e / LCNP4e2
The LCNP4e / LCNP4e2 board is soldered to the board and has an on-board memory of 16 MB. The
LCNP4e / LCNP4e2 board is utilized as the TPS co-processor for the GUS and other workstations that
require LCN connectivity. It plugs into a PCI-Express (PCIe) bus connector of these workstations. The
following image illustrates an LCNP4e / LCNP4e2 board.
- 73 -
Chapter 5 - Servicing


