background image

61

Deutsch

English

G e n e r a l   T e r m s   a n d   C o n d i t i o n s   o f   B u s i n e s s

1.

Offers, conclusion of contract, execution

1.1

The terms and conditions set out below shall apply to all contracts, and shall be deemed

to have been acknowledged by the customer when the order is placed or at the latest

when the first consignment is accepted. They shall remain in force for the entire duration

of the business relationship. No general terms and conditions of purchase used by the cu-

stomer shall apply unless we give our written consent.

1.2

No offer from us shall be regarded as binding on us unless it has been expressly identi-

fied as such. No contract shall come into existence until we have given written confirmati-

on of an order, and then only with the provisions contained therein, or when goods are

delivered if this is sooner.

1.3

All information regarding shapes, dimensions, colours, construction, etc., contained in our

printed matter, catalogues, prices lists, or other contract documentation shall be regarded

as only approximate unless specifically designated as binding.

1.4

We reserve the right to make modifications to the contract products covered, within the bo-

unds of the reasonable. In the case of products manufactured to the customer’s special or-

der, we shall be entitled to deliver up to 10 percent more or less than the quantity orde-

red. The quantity invoiced shall always be the quantity actually supplied.

1.5

No assurances, subordinate agreements, or changes to the contract shall be valid unless

confirmed in writing.

2.

Prices and terms of payment

2.1

The gross prices stated in our offer documentation (catalogues, price lists, diskettes, etc.)

shall be multiplied by the ex-works multiplier and related to the day of delivery. Value Ad-

ded Tax (VAT) shall be added to the prices at the statutory level. Prices are defined as ex-

Elgersweier railway station. If any consignment has a net goods value of DM 100 or mo-

re, packing shall be deemed to be included in the price; if less than DM 100, we charge

DM 10 as a small-quantity surcharge. Quantities of any product ordered in less than the

stated packing unit shall be subject to a surcharge of 10 percent on the value of the goods.

If the goods are to be delivered to a third party, we apply a surcharge of 5 percent of the

value of the goods. Goods are normally despatched ex-station. If the net goods value of

the order is less than DM 1,500, any freight costs shall be added to the invoice. The reci-

pient shall bear the extra costs of express delivery. If goods are sent by post, the customer

shall be invoiced the full postal charge.

2.2

We invoice the gross prices agreed and/or in force when the contract is concluded and

based on the cost factors in effect at that time. Should any of the cost factors (in particu-

lar: materials, wages, energy, and public charges) change between the conclusion of the

contract and the delivery of the goods, we shall be entitled to adjust the gross price ac-

cordingly.

2.3

Our invoices are payable within 7 days at a 3 percent prompt-payment discount, within

14 days at a 2 percent prompt-payment discount, or within 30 days net of any deduction,

counting from the date of invoice in each case. Prompt-payment discount shall not be de-

ducted if the customer is in arrears of payment with any other invoice.

2.4

The customer shall not offset payments which we dispute and/or have not been establis-

hed by a court ruling. The customer shall not exercise any right of retention or withholding

he may have over counter-claims unless they fall under the same contract.

3.

Arrears of payment, deterioration of assets

3.1

In the event of late payment or postponement of payment, interest shall be charged at a

rate 4 points above the basic interest rate of the European Central Bank at the material ti-

me, plus Value Added Tax.

3.2

If the customer falls into arrears of payment, or if there are specific grounds for believing

that he is insolvent, we shall be entitled to cease work on orders in hand and also to de-

mand immediate advance payment of all outstanding accounts, including those not yet

due for payment (including bills-of-exchange and postponed payments), or else the ap-

propriate collateral. Should the customer fail to meet these demands, we shall be entitled

to cancel the contract(s) and invoice the customer for the costs so far incurred and also for

forgone profits.

4.

Delivery period, delivery delay, impossibility

4.1

The agreed delivery shall be deemed to have been met if, by the time it expires, the con-

signment has left our works or the customer has been informed that the goods are ready

for despatch or collection. Any later customer requests for changes or additions shall ha-

ve the effect of lengthening the delivery period by the appropriate length of time. The sa-

me shall apply if unforeseen obstacles arise which are outside our control, such as Acts of

God, force majeure, strikes, lock-outs, or the delayed delivery of essential raw materials,

or materials or parts from our sub-suppliers. The same shall also apply if any of these cir-

cumstances affect our sub-suppliers. The aforesaid circumstances shall likewise not be held

to our account if they arise after a delay has already occurred. If it is not possible to fore-

cast when the above-mentioned hindrances will end, we shall be free to cancel the con-

tract.

4.2

If we fall into arrears of delivery for reasons for which we are to blame, the customer can

set us a suitable extension in writing and state that he will refuse to accept the contract

goods once this extended delivery time has expired. Should the extended delivery time ex-

pire fruitlessly, the customer can cancel the contract by making a written declaration to this

effect. In the event of our having acted with intent or in gross negligence, he can sue for

damages on the grounds of non-fulfilment or delay. Claims for damages over and above

the foregoing, including those based on Article 286 and/or 326 of the Code of Civil Law,

shall be ruled out if the law so permits.

4.3

The foregoing provisions shall also apply if delivery is impossible for reasons for which we

are to blame.

5.

Transfer of risk, part-consignments, insurance

5.1

Risk shall in any case be transferred to the customer when the contract goods are handed

over to the party responsible for transporting them (regardless of whether this is the custo-

mer or a third party). The same shall apply in all relevant respects to part-consignments,

which we shall always be entitled to make. Should the cause of a delay in despatch lie

with the customer, risk shall be transferred on the day on which the customer is notified that

the goods are ready for despatch or collection. If the customer so requests, we will at his

expense insure the contract goods against all insurable risks.

6.

Delay in collection, call-off orders

6.1

Should the customer fail to collect the contract goods on time, we shall be entitled to insist

on immediate acceptance and payment, or to set a suitable extension period, after the ex-

piry of which we shall be free to dispose of the contract goods in any other way and to

supply the customer an appropriate period of time later. The foregoing shall have no ef-

fect on our rights under the conditions laid down in Article 326 of the Code of Civil Law

to cancel the contract or sue for damages on the grounds of non-fulfilment. In the latter ca-

se, we shall also be entitled to demand 25 percent of the purchase price plus VAT as com-

pensation without having to substantiate this claim unless the customer can prove that we

have only suffered a considerably smaller loss. We reserve the right to sue for greater da-

mages if we have actually incurred a greater loss.

6.2

Call-off orders that we have confirmed shall be taken up within one year of the confirma-

tion date, unless anything to the contrary has been specifically agreed. The same shall ap-

ply in the case of reserves held against future orders or later call-off orders. If the goods

are not called off within the agreed or stated periods of time, the provisions of Clause 6

Paragraph 1 above shall apply in all relevant respects.

7.

Retention of title, assignment of claims to payment

7.1

The contract goods shall remain our property until all claims to payment under the busin-

ess relationship with the customer have been settled in full. The same shall apply in the

event of our goods having been installed. If the contract goods are processed, joined,

and/or mixed with other goods, we shall be entitled to co-ownership over the resultant

product in the same proportion as the invoice value of our goods to these other goods at

the point in time when they were processed, joined, or mixed.

7.2

The customer shall only resell our retained goods in the normal course of business, and

then only if he is not in arrears of payment towards us. He shall not be entitled to dispose

of the goods in any other way, e.g. by providing them as collateral or by pledging them.

The customer’s purchase price or his claims to payment for contract work from the resale

of our retained goods are assigned to us here and now in the amount of our invoice va-

lues until all claims to payment stated in sub-clause 7.1 have been settled. The customer

shall be irrevocably authorised to collect these outstanding accounts, and shall be under

an obligation to inform us on request of the names of the third-party debts and the amount

of their accounts payable to him, and in addition to this to provide us with all necessary

information to enable us to collect the accounts receivable that have been assigned to us.

7.3

If so requested, we shall be under an obligation to release collateral to which we are ent-

itled, at our free choice, if the total exceeds the accounts payable to us by more than 25

percent.

7.4

In the event of arrears of payment, imminent cessation of payments, or unsatisfactory in-

formation about the customer’s solvency or asset position, or if compulsory enforcement

proceedings have been initiated against him or his drafts have been refused, we shall be

authorised to take back and/or sell the goods we have delivered to him and the customer

shall be under an obligation to surrender them. He shall also bear all costs incurred

through our taking back and/or selling the goods. The latter shall be deemed to amount

to 20 percent of the proceeds from the resale, without our being required to furnish proof

thereof.

7.5

The customer shall inform us without delay of any attachment or other attempt by a third

party to take title to the retained goods, and shall bear all costs incurred as a result of any

such attachment.

8.

Guarantees, legal liability

8.1

Recognisable defects or deficiencies shall be reported to us in writing within 8 days of re-

ceipt of the consignment, hidden defects without delay as soon as they come to light.

8.2

If complaints prove to be justified, payment shall only be withheld to an extent that is rea-

sonable and commensurate with the defect or deficiency. We shall only bear legal liabili-

ty for defects, deficiencies, or the absence of assured properties if the following conditions

are met: all those parts that prove within 24 months of having been installed, or at the la-

test 30 months after delivery, to be unusable or of significantly reduced usability as a re-

sult of circumstances arising prior to the transfer of risk, meaning in particular if the design,

materials, and/or workmanship were poor, shall be either repaired or replaced at our free

discretion and free of charge. Replaced parts shall become our property.

8.3

Of the costs directly incurred by such repair or replacement, provided the complaint has

proved to be justified, we shall bear the costs of the replacement including its despatch

and all reasonable dismantling and installation costs. Provided it can be reasonably ex-

pected of us under the individual circumstances of the case, we shall also bear the costs

of any of the customer’s technicians or labourers required for this work, with the excepti-

on of travel expenses outside Germany. The customer shall bear all other costs. The re-

paired or new part shall be under guarantee for six months.

8.3.1 The customer shall give us the necessary time and opportunity to carry out the repairs and

make the replacement deliveries that appear necessary to us, otherwise we shall be ab-

solved of liability for the relevant defects and deficiencies.

8.3.2 We shall bear no liability for any injury, loss, or damage caused by any of the following:

unsuitable or improper use, incorrect assembly, installation, or start-up by the customer or

any third party, fair wear and tear, defective, improper, or negligent handling or operati-

on, deficient or defective maintenance, unsuitable consumable materials, deficient buil-

ding work, improper modifications or maintenance work carried out without our prior ag-

reement. No liability shall be entertained for any consequential damage either.

8.4

If neither repair work nor a replacement is possible, or if all attempts have failed, or if any

such attempts are delayed unreasonably, the customer shall be entitled to demand a re-

duction of the price or the cancellation of the contract. Provided always that the law so

permits, the customer shall have no other claims against us or our contractual agents over

and above the foregoing, inside or outside the ambit of the contract, nor any on the gro-

unds of direct or indirect injury, loss, or damage, forgone profit, or from the execution of

guarantee work, unless we have acted with intent or in gross negligence or if liability is

mandatory because of the absence of assured properties.

9.

Violation of subordinate obligations, statute bar

9.1

Our technical consultancy services, whether written or spoken, and any suggestions, cal-

culations, or design or similar work we may undertake shall merely serve to explain to the

customer the best possible use of our products. Nothing therein shall be construed as ab-

solving the customer from his obligation of inspecting our products and ensuring for hims-

elf that they are suitable for the purpose he has in mind.

9.2

If the contract goods cannot be used for their contractual purpose as a result of our culpa-

ble violation of any of the subordinate obligations incumbent on us, including those prior

to the conclusion of the contract, resulting e.g. from inadequate or faulty technical advice

or the wrong instructions, we shall bear legal liability to the exclusion of all further claims

by the customer as set out in Clause 8 of these Terms and Conditions. In the event of our

violating our subordinate obligations, including those prior to contract (within or outside

the contract), we and our contractual and vicarious agents shall be liable for damages on-

ly in cases of intent or gross negligence, provided the law so permits. The statutory regu-

lations on statute-barred cases (the maximum period is 6 months) shall apply to any claims

raised by the customer on the grounds of violation of such subordinate obligations and un-

lawful actions provided there has been no element of intent or gross negligence.

10.

Return shipment

10.1 As a basic rule, we do not take back goods we have delivered. Should we declare our-

selves willing to do so in any individual and exceptional case, following prior written ag-

reement to this effect, an administrative charge of 20 percent of the value of the goods

(plus VAT) shall be raised. We shall also charge any necessary rework costs separately.

The customer shall bear the transport costs and the transport risk.

11.

Place of execution, applicable law, partial invalidity, place of jurisdiction

11.1 The place of execution for deliveries and payments shall be the registered offices of our

company.

11.2 The laws of the Federal Republic of Germany shall be applicable, to the exclusion of uni-

form international law on trade in merchandise (EKG and EKAG).

11.3 Our terms and conditions of sale shall remain binding in all other aspects even if indivi-

dual points prove to be legally invalid. The invalid provisions shall be deemed to have be-

en replaced by that which is legally permissible. 

11.4 Either the court with jurisdiction over our place of business or Stuttgart shall be deemed to

be the agreed and exclusive place of jurisdiction for all claims that may arise, now or in

the future, from any business relationship with registered traders, legal entities under pu-

blic law, or operators of assets under public law within the Federal Special Fund. The sa-

me shall apply if the customer has no general place of jurisdiction within Germany or re-

moves his place of registered or usual residence from Germany after the contract has be-

en concluded, and if his place of registered or usual residence is unknown at the time the

action is raised.

12.

The German text of these General Terms and Conditions shall be solely

binding, and shall take precedence over any translation prepared for

convenience only.

Содержание PHARO Shower Temple 100 Series

Страница 1: ...Montageanleitung Duschtempel 100 Installation instructions 100 EL 40 29250 29270 100 ML 40 29200 29220 Deutsch English ...

Страница 2: ......

Страница 3: ...che Daten Hilfe EL 40 19 Bedienung und Wartung ML 40 28 Technische Daten Hilfe ML 40 30 Pflegehinweise 31 Allgemeine Geschäftsbedingungen 60 English Delivery list 32 The Shower Temple 100 at a glance 33 Measurements 34 For your safety 36 Preparation for assembly 37 Tools fixings 38 Erecting the shower tray 39 Mounitng roof installation unit and columns 40 Fitting door 43 Fitting and sealing the si...

Страница 4: ...1x Wannenfüße verstellbar 4x Dach mit Installation von Kopfbrause und Beleuchtung 1x Paket 2 Installationsprofil mit Anschlussschläuchen und Seitenbrausen 1x Klemmleisten für Seitenscheiben 1x Rundsäulen 2x Befestigungsset 1x Trafo 1x Handbrause Aktiva A8 und Isiflex Brausenschlauch 1x Montageanleitung und rub it Aufsätze Paket 3 Tür aus Sicherheitsglas mit Scharnier und Türgriffen 1x Seitenscheib...

Страница 5: ...Brauseschlauch Normalstrahl Normalstrahl Softstrahl Softstrahl Massagestrahl und Monostrahl Massagestrahl und Monostrahl Wasserdurchfluss stufenlos Wasserdurchfluss stufenlos regulierbar regulierbar 4 Seitenbrausen Rub it 4 Seitenbrausen Rub it Thermostat DN15 G 1 2 DN15 G 1 2 Beleuchtung 3 Halogenstrahler 12 Volt 10 Watt 3 Halogenstrahler 12 Volt 10 Watt Bedienelemente Thermostatgriff mit Sicherh...

Страница 6: ...Vierwegeumstellung Absperrventil Seitenbrause rub it Duschwanne Stahl Schürze Duschtempel 100 ML 40 Art Nr 29200 292201 1 Art Nr entspricht der Abbildung DIN Rechtsanschlag Dach mit integrierter Halogenbeleuchtung Profil Seitenscheiben Echtglas Handbrause Aktiva A8 Isiflex Brausenschlauch Tür Echtglas Kopfbrause Seifenablage mit Reling elektronisches Bedienelement Seitenbrause rub it Duschwanne St...

Страница 7: ...ersorgung Innen Ø 25 Pg 29 DT 100 EL40 Innen Ø 25 Pg 21 DT 100 ML40 55 Erforderliche Raumhöhe für die Montage 2 4 m Aufstellbereich Duschwanne waagerecht vorbereiten Achtung Duschwanne muss unter die Fliesen gestellt werden deshalb untere Fliesenreihe im Bereich Duschwanne aussparen mind 170 mm max 210 mm Die Duschwanne kann max 10 mm eingelassen werden Maße in mm angegeben Deutsch ...

Страница 8: ...tzen der Trafo darf nicht mehr betrieben werden Ein defekter Trafo ist an den Hersteller einzusenden oder der technische Kundendienst ist zu benachrichtigen Entspre chendes gilt wenn eine Sicherung ausgelöst wurde Trafo und Netzstecker müssen jederzeit frei zugänglich sein Der Trafo ist beim DT 100 ML 40 mit 7 m Anschlusskabel versehen Beim DT 100 EL 40 ist das Anschlusskabel 7m mit der Installati...

Страница 9: ...wie der Seiten brausen erfolgt durch die Installationseinheit Der Idealbereich für die Zuleitungsanschlüsse befindet sich im Eckbereich hinter dem Profil Stromversorgung 230 V 50 60 Hz Leerrohr für Stromversorgung elektronisch Ø 25 Leerrohr für Stromversorgung manuell Ø 25 wahlweise links oder rechts von der Ecke Empfohlener Innen Durchmesser um ein Verkanten des Anschlusskabels im Leerrohr zu ver...

Страница 10: ... 6x50 Dübel Ø8 und Unterlag scheiben A6 4 zur Befestigung Wandhalter 2 x Flachrundschraube M8x30 Sechskantmutter M8 und Un terlagscheiben A8 5 zur Befestigung Stützgestell 2 x Senkschraube M6x20 Flügelmutter M6 und Unterlagschei ben A6 4 für Befestigung der Installationseinheit 2 x Sechskantschraube 10x40 für Befestigung Säulen 4 x Senkschraube M10 x 30 für Befestigung Säulen 4 x Abdeckkappe Türbe...

Страница 11: ...oden Sollmaß mind 2 mm Duschwanne ausrichten und fixieren Duschwanne aufstellen und waagerecht ausrichten Mit Was serwaage Wannenposition prüfen Wannenfüße kontern Befe stigungspunkte 6 7 auf Wand und Boden übertragen Dusch wanne wieder entfernen Wandbefestigungspunkte 6 Ø 10 und Bodenbefestigungspunkte Ø 8 bohren Dübel setzen Wan nenposition und Lage prüfen In der Ecke die Wanne mit Gewindebolzen...

Страница 12: ... abdichten Befestigungspunkte der beiden Haltewinkel 3 links und rechts markieren körnen und bohren Ø6 Haltewinkel mit Kreuzschlitz Holzschrauben 5x35 festschrauben Befestigungspunkte der Wandbefestigung mit Sechskant Holz schrauben 6x50 und U Scheibe 6 4 x 10 6 festschrauben Montage Klemmleiste Klemmprofil 5 von der Klemmleiste 4 trennen Befestigungs punkte der Klemmleisten 2 links und rechts auf...

Страница 13: ...6 5 9 10 11 1 2 3 7 8 4 Säulen mit Gleitring 1 Unterlagscheibe 2 und Muttern 3 si chern Muttern handfest anziehen Montage Stützgestell Stützgestell 4 auf die Wandbefestigung und die Säulen legen Dekorringe 8 auf die Säulen setzen Stützgestell auf den Säu len mit Stützring 7 U Scheibe 6 und Sechskantschraube 5 M10x40 sichern Sechskantschraube handfest anziehen An der Wandbefestigung Schlossschraube...

Страница 14: ...gen um die Installationseinheit für Wartungsarbeiten aushängen zu können Installationsprofil 1 oberhalb der Haltewinkel 2 gegen die Wand drücken und vorsichtig nach unten gleiten lassen bis es auf dem Wannenrand steht Installationsprofil mittig auf die Ecken ausrichten Installationsprofil mit Flügelmutter 3 und Spanplatte 4 festklemmen Sterngriffschraube lösen und ca 1 5 cm aufdrehen Dach montiere...

Страница 15: ...timal schließt muss die Tür gleichmäßig an der Dichtlippe anliegen Dabei müssen die Türkanten parallel zu den Säulen verlaufen Anlage der Tür zur Dichtlippe hin prüfen Tür muss oben und unten an der Dichtlippe anliegen Durch Lösen der Kreuzschlitzschraube 6 am unteren Scharnier kann die Neigung der Tür zur Dichtlippe hin verstellt werden Parallelität der Türkanten zu den Säulen einstellen Die Türk...

Страница 16: ...hnen 4 Scheibe ausbauen und Dichtprofil kürzen Vor dem erneuten Einsetzen der Scheibe ist die Nut der Säulen im Bereich der Duschwanne 1 mit essigsäurefreiem Silikon ab zudichten Scheibe über das Klemmprofil mit Innensechskantschrauben M6x10 6 sichern und Dichtkappen 5 auf die Schrauben stecken 1 2 3 5 4 6 7 8 20 30 20 2 0 3 0 Dichtkeil einsetzen Dichtkeil 7 mit beiliegendem Silikonfett leicht ein...

Страница 17: ...bgleich Motorabgleich Um eine einwandfreie Funktion des Duschtempel zu gewähr leisten ist nach der Inbetriebnahme ein Thermostatabgleich durchzuführen wie in Abschnitt Bedienung und Wartung be schrieben Duschtempel elektronisch Motorabgleich Seite 19 Duschtempel manuell Thermostatabgleich Seite 29 Abschlussprüfung Zur Funktionsprüfung Isiflex Brausenschlauch und Handbrause Aktiva A8 mit Siebdichtu...

Страница 18: ...lenkombination bilden sich bei aktiver LCD Hinter leuchtung die ermittelten be dienbaren Geräte ab Daraufhin erscheint je weils ein blinkender Punkt innerhalb der be dienbaren Anlagenkom ponenten Die Anlage befindet sich jetzt im Zustand Sleep AUS Ta stenbeleuchtung Displaybe leuchtung und die gesamte Anlage sind abgeschaltet Das Gerät kann jetzt durch Betätigung irgend einer Taste wieder in den Z...

Страница 19: ...en automatisch ab Werkseitige Einstellung 2 Mi nuten individuell einstellbar 1 50 min siehe Seite 22 Der Motorabgleich kann mit der Taste 42 abge brochen werden es gilt dann die zuletzt gültige Werkein stellungskurve und so einfach gehts Der Duschtempel muss sich im Zustand Stand by befinden Display ist hinterleuchtet kei ne Funktion aktiv Beim Mo torabgleich wird die Hand brause automatisch aktiv...

Страница 20: ...usenkom binationen Beispiel 1 Kopf und Seitenbrausen Beispiel 2 Hand und Seitenbrausen Temperatureinstellung Mit den Tasten und kann die Temperatur ein gestellt werden Für Temperaturen über 42 C Gleichzeitiges Drücken der Tasten und 42 Erneutes Drücken der Mode Taste Rückkehr zur Tem peratureinstellung 42 Verbrühschutz Der Verbrühschutz verhindert das Einstellen von Temperatu ren über 42 C Hydroma...

Страница 21: ... Mode Taste Das Display zeigt an PO2 Programmpunkte Werkseinstellungen abrufen verändern Obere Rückstellgrenze Ins Programm Menü gelan gen Tasten 42 und Lichttaste für mindestens 5 Sekunden Drücken bis die Anzeige PAr im Display erscheint Danach Mode Taste drücken Das Display zeigt nun die An zeige P00 Nochmaliges Drücken der Mode Taste lässt den Wert 42 C erschei nen Mit den Tasten ist der Wert i...

Страница 22: ...rscheint Mit den Tasten und ist der Wert innerhalb der Grenzen 1 min bis 50 min einstellbar Gespeichert wird mit der Mode Taste Das Dis play zeigt an PO4 Konfigurationscode Gibt dem Service Techniker Aufschluss über die ange schlossenen Geräte Code nicht verstellbar Mit der Taste kommt man zum nächsten Programm punkt PO5 Drücken der Mode Taste Ein drei stelliger Konfigurationscode erscheint Softwa...

Страница 23: ... Werksein stellungen Tasten 42 und Kopf brause mindestens 5 s lang drücken bis die Anzeige RES erscheint Rückholen ab brechen Taste 42 nochmals drücken Mode Taste drücken Reset Vorgang wird ausgeführt Rückholen der Werksein stellungen Mischer Tem peratur Stellungskurven Zurücksetzen aller Werte der Anlagenkonfiguration auf die Werkseinstellungen Tasten 42 und Hydromassage min destens 5 s lang drüc...

Страница 24: ... signalisieren ebenfalls unge wöhnliche Betriebszustände Der weitere Duschbetrieb bleibt je doch im Gegensatz zur Warnung bis zur Fehlerbehebung völlig unterbrochen Eine mögliche Gefährdung des Benutzers wird somit ausgeschlossen Auflistung der möglichen Warnungen Fehlermeldungen im Display K4 Warnung mögliche Ursache A01 Motorstrom des Thermostatmotors zu klein Leitungsbruch Steckverbindung A03 M...

Страница 25: ...pterhülse abnehmen Regel Element herausnehmen und Siebe reinigen 7 Einbau in umgekehrter Reihenfolge durchführen 8 Weiße Adapterhülse wieder aufstecken und Regel Element bis Anschlag nach rechts drehen 9 Stromversorgung wieder herstellen 10 Motorabdeckung wieder aufstecken 11 Motorabgleich durchführen siehe Seite 19 1 2 3 Frostgefahr Rohrleitung entleeren Vorabsperrung öffnen Rückflussverhinderer ...

Страница 26: ...eingesetzt werden Warmwasserversorgung Die Warmwasserversorgung am Versorgungsanschluss muss mind 2 C höher als die gewünschte Mischwassertemperatur sein Die Temperaturdifferenz am Versorgungsanschluss sollte 50 C betragen Druckunterschiede Druckunterschiede zwischen Kalt und Warmwasseranschluss müssen ausgeglichen werden Transformator Sicherungen Technische Daten Netzanschluss 230V 60 50 Hz Nenna...

Страница 27: ...ahler 12V 10W austauschen leuchtet nicht Es läuft kein Wasser nach Stockwerksabsperrung Stockwerksabsperrung öffnen dem die Tastatur betätigt geschlossen wurde Vorabsperrung geschlossen Vorabsperrung öffnen Schmutzfangsiebe verschmutzt Schmutzfangsiebe reinigen Thermostat warten Nach einiger Zeit des Warmwasserspeichermenge Warmwasserspeichermenge oder Duschens verstellt sich zu gering Speichertem...

Страница 28: ...entils selbsttätig ab Die Einschaltautomatik kann überbrückt werden um die Be leuchtung über einen externen Schalter ein und ausschalten zu können Schalter ist im Lieferumfang nicht enthalten Schaltbild siehe Seite 29 Die Überbrückung muß von einem zugelasse nen Fachmann durchgeführt werden Seitenbrausen warten Die Seitenbrausen sind mit dem Reinigungssystem rub it ausge stattet Vorteil Kalkablage...

Страница 29: ...ausdrehen SW 17 6 Schmutzfangsiebe reinigen 7 Einbau in umgekehrter Reihenfolge durchführen Bei Frostgefahr und Entleerung der Rohrleitung Vor absperrung öffnen Rückflussverhinderer ausbauen SW 17 Installationseinheit durch Ausblasen mit Druckluft wasserfrei machen Schaltbild 1 Beleuchtung wird über Wasserdruck Sensor eingeschaltet 2 Beleuchtung wird über externe Schalter eingeschaltet Die Install...

Страница 30: ...sen Vorabsperrung öffnen Schmutzsiebe im Thermostat Schmutzsiebe reinigen verstopft Beleuchtung funktioniert nicht Leuchtmittel defekt Leuchtmittel austauschen Verbindungskabel auf dem Verbindungskabel einstecken Dach nicht eingesteckt Transformator oder Trafo an Hersteller einsenden Druckschalter defekt Nach einiger Zeit des Warmwasserspeichermenge Warmwasserspeichermenge oder Speichertemperatur ...

Страница 31: ... einem Tuch polieren Das Hansgrohe Reiniger Set Best Nr 90921 bestehend aus Schnellentkalker Brillant Color Reinigungstücher Biff Supra Bad Reinigungskonzentrat Rakel Reinigungstuch erhalten Sie im Sanitärfachhandel Keine aggressiven oder säurehaltigen Reinigungsmittel Scheuermittel oder Essigreiniger verwenden Vorsicht im Umgang mit Kosmetika und Desinfektionsmittel An den Installateur Weisen Sie...

Страница 32: ...able shower tray feets 4x Roof with integrated over head shower and lighting set 1x Pack 2 Installation profile with supply hoses and body showers rub it 1x Clamping ledges for side glass panels 2x Columns 2x Attachment set 1x Transformer 1x Hand shower Aktiva A8 and Isiflex shower hose 1x Pack 3 Door of safety glasses with hinge and door handles 1x Side panels of safety glasses with sealing strip...

Страница 33: ...shower hose shower hose Normal spray Normal spray Soft spray Soft spray variable flow restrictor variable flow restrictor 4 body showers Rub it 4 body showers Rub it Thermostat DN15 G 1 2 DN15 G 1 2 Lighting 3 Halogen spotlights 12 Volt 10 Watt 3 Halogen spotlights 12 Volt 10 Watt Operating elements Thermostat handle with safety stop Electronic operating pad with On off control Sensor keys Quattro...

Страница 34: ...n off control Body shower rub it Steel shower tray Shower tray skirting Shower Temple 100 ML 40 Order No 29200 292201 1 Order number corresponds to the diagramm right hand stop Roof with integrated Halogen lighting Profile Side panels of pure glass Hand shower Aktiva A8 Isiflex shower hose Door of pure glass Overhead shower Soap recess with rail Electronic control pad Body shower rub it Steel show...

Страница 35: ...55 The required installation height is 2 4 m Level the area where the Shower Temple is going to be erected The maximum tile depth must not exceed 10mm Before mounting the Shower Temple tile the room excluding the wall near to the shower tray Tiling the wall next to the shower tray after the shower tray is erected Seal the complete gap between shower tray and wall with suitable bathroom filler Meas...

Страница 36: ...hot and cold water supply pipes and the steel shower tray are earthed It is forbidden to replace a damaged mains connection the transformer cannot be operated Send defective transformer to the manufacturer or call the technical service the same is required if a fuse is released The transformer and the plug should be installed outside the bathroom in an accessible area The Shower Temple comes with ...

Страница 37: ...e installation unit The best place for the supply connections is at the corner behind the profile Power supply 230 V 50 60 Hz Hollow pipe for power supply Electronic EL40 interior diametre 35 Manual ML40 interior diametre 25 Alternatively left or right at the corner recommended diameter to prevent stoppage of the connecting cable in the hollow pipe Concealed water supply Alternatively left or righ...

Страница 38: ...ttaching wall bracket 1x Head screw M8x30 washer A 8 5 and hexagon nut M8 for mounting support frame 2x Countersunk nut M6x20 washer A 6 4 and wing nut M6 for mounting installation unit 2x Hexagonal nut M10x40 washer A 10 5 for mounting support frame 4x Countersunk screw M10x30 washer A 10 5 for fixing columns 4x Cover cap 8x Cover cap 2x Sealing strip Attention Do not brick in the shower tray unt...

Страница 39: ...nd positioning shower tray Position shower tray and align horizontally Check with spirit level the horizontal level of the shower tray Fix shower tray feet Mark fitting points 6 7 to wall and floor Remove shower tray Drill holes at fixing points on wall 6 Ø10 and floor 7 Ø8 insert dowels Check position and level of the shower tray Fix the shower tray with bolt 1 and sound insulation hollow pipe in...

Страница 40: ...ee from acetic acid Mark left and right fixing point of the holding angle 3 punch and drill holes Ø6 Secure holding angle with Phillips screw 5x35 Mark left and right fixing point of the wall holder 1 punch and drill holes Ø8 Secure wall holder with hexagonal wood screws 6x50 and washer 6 4x10 6 Mounting clamping ledge Separate clamping profile 5 from clamping ledge 4 Mark left and right on the wa...

Страница 41: ...e shower tray Secure columns with slide disc 1 washer 2 and nut 3 Tighten nut by hand Mounting support frame Lay support frame 4 onto the columns and wall holder Lay decor ring 8 onto columns Secure support frame onto columns with support ring 7 washer 6 and hexagonal head screw 5 M10x40 Tighten hexagonal head screw by hand Fit screw 11 M8x30 from the underside coming into the wall holder Secure s...

Страница 42: ...stop on the rim of the shower tray Centre installation unit in the corner Fix installation unit with wing nut and clamping plate Loosen star knob screw and turn on 1 5 cm Mounting roof Pre mount on the support frame the screw 9 with washer 8 and nut 7 Slide roof between installation unit and the wall holder Fit screw 9 into the cut out of the roof 10 Loosen 12 wing nut Slide distance equaliser 13 ...

Страница 43: ... the parallel position of the door to the columns The distance 7 between door and column should be 4 mm Loosen clamping screw 2 by using an Allen key size 4 Equalise door Tighten clamping screw 5 and fixing screw 8 Fix the cover cap The tension screw 5 is under spring pressure be careful to prevent damages at the column Adjusting the closing force of the door If the door is left handed the tension...

Страница 44: ...ark the sealing profile respectively 4 Remove side glass panel and cut off the sealing profile Before insert the side glass panel seal the groove in the area next to the shower tray 1 Secure the side glass panel with the clamping ledge by using hexagonal head screw M6x10 6 Put on the cover caps 5 1 2 3 5 4 6 7 8 20 30 20 2 0 3 0 Inserting the sealing profile Lightly grease the sealing profile 7 wi...

Страница 45: ...mains supply 230 V 50 60 Hz Thermostat alignment motor alignment To guarantee the function perform after initial use the alignment as described in chapter Operating and servicing Electrical Shower Temple motor alignment page 47 Manual Shower Temple thermostat alignment page 57 Final checks For perfect function check connect the Isiflex shower hose with the Aktiva A8 hand shower Include the mesh wa...

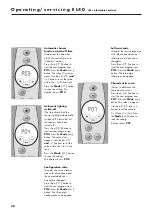
Страница 46: ...nized by the system Shortly afterwards the units which can be operated are shown with LCD background lighting on A flashing dot is then shown within the system components that can be used The system is now in sleep mode OFF Button lights display lights and the whole system are switched off Pressing any button returns the system to stand by mode ready for use Light button Warm water temperature abo...

Страница 47: ... Factory setting 2 minutes individually adjustable 1 50 min refer to Page 50 Pressing the 42 button stops motor adjustment prematurely the last valid factory setting curve is then applicable and it is as simple as this The Shower Temple must be in stand by mode display has background lighting no func tions are active The hand shower is activated automati cally during motor adjustment First press t...

Страница 48: ...mple 1 Overhead and body showers Example 2 Hand and body showers Setting the temperature Use the and buttons to set the temperature For temperatures above 42 C Press the and 42 buttons simultaneously Pressing the Mode button again Return to temperature setting 42 Protection against scalding Protection against scalding prevents setting temperatures above 42 C Hydromassage First activate the Body sh...

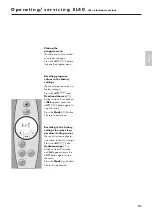
Страница 49: ...0 C limits Press the Mode button to save the setting The display shows PO2 Program items Factory settings Setting Adjusting Upper reset limit Starting the program menu Press the 42 and Light but tons for at least 5 seconds until PAr appears on the display Now press the Mode button The display now shows P00 Press the Mode button again to display the value 42 C Now use the buttons to adjust the valu...

Страница 50: ...rs Use the and buttons to set the value within the 1 to 50 min limits Press the Mode button to save the setting The display shows PO4 Configuration code Provides the service techni cian with information about the connected devices Cannot be changed Press the button to start the next program item PO5 Press the Mode button The three digit configuration code appears Software code Provides the service...

Страница 51: ...ctory settings Press the 42 and Overhead shower buttons at least 5 seconds un til RES appears press the 42 button again to stop the reset Press the Mode button The reset is performed Resetting to the factory settings for mixer tem perature setting curves Resets all system configura tion values to factory settings Press the 42 and Hydromassage buttons at least 5 seconds until trC appears press the ...

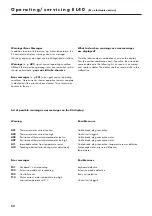
Страница 52: ...itions Here however shower operation remains complete ly blocked until the error has been cleared This prevents any hazards to the user List of possible warnings error messages on the K4 display Warning Possible cause A01 Thermostat motor current too low Cable break plug connection A03 Thermostat motor current too high Control unit sluggish A05 Resistance of thermostat potentiometer too low Cable ...

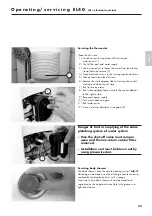
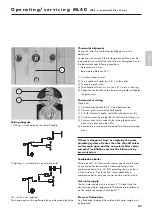
Страница 53: ...ite adapter sleeve and turn the control element to the right to stop 9 Reconnect power supply 10 Push motor back on again 11 Refit motor cover 12 Carry out motor adjustment see page 47 1 2 3 Danger of frost or emptying of the entire plumbing system of water system then the shut off valve must remain open and the non return valves filter removed Installation unit must be blown out by using pressuri...

Страница 54: ... The hot water supply must be at least 2 C higher than the desired mixed water temperature The temperature difference on the supply connection should be 50 C Pressure fluctuations Any fluctuations between the cold and hot water supply must be balanced Technical Data Power supply 230V 50 60Hz Rated output 35 VA Transformer Protection Class II Protection type IP 65 Minimum water pressure 1 5 bar Rec...

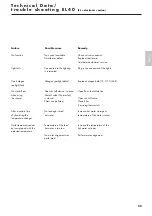
Страница 55: ... V 10 Watt spotlight fails No water flow Floor shut off device is closed Open floor shut off device when using Shut off valve Thermostat the shower is closed Open shut off valve Filters are polluted Clean filter Servicing thermostat After a certain time Not enough stored Increase hot water storage or of showering the hot water temperature of the water stored temperature changes Outlet temperature ...

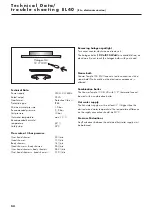
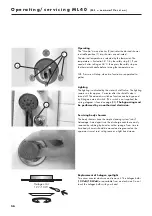
Страница 56: ...prox 2 minutes after the shut off valve is turned off The automatic switch on function can be bypassed by fitting an external switch This switch is not supplied the wiring diagram is found on page 55 The bypassing must be performed by an authorised electrician Servicing body showers The body showers have the simple cleaning system rub it Advantage Lime deposits on the discharge nozzle are easily r...

Страница 57: ... them counter clockwise check and clean filter 6 Reassemble in reverse order and perform thermostat align ment If there is danger of frost or emptying the entire plumbing system of water then the shut off valves must remain open and the non return filter valves removed Installation unit must be blown out by pressurised air Wiring diagram 1 Lithing is switched on by the shut off handle 2 Lighting i...

Страница 58: ...alve of the Open shut off valve thermostat is closed Filter is polluted Clean filter Light fails Halogen bulb defect Replace halogen bulb Connection to the lighting Plug in the connector of the lights is interrupted Transformer defect Replace transformer Pressure switch defect Contact technical service After a certain time of Not enough stored hot water Increase stored hot water or the temperature...

Страница 59: ...metic products or disinfecants Care of glass shelves and mirror To remove grease stains cosmetics etc wipe with a chamois cloth and lukewarm warm water Remove drip marks around the edge with a soft dry cloth Don t use window cleaning products or chemicals as these would damage the special coating of the mirror and may cause brown spots We are not responsible for damage caused by disre gard of thes...

Страница 60: ...bunden und oder vermischt steht uns Miteigentum zu und zwar im Verhältnis des Rech nungswertes unserer Waren zu diesen anderen Waren zum Zeitpunkt der Verarbeitung Verbindung oder Vermischung 7 2 Der Käufer darf unsere Vorbehaltsware nur im gewöhnlichen Geschäftsverkehr und nur dann veräußern wenn er uns gegenüber nicht im Zahlungsverzug ist Zu anderen Verfü gungen über die Vorbehaltsware z B Sich...

Страница 61: ... in the event of our goods having been installed If the contract goods are processed joined and or mixed with other goods we shall be entitled to co ownership over the resultant product in the same proportion as the invoice value of our goods to these other goods at the point in time when they were processed joined or mixed 7 2 The customer shall only resell our retained goods in the normal course...

Страница 62: ......

Страница 63: ......

Страница 64: ...s D1 and D2 Sandown Park Trading Estate Royal Mills Esher Surrey UK KT10 8BL Telephone 44 0 13 72 46 56 55 Facsimile 44 0 13 72 47 06 70 e mail sales hansgrohe co uk homepage www hansgrohe co uk Griechenland Niveco SA Posidonus Ave 46 GR 17561 P Faliro Tel 30 0 1 9 88 01 80 Fax 30 0 1 9 88 38 47 Ungarn Hansgrohe Vertriebsbüro Tomas Koeszeghy Kuelso Vaci UT 53 H 1047 Budapest Tel Fax 36 0 1 3 69 64...

Отзывы: