43
English
F i t t i n g d o o r
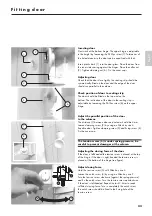
Inserting door
Start work at the bottom hinge. The upper hinge is adjustable
in the height by loosening the Phillips screw (7). Tolerances of
the hole distances in the door can be equalised with that.
Insert plastic bush (1) into the door glass. Place the door from
the inner side coming against the hinges. Place the collar nut
(2). Tighten clamping nut (6) . Fix the cover caps
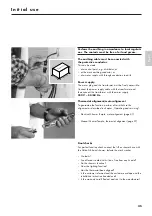
Adjusting door
Check that the door close tightly, the sealing strip should be
symmetrically fitted on the door and the edge of the door
should run parallel to the columns.
Check position of door to sealing strip
The door should be fitted on the top and on the
bottom. The inclination of the door to the sealing strip is
adjustable by loosening the Phillips screw (6) on the upper
hinge.
Adjust the parallel position of the door
to the columns:
The distance (7) between door and column should be 4 mm.
Loosen clamping screw (2) by using an Allen key size 4.
Equalise door. Tighten clamping screw (5) and fixing screw (8).
Fix the cover cap.
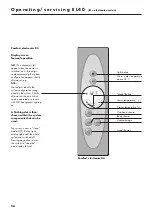
The tension screw (5) is under spring pressure, be
careful to prevent damages at the column.
Adjusting the closing force of the door
If the door is left-handed the tension screw is placed at the top
of the hinge, if the door is right handed the tension screw is
placed at the bottom of the hinge (see figure).
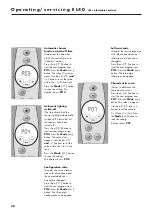
Adjust closing force
Hold the tension screw (5) with Allen key size 4.
Loosen the notch screw (4) by using an Allen key size 2.
Turn the tension screw clockwise (against the spring pressure)
and fix the notch screw. Turn the tension screw anticlockwise
if the door is left-handed. Repeat the task 3 times to reach
sufficient closing force. Turn in completely the notch screw,
the notch screw should be fixed in the fixing hole of the
tension screw.
1
2
3
4
5
6
7
8


