EZMaster
EZMaster
User’s Guide
Page 13 of 53
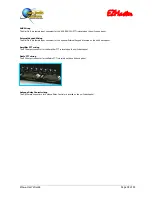
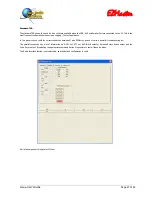
You can easily locate the DIPswitch by removing the EZMaster box top panel.
Unscrew the 4 screws on the box top to remove the top panel.
Locate the DIPswitch in the front-right corner, just behind the front panel’s
microphone connectors.
Look at the picture to see where the DIPswitch is really located.
Set the configuration you may need.
Put back the top panel to safely close the unit.
The table below shows how to set each DIPswitch pin depending on the microphone/radio manufacturer.
Manufacturer
DIP1 DIP2 DIP3 DIP4 DIP5 DIP6 DIP7 DIP8
Icom
ON
OFF
ON
OFF OFF
ON
OFF OFF
Yaesu
OFF OFF OFF
ON ON
OFF
ON
OFF
Kenwood
ON ON
OFF OFF OFF OFF OFF
ON
The usage of different microphone models may still be possible by using an adapter cable.
Moreover, two headphone 6.3mm stereo jacks are also available on the front panel to connect two headphone sets.
This configuration introduces the unique “
Twin Headphones”
feature to allow the simultaneous listening by two operators on two
radios.
See the Twin Headphones section for details.
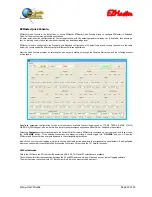
The Front Panel Keypad MENU
This MENU, which is a multilevel menu, allows an easy way to enter and execute some commands, mainly to administer the unit.
You can enter the MENU function by simply press either the UP or the DOWN Arrow.
Continuing to press the arrow you can browse, up or down, through the menu itself.
The MENU currently has 3 (three) items at the first level, while each item has also a second level MENU.
The table below represents the multi level MENU.
FIRST LEVEL
SECOND LEVEL
Comment
Set EZMaster Mode
Set Standard Mode
Set EZMaster to the Standard Mode
Set Extended Mode
Set EZMaster to the Extended Mode
Set Advanced Mode
Set EZMaster to the Advanced Mode
Exit
Exit
this
level
Firmware Download
Press RET to Start
Start the new Firmware download
Exit
Exit
this
level
Reset
Press RET to RESET
Performs a Hardware Reset
Exit
Exit
this
level
Pressing RET, while on a first level item, you enter the associated second level. You can browse this level again by pressing the UP or
DOWN arrows. Pressing RET again on a second level item will execute the associated command as represented in the table above.
Each second level can always be exited by pressing RET on the Exit command.
The EXIT brings you to the corresponding upper level menu item.
Содержание EZMaster
Страница 52: ...EZMaster EZMaster User s Guide Page 52 of 53 Mainboard Printed Circuit Rev 4 00...
Страница 53: ...EZMaster EZMaster User s Guide Page 53 of 53 Take your Personal Notes here...
Страница 72: ...Microphone Cable ICOM EzMaster Back Panel View IcomMic EZMaster 1 4 7 5 5 2 6 3 Cable Lenght 90 cm...
Страница 73: ...Microphone Cable YAESU EzMaster Back Panel View YaesuMic EZMaster 8 4 7 5 6 2 5 3 Cable Lenght 90 cm...
Страница 74: ...Microphone Cable Kenwood EzMaster Back Panel View Kenwood Mic EZMaster 1 4 7 5 2 2 8 3 Cable Lenght 90 cm...
Страница 75: ...Microphone Cable Orion EzMaster Back Panel View Orion Mic EZMaster 2 4 1 5 3 2 4 3 Cable Lenght 90 cm...
Страница 78: ...CW Cable RCA Connector Jack 6 3 Cable Lenght 150 cm...
Страница 81: ...Radio YAESU Cable MiniDin 6 DIN 6 Cable Length 90 cm EzMaster Back Panel View DIN 6 MiniDin 6 1 GND 2 4 3 5...
Страница 85: ...RTTY FSK AFSK ORION Cable MiniDin 8 DIN 8 Cable Length 150 cm DIN 8 MiniDin 8 7 1 2 2 3 3 2 4 1 6 2 5 4 6 7 2 8...


