Halcyon H50-01-NG Скачать руководство пользователя страница 16

Halcyon

 Gas Fireplace                                                                                                                                                                          European

Home

.com

16

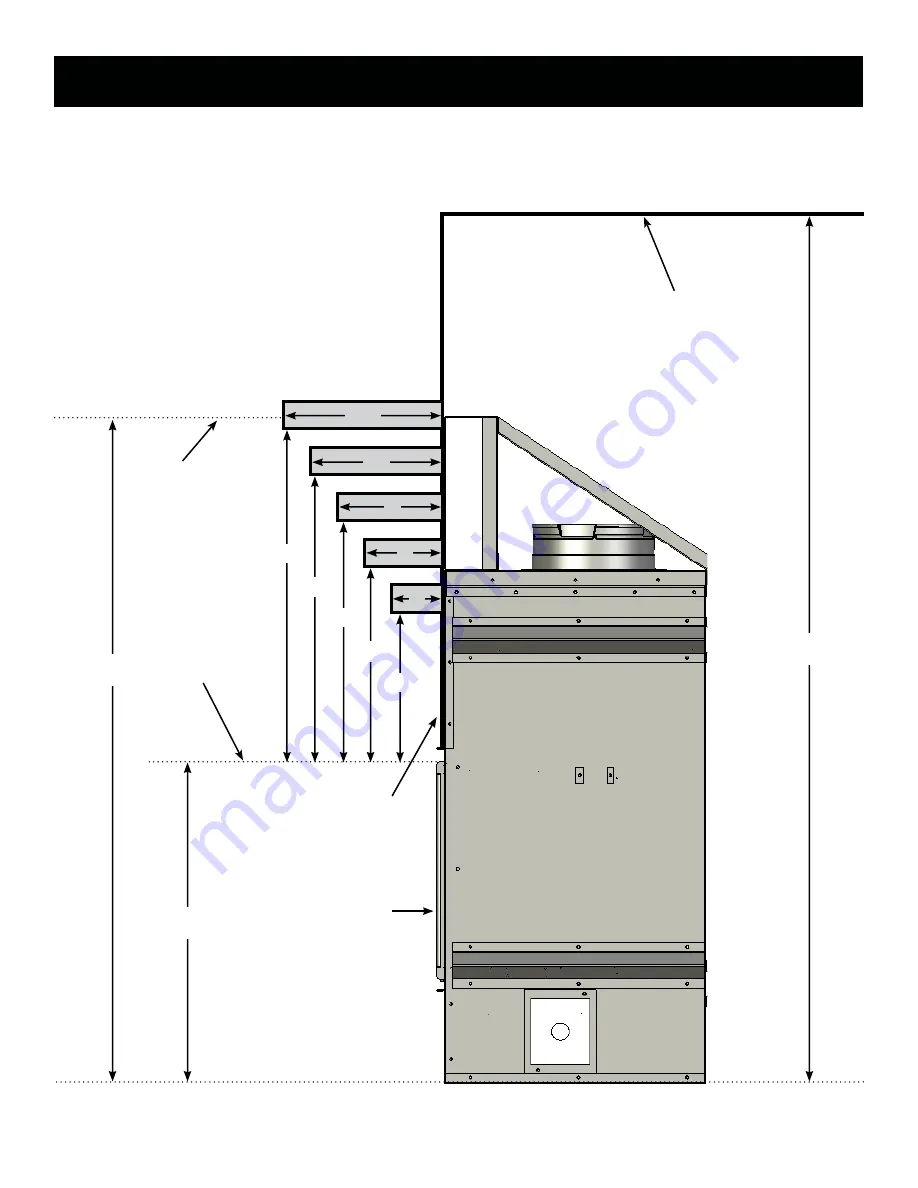
Figure 12 - Mantel, Ceiling and Enclosure Clear-

ances (right side view)

MINIMUM CLEARANCES to COMBUSTIBLES

Non

-combustible 

Wall Face

Glass Panel

Top Line of 

Glass

Panel Frame

4”

6”

8”

10”

22”

20½”

19”

17½”

16”

44”

57½”

Ceiling

Line

Enclosure

Top

21”

12”

Содержание H50-01-NG

Страница 1: ...06 5 WARNING If the information in these instructions is not followed exactly a fire or explosion may result causing property damage personal injury or loss of life Do not try to light any appliance...

Страница 2: ...FIREPLACE 38 COMPLETING the INSTALLATION 40 MAINTENANCE 43 TROUBLESHOOTING 45 INSTALLATION RECORD 47 Appendix A LP Gas Conversion 49 These symbols appear throughout this Manual This WARNING symbol ind...

Страница 3: ...irement 8 The area around the Halcyon Gas Fireplace must be kept clear and free from combustible materials gasoline and other flammable vapors and liquids 9 The flow of combustion and ventilation air...

Страница 4: ...height of eight 8 feet above grade directly in line with the exhaust vent terminal for the horizontally vented gas fueled heating appliance or equipment The sign shall read in print size no less than...

Страница 5: ...157 8 C Glass Frame Height 145 16 D Viewable Height 123 4 E Bead to Floor 6 F Total Width 59 G Bead to Bead Width 513 4 H Glass Frame Width 501 2 I Viewable Width 483 4 J Cabinet Width Standoffs 561 4...

Страница 6: ...9 16 M Depth With Standoffs 18 N Depth Minus Standoffs 17 O Rear of Cabinet to Center Line of Vent Collar 71 4 P Rear of Cabinet to Center Line of Gas Access 87 16 Q Bottom of Cabinet to Center Line o...

Страница 7: ...replace is installed and operated OMNI Test Laboratories Inc has certified that the Halcyon Gas Fireplace meets the ANSI Z21 88 2007 CSA 2 33 2007 Vented Gas Fireplace Heaters and CAN CGA 2 17 M91 Gas...

Страница 8: ...tion instructions Keep burner and control compartment clean See installation and operating instructions ac companying appliance WARNING Improper installation adjustment alteration service or maintenan...

Страница 9: ...clearances 1 Rough Installation Build the rough frame and install the Fireplace 2 Electric Installation The electric supply connections and the control switches 3 Gas Installation The gas hook up 4 Ve...

Страница 10: ...vent A number of installation styles are possible a corner an island a peninsula built into a wall or enclosed by walls For maximum performance you should choose a Fireplace location which minimizes t...

Страница 11: ...re W and the minimum distance between a room ceiling and the bottom of the Halcyon V Figure 8 shows the relationship between a room ceiling V and an enclosure or chase ceiling W S U T Figure7 RoughOpe...

Страница 12: ...talled in a simple bump in enclosure If your installation requires more duct it is available through your retailer or from European Home NOTE A grille for each duct box is NOT included and must be pro...

Страница 13: ...e chart representing your run and the two numbers left and right columns of the chart representing your rise Mark the point at which the lines intersect If that point falls in a black area the configu...

Страница 14: ...Note 3 3 ft 91 cm within a height of 15 ft 4 5 m above the meter regulator assembly I Clearance to a service regulator vent outlet See Note 3 3 ft 91 cm J Clearance to non mechanical air supply inlet...

Страница 15: ...e proofed made fire resistant orare fire rated they are considered combustible The combustibility of a material can be tested per ASTM E136 StandardTestMethodforBehaviorofMaterialsinaVerticalTube Furn...

Страница 16: ...16 Figure12 Mantel CeilingandEnclosureClear ances rightsideview MINIMUM CLEARANCES to COMBUSTIBLES Non combustible Wall Face Glass Panel Top Line of Glass Panel Frame 4 6 8 10 22 201 2 19 171 2 16 44...

Страница 17: ...lcyon cabinet may be no closer to the room ceiling than 44 The minimum height of an enclosure is 571 2 Figure 13 shows the combustible facing limits for the Halcyon Gas Fireplace Combustible wall faci...

Страница 18: ...01 LP Gas Conversion Kit is sold separately See Appendix A for complete conversion instructions Note Check the VENTING section now to determine if your installation requires the Horizontal Heat Shield...

Страница 19: ...anges to the framing Do not enclose the Fireplace chase or begin the finish work until the Fireplace has been installed tested and approved by the local code inspection authority Note INSTALLATION Fig...

Страница 20: ...ly circuit which provides electrical power solely to the Control Module and is used to power the control and safety systems The Control Circuit must not contain a dimmer but it may be switched The Con...

Страница 21: ...he National Electrical Code d Using wire nuts connect the Lamp Circuit to the blue and purple wires and connect the Control Circuit to the white and black wires e Connect the green ground wire to an a...

Страница 22: ...FLAME PV MV TH TR FLAME SENSOR SPARK IGNITOR N L1 G to 1 x 120 V AC SWITCHED CONTROL CIRCUIT TRANSFORMER Control Schematic Lamp Schematic Figure18 LampandControlElectricalSchematicDiagrams Table7 Wire...

Страница 23: ...isolated from the gas supply system by closing the service valve during any pressure testing of the gas supply system at test pressures equal to or less than psi 3 5 kPa Verify the gas pressure using...

Страница 24: ...ction 1 2 3 5 6 7 8 9 10 4 Figure20 HalcyonPanelNumbers 7 INSTALL THE MEDIA The contents of the bag of Burner Media should be spread to an even depth over the entire burner top a Cut one corner of the...

Страница 25: ...When replacing the glass panel assembly use only European Home part number H50 SA GP 01 substitute parts are not permitted Replacement part numbers are listed in the MAINTENANCE section Replacement o...

Страница 26: ...nd Latch 4 by swinging Latch 1 clockwise and Latch 4 counter clockwise until they swing free of their catches c Using two hands swing the bottom edge of the panel out and lift the top of the panel off...

Страница 27: ...ct vent components from any of the manufacturers listed in Table 8 Approved terminations are also listed in Table 8 All measurements are taken from the center of the vent connector on the top of the H...

Страница 28: ...90 45 equals 270 but a combination of two 90 elbows and three 45 elbows is not allowed the total equals 315 These elbows can be installed either horizontally or vertically The first 90 elbow must have...

Страница 29: ...must remain open until the Fireplace has been tested and is operating properly Figure26 RestrictorAdjustmentQuadrants Setting the Restrictors The Restrictor Settings Charts pages 32 33 accommodate ven...

Страница 30: ...that the intersection of 8 feet total rise and 9 feet total run falls within the section labeled B1 2 21 2 This means that the Air Intake Adjustment Quadrant is set to a position one half of the way...

Страница 31: ...e C Using the dimensions shown in Figure 28 the intersection of the rise 16 and run 12 on either Chart is black Therefore this configuration is not allowed 3 6 Figure29 VentingExample 10 Example D The...

Страница 32: ...32 32 31 31 30 30 29 29 28 28 27 27 26 26 25 25 24 24 23 23 22 22 21 21 20 20 19 19 18 18 17 17 16 16 15 15 14 14 13 13 12 12 11 11 10 10 9 9 8 8 7 7 6 6 5 5 4 4 3 3 2 2 1 1 0 1 2 3 4 5 6 7 8 9 10 11...

Страница 33: ...1 20 20 19 19 18 18 17 17 16 16 15 15 14 14 13 13 12 12 11 11 10 10 9 9 8 8 7 7 6 6 5 5 4 4 3 3 2 2 1 1 0 1 2 3 4 5 6 7 8 9 10 11 12 13 14 15 Horizontal Vent Run in feet Vertical Vent Rise in feet E 3...

Страница 34: ...ort is ducted the resulting wall temperature will be higher than if two ports are ducted The Remote Heat Kit components can accommodate several different installation configurations but the following...

Страница 35: ...pper cover Remove both covers See Figure 32 b Remove the insulation discs and lower covers c Leave the two gaskets in place on the cabinet top d Place two duct collars on the cabinet top one around ea...

Страница 36: ...d insulation back to expose the metal core It is easier to pull the metal core onto both the duct box and duct collar than to push it i Working with one hand inside and one hand outside slowly work th...

Страница 37: ...ound the Glass Panel Assembly When the Halcyon cools the movement of air stops NOTE Make sure that the Heat Kit can move air away from the fireplace otherwise the wall face above the fireplace will be...

Страница 38: ...and sealants used when manufacturing the Fireplace We recommend that you open the nearby windows for extra ventilation and operate the Fireplace for at least four hours Upon lighting the Fireplace wh...

Страница 39: ...nt C Do not use this appliance if any part has been under water Immediately call a qualified service technician to inspect the appliance and to replace any part of the control system and any gas contr...

Страница 40: ...necessary it is dependent on the type of fuel that is being used When burning natural gas flames that are too short or too blue will be the most common observation When burning LP gas flames that are...

Страница 41: ...crement is required and the flames are still too long and sooty then go to Step 3 below 3 Adjust the exhaust restrictor by a Loosening the exhaust quadrant locking wingnut b Adjust the exhaust quadran...

Страница 42: ...he facing within the limits shown in Figure 13 however must be made of non combustible material The Halcyon was designed to be faced with approved 1 2 thick non combustible facing This non combustible...

Страница 43: ...r proper combustion Carefully clean the Crushed Glass Burner Media with a brush 3 Check that the vent pipe and termination cap are free from obstructions such as nests leaves or debris Ensure that the...

Страница 44: ...ing products including water on the media 4 When necessary the panels can be removed and cleaned as follows a The stone like panels should be brushed with a clean soft bristled brush Do not use any cl...

Страница 45: ...ated again and flame sensor is not shorted to ground replace the control module A flashing light indicates the problem is most likely in the external components or wiring see Table 11 below Proceed as...

Страница 46: ...internal fault with the pilot valve PV relay Check for short betweenTH and PV If no external cause then replace control module There is an internal fault with the main valve MV relay Check for short...

Страница 47: ..._____ SoldBy __________________________________________________________________________________________________ Fuel Natural Gas Propane Inlet Pressure at Installation ________________________________...

Страница 48: ...Halcyon Gas Fireplace EuropeanHome com 48 NOTES...

Страница 49: ...e installed by a qualified service agency in accordance with the manufacturer s instructions and all applicable codes and requirements of the authority having jurisdiction If the information in these...

Страница 50: ...r assembly up about an inch and move it to the right enough to provide an opening through which you can reach the wiring tunnel See Figure A1 Take care to avoid damaging the gasket beneath the burner...

Страница 51: ...es by unscrewing them from the Center Tee See Figure A3 8 Screw the left and right LP Burner Orifices into the tee and tighten securely 9 Re install the left and right Burners and secure them with the...

Страница 52: ...g the conversion on the LP Conversion Label Peel the backing off the label and affix it to the bottom plate of the Burner Assembly next to the gas valve as shown in Figure B8 13 Re install the Burner...

Страница 53: ...rifice Size 56 DMS OMNI Test Laboratories Inc has certified that the Halcyon Gas Fireplace meets the ANSI Z21 88 2007 CSA 2 33 2007 Vented Gas Fireplace Heaters and CAN CGA 2 17 M91 Gas Fired Applianc...

Страница 54: ...lcyon Gas Fireplace EuropeanHome com 54 rev 110707u EUROPEAN HOME a division of Europa Ja Inc 376 Washington Street Suite 203 Malden MA 02148 1300 tel 781 324 8383 fax 781 324 8384 info europeanhome c...

Отзывы: