Hach Ultra ORBISPHERE 3624 Скачать руководство пользователя страница 84

78 of 96

 Maintenance and Troubleshooting - 3624 ProBrix Plus

 Operator Manual

ORBISPHERE

8.1.5 Yearly 

The following is available from Hach Ultra as a Maintenance Agreement:

• Replace membrane on the CO

2

 sensor and recalibrate (refer to the accompanying 

TC Sensor Maintenance and Installation Manual 

for membrane replacement 

instructions)

• Inspect pump for signs of wear (severe leakage) and perform pump seal 

replacement if necessary (see 

“Pump Seal Replacement” on page 79

)

• Inspect O-rings in the flow chamber for wear, and replace if necessary
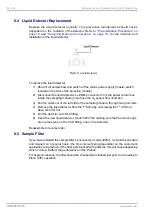
• Replace liquid detector at inlet of the ProBrix 

Note:

CiP should be carried out any time the sample path is exposed to air.

8.2 Sensor Maintenance 

It is time to perform an O

2

 sensor service when you experience:

• Difficulties with calibration
• An unusually long stabilization time, either with the sensor exposed to an air-

saturated medium or to changing oxygen concentration conditions

• Noisy or drifting signals under what you believe to be constant oxygen 

concentration conditions

For more information on O

2

 sensor maintenance, please refer to the accompanying 

EC

Sensor Maintenance and Installation Manual

Unlike your O

2

 sensor, the CO

2

 sensor does not require regular servicing. Membrane

changes need be performed far less often.

Periodically, check the CO

2

 sensor calibration using a known standard. As long as the

reading is ±1% of the expected value, no action needs to be taken. If the reading has
changed ±1-10%, a new calibration should be performed. If the deviation is more than
10% of the original values, a membrane service is required.

A visual inspection of the sensor face will also reveal any problem like dust deposits or
accumulation of dirt onto the protection grill.

For more information on CO

2

 sensor maintenance, please refer to the accompanying 

TC

Sensor Maintenance and Installation Manual

Содержание ORBISPHERE 3624

Страница 1: ...Operator Manual ORBISPHERE 3624 Revision F 03 10 2008 ...

Страница 2: ......

Страница 3: ... Conformément à la réglementation européenne directive UE 2002 96 EC les utilisateurs de matériel électrique en Europe doivent désormais retourner le matériel usé ou périmé au fabricant pour élimination sans frais pour l utilisateur Remarque Veuillez vous adresser au fabricant ou au fournisseur du matériel pour les instructions de retour du matériel usé ou périmé aux fins d élimination conforme IT...

Страница 4: ... wetgegeving EU richtlijn 2002 96 EC dienen gebruikers van elektrische apparaten voortaan hun oude of afgedankte apparatuur kosteloos voor recycling of vernietiging naar de producent terug te brengen Nota Als u apparatuur voor recycling terugbrengt moet u contact opnemen met de producent of leverancier voor instructies voor het terugbrengen van de afgedankte apparatuur voor een juiste verwerking P...

Страница 5: ...ment marked with the above symbol may not be disposed of in European public disposal systems after 12 August 2005 Hach Ultra will offer to take back free of charge to the customer any old unserviceable or redundant analyzers and systems which carry the above symbol and which were originally supplied by Hach Ultra Hach Ultra will then be responsible for the disposal of this equipment In addition Ha...

Страница 6: ... Cd Hexavalent Chromium Cr VI Polybrom Biphenyls PBB Polybrom Diphenyls PBDE 1106A Backplane Board X 1062C Keypad Board X 1100B Logic Board X 1104A Analog Board X 1121B Options Board X 1067C Supply Board X 1063G Supply Board X 1127 Connection Board X 1117C Measurement Board X 70467 LCD Board X Spacer X O Indicates that this toxic or hazardous substance contained in all homogeneous material for thi...

Страница 7: ...e Gas Connection 23 1 7 Installation Completion Check List 25 1 7 1 Check the Purge Gas Supply 25 1 7 2 Check Sampling Pump 25 1 7 3 Check PC Instrument Connections 25 2 Operating Information 2 1 Instrument Controls 27 2 2 Program Menus 28 2 3 Entering Numerical Values 28 2 4 CO2 O2 and Brix Diet Measurement 28 2 4 1 Measurement Displays 29 2 4 2 Measurement Hold Switch 29 2 4 3 Warning Messages 3...

Страница 8: ...erature Values 49 4 2 5 Autosave 49 4 2 6 Water Calibration Status 50 4 2 7 Alarms Delay 50 4 2 8 Sound Alarms 50 4 2 9 Serial Output 51 4 3 Tools Menu 52 4 3 1 Chart 52 4 3 2 Events List 53 4 3 3 Statistics 53 5 Calibrations 5 1 Sensor Calibrations 55 5 1 1 Barometric Pressure Sensor Calibration 56 5 1 2 CO2 Sensor Calibration 56 5 1 3 O2 Sensor Calibration 59 5 2 Brix Calibration 60 5 3 Diet Cal...

Страница 9: ...nts 7 1 Model 32957 Sample Filter Kit 75 7 1 1 Installation 75 7 1 2 Maintenance 75 8 Maintenance and Troubleshooting 8 1 Preventive Maintenance 77 8 1 1 Daily 77 8 1 2 Weekly 77 8 1 3 Monthly 77 8 1 4 Six Monthly 77 8 1 5 Yearly 78 8 2 Sensor Maintenance 78 8 3 Pump Seal Replacement 79 8 3 1 Pump Removal 79 8 3 2 Seal Replacement 80 8 3 3 Pump Installation 81 8 4 Liquid Detector Replacement 82 8 ...

Страница 10: ...4 of 96 Table of Contents 3624 ProBrix Plus Operator Manual ORBISPHERE 10 3 Spare Parts 90 Appendix A Glossary A 1 Common Units 91 A 2 Terms and Definitions 91 ...

Страница 11: ...June 2000 Orbisphere Revision B December 2002 Orbisphere Revision C May 2003 Hach Ultra Analytics Revision D July 2004 Hach Ultra Analytics Revision E February 2006 Hach Ultra Revision F May 2007 Hach Ultra Safety Conventions WARNING A warning is used to indicate a condition which if not met could cause serious personal injury and or death Do not move beyond a warning until all conditions have bee...

Страница 12: ...med exclusively by personnel specialized and authorized to work on electrical installations in accordance with relevant local regulations Service and Repairs None of the instrument s components can be serviced by the user Only personnel from Hach Ultra or its approved representative s is are authorized to attempt repairs to the system and only components formally approved by the manufacturer shoul...

Страница 13: ...duct indicates that the marked item can be hot and should not be touched without care This symbol when noted on the product indicates the presence of devices sensitive to electrostatic discharge and indicates that care must be taken to prevent damage to them This symbol when noted on the product identifies a risk of chemical harm and indicates that only individuals qualified and trained to work wi...

Страница 14: ...8 of 96 Manual Overview 3624 ProBrix Plus Operator Manual ORBISPHERE ...

Страница 15: ...o not hesitate to contact your Hach Ultra representative Note Because there are specific line to sampling module distances and line level considerations specified in Pre Installation Procedures on page 10 make a pre installation inspection before delivery of the ProBrix Plus to ensure that these conditions can be met Note User supplied N2 purge gas cylinder mounts on right side and may vary in wid...

Страница 16: ...cause degassing of the CO2 leading to incorrect measurements Tilt the connectors 10 15 upward and 45 toward the line axis as illustrated in Fig 1 2 Mount the liquid detector in a T Piece Swagelok fitting in the inlet line The detector should be on top facing downward as depicted in Fig 1 3 Provide an N2 gas cylinder minimum 30 liters recommended with a pressure regulator output in the range 2 to 7...

Страница 17: ...ged separately Note If you have ordered the sampling unit for Brix analysis only model 32109D A or 32109D B a CO2 sensor is not included Instead a sensor simulator model 29117 is pre installed see diagram above As such all the following references to the CO2 sensor installation can be ignored Keeping the crate vertical open the front cover of the crate and carefully pull the sampling module out of...

Страница 18: ...ge gas tubing from the purge gas regulator and re tighten all purge gas fittings see also CO2 Sensor Purge Gas Connection on page 23 Install the 3mm inside diameter purge gas exit tube into the CO2 sensor If you have also taken delivery of the sample filter install this on the sample inlet tube using standard Swagelok connections see also Model 32957 Sample Filter Kit on page 75 for additional inf...

Страница 19: ...s are provided on the underside of the instrument LEMO and Binder connectors for the sensors sampling module and power are inside the opening of the mounting bracket If mounting separately include at least 400 mm additional frontal clearance for front panel access and at least 100 mm bottom clearance for cable protrusion Fig 1 7 Indicating Instrument Front and Bottom View ...

Страница 20: ...e four cables from the top of the sampling module with the LEMO 6 LEMO 8 LEMO 10 and Binder connectors through the stainless steel neck see Fig 1 8 Attach the neck to the top of the sampling module using the four bolts provided on the top Connect the cables to the three LEMO connectors and the Binder connector at the bottom of the instrument case The LEMO and Binder connectors for the sensors samp...

Страница 21: ...hat its cable is connected to the power unit located inside the sampling module Place the N2 purge gas cylinder in its fixture on the right of the sampling module holding it in place with the straps provided and connect the gas tubing to the inlet above the straps Check the pressure on the pressure regulator of the cylinder 3 to 5 bar gauge and adjust the pressure on the internal purge gas pressur...

Страница 22: ... Fig 1 9 on page 14 and are not seen by the operator On a wall mount instrument extension cables must be provided to enable connections to the LEMO connectors and the Binder connector see your Hach Ultra Service Representative for details Connections for serial data recorder output hold switch and alarm relays use watertight cable glands at the bottom of the instrument housing The user must wire h...

Страница 23: ...J6 J5 J8 and J9 and Jumpers J15 J16 and J17 Note You must ground each cable shield properly to ensure proper operation 1 4 3 1 Serial PC Wiring Identification Note Serial communication parameters Baud rate 9600 Data bits 8 Stop Bit 1 Start Bit 0 Parity None See also PC Installation on page 21 for additional PC installation and wiring information Fig 1 11 1126A Connection Board Table 1 1 Serial Wir...

Страница 24: ...ing Identification Analog Output 3624 Instrument Terminal Block Position User Recorder Signal CO2 Output J5 1 CO2 In CO2 GND J5 2 CO2 Return Brix Diet Output J5 3 Brix Diet In Brix Diet GND J5 4 Brix Diet Return Table 1 3 Alarms Output Wiring Identification Alarm Relay 3624 Instrument Terminal Block Position User Alarm Device Signal High Low alarm output J8 1 High Low alarm contact Hi High Lo Low ...

Страница 25: ...e 1 5 Dry Contact Jumpers Configuration Configuration 3624 Instrument Terminal Block Position Orbisphere Power J15 J16 Jumpers 2 3 Normally Open Default J17 Jumpers 1 2 Normally Closed J17 Jumpers 2 3 Table 1 6 Hold Switch Wiring Identification DC Power 3624 Instrument Terminal Block Position User Hold Switch J9 1 24VDC In J9 2 Return Table 1 7 Dry Contact Jumpers Configuration Configuration 3624 ...

Страница 26: ... metal washer with an interior diameter of 7 5mm 2 Pass the cable through the nut the gasket and the 8 3mm washer 3 Strip off 110mm of external insulation and 85mm of shielding see Fig 1 13 4 Pass the cable through the 7 5mm washer 5 Pinch the shield so that its entire circumference is pressed between the two washers see Fig 1 12 6 Pass the cable into the box blocking the cable gland 7 Reattach an...

Страница 27: ...screen instructions To connect the PC to the instrument connect the serial cable to the instrument terminal block see 3624 Indicating Instrument Installation on page 13 making sure the connections are as indicated in Table 1 9 there is also an identifying sticker with this information inside the indicating instrument The cable should use two twisted pairs and include a metallic shield to carry the...

Страница 28: ...he COM port is set to those connected above e g COM3 and or COM4 depending on the line s you are using see Setting a LINE Configuration on page 44 Once the sampling module and instrument are switched on communication tests can be made Refer to Serial Output instrument only on page 40 to enable the serial communications from the 3624 instrument to the ProBrix Plus PC Program Following a product cha...

Страница 29: ...urge Gas Connection Before installing the CO2 sensor make sure that 1 The instrument is switched ON 2 The purge gas is connected see following instructions and supplied at 2 bar gauge pressure CAUTION Do not place the CO2 sensor into a liquid sample until the above is true as without a constant supply of dry purge gas water could condense inside the measuring chamber and cause damage to the therma...

Страница 30: ... of the purge gas To insert push it firmly into the orifice diametrically opposite the purge gas entrance To remove push on the ring surrounding the tube then pull To ensure continuation of purge gas while the sensor is in contact with the sample it is recommended to use a backup purge gas cylinder with an automatic changeover valve Drain the condensate periodically Open the Condensate Bleed Screw...

Страница 31: ... chamber and store in a dry place 1 7 2 Check Sampling Pump When the pump switch is ON the sampling module pump will not activate unless all of the following conditions are met The instrument is powered on and in measurement or Brix Diet sensor calibration mode The liquid detector conductivity sensor notes the presence of liquid The Brix Diet sensor detects a density level that is greater than hal...

Страница 32: ...26 of 96 Installation 3624 ProBrix Plus Operator Manual ORBISPHERE ...

Страница 33: ...position to start the instrument in measurement mode The function keys see Fig 2 2 are only active if the key switch is in the unlocked position Use the vertical locked position to avoid accidental modifications The instrument front panel has a two line LCD Display of 16 characters per line plus a button to illuminate the display for a three minute period Four Function Keys provide simple operator...

Страница 34: ...ntil the main menu is displayed next press the up down arrows until your choice is flashing and then press ENTER 2 3 Entering Numerical Values When entering numbers in any of the instrument menus the current numerical value is displayed with one digit highlighted by the symbol below it 2 4 CO2 O2 and Brix Diet Measurement The flow chart below depicts the instrument measuring menus available For in...

Страница 35: ...ese displays and move to the Main Menu to access additional menus Measure Options and Calibrate Note After pressing ESC the instrument will check if Change Product is accessible switch set to PC ANALYZER see Change Product on page 42 If not then the Main Menu will appear Otherwise you will be requested to enter a new product number and the above measurement cycle restarts If you do not wish to ent...

Страница 36: ...ent display updates When the LCD displays sample measurement and temperature the bottom line includes a warning condition as a three letter code on the right hand side A message appears on the PC screen is recorded in an Event List and an audible message is heard provided the relevant sound alarm box has been checked in the PC program see Sound Alarms on page 50 The alarm relays respond accordingl...

Страница 37: ...Numerical Indicator Panel The numerical indicator panel shows information relating to the last measurement This panel is divided into four containing the CO2 data the Brix Diet data the O2 data and the temperature information For each of these the units of measurement the most recent measurement value and a vertical bar graph are shown Note The display box allows up to 4 digits and a decimal point...

Страница 38: ...ld condition 2 6 2 Status Panel The status panel is displayed below the indicator panel and shows the following CO2 Offset and Status Brix Diet Offset and Status O2 Status Run Efficiency The status for CO2 Brix Diet and O2 will indicate Standby Measure or Fault In addition the Brix Diet may also indicate Calibration if this is a diet or T A product and the automatic or manual calibration mode has ...

Страница 39: ...lection box illustrated below will be displayed and the correct product can be selected using one of the following methods By typing the product number if known in the upper right hand box By using the right hand scroll bar By using the Search button to find a product name Note If an inverted offset value has been entered against the product this value is not shown here but the brix target and ala...

Страница 40: ...sults of the samples in the corresponding column CO2 and or Brix Diet The average value is computed automatically as the sample data is entered A minimum of 1 and a maximum of 3 samples can be taken Leave the data entry box blank where samples are not taken Note that if you do not want to calculate an offset for one of these measurements the whole of that column must be left blank Once all the res...

Страница 41: ...ms Delay on page 50 2 6 4 4 Graph If a single LINE is in use this button will switch to a full screen graphical display for that LINE Select the Numeric button on the graph display to switch back to the dual numeric graph display Note that if both LINES are in use then this is a straightforward switch between the graphical and numeric output display for the selected LINE 2 6 4 5 Clear This button ...

Страница 42: ... run then select this button to change the inverted offset value Note Any changes to the offset value will be updated for this product in the product list file However the original target and alarm values for the product will remain unchanged in the product list file 2 6 4 8 End Select this button to stop the current product run The window illustrated left will be displayed Enter either the new ta...

Страница 43: ...re outlined in Fig 3 1 Several of these menus duplicate functions that are more efficiently performed from the PC see also PC Program Setup on page 43 For those menus that are exclusive to the instrument the phrase Instrument Only has been added to the section headings Fig 3 1 Instrument Modify Options Menu Flow Diagram ...

Страница 44: ...a the next step is to choose your preferred display units from the available choices as outlined in the table below DISSOLVED PARTIAL PRESSURE FRACTION Next choose one of the options displayed to set the placement of the decimal point on the lowest measurement range Finally select the temperature units C F or K 3 1 2 BRX First enter the product number you wish to access after which select your pre...

Страница 45: ...he instrument It is recommended that you use the ProBrix Plus PC Program to set alarm limits as the limits set by the program are stored permanently If you use the instrument the values set here will be overridden by the stored PC values the next time the product is selected The instrument provides two alarm relays High Low and Low Low High High which can be set separately for CO2 and Brix Diet me...

Страница 46: ...message on your instrument LCD Choose CONTINUOUS PURGE from the MODIFY OPTIONS menu The continuous purge display alternates between two screens One is a combined CO2 0 and Brix Diet 1 sensor voltages and the other is the O2 02 sensor current and temperature Press ESC to exit this option Note that the CO2 sensor is continually purged whenever you exit the measurement mode If you chose ENABLED then ...

Страница 47: ...in English French Japanese Spanish German or Italian although the units of measurement remain the same i e parts per million is still expressed as ppm regardless of language Choose LANGUAGE from the MODIFY OPTIONS menu and select your preference 3 8 Hold Recovery instrument only This option allows you to choose a longer or shorter recovery time after a Hold condition has ended Choose HOLD RECOVERY...

Страница 48: ...nce of CO2 on the Brix measurement or DISABLED if no correction is required The BRIX CO2 process is the same except it allows you to apply a correction for the influence of Brix on the CO2 measurement 3 10 2 Temperature Correction If the sample temperature varies during the measurement cycle the temperature change is translated as an interference signal on CO2 sensor measurements This option reduc...

Страница 49: ...ers will have been entered The system should be loaded up with the necessary data and measurement parameters by adhering to the following sequence of events all of which can be accessed from the Configuration Menu on the main screen 4 2 1 Access Levels A number of the program options require a valid user ID to be entered This ID will define which options a user has access to If access is granted t...

Страница 50: ...alid ID and Name For each individual a name an alphanumeric ID minimum of 4 characters and an access level is required As mentioned above only the QC Manager level can add remove or change existing entries The list is displayed alphabetically and holds a maximum of 100 entries If the No ID required box is checked then all users are given access to all options and menus with the exception of this A...

Страница 51: ...ect the required LINE number 1 10 This name is used for the audible alarms and defines the directory where measurement data is saved not to be confused with Line A B COM port defines the serial communications port used to communicate with the instrument This should have been set up at installation time and would not normally require changing Always Calib Diet allows you to change the way calibrati...

Страница 52: ...n displays and data collection Enter a value into the Tfiller s box This value is the estimated time in seconds for the sample to travel from the ProBrix instrument to the place where samples are picked up for Lab tests Now enter the measurement parameters into the CO2 and Brix Diet columns Units Choose the desired measurement unit for this product from the drop down lists The choice also determin...

Страница 53: ...set If you have a sugar inversion issue whereby the density of the sugar is likely to change during a run enter an offset value here This value positive or negative is added to the target and alarm values during a run but does not change the actual alarm and target values entered above Note All the product information for each LINE is stored in Products List files called PROD31 bin LINE A and PROD...

Страница 54: ...information on the format and layout of the file Any attempt to load a file other than in the format described in this help topic will result in an error Export Use this option to create a formatted text file of your complete product list This format can be loaded into a spreadsheet e g Microsoft Excel where it may be easier to effect any global changes to the data rather than using the ProBrix Pl...

Страница 55: ...ent run started and are given a file extension of cbo e g file 10311015 cbo relates to the measurement run started on 31st October at 10 15 a m As the year is not part of the file name it is recommended that at Year End all measurement data files are copied into a backup directory before being deleted to avoid any confusion during the coming year Oxygen Set the O2 units ppm or ppb Set the High Hig...

Страница 56: ...tion and turn the status to On 4 2 7 Alarms Delay Selecting the Alarms Delay option and entering a value of between 0 and 30 will override this default to the new value 4 2 8 Sound Alarms The ProBrix PC Program can trigger audible alarm messages To receive these messages on your PC it must be equipped with speakers and have a sound card installed Define the alarms for which an audible alarm is hea...

Страница 57: ...be the one heard P0 P1 P2 P3 Alarm priorities are defined as follows Line off Hold P0 Error P1 High High and Low Low P2 High and Low P3 If there are warnings of the same priority the following order will be respected 1 Brix 2 CO2 3 O2 4 Temperature For example if there are simultaneous CO2 High High P2 and Brix Error P1 alerts then the Brix warning will be the one triggered and if there are simult...

Страница 58: ...limits made here do not affect the values in the LINE Display window Changes to the O2 and Temperature values can be made in a similar way by selecting the appropriate button The Time button allows you to define the time base for the chart This is from 10 minutes to 7 5 hours meaning that a maximum of 7 5 hours of data can be displayed in the chart window at any one time The maximum resolution is ...

Страница 59: ...one of the following conditions The channel was in a fault condition Sensor Out Overflow etc The channel was in standby status The LINE was on Hold The Copy button in this dialog box enables you to copy the statistics to the clipboard for subsequent pasting into other applications This option displays all the events that have occurred during the current product run for this LINE The date and time ...

Страница 60: ...54 of 96 PC Program Setup 3624 ProBrix Plus Operator Manual ORBISPHERE ...

Страница 61: ...for assistance Note When selecting the calibration menu all measurement operations are discontinued All of the menus require user input of one form or another This is carried out using the four function keys on the Instrument Panel see Instrument Controls on page 27 You should ensure that you are familiar with the use of these keys especially in entering and modifying numeric fields see Entering N...

Страница 62: ...ed when measuring at higher line pressures and requires a precise in line pressure gauge to perform 5 1 2 1 Partial Pressure Calibration With this procedure you must expose the sensor to a known pressure of pure CO2 gas in the range of 1 to 5 bar absolute preferably around 3 The procedure requires a source of pure CO2 regulated by a pressure valve connected to the central entry port of the flow ch...

Страница 63: ...IAL PRESSURE Select your preferred unit of measurement from the CO2 UNITS menu to bring up the menu for specifying the gas pressure Note If this is the first calibration then the message indicates a percentage of the expected value EXPT VAL rather than the last calibration LAST CAL This percentage must be between 50 and 150 in order to calibrate If the percentage is outside the limits you will see...

Страница 64: ...ze the reading operate in Measurement Mode for about 30 minutes When stable press ESC and select CALIBRATE from the main menu Select SENSOR CO2 followed by FRACTION Select your preferred unit of measurement from the CO2 UNITS menu to bring up the menu for specifying the gas Enter the concentration of the calibration gas in volume percent and proceed as described above for Partial Pressure Calibrat...

Страница 65: ...ndicates a percentage of the expected value EXPT VAL rather than the last calibration LAST CAL This percentage must be between 50 and 150 in order to calibrate If the percentage is outside the limits you will see the Calibration Out Of Bounds message briefly before the instrument returns to the Calibration menu If this occurs the sensor may need to be serviced or replaced If the percentage is with...

Страница 66: ...when the product is selected If the product is run from the instrument then the dialog box appears only if the Always Calib Diet box is checked for this line see Setting a LINE Configuration on page 44 for more details otherwise these products are treated the same way as diet a and T A a products and an automatic calibration is made as described above The target measurement for the product is auto...

Страница 67: ...te you can now go through the product calibration process This is achieved by selecting the Calibration button in the Products List window for the required product This will display the density of the syrup at 20 C and the mixing ratio volume of syrup to volume of water which can only be modified if this is a diet product not applicable to T A products Pressing OK will apply these new parameters t...

Страница 68: ...62 of 96 Calibrations 3624 ProBrix Plus Operator Manual ORBISPHERE ...

Страница 69: ...creen until you select a file to open from the File Menu In addition double clicking on a cbo file if you can access these files directly will also start up the viewer and display details for the selected file Note Most of the commands are easily accessible from the toolbars located above the data view window In addition a number of commands are standard Windows commands e g Print Print Preview et...

Страница 70: ... menu will achieve the same result but the slider bar will be automatically selected for you Just move it with the mouse to where you want it positioned and press the left mouse button You must now select which toolbars and menus you want to work with by clicking once in either the Table or Graph Window If you have selected the Table Window then the Graph Toolbar and Graph Menu options will be una...

Страница 71: ...lected columns by holding down the mouse button on one of the selected column headings a small box symbol appears under the cursor and then drag the cursor to where you want the column s inserted 6 2 2 Graph Window Exclude Mode In this mode the cursor operates as in the normal mode but when a selection is made those rows will be excluded from the statistical analysis see Statistics on page 72 In a...

Страница 72: ...nt point Information Mode Click on any data point in the Graph Window to position the vertical line and to display a pop up measurement box showing the time and measurement details for that point Zoom Mode Drag a rectangle across the graph to zoom in on a particular area for closer inspection The selection must include at least two measurement points The graph will then automatically zoom in on th...

Страница 73: ...at were entered during the run from the LINE Window New comments are stored within the file using the previously mentioned Save or Save As options 6 4 Table Menu While in the Table Window you can right click the mouse for quick access to some of the Table Menu options 6 4 1 Copy Copies the selected table contents as a text file to the clipboard for pasting into other applications e g Excel The sel...

Страница 74: ...a cell color a cell border and the text alignment within the cell Three options are available for change Column Header Row Header Standard or table contents Highlight one of these styles and select the Change button to display a standard formatting dialog box Incorporate the changes required To save these changes for subsequent use check the Save as default box 6 4 5 Table Format This dialog box a...

Страница 75: ...sion or inclusion in the statistics calculations Any selection that is excluded is also highlighted by a color change in the Graph Window 6 4 8 Show A list of measurements that can be viewed in the Table Window is made available Select the ones you require for your display Note Making your selections from the buttons in the Table Toolbar see Fig 6 6 or by right clicking the mouse is a much quicker...

Страница 76: ...lick on your next and subsequent selections Select the Points Font and Color tabs and personalize your graphical displays to suit your requirements Once you have made all your changes select the Apply button to apply these changes to your current display Once you are happy with all the changes select the OK button to store the changes and return you to the Graph Window Any changes you make will be...

Страница 77: ...his option allows you to modify the high and low limits for each of the measurements in the graphical display 6 5 5 Copy Copies the graph in bitmap format only to the clipboard for pasting into other applications For additional formats use the Export button as described earlier This option allows you to select from a list of additional events to be shown in the Graph window A maximum of 4 only can...

Страница 78: ...in the window to display the Customize menu which allows you to customize your display Right click the mouse to display a list of quick access display options Click the hand symbol when available to see a pop up display of statistics applicable at that point Using the Include Exclude options in the Table or Graph Windows is reflected real time in the Statistics Window Tabular and or Graphical disp...

Страница 79: ...ber of zones centered on the average value The width and the number of zones are user defined in the Statistics Settings box It is possible to place the mouse cursor over various points in the chart or table which will cause the cursor to change to a hand symbol Double clicking the mouse button anywhere in the screen where a hand symbol is not visible will bring up the Graph Customize screen to al...

Страница 80: ...he choices are available from a drop down list 6 6 2 3 Customize and Copy These options provide the same functionality as previously explained in the Graph Menu section This dialog box allows you to determine the type of graph you wish to display There is a choice between Alarm Limits or Limits The Alarm Limits choice requires no additional parameters and takes it s X axis values from the High Hig...

Страница 81: ...ee illustration above has been developed to trap any particles prior to entering the Probrix system 7 1 1 Installation 7 1 2 Maintenance Once installed the filter should be checked and cleaned on a regular basis the time interval being dependant on your application and product If the filter gets blocked with particles this will cause degassing which in turn will affect the performance of the Probr...

Страница 82: ...76 of 96 Accessories and Attachments 3624 ProBrix Plus Operator Manual ORBISPHERE ...

Страница 83: ...te that humid purge gas will damage the CO2 sensor 8 1 2 Weekly Inspect all hoses and connections to and from the Sampling Module for leaks or damage Tighten or replace components as required Inspect all hoses and connections inside the Sampling Module for leakage condensation is normal Inspect the pump inside the Sampling Module for leakage minor dripping is normal If excessive leakage is present...

Страница 84: ...er with the sensor exposed to an air saturated medium or to changing oxygen concentration conditions Noisy or drifting signals under what you believe to be constant oxygen concentration conditions For more information on O2 sensor maintenance please refer to the accompanying EC Sensor Maintenance and Installation Manual Unlike your O2 sensor the CO2 sensor does not require regular servicing Membra...

Страница 85: ... 8 3 1 Pump Removal The pump is accessible from the sampling module First shut off the sample flow and switch off the mains power supply master switch located on the side of the sampling module before opening the sampling module Remove the power cable from pump refer to Fig 8 1 1 Remove the cover 1 from the pump motor s connection box 2 Disconnect the three power leads inside the connection box 3 ...

Страница 86: ...nscrew the 15 mm nut of the pump rotor If the 15 mm nut is too tight to hold the shaft by hand pry the fan off the shaft with two flat screwdrivers block the shaft with a round wrench Pull the pump rotor off the shaft by hand Save the Woodruff key 940 Remove the rotating SiC seal assembly 433 Unclip the seal spring from the rotating seal assembly use a flat screwdriver lever on the pump housing Re...

Страница 87: ... with dimensions Øint 9 5mm Øext 18 9mm L 25mm Slide the seal assembly cage O ring and spring in place preferably using a 20mm tube to push home Install impeller 230 Remove the seal mounting tool Z Place the Woodruff key 940 in its slot on the shaft Mount the pump impeller the O ring 412 2 on the impeller hub faces the motor side Tighten the impeller nut 906 with O ring 412 1 moderately finger tig...

Страница 88: ...ensor flow chamber 3 Pull the cable out of the left side of the sampling module through two grommets 4 Remove the liquid detector from the T fitting by unscrewing the 1 VCO nut Save the VCO nut 5 Pull the detector out of the fitting 6 Insert the new liquid detector model 32873 03 making sure that the two O rings are in place one on the VCO fitting one on the detector Reassemble in reverse order 8 ...

Страница 89: ...ve 4 5V return sensor to Hach Ultra Damaged sensing element caused by mishandling during membrane replacement For experienced service personnel only Remove membrane and support Check for broken wires of the thermal conductivity chip under microscope Return sensor to Hach Ultra Analytics System does not start No display or backlight Improper line voltage Check 3624 instrument voltage Select proper ...

Страница 90: ...Ultra Grounding mismatch between Orbisphere instrument and electronic accessories plotter terminal Plug all accessories and instrument into same mains terminal Stabilized reading Totally erratic readings CO2 Water condensation into the thermal conductivity element due to purge failure or humid purge gas Blow dry purge gas in continuous purge mode overnight Resume measurement mode In most cases sen...

Страница 91: ...asurement cycle if V3beg 2500mV or V3beg 4450mV Restore purge gas 0 RAMP LIMIT VIOLATED Lmt Overflow On On At the end of a measurement cycle if V3end 2500mV or V3end 4450mV Check membrane 0 PURGE VOLTAGE DRIFTING Chk N A Off Off At the beginning of a measurement cycle if V3beg 2000mV or V3beg 3950mV OR at the end of a measurement cycle if V3end 2000mV or V3end 3950mV Check purge gas 0 ATTENTION LO...

Страница 92: ...s Table 8 4 Brix Diet Sensor Warning Messages Message on Instrument LCD LCD Code PCEvent List High Low Relay Hi Hi Lo Lo Relay Reason Action 1 CHECK THE SENSOR Out Sensor out On On Brix Diet sensor disconnected Connect sensor OSCILLATOR STOPPED Osc Overflow On On Brix Diet sensor malfunction Check Sensor Connections U TUBE EMPTY Emp Overflow On On Brix Diet sensor U tube empty Restore sample DEGAS...

Страница 93: ...iet Signal drift 1 of reading between service 1 of reading between service Negligible Startup response time 45 seconds 38 seconds 1 minute Brix 3 minutes Diet System refresh rate 15 seconds Sample flow requirement Maintained by internal pump Sample pressure limit 12 bar Sensor temperature limit 10 C to 100 C Temperature compensated range 0 C to 35 C Digital output RS 422 485 Baud rate 9600 Stop Bi...

Страница 94: ... 230 VAC 10 115 or 230 VAC Fuse 230 VAC 100 mA 3A thermal protection N A 115 VAC 250 mA 6A thermal protection N A Frequency 50 60 Hz 50 60 Hz 50 60 Hz Nominal power requirements 40 VA 700 VA 300 VA Weight 8 kg 95 kg 10 kg Enclosure classification IP62 NEMA4 IP62 NEMA4 N A EMC Requirements EN 50082 2 EN 61326 1997 A1 1998 A2 2001 A3 2003 EN 50082 2 EN 61326 1997 A1 1998 A2 2001 A3 2003 N A Safety R...

Страница 95: ...res sampling system 32109B A ProBrix sampling system including 2 x 32505 01 115VAC at 60 Hz 32109B B ProBrix sampling system including 2 x 32505 01 230VAC at 50 Hz 32109C A ProBrix sampling system without swan neck Includes 2 x 32505 01 115VAC at 60 Hz 32109D A ProBrix sampling system for Brix analysis only 115VAC at 60 Hz 32109D B ProBrix sampling system for Brix analysis only 230VAC at 50 Hz Par...

Страница 96: ...th fittings Supplied with EPDM O rings 32207 Connection kit for ProBrix Includes 2 connectors to be welded on sample line 2 shut off valves 2 flexible sanitary hoses 3m necessary nuts and adapters 32209 Wall mounting kit for instrument part of ProBrix including mounting bracket 32505 01 1 meter sensor cable for all new TCD sensors and for all sensors for 2620 2640 and 264xx instruments Supplied wi...

Страница 97: ...y weight ppm parts per million by weight V V volume per volume ratio Table A 2 Terms and Definitions Terms Meaning Absolute pressure Absolute pressure is relative pressure plus atmospheric pressure Concentration The relative content of a component in a gaseous or liquid media Conductivity The reciprocal of electrical resistivity Headspace The empty volume above a liquid or solid in a closed contai...

Страница 98: ...92 of 96 Glossary 3624 ProBrix Plus Operator Manual ORBISPHERE ...

Страница 99: ...ble 1 7 Dry Contact Jumpers Configuration 19 Fig 1 12 Cable Wiring through a Gland 20 Fig 1 13 Strip Off External Insulation 20 Table 1 8 User Supplied Cabling Requirements 21 Table 1 9 Instrument to PC Connections 21 Fig 1 14 29089 Gas Pressure Regulator and Filter 23 Fig 2 1 Instrument Controls 27 Fig 2 2 Instrument Function Keys 27 Fig 2 3 Instrument Measurement Menu Flow Diagram 28 Fig 2 4 Mea...

Страница 100: ...le Toolbar 69 Fig 6 7 Graph Customize Screen 70 Fig 6 8 Graph Events Screen 71 Fig 6 9 Statistics Screen 72 Fig 6 10 Statistics Settings Screen 74 Fig 7 1 Model 32957 Filter Kit 75 Fig 8 1 Pump Removal 79 Fig 8 2 Seal Replacement 80 Fig 8 3 Seal Re Assembly 81 Fig 8 4 Liquid Detector 82 Table 8 1 Measurement Troubleshooting 83 Table 8 2 CO2 Sensor Warning Messages 85 Table 8 3 O2 Sensor Warning Me...

Страница 101: ...3624 ProBrix Plus User Notes 95 of 96 Operator Manual ORBISPHERE User Notes ...

Страница 102: ......

Отзывы: