


-68-
Model G0699 (Mfd. Since 5/15)
Lubrication
Other than the lubrication points covered in this
section, all other bearings are internally lubricated
and sealed at the factory. Simply leave them
alone unless they need to be replaced.
Although it is not necessary to remove the table
to complete the lubrication tasks for the trun-
nions and leadscrews, to do so makes it easier to
access these areas for proper inspection, clean-
ing, and lubrication.
Important: Take care not to get any lubrication on
the drive V-belts to prevent slippage and damage.
If you do, replace them.
Removing Main Table
Tools Needed
Qty
Hex Wrench 4mm .............................................. 1
Hex Wrench 6mm .............................................. 1
Hex Wrench 8mm .............................................. 1
Wrench 19mm ................................................... 1
Wrench 24mm ................................................... 1
To remove the table:
1. DISCONNECT SAW FROM POWER!
2. Remove the rip fence assembly, rip fence
rail, rip fence scale, and both extensions
wings from the cast iron table.
3. Move the sliding table all the way forward and
vlock it in place.
4. Remove the four hex nuts and spacers from
the bottom of the studs that secure the cast
iron table to the cabinet (see
Figure 132).
Important: The position of the four upper
lock nuts were set at the factory so that the
cast iron table is square with the saw blade
from side to side and back to front. DO NOT
change the position of these lock nuts (see
Figure 132). Otherwise, you will have to per-
form the time consuming procedure of bring-
ing the table back to square with the blade.
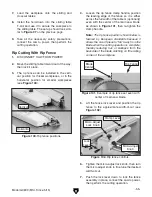
5. With the help of another person for lifting,
remove the table from the cabinet and place
it in a safe location.
6. Remove the four spacers from the top of the
cabinet.
Trunnions
The tilt and elevation trunnions (see
Figure 133)
are curved cast iron surfaces that allow the heavy
motors, arbor assemblies, and blades to tilt and
change elevation.
It will be necessary to use the tilt and elevation
handwheels to gain access to the full lengths of
the trunnion sliding surfaces. Use mineral spirits
and shop rags to clean away the grime and debris,
then apply a thin coat of multi-purpose grease to
the full length of the trunnions. Move the trunnions
through their full range of movement several times
to evenly distribute the grease.
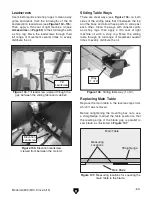
Figure 132. Main table mounting fasteners.
Figure 133. Locations of the trunnions.
Tilt Trunnions
Elevation Trunnion
Содержание G0699
Страница 21: ...Model G0699 Mfd Since 5 15 19 5mm Hardware Recognition Chart...
Страница 108: ......