


-48-
Model G0699 (Mfd. Since 5/15)
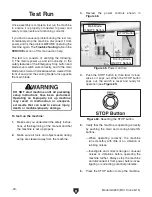
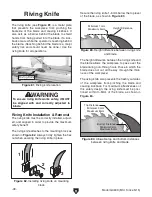
Riving Knife
Secure the riving knife 1–5mm below the top level
of the blade, as shown in
Figure 83.
Height Difference
Minimum 1mm
Maximum 5mm
Figure 83. Height difference between riving knife
and blade.
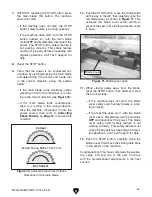
Minimum 3mm
Top Distance
Bottom Distance
Maximum 8mm
Minimum 3mm
Maximum 8mm
Figure 84. Allowable top and bottom distances
between riving knife and blade.
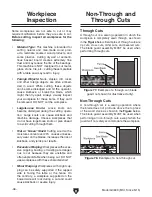
The height difference between the riving knife and
the blade allows the workpiece to pass over the
blade during non-through cuts (those in which the
blade does not cut all the way through the thick-
ness of the workpiece).
The riving knife also prevents the freshly cut sides
of the workpiece from pinching the blade and
causing kickback. For maximum effectiveness of
this safety design, the riving knife must be posi-
tioned within 3–8mm of the blade, as shown in
Figure 84.
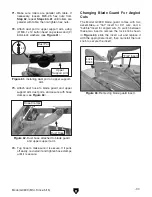
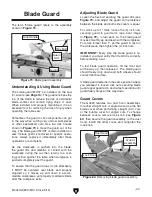
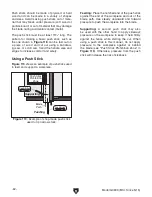
The riving knife (see
Figure 81) is a metal plate
that prevents the workpiece from pinching the
backside of the blade and causing kickback. It
also acts as a barrier behind the blade to shield
hands from being pulled into the blade if a kick-
back occurs while the operator is reaching behind
the blade. (Reaching behind the blade is a major
safety risk and should never be done.) Use the
riving knife for all operations.
Figure 81. Riving knife location.
Riving Knife
Figure 82. Installing riving knife on mounting
block.
1
2
3
The riving knife must be correctly installed, adjust-
ed, and aligned in order to provide the maximum
safety benefit.
The riving knife attaches to the mounting block as
shown in
Figure 82. Always firmly tighten the hex
nut when securing the riving knife in place.
Riving Knife Installation & Removal
To ensure riving knife works safely, it MUST
be aligned with and correctly adjusted to
blade.
Содержание G0699
Страница 21: ...Model G0699 Mfd Since 5 15 19 5mm Hardware Recognition Chart...
Страница 108: ......