


Model G0699 (Mfd. Since 5/15)
-65-
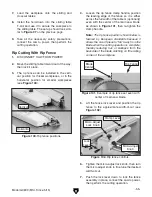
7. Make a lip from scrap wood that is approxi-
mately 2
1
⁄
2
x
3
⁄
8
" x
3
⁄
8
", then fasten this piece
to the bottom of the base, as shown in
Figure
128.
Tip: Try using cyanoacrylate type wood glue
or small wood screws to secure the lip to the
push block base.
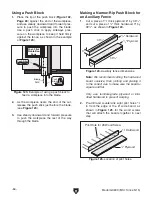
Using the Auxiliary Fence and Push
Block
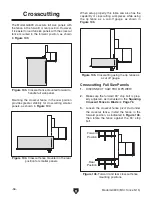
1. Place the auxiliary fence on the table and
clamp it to the fence at both ends, then adjust
the distance between the auxiliary fence and
the blade—this determines how wide the
workpiece will be ripped (see the example in
Figure 129).
Workpiece
Cutting Width
Blade
Auxilliary Fence
Figure 129. Example of adjusting ripping
distance between blade and auxiliary fence.
3. Fasten the 6" and 3" wide boards with eight
#6 x
1
⁄
4
" wood screws through the holes you
drilled in
Step 2; the fence should look like
the one shown in
Figure 126.
4. Cut a piece of plywood 15" long and 5
1
⁄
4
" wide
for the base of a push block, then cut off a
strip
3
⁄
8
" wide by 12
1
⁄
2
" long (see
Figure 127).
3
⁄
4
"
Plywood
Completed
Fence
3
⁄
4
"
Hardwood
#8 x 1
1
⁄
2
"
Wood Screw
Figure 126. Auxiliary fence complete.
5
5
/
8
"
15"
5
1
/
4
"
12
1
/
2
"
2
1
/
2
"
3
/
8
"
Figure 127. Push block base pattern.
5. Cut a piece of
1
⁄
2
" plywood 10" long by 5"–9"
high for the handle, then cut it to the desired
final shape.
6. Pre-drill and countersink three holes through
the bottom center of the base, then attach the
handle to the base with #6 x
1
⁄
4
" wood screws
(see
Figure 128).
Lip
Handle
3
/
8
"
3
/
8
"
2
1
/
2
"
Figure 128. Push block and lip.
Keep the riving knife and blade guard prop-
erly installed during cutting operations.
Failure to do this present amputation
hazards!
Содержание G0699
Страница 21: ...Model G0699 Mfd Since 5 15 19 5mm Hardware Recognition Chart...
Страница 108: ......