


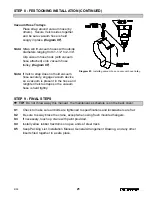

STEP 4 - SPLICE JOINT INSTALLATION
4.1
Attach hardware to splice joint. Slide splice joint over track
of installed runway/monorail.
4.2
Slide next runway/monorail section into splice joint,
bringing runway/monorail ends as close as possible
(
diagram 4A
or
4B
).
Center the splice joint over the track ends.
4.3
For trussed track:
Place a truss splice plate on each
side of runway truss tube and bolt into place
(
diagram 4B
). Tighten hexnuts, but
do not torque
until you have completed Steps 4.4 and 4.5.
4.4
Refer to Step 2.4, on page 3, for lower hanger
installation.
Attach runway to upper hanger by repeating Steps
3.2, on page 5 and 3.3, on page 6.
4.5
Adjust track for smooth transition:
Tighten clamping bolts along the
top of splice
joint
to force track down onto lower flanges of
splice. Check to see that the transition from
one track to the other is smooth: no raised
areas to inhibit trolley or end truck operation.
Tighten clamping bolts along the
sides of
splice joint
to align track laterally. Check to
see that track portion of runway/monorail is
horizontally and vertically flush.
Tighten jam nuts, on both the top and sides of
the splice joint, to lock clamping bolts in place
(
diagram 4A
or
4B
).
4.6
For trussed track:
After you have adjusted the track for smooth transition, torque the
truss splice plate hexnuts (
chart 2A
, on page 2).
4.7
For additional runways repeat Steps 4.1 through 4.6.
4.8
Install end stops (Step 3.4, on page 6).
TIP:
If using trussed track, use both the splice joint and the
splice plate.
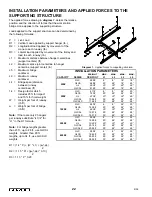
WARNING
Do not deviate from the dimensions specified in the General
Arrangement Drawing for maximum space from hanger point to
splice joint. Installation parameters can be found on page 22.
Æ
Diagram 4A.
Splicing untrussed track.
Do not “over-tighten”
clamping bolts on splice joints: this will cause permanent damage
to the runway track. Clamping bolts are utilized for alignment purposes.
WARNING
Diagram 4B.
Splicing trussed track.
7
9/05
Bridge Crane
Monorail
Содержание AL 1000
Страница 1: ......


