background image


Operation Manual 

17 


7.3.6   Recording Duration 


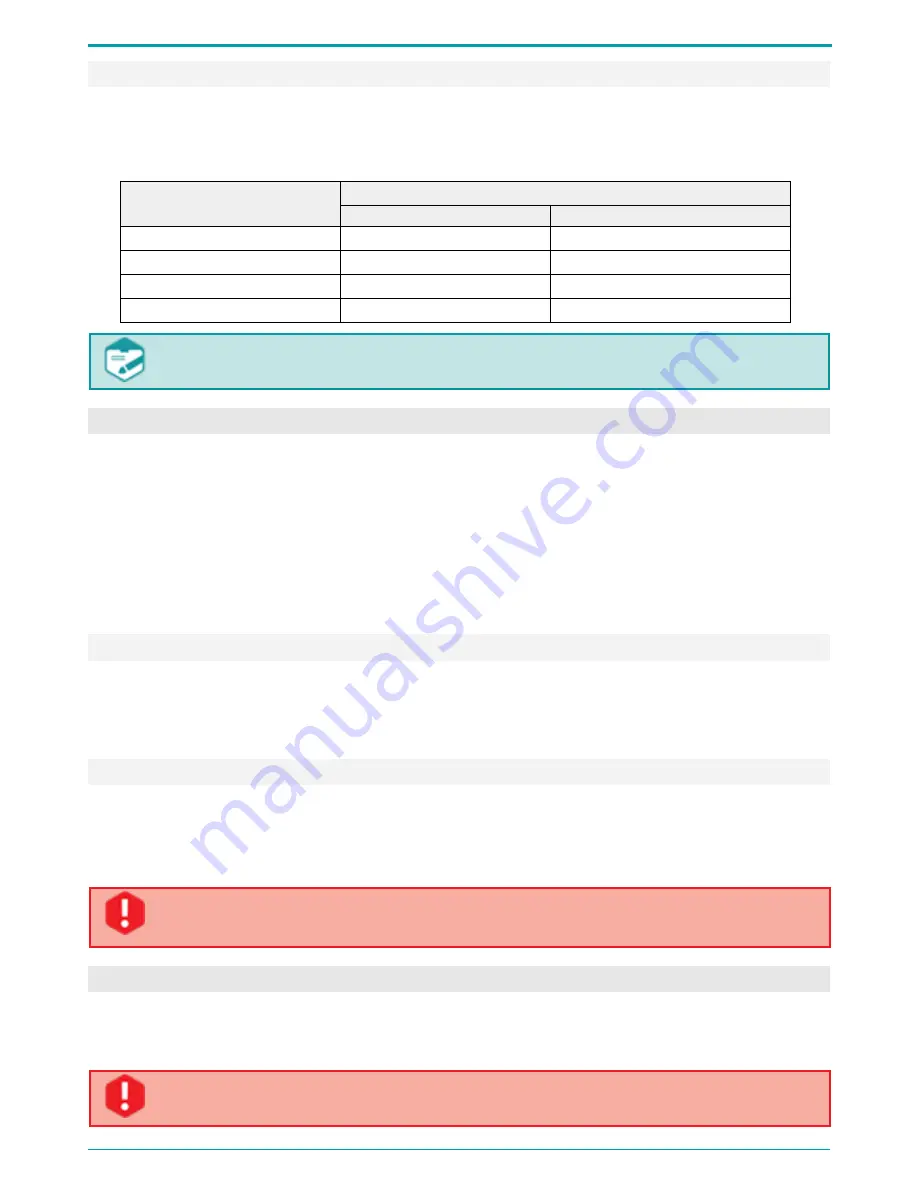
Recording  duration  depends  on  the  specified  parameters  and  available  memory.  Table  3  lists 
approximate recording time for different recording modes and sampling rate values. 

Table 3: Recording duration for various modes and sampling rate values. 

Mode 

Recording duration with the sampling rate 

22050 Hz 

8000 Hz 

μ-law 8 bit, mono 

196 h 

541h 

μ-law 8 bit, stereo 

98 h 

270 h 

PCM 24 bit, mono 

64 h 

180 h 

PCM 24 bit, stereo 

32 h 

90 h 


Note  that  any  recording  exceeding  2  GB  will  be  divided  into  2  files  automatically. 
Maximum recording size is 2 GB. 


7.4     R ec o r di ng  P l a yb a c k   an d  De l e ti on  

You can delete and play back recordings stored in the device memory either using device controls 
or by means of the supplied application. 

Playback and deleting process by means of Voice Recorder Manager is described in section 9.5. 

To  play back  or  delete  recordings  with  multi-functional  button  located  on  the device case  (7  on 
Figure 1), you must assign the relevant function via the application (see section 9.4.11). 

Without application you can play back only the last recorded audio file.  

By default the button (7 on Figure 1) performs playback. 

7.4.1  Playback 


If  the playback function  is  selected,  to  play the  last  recording  stored  at  the  flash  memory,  plug 
earphones in the respective jack at the voice recorder case and press the button (7 on Figure 1). 
To stop playback, press the button again. 

7.4.2 File Deletion 

If  erase  function  is  selected,  press  the  voice  recorder  erase  button  (7  on  Figure 1)  and  hold  it 
down for about 3 seconds in order to erase all recordings from the voice recorder memory quickly. 
The red LED (6 on Figure 1) will indicate the whole process of file deletion. All recordings will be 
removed from the voice recorder memory. 


Deleted data cannot be recovered. 

In case PIN is enabled, the erase option of the button becomes unavailable. 


7.5     RE SE T  B ut to n  

The  RESET  button  located  on  the  device  case  (8  on  Figure 1),  is  used  for  recorder  reboot.  The 
RESET button is located in the small  pin sized hole. You will need a paper clip to actually press 
the button. After pressing RESET, all user settings will not be modified. 


Do  not  use  needles  and  other  sharp  objects  as  they  can  damage  the  button,  and  its 
functions will no longer be available. 

Содержание STC-H661

Страница 1: ...Operation Manual Note to Customer Gnome PII Portable Digital Stereo Recorder STC H661 Operation Manual ...

Страница 2: ...eechpro com Saint Petersburg Phone 7 812 325 88 48 Fax 7 812 327 92 97 Moscow Phone 7 495 669 74 40 Fax 7 495 669 74 44 You can also open a support ticket with us via our web portal http www speechpro com support_form The manufacturer retains the right to issue amendments to this Operation Manual following any improvements to device design without any prior notification Any such amendments will be...

Страница 3: ...tery 12 6 5 2 Battery Charge 12 7 OPERATING THE DEVICE 13 7 1 Default Configuration 13 7 2 Getting Started 13 7 3 Audio Recording 13 7 3 1 Recording Hints 13 7 3 2 Manual Recording 14 7 3 3 Volume Triggered Recording VOX 15 7 3 4 Scheduled Recording Mode 15 7 3 5 Loop Recording Mode 16 7 3 6 Recording Duration 17 7 4 Recording Playback and Deletion 17 7 4 1 Playback 17 7 4 2 File Deletion 17 7 5 R...

Страница 4: ...ime Monitoring 29 9 4 9 Watermarks 29 9 4 10 Scheduled Recording 29 9 4 11 Erase Playback Button 30 9 4 12 LEDs Status 31 9 4 13 Profiles 31 9 4 14 Changing PIN 31 9 4 15 Setting Device Time 32 9 5 Recordings 33 9 5 1 The Recordings Area 33 9 5 2 Toolbar 33 9 5 3 Recording List 34 9 5 4 Recording Playback 34 9 5 5 Deleting Recordings 34 9 5 6 Copying Files to PC 35 9 5 7 Digital Signature 35 9 6 E...

Страница 5: ...ile names and access paths Below there is a notification layout used in the Manual according to notification severity level Links to other documents in the body text Notes important notices and instructions obligatory for fulfilling Not fulfilling these requirements may potentially lead to hardware and software malfunctions and failures Trademarks Windows is a trademark of Microsoft Corporation Ot...

Страница 6: ...t Petersburg Phone 812 325 88 48 Fax 812 327 92 97 1 2 Service Maintenance and Technical Support To contact Technical Support use the following methods Email support speechpro com Web Portal http www speechpro com support_form When contacting our Technical Support please include the following details into your call ticket Device title and version Device content Detailed issue description ...

Страница 7: ... device to a PC enables recorded data playback copying recordings to PC hard drive and changing recorder options 2 2 Legal Warning Recordings made with the device are acceptable for speaker identification or other forensic analysis purposes Before using the device you are encouraged to make yourself familiar with any laws and regulations regarding voice recording applicable to your country 3 DATA ...

Страница 8: ... Operation Manual 1 Shipping box 1 4 2 Advanced Package Title Quantity Gnome PII Portable Digital Stereo Recorder STC H661 internal battery 16 GB onboard memory 1 USB cable 1 Software Installation Package on CD 1 Operation Manual 1 Shipping box 1 Line in cable 1 Microphone set with a remote control 1 Compact headphones 1 110 240 V 50 60 Hz power supply from the AC 1 Desk microphone 1 Shockproof ca...

Страница 9: ...microphone input signal level 200 mVeff Rated linear input signal level 2 Veff Rated output signal level 2 Veff Operation duration without charging Recording duration with default settings see section 7 1 70 h mode standby mode 20000 h volume triggered recording 160 h DC power supply voltage 5 V Internal battery type Li Pol Internal battery capacity 1100 mAh Battery charging time 5 h max Maximum r...

Страница 10: ...No Marking Title 1 USB USB port 2 Recording switch 3 OUT 3 5 headphone jack 4 IN Mic jack 5 Internal mics 6 Battery charge level and recording mode LED indicator 7 Functional button Erase playback button 8 RESET button 6 2 Device Memory For recording storage the eMMC embedded non volatile memory system of 16 GB total capacity is used in the device The storage keeps audio data for at least 10 years...

Страница 11: ...d be connected to the voice recorder to increase stereo base and recording quality Figure 3 Connecting external microphone When connecting external microphones or a PC connection cable to the voice recorder make sure that the PUSH button on the plug is directed opposite to the panel with device serial number Figure 3 When disconnecting the cable from the recorder first press the PUSH button on the...

Страница 12: ...n expected or several devices are connected to a single port you may experience temporary connection issues The red LED 6 on Figure 1 will light up and remain on continuously until the battery is fully charged After the battery is fully charged the process will be automatically finished and the LED indicator will go down In case the charger is not unplugged after certain battery discharge or if th...

Страница 13: ...tions see section 9 4 15 Enable and enter a PIN to protect Gnome PII settings against unauthorized access if required see section 9 4 14 Plug in external microphone if required see section 6 3 Before connecting your voice recorder to a PC make sure the PC case is effectively grounded Grounding is strictly recommended if you intend to connect your voice recorder to a PC and an external signal sourc...

Страница 14: ...e the smaller is reverberation echo and the higher is the gain level and speech intelligibility During stereo recording external microphones must be placed at least 15 cm away from each other Try to place the microphones in such a way as to avoid vibration impact and rubbing against other surfaces External microphones are more sensitive and at the same time can be easily concealed under a jacket l...

Страница 15: ...automatically at any desired time using built in timers To enable the scheduled recording mode while configuring the device parameters see section 9 4 10 do the following Enable one or several timers Set the desired start and stop time for each recording session If multiple times are enabled and the end of one recording session overlaps the beginning of the next recording one the device will recor...

Страница 16: ...ce this segment is full the data recorded in the very beginning of the recording session will start being replaced with the new data Loop recording duration can be specified in hours and minutes see section 9 4 7 Maximum loop duration cannot exceed 2 GB Loop recording can be used in combination with any other recording mode ...

Страница 17: ...11 Without application you can play back only the last recorded audio file By default the button 7 on Figure 1 performs playback 7 4 1 Playback If the playback function is selected to play the last recording stored at the flash memory plug earphones in the respective jack at the voice recorder case and press the button 7 on Figure 1 To stop playback press the button again 7 4 2 File Deletion If er...

Страница 18: ...nstallation 8 2 1 System Requirements The minimum system requirements for the Manager are PC with available USB port and a CD drive CPU Intel Pentium III RAM 256 MB or more Microsoft Windows 7 8 64 and 32 bits Audio I O sound card Headphones Mouse keyboard At least 16 GB of free hard disk space to store recorded data is recommended 8 2 2 Driver Installation To operate audio files via Voice Recorde...

Страница 19: ... and select Control Panel Device Manager If the driver is installed successfully the device will be displayed in the Device Manager dialog Figure 5 a In the Disk drivers section as STC Product USB Device b In the Portable Devices as GNMR2_ХХХХХ where ХХХХХ is the device serial number c In the Ports COM LTP section as Communications Port No additional Voice Recorder Manager installation is required...

Страница 20: ...eas arranged the following way 1 Main menu 2 Device state 3 Area displaying one of the three operation modes Overview Settings and Recordings Figure 6 Main screen Overview area Application main screen is composed of the following icons Icon Description Opens the Overview area see section 9 3 Opens the Settings area see section 9 4 Opens the Recordings area see section 9 5 Closes the application se...

Страница 21: ...ee memory KB the amount of free memory Used memory KB the amount of used memory Maximum record time h m s estimated recording duration with specified device operation parameters The Miscellaneous section contains the following data Serial number device serial number Firmware version Device firmware version The Overview area also contains the following buttons Name Description Creates public key fi...

Страница 22: ...signature file To perform verification apart from audio recording you need digital signature file and public key file You are recommended to locate public key file key digital signature file dsg and audio recording wav in the same folder Figure 8 Figure 8 Files prepared for verification process Figure 9 Specifying access paths To start verification process click Verify sign Figure 6 In the Verify ...

Страница 23: ...meters for each fragment Begin fragment start time End fragment end time Duration total fragment duration Info watermark check results The Info column contains data on the detected fragment or whole file Table in the dialog contains the following information Date and time fragment or file has been created Device name for example GNR 2_661 Device serial number for example 1904 If no watermarks are ...

Страница 24: ...ed recording part can last several seconds or minutes Click Close to exit the Check file dialog 9 3 5 Memory Formatting Figure 13 Fast formatting To perform device formatting click Format memory Figure 6 After the device memory is 50 100 full you are recommended to format the device memory instead of deleting recordings in order to extend flash memory life Please note that formatting will delete a...

Страница 25: ...sion will be applied to the device A message suggesting rebooting PC Figure 15 will show up Click OK 9 3 8 About Figure16 The About dialog To view the Voice Recorder Manager information click About Figure 6 To close the About dialog Figure 16 click OK 9 4 Settings The Settings area is used for configuring device parameters To open the Settings area click 9 4 1 Settings Area Figure 17 Settings area...

Страница 26: ...ion If no errors have been detected this section will display No errors message 9 4 2 Signal Source Figure 18 Signal source shortcut menu Source signal shortcut menu Figure 18 is used for selecting recording source for left and right channels A signal can be recorded in either mono or stereo Stereo recording involves recording onto two separate channels one channel for the left sound input and ano...

Страница 27: ...ompression cannot be used for 32000 Hz and 44100 Hz sampling rate A law compression μ law compression 9 4 5 Volume Triggered VOX Recording Figure 22 Volume triggered VOX recording shortcut menu To open the VOX setup dialog Figure 22 click the Setup option of the VOX recording shortcut menu Figure 23 In the volume triggered mode recording process starts automatically as soon as volume level reaches...

Страница 28: ...ecting gain control type and specifying manual control parameters In the Gain control dialog Figure 25 select one of two Types Tick the Manual option to enable Left channel and Right channel setting areas for manual adjustment Tick the Change both simultaneously checkbox to adjust both channels at the same time Figure 25 Gain control settings dialog Current signal level indicator shows the current...

Страница 29: ...xceed specified time limits In case the specified loop duration exceeds 2 GB you will see a message suggesting reducing loop duration A file recorded in the loop mode cannot exceed 2 GB 9 4 8 Real time Monitoring Figure 28 Real time monitoring shortcut menu Real time monitoring shortcut menu Figure 28 is used for enabling and disabling real time monitoring mode 9 4 9 Watermarks Figure 29 Watermark...

Страница 30: ...ith the remote control After all the parameters are set click OK to enable the timer To disable timer click Off To cancel all the current selections click Cancel In case you set two periodic timers with the exact same parameters or if the device detects errors while applying timer parameters you will see an error message in the area 3 of the application main screen Figure 17 Scheduled recording wi...

Страница 31: ...corder parameters specified can be saved and loaded by means of the Save profile and Load profile options You can generate up to three user profiles Figure 34 Saving a profile To create and save a profile configure needed parameters and click Save profile The Select profile dialog will show up Figure 34 Use drop down list to select one of the three profile names Profile 1 Profile 2 or Profile 3 Cl...

Страница 32: ...de dialog After the code is set the application will require entering PIN the next time you connect the device to PC In the dialog Figure 37 enter PIN in the relevant box and click OK For security purposes you are recommended to use at least four digits for PIN 9 4 15 Setting Device Time Time and date of the connected device are displayed in the Device time area 5 of the Voice Recorder Manager mai...

Страница 33: ...ollowing controls Figure 39 1 Tool bar 2 Folder selection drop down list 3 List of recordings 9 5 2 Toolbar Below you can see a table with icons their description and relevant shortcut menu options Icon Shortcut menu option Description and purpose Grid lines Display grid of the recording list Select string Select the whole string Refresh Refresh recording list Up Go one level up Delete Delete sele...

Страница 34: ...ing mode The way the recording was triggered M Manually T Scheduled Recording V volume triggered recording L Loop recording Audio summary Sampling rate mono stereo compression type Duration Recording duration Source Recording source 9 5 4 Recording Playback The rng recordings cannot be played back before their conversion to other format Figure 40 Windows Media player dialog Double click a recordin...

Страница 35: ...ect the Unroll option of the shortcut menu Figure 39 9 5 7 Digital Signature You can generate digital signature for an audio file while copying it to PC hard drive To do so open shortcut menu of a file you want to create digital signature for and click Sign Figure 39 To create digital signature for rng files open shortcut menu and click Unroll and sign Figure 39 In the Save as dialog Figure 42 spe...

Страница 36: ...the one compatible with your OS If the driver has been installed correctly but error messages still show up delete the driver reboot your PC and try to reinstall the driver 11 OPERATING CONDITIONS The recorder is designed to be used under the following operating conditions Environment temperature minus 5 to plus 40 C Relative humidity up to 80 at 30 C 12 TANSPORTATION AND STORAGE CONDITIONS The re...

Страница 37: ...ee files the Certificate of Acceptance The Manufacturer shall perform product warranty maintenance with no extra cost for the Customer Warranty maintenance means product performance recovery in case of product failure that is not in any way related to product misuse within the warranty period Product return operation sending the product to warranty maintenance facility product recovery or replacem...

Страница 38: ...th required standards and valid technical documentation and classified as fit for use Head of Quality Control Dept Stamp Here ______________________ ______________________ Signature Print Full Name ______________________ Date DD MM YYYY Shipping Date _____________________ __________________ ___________________ day month year Signature Print full name Batch Number and Device Number Breakdown 003 05...

Страница 39: ...Operation Manual 39 ...

Страница 40: ......

Страница 41: ......

Страница 42: ......

Отзывы: