background image

Maintenance

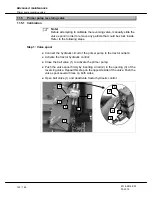
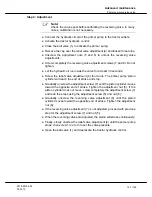
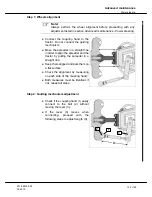
Clean the product

2018-9015-003
03-2015

110 / 148

10.23

Clean the product

After each use and once a year

Warning!

Beware of potential falls: always walk on the nonslip band installed on
the product.

Attention!

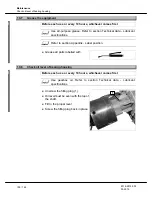
Use tap water to clean this product. Do not exceed 105 bar when using
a pressure washer and keep the nozzle at a distance of 30 cm from the
surface to be cleaned.

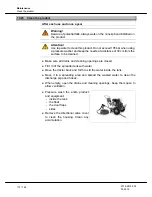
● Make sure all drains and cleaning openings are closed.

● Fill 1/3 of the spreader tank with water.

● Move the tractor back and forth to stir the water inside the tank.

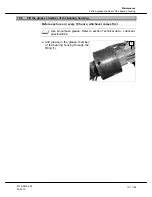
● Move it to a spreading area and spread the wasted water to clean the

discharge pipe and hoses.

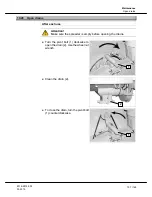
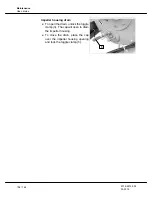
● When empty, open the drains and cleaning openings. Keep them open to

allow ventilation.

● Pressure wash the entire product

and equipment:

- inside the tank
- the float
- the door flaps
- sides.

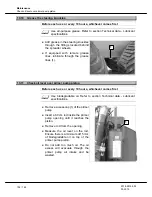
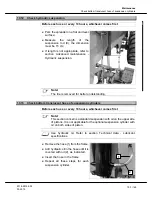
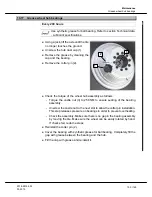
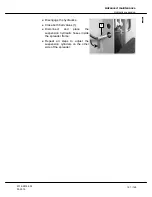
● Remove the directional valve cover

to clean the housing. Clean any
accumulation.

Содержание EL44

Страница 1: ...EL44 Liquid Manure Spreader Instruction Manual Installation Instructions Original instructions 2018 9015 003 03 2015 engineering for a better world GEA Farm Technologies...

Страница 2: ...4 6 Bolt torque chart 35 4 7 Lubricant specifications 35 4 8 Manufacturer nameplate 36 5 Handling 37 5 1 Special qualifications required for handling 37 5 2 Safety instructions for handling 37 5 3 Han...

Страница 3: ...9 3 Troubleshooting possible faults 89 10 Maintenance 93 10 1 Special personnel qualification required for maintenance work 93 10 2 Safety instructions for maintenance 93 10 3 Schedule maintenance res...

Страница 4: ...valve 122 11 6 Power steering 124 12 Decommissioning 129 12 1 Special personnel qualification required for decommissioning 129 12 2 Safety instructions for decommissioning 129 12 3 Temporary decommiss...

Страница 5: ...most recent version can be obtained through the dealer or directly from the manufacturer Pictograms used This pictogram indicates information that will be helpful toward a better understanding of the...

Страница 6: ...lease contact your nearest dealer There is a comprehensive dealer Internet search function on our website at the following address www gea farmtechnologies com European contact information GEA Farm Te...

Страница 7: ...y General principles for design Risk assessment and risk reduction EN ISO 14121 2 2008 02 Safety of machinery Risk assessment Part 2 Practical guidance and examples of methods NF X 08 003 1 2006 07 Gr...

Страница 8: ...in material or workmanship for a period of twelve 12 months from the date of delivery of the equipment to the Purchaser This written warranty takes precedence over any other written warranty included...

Страница 9: ...notifies in writing his Dealer or the Company whichever the case may be of any defect of the equipment In either case the notification must be made within the twelve 12 months following the date of t...

Страница 10: ...mental conditions including without limitation damages caused by fire lightning flood or other natural disaster damages caused by the use of sand litter or other abrasive or inadequate material includ...

Страница 11: ...ONSEQUENTIAL INCIDENTAL PUNITIVE OR EXEMPLARY DAMAGES IN ANY KIND OR CHARACTER INCLUDING INDIRECT COSTS LOSS OF PRODUCTION LOSS OF REVENUES OR PROFITS AND OTHER DISBURSEMENTS WHICH MAY OCCUR Some stat...

Страница 12: ...ting from the modification of shear bolts Power take off In the case of a spreader used under normal conditions the warranty period of the PTO is twelve 12 months from the date of delivery of the equi...

Страница 13: ...e guarantee mentioned above will apply only in the event that the Purchaser has opted for the extended warranty Steel Plus option thick steel reservoir The Stainless Steel option is also available to...

Страница 14: ...gularly instructed on relevant matters The owner must ensure a safe environment by providing this instruction manual with this product adequate lighting in all areas where activities in connection wit...

Страница 15: ...immediate danger to life or health of personnel Death or serious injury will result if the danger is not avoided Warning The indication Warning signals potential danger to life or health of personnel...

Страница 16: ...work in confined spaces it is MANDATORY to read and follow the Safety Procedures concerning Confined Spaces available in the websites listed below These safety procedures explain the risks related to...

Страница 17: ...uct unless they are performing instructions included in this manual When near this product keep body parts such as hands feet hair as well as clothing away from dangerous parts such as rotating parts...

Страница 18: ...of those rules maintenance and methods Qualified personnel Qualified personnel refers to those having obtained the academic knowledge of a specific field of work This personnel has followed a training...

Страница 19: ...parts protecting the user against dangerous elements Those parts must be in perfect working condition and remain in place at all times Replace if damaged worn and or defective Refer to the part number...

Страница 20: ...erhead electrocution hazard Do not allow the equipment to touch overhead electrical lines part no 2099 4725 260 Danger Toxic gases Manure produces toxic gases that can lead to unconsciousness asphyxia...

Страница 21: ...d as improper use and will void the warranty The manufacturer is not liable for any resulting damages due to improper use of this product The user carries the risk Proper use also includes reading and...

Страница 22: ...3 03 2015 22 148 3 2 Modification made to this product For safety reasons do not carry out any unauthorized modification to this product Any modification must be approved by the manufacturer in writin...

Страница 23: ...ble 3 Suspension cylinder 4 Fill opening with protective grid 5 Anti siphon 6 Lifting ring 7 Impeller housing impeller for 540 RPM or 1000 RPM 8 Hoses and wires support 9 Coupling hand 10 Jack 11 Draw...

Страница 24: ...nd 1 Coupling hand 2 Monitoring mechanism 3 Control rod 4 Steering control valve 5 Axle hydraulic hoses 6 Tractor hydraulic hoses 7 Control valve guard 8 Safety mechanism spring 9 Safety mechanism 10...

Страница 25: ...eld not illustrated 6 7 8 9 10 1 5 11 3 4 2 14 13 12 Legend 1 Upper brake lining 2 Drum spacer 3 Hub 4 Hub cap 5 Lower brake lining 6 Air chamber booster 7 Push rod 8 Slack adjuster 9 S camshaft 10 Ad...

Страница 26: ...shown 5 8 9 4 6 2 1 3 10 7 Legend 1 Tank bottom valve cylinder 6 Check valve 2 Directional valve loading or spreading mode 7 Aluminum pipe transportation support 3 Suction hose transportation support...

Страница 27: ...id from a spreader to another 1 2 3 5 4 6 Legend 1 Transfer pipe receptacle in transport position 2 Articulated transfer pipe 3 Hydraulic cylinder to raise lower transfer pipe 4 Hydraulic motor to rot...

Страница 28: ...s 2018 9015 003 03 2015 28 148 3 4 3 In tank recirculating kit The in tank recirculating kit allows agitating the liquid manure to keep it homogenized during transport 2 1 Legend 1 Directional valve 2...

Страница 29: ...oor 2 Hydraulic cylinder 3 Air vent Included with hydraulic sliding door in order to allow air exchange 3 4 5 Powerful halogen rear lights Broad coverage beam providing sufficient lumens to work in th...

Страница 30: ...Description Options 2018 9015 003 03 2015 30 148 3 4 7 Hydraulic jack 1 2 Legend 1 Hydraulic hoses 2 Hydraulic jack 3 4 8 Flapper doors on fill opening 2 1 Legend 1 Flapper doors 2 Guard over springs...

Страница 31: ...6 cm high extension also available 3 4 10 Solenoid valve The solenoid valve allows adding more hydraulic options Each solenoid can control two different hydraulic functions by switching the selector 1...

Страница 32: ...eader Weight without tool bar Spreader Empty kg 6346 6556 8766 8976 9185 9394 Spreader Full kg 20693 22695 28493 30495 32497 34500 Spreader load point without tool bar Tongue load kg 2000 2220 3000 30...

Страница 33: ...6214 6577 6894 7257 7575 7893 24 4627 4990 5307 5579 5897 6169 6441 6713 32 4218 4536 4808 5080 5352 5624 5851 6078 40 3810 4082 4309 4581 4808 5035 5262 5488 4 3 Tractor specifications Spreader model...

Страница 34: ...rate at the pump output without tool bar Performance will differ depending on the tool bar model and manure consistency Spreader draw bar inclination The spreader draw bar is adjusted on the spreader...

Страница 35: ...170NM 125ft lbs 244NM 180ft lbs 339NM 250ft lbs 542NM 400ft lbs 868NM 640ft lbs 1315NM 970ft lbs 4 7 Lubricant specifications Lubricant type Grades Specifications Purpose All purpose grease Use this...

Страница 36: ...a Manufacturer nameplate 2018 9015 003 03 2015 36 148 4 8 Manufacturer nameplate The manufacturer s plate is mounted on the product The serial number is indicated on the plate and also carved on the s...

Страница 37: ...reader The uneven surface under the product could unbalance the load resulting in injuries and or damages Warning Wear protective boots eye gear and gloves for all steps included in this section Atten...

Страница 38: ...ull the spreader out of the container 5 3 2 Lifting spreader components Warning Do not use a forklift truck to lift the spreader Uneven surfaces under the product can cause unbalanced load and result...

Страница 39: ...preader is not designed to be lifted because of the uneven surfaces under the tank Note Park the spreader on a level and firm surface Place the forklift truck in front of the spreader draw bar Attach...

Страница 40: ...emove the transport stands until all wheels are installed properly Note Park the spreader on a level and firm surface Note When wheels are installed on the spreader position two wheel chocks one at th...

Страница 41: ...efore assembling this product look for any damages caused during shipping and handling Do not use damaged components Use the special tools indicated for installation Also read the section Safety 6 3 A...

Страница 42: ...ain hoist with safety chains To lift the accessories Crane To lift the spreader Wrench set To tighten bolts and anchor bolts Ratchet tool set To tighten bolts Heavy duty torque wrench To tighten bolts...

Страница 43: ...disposing of the packing material Handle the packing material properly and dispose according to your valid local regulations and rules on waste disposal Please refer to your local resources for any qu...

Страница 44: ...5 44 148 Lift the spreader refer to section Handling Lifting the spreader Remove the transport stands 1 1 Remove the lock plate 2 from each cylinder if applicable Remove the cotter pin 3 and the washe...

Страница 45: ...ke sure compressed air is filtered and regulated between 4 82 to 6 90 bar Attention Never exceed 8 27 bar Install the upper brake lining 1 over the hub receptacle 2 Make sure the brake lining is well...

Страница 46: ...tacle 1 using a brush Lift the wheel hub using the lifting chains 2 Secure the lifting chains with two wheel nuts as illustrated Rotate the hub shaft to position the hub hole 3 horizontally Insert the...

Страница 47: ...is maintained during the installation of the drum The air pressure will keep brake linings close to the drum which makes installation easier 3 1 2 Lift the drum 1 and install it over the brake lining...

Страница 48: ...knuts 3 Fix the lower dust shield 5 on the steering knuckle 9 using bolts 7 and lock washers 8 Fix the links 12 on the steering knuckle 9 using bolts 10 and lock washers 11 Fix the links 12 on the upp...

Страница 49: ...the tire Lift the tire and position it on the wheel hub Install ten wheel nuts and tighten to 508 NM following the sequence illustrated After tightening all nuts double check the torque for safety Re...

Страница 50: ...pen hydraulic system The beyond plug 2 is required for tractor equipped with a closed hydraulic system also called load sensing in some cases 2 1 Note A new equipment always comes with two plugs a sta...

Страница 51: ...re of potential falls always walk on the nonslip band installed on the product 3 2 1 4 Loosen bolts 1 holding the disc flanges 2 and the collar 3 Turn the anti siphon 4 upward Tighten bolts 1 holding...

Страница 52: ...nslip band installed on the product Unscrew both handles Remove the top fill indicator 1 from the opening 1 Remove the O ring 2 fastened to the top fill indicator 2 Place the O ring over the lid 3 of...

Страница 53: ...embly Refer to section Technical data Bolt torque chart 1 1 Install the mudguard supports A B C D E on the brackets 1 welded on the side of the spreader using carriage bolts flat washers and locknuts...

Страница 54: ...ns 5 and 6 on supports Fasten bottom part of section 1 on support Fasten bracket F on upper part of section 1 Fasten section 2 between sections 1 and 6 Fasten bottom part of section 3 on support Faste...

Страница 55: ...assembly 2018 9015 003 03 2015 55 148 6 12 Ladder assembly Warning Beware of potential falls always walk on the nonslip band installed on the product Install the ladder on the spreader using four bol...

Страница 56: ...embly Note The rear underrun protection must be mounted underneath the rear end of the spreader It might not be compatible with some tool bar models Consult your local rules and regulations to check i...

Страница 57: ...sembly optional Warning Beware of potential falls always walk on the nonslip band installed on the product Note The flexible suction hose is not shown in the illustration below It is installed on the...

Страница 58: ...valve cylinder 2 located inside the tank Insert a screwdriver 3 through the extension bracket to maintain it at its maximum height Fix the cylinder rod 4 to the extension 5 using a bolt 6 Make sure th...

Страница 59: ...Step 3 Hose support installation 13 15 14 17 13 16 Install the supports 13 on the welded brackets 14 using two bolts 15 for each support Install the aluminum pipe 16 on the supports 13 Install the suc...

Страница 60: ...he transfer pipe 3 using bolts flat washers and locknuts Tighten all nuts Apply grease on the pipe end 4 to facilitate the transfer pipe assembly 3 Lift the transfer pipe assembly 3 using an appropria...

Страница 61: ...he second hose to the cylinder Bolt the door using provided hardware Open the ball valve located on the door frame 6 17 Hopper assembly optional Warning Beware of potential falls always walk on the no...

Страница 62: ...2015 62 148 6 19 Solenoid valve assembly optional This option is installed on the spreader Hose connection must be done Selector switch must be connected to the tractor 12 VDC outlet Refer to section...

Страница 63: ...g checklist is completed The first start steps intend to test the product in order to validate its functionality and efficiency before handing it over to the customer Therefore the dealer along with t...

Страница 64: ...he oil levels are adequate All bolts are torqued All drains are closed All connections are secured A visual inspection is performed to ensure there are no leaks signs of distortion or defective parts...

Страница 65: ...e owner is instructed on how to operate the air brake system Hydraulic suspension DONE N A The hydraulic suspension is adjusted and the spreader inclination is adequate when connected to the tractor O...

Страница 66: ...uch as guards covers chains etc are in perfect working condition and remain in place to ensure safety the lubricants such as grease oil etc are at an appropriate level there are no leaks all bolts are...

Страница 67: ...rning Keep body parts and clothing away from moving parts Warning Keep safety devices in place Warning Do not operate this product if a person is on top Warning Wear protective boots eye gear and glov...

Страница 68: ...am Attention The spreader must be towed by the tractor for which it was designed When changing tractor the spreader draw bar must be adjusted Refer to your authorized dealer for more information Using...

Страница 69: ...spreader coupling hand on the tractor hitch by lowering the jack Lock the coupling hand to the tractor locking mechanism Lock the guiding mechanism 3 to the side ball 4 by pressing on the coupling ha...

Страница 70: ...ogies Canada Inc Division GEA Houle Safety chains Safety chains must be in place at all times to prevent the driveline guards from rotating Replace if damaged Make sure the safety chains do not restri...

Страница 71: ...m 10 maximum Joints must always be directed toward the same side of the driveline Lubrication For universal joints use a high quality grease formulated for intensive use Follow the instructions of the...

Страница 72: ...to set the braking power manually Set the Wabco valve according to the actual load inside the tank before testing the air brake system Refer to section Operating Moving the spreader Adjusting Wabco v...

Страница 73: ...ing Connecting the spreader Remove safety brakes and move the spreader Set the hydraulic flow rate of the output connected to the power steering valve as per the spreader model Spreader model Hydrauli...

Страница 74: ...74 148 8 6 1 Turning radius Attention Follow the turning radius to prevent premature wear of the tires and to avoid damaging mechanical parts of the spreader Spreader model Inside radius A Outside ra...

Страница 75: ...co valve Stop the tractor engine and apply hand brakes prior to adjust brakes Check manure level indicator 3 and adjust the Wabco valve 1 located at the front of the spreader Rotate the handle 2 to th...

Страница 76: ...Park the spreader on a level and firm surface Note Before loading the spreader make sure that manure is homogenized and that the consistency matches the tool bar capacity Refer to section Appendix Co...

Страница 77: ...e rear optional of the spreader while loading 3 Reduce filling rate when the spreader tank is full Stop filling when the top level rod indicator 4 starts to raise 4 Rotate the handle of the Wabco valv...

Страница 78: ...r tank contains liquid Note Familiarize yourself with the hydraulic functions and spreading tools before spreading Note The air brake system is equipped with a Wabco valve which allows to set the brak...

Страница 79: ...y Refer to section Appendix Consistency test Note Refer to the PTO driveline instruction manual and follow manufacturer s recommendations Apply the tractor parking brake and turn off the engine Remove...

Страница 80: ...way from the spreader Set the height of the support 10 so that the end of the hose 11 lays horizontally Make sure the other end of the hose is well inserted in the manure 10 11 Legend O Open position...

Страница 81: ...tank Monitor the level of liquid inside the tank When the tank is full open the ball valve C Close gate valve A Open tank bottom valve D Remove suction hose by pushing the receptacle lever 1 to disco...

Страница 82: ...ode only when travelling in a straight line Attention Disengage the PTO before turning with this product Position the directional valve indicator 1 in recirculating mode 2 Engage the PTO in low revolu...

Страница 83: ...cleaning openings and drains when the spreader tank contains liquid Attention Always keep this product on a flat and level surface A B 1 3 2 Use the hydraulics to lift and rotate the articulated tran...

Страница 84: ...sliding door The ball valve is located on the door frame Open or close the hydraulic sliding door using the hydraulic control 8 9 4 Optional hydraulic jack Align the tractor hitch ball 2 under the spr...

Страница 85: ...nnect the solenoid valve kit to the tractor 12 VDC electrical output Connect hydraulic hoses to the tractor Turn the selector switch to proper position to control a specific option Activate the lever...

Страница 86: ...ook them on their supports Remove the manual jack 1 from the transportation support 2 Place the jack on the draw bar secure with a safety pin 3 Adjust the spreader height 2 3 1 If using a hydraulic ja...

Страница 87: ...fer to the PTO driveline instruction manual and follow the manufacturer s recommendations Remove the safety chain if applicable European model not illustrated Disconnect the PTO from the tractor Place...

Страница 88: ...fore connecting or disconnecting the PTO driveline Warning HYDRAULIC LINE UNDER PRESSURE Do not use your fingers to check for leaks Fluids can penetrate skin and cause serious or fatal injuries Hold a...

Страница 89: ...in the directional valve Unbolt the valve cover and remove the foreign material Obstruction in the discharge pipe Remove the obstruction from the pipe Obstruction in the impeller output Disconnect th...

Страница 90: ...nched or defective hoses and repair The brake linings are worn out Refer to section Advanced maintenance Changing air brake parts A slack adjuster is not properly adjusted Refer to section Advanced ma...

Страница 91: ...n Advanced maintenance Power steering The springs of the power steering safety mechanism are loose Vibration in the steering and wheels Power steering spring cylinder does not work properly Contact yo...

Страница 92: ...ch hydraulic oil in the cylinder Refer to section Advanced maintenance Hydraulic suspension The solenoid valve does not work Electric wires are defective or not connected Contact your dealer Self load...

Страница 93: ...luded in this section Warning Beware of potential falls always walk on the nonslip band installed on the product Warning Beware of leaks and spills such as grease oil water etc They can make a surface...

Страница 94: ...he spreader Attention Keep air brake gladhands clear of dirt and sand when disconnected from the tractor to avoid damaging the air brake system Always hook them on their supports at all times Note Hav...

Страница 95: ...s maintenance schedule Tractor The spreader is towed by a tractor Neglecting the tractor maintenance schedule may lead to damages to the spreader For example the tractor compressor must filter the air...

Страница 96: ...bearing housing X Grease the steering knuckles X Check oil level over primer pump piston X Check hydraulic suspension X Check bottom translucent hose of suspension cylinders X Torque wheel nuts X Pur...

Страница 97: ...side the tank before testing the air brake system Refer to section Operating Moving the spreader Adjusting Wabco valve Test the service brakes Apply and release the tractor brake pedal a few times bef...

Страница 98: ...ch use or every 10 hours whichever comes first Inspect the spreader to find any defective part or signs of abnormal wear Tires and wheel nuts Tire pressure refer to section Technical data Tire specifi...

Страница 99: ...lubricant using the grease fittings Lubricate the pivot points 3 with all purpose grease Lubricate the joint 4 using fine oil 1 2 3 4 Lubricate the pivot points of the power steering mechanism 5 with...

Страница 100: ...data Lubricant specifications Refer to section Appendix Label position Grease all parts labelled with 10 8 Check oil level of bearing housing Before each use or every 10 hours whichever comes first Us...

Страница 101: ...15 101 148 10 9 Fill the grease chamber of the bearing housing Before each use or every 10 hours whichever comes first Use all purpose grease Refer to section Technical data Lubricant specifications A...

Страница 102: ...icate through the grease lines 1 1 10 11 Check oil level over primer pump piston Before each use or every 10 hours whichever comes first Use biodegradable oil Refer to section Technical data Lubricant...

Страница 103: ...ire is removed for better understanding 10 13 Check bottom translucent hose of suspension cylinders Before each use or every 10 hours whichever comes first Note This section concerns a standard suspen...

Страница 104: ...ichever comes first Find the steel cable 1 located on the side of the spreader Pull cable for 3 seconds to purge oil water and dust from the air tank 2 2 1 10 16 Adjust the springs of the parallel bar...

Страница 105: ...wheel hub assembly as follows Torque the castle nut 3 to 258 NM to ensure seating of the bearing assembly Unscrew the castle nut to the next slot to allow the cotter pin installation This step releas...

Страница 106: ...que chart 10 19 Change the oil of the bearing housing Every 200 hours Refer to section Technical data Lubricant specifications Place a container under the drain plug 1 to collect the oil Remove the fi...

Страница 107: ...20 Open drains After each use Attention Make sure the spreader is empty before opening the drains Turn the pivot bolt 1 clockwise to open the drain 2 Use the wheel nut wrench 1 Clean the drain 2 2 To...

Страница 108: ...003 03 2015 108 148 Impeller housing drain To open the drain unlock the toggle clamp 3 The cap will open to drain the impeller housing To close the drain place the cap over the impeller housing openi...

Страница 109: ...e spreader is empty before opening cleaning openings 1 Unscrew the handles 1 Remove the cover 10 22 Grease slack adjuster Once a year Attention Do not over grease the slack adjusters it will damage th...

Страница 110: ...from the surface to be cleaned Make sure all drains and cleaning openings are closed Fill 1 3 of the spreader tank with water Move the tractor back and forth to stir the water inside the tank Move it...

Страница 111: ...enance Warning HYDRAULIC LINE UNDER PRESSURE Do not use your fingers to check for leaks Fluids can penetrate skin and cause serious or fatal injuries Hold a piece of cardboard to check for leaks Warni...

Страница 112: ...e Do not apply air pressure in the line Attach safety chains to the spreader lifting rings Slowly lift the spreader to get enough clearance to install support stands 1 under the spreader Remove wheel...

Страница 113: ...6 5 A 8 Pos Part No Description 1 2018 2400 090 Wheel nut 2 2018 4710 180 Brake drum 3 2018 4710 640 Slack adjuster 4 2018 4701 560 kit Upper brake lining 5 Lower brake lining 6 Blue spring 7 Retainin...

Страница 114: ...ove brake linings 4 5 Maintain air pressure in the emergency line red hose to keep the brake linings close to the hub Remove the two retaining springs 7 hooked between the upper and the lower brake li...

Страница 115: ...r pressure in the brake system Connect the tractor air brake outlets to the spreader emergency line red hose and service line yellow blue hoses Make sure the pressure is maintained between 4 83 to 6 9...

Страница 116: ...Note Slack adjusters must be adjusted manually They require periodic adjustments to ensure optimal braking performance Lubricate slack adjusters with all purpose grease after the first three months of...

Страница 117: ...ed 150 mm 150 mm 300 mm The hydraulic suspension is perfectly adjusted and the spreader inclination is adequate More than 150 mm Less than 150 mm Adjust the inclination of the spreader tank by removin...

Страница 118: ...wer unit is sufficient Remove the suspension hydraulic hose from the frame The hose is located at the front of the spreader Connect the suspension hydraulic hose to the tractor Open the ball valve 1 o...

Страница 119: ...th X Spreader model 150 mm EL44 4D EL44 6D Disengage the hydraulics Close the ball valve 1 of the suspension hydraulic hose Disconnect the suspension hydraulic hose and place it inside the spreader fr...

Страница 120: ...lic hoses from the frame The hoses are located at the front of the spreader Connect both suspension hydraulic hoses to the tractor Open the ball valves 1 of the suspension hydraulic hoses Engage the h...

Страница 121: ...018 9015 003 03 2015 121 148 Disengage the hydraulics Close both ball valves 1 Disconnect and place the suspension hydraulic hoses inside the spreader frame Repeat all steps to adjust the suspension c...

Страница 122: ...fer to the following steps Step 1 Valve spool Connect the hydraulic circuit of the primer pump to the tractor outlets Activate the tractor hydraulic control Close the ball valve 1 to activate the prim...

Страница 123: ...tment 4 four turns The primer pump piston cylinder will reach the end of stroke and stop Gradually unscrew the adjustment screw 7 until the piston cylinder moves toward the opposite end of stroke Tigh...

Страница 124: ...eering engaged needlessly to prevent the tractor hydraulic system from overheating Attention Do not tow the spreader at a speed exceeding 12 km h when the power steering is engaged It is important to...

Страница 125: ...spreader in a straight line in order to align the spreader and the tractor by pulling the spreader in a straight line Keep them aligned and park them on a flat surface Check the alignment by measurin...

Страница 126: ...chanism 3 3 4 2 4 1 Position the parallel bars 1 perpendicular with the flat bar support 2 by adjusting the eye bolts 3 The springs 4 must be straight not hanging nor stretched Make sure the parallel...

Страница 127: ...djustments must be performed before proceeding with the cables adjustment Use a vise grip to lock the power steering rod 1 on the flat bar support 2 to hold the power steering in neutral position Adju...

Страница 128: ...e maximum efficiency of the power steering Note Adjust the control valve only when all the previous steps have been performed Note Adjust the release point of the tractor hydraulic lever prior to adju...

Страница 129: ...e could unbalance the product resulting in damages and or injuries Attention Keep all hose couplings clear of dirt and sand when disconnected from the tractor Always hook them on their supports Note U...

Страница 130: ...door flap and sides to release the springs completely Remove the directional valve cover and clean the housing Clean any accumulation of dry manure Fill 1 3 of the tank with water Remove wheel chocks...

Страница 131: ...ns Place the product in a storehouse after cleaning to protect it against the elements and prevent premature corrosion Turn off the tractor engine Place wheel chocks one at the front and one behind a...

Страница 132: ...Appendix Label position 2018 9015 003 03 2015 132 148 13 Appendix 13 1 Label position 13 1 1 Safety labels A C E D B F A C J H G K L M M I M N...

Страница 133: ...3 2015 133 148 A 2099 4725 210 B 2099 4725 270 C 2099 4725 180 D 2099 4725 170 E 2099 4725 130 F 2099 4725 100 G 2099 4725 390 H 2099 4725 120 I 2099 4725 520 J 2007 4700 390 K 2010 4703 430 L 2010 47...

Страница 134: ...Appendix Label position 2018 9015 003 03 2015 134 148 13 1 2 Lubrication labels A A A A A A A A A A A A A A A B A 2099 4701 240 B 2099 4701 250...

Страница 135: ...ms 2018 9015 003 03 2015 135 148 13 2 Pneumatic diagrams 13 2 1 EL44 4D air brake 1 2 3 4 5 6 6 7 7 7 7 6 Legend 1 Emergency line 2 Service line 3 Wabco valve 4 Air tank 5 Control valve 6 Test connect...

Страница 136: ...diagrams 2018 9015 003 03 2015 136 148 13 2 2 EL44 6D air brake 1 2 3 4 5 6 6 7 7 6 7 7 7 7 4 5 6 6 Legend 1 Emergency line 2 Service line 3 Wabco valve 4 Air tank 5 Control valve 6 Test connection 7...

Страница 137: ...3 03 2015 137 148 13 3 Hydraulic diagrams 13 3 1 EL44 4D hydraulic power steering 1 2 3 3 6 5 4 4 2 Legend 1 Axle 1 non steerable 2 Axle 2 steerable 3 Power steering control valve 4 Compression spring...

Страница 138: ...2 EL44 6D hydraulic power steering 1 2 4 4 3 7 5 5 6 5 5 1 3 8 8 Legend 1 Axle 1 steerable 2 Axle 2 non steerable 3 Axle 3 steerable 4 Power steering control valve 5 Compression spring 6 Power steerin...

Страница 139: ...pendix Hydraulic diagrams 2018 9015 003 03 2015 139 148 13 3 3 Self loading option 1 2 3 4 Legend 1 Tank bottom valve cylinder 2 Primer pump cylinder 3 Tank bottom valve control lever 4 Reversing valv...

Страница 140: ...8 9015 003 03 2015 140 148 13 3 4 Solenoid valves control option 1 2 3 4 5 6 Legend 1 Solenoid valve 2 Selector switch 3 Hydraulic component 1 4 Hydraulic component 2 5 Tractor hydraulic outlets 6 Tra...

Страница 141: ...Appendix Hydraulic diagrams 2018 9015 003 03 2015 141 148 13 3 5 Nursing kit option 1 2 3 4 4 Legend 1 Hydraulic cylinder 2 Optional hydraulic cylinder 3 Hydraulic motor 4 Restrictor...

Страница 142: ...egend WHITE White 1 Yellow left turn 1 Green right turn RED Red 2 Blue auxiliary 3 Brown tail light YELLOW Yellow 4 Red stop 5 White ground BLUE Blue 6 White 7 White GREEN Green 8 Brown 9 Black BROWN...

Страница 143: ...product 1 Set a pail on a level surface and install a 60 cm round plate at the center of the pail 2 Fill a second pail with homogenized liquid manure and slowly pour it in the center of the plate unt...

Страница 144: ...ct and note the parameters described below Fill the spreader tank with liquid manure Note the volume of manure inside the spreader tank Move to a spreading area Position the tool bar to spread Move th...

Страница 145: ...ers minute x 600 11 5 meters 9 6 km h 26359 liters hectare Spreading rate versus spreading speed Determine the proper spreading rate according to your application in order to define the tractor speed...

Страница 146: ...motive Engineers USA United States of America WWW World Wide Web Units Explanation Units Explanation A ampere kg kilogram AC alternative current kPa kilopascal cm centimeter kW kilowatt degree km h ki...

Страница 147: ...Appendix Abbreviations 2018 9015 003 03 2015 147 148...

Страница 148: ...ues Excellence Passion Integrity Responsibility GEA versity GEA Group is a global engineering company with multi billion euro sales and operations in more than 50 countries Founded in 1881 the company...

Отзывы: