TROUBLESHOOTING & REFERENCES
I-5
ENGLISH
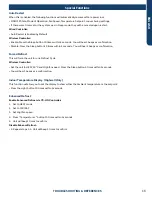
Special Functions
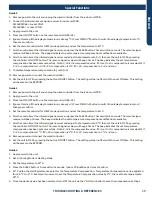
Guide 2
1. Remove power to the unit and unplug the wired controller from the indoor unit PCB.
2. Connect the infrared remote signal receiver to indoor unit PCB.
0151800106E = socket CN29
0151800267 = socket CN21
3. Apply power to the unit.
4. Press the ON/OFF button on the remote control (HBS-01).
5. (Ignore this step if the display temperature is already
O
C,) Press MENU/
O
F button to switch the display temperature to
O
C,
then press confirm.
6. Set the remote controller for HEAT mode operation, and set the temperature to 24
O
C.
7. Aim the controller at the infrared signal receiver, and press the SLEEP button 7 times within 5 seconds. The remote signal
receiver will beep 2 times. The beeps indicates the set temperature compensation modification is available.
8. Aim the controller at the infrared signal receiver and adjust the temperature to X
O
C, then set the unit to OFF by pressing
the controller’s ON/OFF button. The remote signal receiver will beep 4 times. The beep indicates the set temperature
compensation has been set successfully.
Note: X-24 is the compensation value. If X is set to 24, compensation is canceled (0). If
X = 25, compensation is 1
O
C. If X =26, compensation is 2
O
C. If X =22, compensation is -2
O
C, and so on.
9. To disable temperature compensation (0), set X to 24
10. Remove power and connect the wired controller.
11.
Set the unit to OFF by pressing the button ON/OFF button. The setting will be in effect with the next ON time. This setting
will be saved in the EEPROM.
Guide 3
1. Remove power to the unit and unplug the wired controller from the indoor unit PCB.
2. Apply power to the unit.
3. Press the ON/OFF button on the remote control (HBS-01).
4. (Ignore this step if the display temperature is already
O
C,) Press MENU/
O
F button to switch the display temperature to
O
C,
then press confirm.
5. Set the remote controller for HEAT mode operation, and set the temperature to 24
O
C.
6. Aim the controller at the infrared signal receiver, and press the SLEEP button 7 times within 5 seconds. The remote signal
receiver will beep 2 times. The beeps indicates the set temperature compensation modification is available.
7. Aim the controller at the infrared signal receiver and adjust the temperature to X
O
C, then set the unit to OFF by pressing
the controller’s ON/OFF button. The remote signal receiver will beep 4 times. The beep indicates the set temperature
compensation has been set successfully.
Note: X-24 is the compensation value. If X is set to 24, compensation is canceled (0). If
X = 25, compensation is 1
O
C. If X =26, compensation is 2
O
C. If X =22, compensation is -2
O
C, and so on.
8. Remove power and connect the wired controller.
9.
Set the unit to OFF by pressing the button ON/OFF button. The setting will be in effect with the next ON time. This setting
will be saved in the EEPROM.
Guide 4
1. Apply power to the unit.
2. Set to Cooling Mode or Heating Mode
3. Set the temperature to 24
O
C.
4.
Press the SLEEP button 7 times within 5 seconds. Indoor PCB will Beep 2 times to confirm.
5. 24
O
C will be the starting/reference point for the Temperature Compensation. Temperature Compensation can be adjusted
from -8
O
C to +6
O
C. Example: if you want to set the Temperature Compensation value by 4
O
C, then set the temperature to
28
O
C
.
6. Once the desired value has been selected, turn OFF the unit via the YR-HG controller to save the compensation settings.
Содержание AB09SC2VHA
Страница 2: ...Oct 2020 Manual release Revision History ...
Страница 12: ... This page intentionally left blank ...
Страница 45: ...WALL MOUNT TECHNICAL OVERVIEW ENGLISH Topic Title C 9 Wiring Diagrams ...
Страница 68: ... This page intentionally left blank ...
Страница 78: ... This page intentionally left blank ...
Страница 104: ... This page intentionally left blank ...


