2. HORIZONTAL MODE
2-37
2.18 Event Mark, Own Ship Position Mark
The event mark is useful for finding the horizontal range, depth and bearing to a
location some distance from current position. 10 such marks may be inscribed
on the horizontal display. This function requires speed and heading data.
There are two types of event marks, latest event mark (
⊕
) and event mark (+).
Each time an event mark is entered the latest event mark appears at the
trackball mark position and all other event marks are shown by the “plus” (+)
mark and numbered in sequential order. When the memory capacity for event
marks is reached the earliest event mark is automatically erased to make room
for the latest.
The own ship mark ( ) is used to mark current position.
2.18.1
Entering an event mark
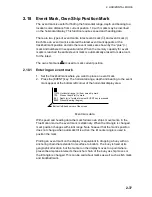
1. Set the trackball mark where you want to place an event mark.
2. Press the [EVENT] key. The horizontal range, depth and bearing to the event
mark appear at the bottom left corner of the horizontal display area.
→
234: Horizontal range (m) from own ship mark
↓
19: Present depth (m) to mark
(35): Depth (m) of mark at moment EVENT key is pressed.
B265: Present bearing (degree)
Bottom left-hand corner of the screen
Event mark data
With speed and heading data the mark follows own ship’s movements. In the
True Motion mode, the event mark is stationary. When the tilt angle is changed
mark position changes with slant range. Note however that the mark’s position
does not change when automatic tilt is active; the tilt center angle is used to
position the mark.
Plotting an event mark on the display is equivalent to dropping a buoy with an
anchoring chain that extends from surface to bottom. The buoy is fixed at its
geographical location, but the marker on the display moves to a point where
present beam plane intersects the anchor chain of the buoy as ship moves or
the tilt angle is changed. This can be said about marks as well such as fish mark
and trackball mark.
Содержание FSV-30
Страница 1: ...COLOR SCANNING SONAR FSV 30 ...
Страница 14: ...This page is intentionally left blank ...
Страница 30: ...1 OPERATIONAL OVERVIEW 1 16 This page is intentionally left blank ...
Страница 80: ...2 HORIZONTAL MODE 2 50 The page is intentionally left blank ...
Страница 100: ...3 VERTICAL MODE 3 20 The page is intentionally left blank ...
Страница 122: ...5 6 This page is intentionally left blank ...
Страница 136: ...7 10 This page is intentionally left blank ...
Страница 152: ...8 OTHERS MENU 8 16 This page is intentionally left blank ...
Страница 170: ...10 MAINTENANCE TROUBLESHOOTING 10 14 This page is intentionally left blank ...
Страница 174: ...SP 4 This page is intentionally left blank ...
Страница 182: ...ORIGINAL SETTING AP 8 New Original setting ...
Страница 183: ...ORIGINAL SETTING AP 9 ...
Страница 184: ...ORIGINAL SETTING AP 10 ...
Страница 185: ...ORIGINAL SETTING AP 11 Color setting ...
Страница 186: ...ORIGINAL SETTING AP 12 Color Response Curve setting ...


