background image

129

PRIMERGY BX620 S4 Server Blade User’s Guide      

6

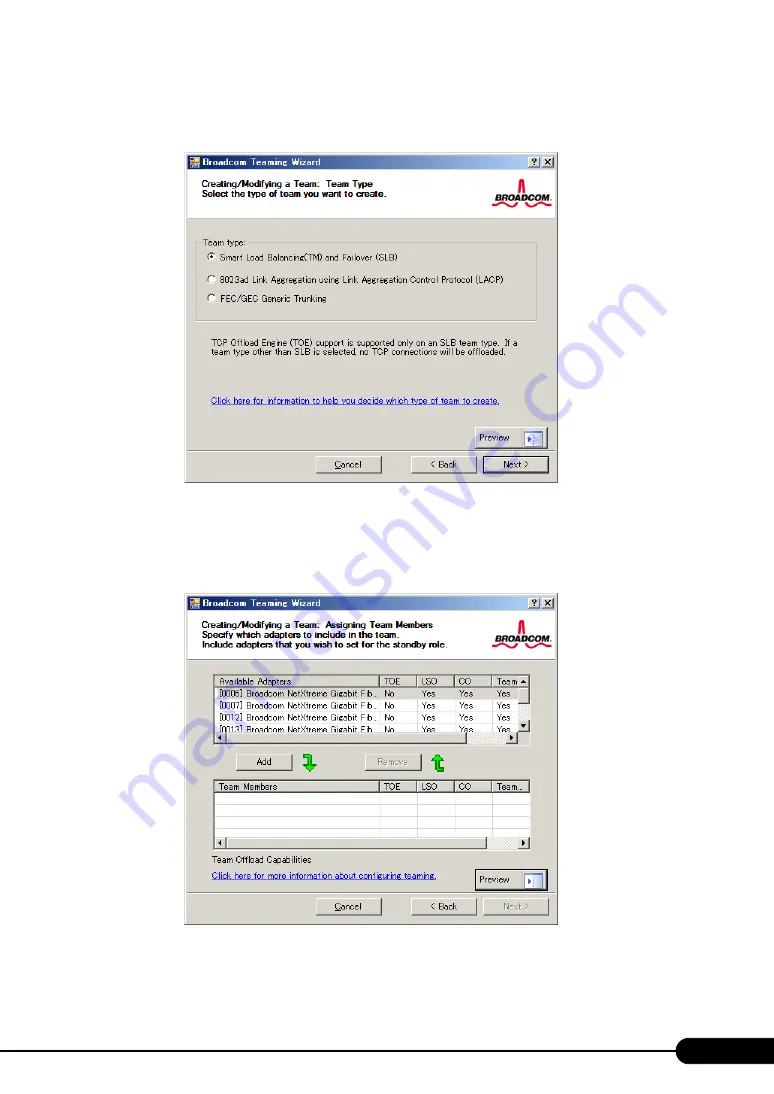
Enter a team name, and click [Next]. 

The [Creating/Modifying a Team: Team Name: Team Type] window appears.

7

Select the team type, and click [Next].

The following is an explanation for when selecting [Smart Load Balancing (TM) and Failover 

(SLB)] as an example. The [Creating/Modifying a Team: Assigning Team Members] window 

appears.

8

Select the adapter to be incorporated in the Team from the [Available Adapters] 

list, and click [Add].

The selected adapter is added in the [Team Members] list.

Содержание PRIMERGY BX620 S4

Страница 1: ...lation This chapter explains how to install the OS on the server without using ServerStart Chapter5 Operations after OS Installation This chapter explains the operations to be performed after OS installation Be sure to perform those operations before operating the server Chapter 6 High Reliability Tools For stable PRIMERGY server operations we recommend that high reliability tools be installed Thi...

Страница 2: ...operating system and application software perform backup and other necessary operations Note that data protection is not guaranteed when repairs are performed It is the customer s responsibility to maintain backup copies in advance In case of data loss Fujitsu assumes no liability for data maintenance or restoration and damages that occur as a result of the data loss for any reason except for item...

Страница 3: ...ed on chassis Server Blades slot 4 and slot 10 the device may not operate correctly Four internal LAN ports out of six of this Server Blade cannot be used Do not install the Server Blade slot with 4 Gbit s FC I O Module PG FCD201 installed on BX600 S2 chassis This will cause a failure When installing a Server Blade with a FC expansion board installed on the BX600 S2 chassis use the 4 Gbit s FC I O...

Страница 4: ...y Shift key etc DVD ROM drive descriptions In this manual a DVD ROM drive is described as CD DVD drive Failure to observe this warning may cause serious injury or death and or destroy the system Failure to observe this warning may lead to injury destruction of the system or loss of data A triangle mark emphasizes the urgency of the WARNING and CAUTION Details are described next to the triangle A b...

Страница 5: ... convenience of explanation Consecutive operations Consecutive operations are described by connecting them with Abbreviations The following expressions and abbreviations are used throughout this manual Example Procedure of clicking the Start button pointing to All Programs and clicking Accessories Click Start All Programs Accessories table Abbreviations of Product names Product names Expressions a...

Страница 6: ...rver 2003 R2 Microsoft Windows Server 2003 R2 Enterprise Edition Microsoft Windows Server 2003 Standard x64 Edition Windows Server 2003 x64 1 Microsoft Windows Server 2003 Enterprise x64 Edition Microsoft Windows Server 2003 R2 Standard x64 Edition Windows Server 2003 R2 x64 Microsoft Windows Server 2003 R2 Enterprise x64 Edition Microsoft Windows 2000 Server Windows 2000 Server Microsoft Windows ...

Страница 7: ...E TXT file in the root folder on the PRIMERGY Startup Disc Use a text editor to read it Latest information about software provided with this server For the latest information regarding ServerStart ServerView and other software provided with this server refer to the Fujitsu PRIMERGY website http primergy fujitsu com Warning and Caution Labels Warning and caution labels are found on the server Do no...

Страница 8: ...8 ...

Страница 9: ...ngs 36 2 2 Selecting the Installation Method 39 2 2 1 Supported OS 40 2 2 2 Installation Modes of ServerStart 41 2 3 Precautions on Installation 42 2 3 1 Installation Partition Size 42 2 3 2 Notes on Configuring RAID 42 2 3 3 Notes on a Multiple LAN Adapter Configuration 43 2 3 4 Cautions for Using ServerStart 43 2 3 5 Onboard Controller and Expansion Cards Supported by ServerStart 45 2 3 6 Cautio...

Страница 10: ...003 108 5 3 Storing the System Setting Information 110 5 3 1 How to Store the BIOS Information with Server Management Tools 111 5 3 2 How to Recover the BIOS Information with Server Management Tools 112 5 4 Creating Maintenance Tools 113 5 4 1 Installing ServerStart 113 5 4 2 Creating Server Management Tools Disk 116 5 4 3 Creating a DOS Floppy Disk 116 5 5 Notes Before Operating the Server 117 5 ...

Страница 11: ...PU Installation 176 7 3 2 Available CPUs and Notes 177 7 3 3 How to Install a CPU 178 7 3 4 Defective CPU Disconnection Function 181 7 4 Installing Memory Modules 182 7 4 1 Location of Memory Module Installation 183 7 4 2 Available Memory Modules and Notes 183 7 4 3 How to Install Remove Memory Module 186 7 4 4 Defective Memory Disconnection Function 187 7 5 Installing an Expansion Card 188 7 5 1 ...

Страница 12: ... 8 2 10 CPU Status Submenu 220 8 2 11 Memory Status Submenu 221 8 2 12 Console Redirection Submenu 222 8 2 13 System Information Submenu 223 8 2 14 Boot Menu 224 8 2 15 Boot Device Priority Submenu 225 8 2 16 Exit Menu 226 Chapter 9 Operation and Maintenance 9 1 Daily Maintenance 228 9 1 1 Checking the Server Condition 228 9 2 Troubleshooting 229 9 2 1 Hardware Troubleshooting 229 9 2 2 Error Mess...

Страница 13: ...ntenance Service 258 9 8 2 Contacting Maintenance Support 259 9 9 Maintenance Notes 260 9 9 1 Operations after Replacement of a SAS Module or an Expansion Card Slot Module 260 Appendix A Server Blade Specifications 262 B Specifications for Internal Options 264 B 1 CPU Specifications 264 B 2 Memory Specifications 265 B 3 Internal Hard Disk Unit Specifications 265 B 4 Expansion Card Slot Module Spec...

Страница 14: ...14 ...

Страница 15: ... Blade as well as an overview of the software provided with this Server Blade In addition the workflow from placing the Server Blade to starting the operation is also described 1 1 BX600 Blade Server 16 1 2 Supplied Software 20 1 3 Component Names and Functions 27 1 4 Workflow 32 ...

Страница 16: ... channels and so on in a 7U height approx 31 cm Chassis due to its high performance and highly integrated design The blade server consists of the following components Chassis or Case The following blades can be installed on the 7U size Chassis Server Blades Max 10 Storage Blades Max 5 Network Blade external connection device Max 4 Management Blade Monitoring device 2 installed as standard Front Se...

Страница 17: ...nal LAN ports including a LAN Expansion Board in a Server Blade to the external LAN ports at a ratio of 1 1 FC Pass Thru Blade FC Pass Thru Blade is used to connect between the ports of the Fibre Channel Expansion Board optional that is installed in the Server Blade and the external Fibre Channel ports at a ratio of 1 1 Management Blade monitoring device This blade is used to monitor the power sup...

Страница 18: ... depending on system configurations High speed processing Quad Core Intel Xeon Processors or Dual Core Intel Xeon Processors The server supports up to two Quad Core Intel Xeon processors or Dual Core Intel Xeon processors for high speed data processing A Quad Core processor functions as four physical CPUs a Dual Core processor functions as two physical CPUs A Quad Core Processor does the same work...

Страница 19: ...d connection to the backup device are enabled High reliability You can specify a password so that only a specific person can use the Server Blade The server supports the Single Device Data Connection SDDC function using PC2 5300 compliant memory DDR2 667 SDRAM and the memory mirror function depending on the memory configuration to enable data recovery in the event of a memory error A storage syste...

Страница 20: ...d by ServerStart In addition high reliability tools and array controller management tools are automatically installed It prevents the related errors It is recommended to perform the OS installation with using ServerStart ServerStart Auto setup Using ServerStart Automatic RAID configuration Automatic installation of recommended drivers Automatic installation of high reliability tools are available ...

Страница 21: ...an configure a network on server installation For details on available network patterns refer to Using ServerStart to Configure the Network Automatic driver installation This function installs the recommended drivers for such as automatically recognized expansion cards on the server installation It is preventative for mismatch driver installations such as previous version or incompatible drivers A...

Страница 22: ...nding on the mode Tool bar For the expert mode While the wizard is running do not click the icon to move to the previous or next window or to upper tree level To move to a different window click the Previous Up or Next button at the bottom of the wizard window Goes to the next page Returns to the main screen Ends ServerStart Changes the size of icons Returns to the previous page Resets the status ...

Страница 23: ...t function through normal operations to restoration from errors Server monitoring tools System diagnosis support tool LAN driver advanced setup tools Server monitoring tools The server monitoring tools monitor the hardware status and notify the event of an error when irregular status occurs Early detection of a server failure ServerView ServerView monitors the server status to protect important se...

Страница 24: ...s DSNAP DSNAP is a command line utility for collectively acquiring failure analysis information Command line operation makes easy to set the configuration information of the system file and major registries and collect the event log When a problem occurs in your Windows Server 2003 system DSNAP is used for a support engineer to understand your system software configuration and settings correctly a...

Страница 25: ...erverView Console are installed together These cannot be selected individually To use all functions of ServerView Java2 Runtime Environment Standard Edition and Web server are required When using ServerStart to install the OS Java2 Runtime Environment Standard Edition is installed automatically For Web server you can use either of the following by selecting a menu ServerView Console for Apache Ins...

Страница 26: ...or Windows Server 2008 ServerView Console for IIS cannot be installed For Windows Server 2003 it is not possible to release both the ServerView Console for IIS and the ServerView Console for Apache However it is possible for Windows Server 2008 In Windows Server 2008 Server Core installation environment ServerView Console for Apache is not supported Intel PROSet will be installed only when an opti...

Страница 27: ...hen installing removing a Server Blade b 2 5 inch storage bay Install the hard disk unit Up to two hard disk units can be installed in this Server Blade c Hard disk status LED Indicates the state of the internal hard disk unit installed where the LED is located The meanings of each LED is as follows Hard disk access LED Left This LED lights green when data is being written to or read from the hard...

Страница 28: ... the Server Blades The Chassis power is not turned on Lights green The power is turned on Lights amber The power is turned off Standby Blinks green Blinks when an error is detected in the Server Blade or the Server Blade identification function is used while the power is turned on If an error occurs contact an office listed in the Contact Information of Start Guide or device administrator Blinks a...

Страница 29: ...s depending on the LAN status as follows j Display USB extension connector Display device or USB connected peripheral devices are connected using a Display USB Extension Cable k Expansion Card Slot The SAS controller with array function is installed standardly When the optional expansion card slot module is installed a PCI Express or PCI X expansion card can be installed The type of card that can ...

Страница 30: ... port 2 for I O expansion board Ports Max 2 ports for I O expansion board Fibre Channel Expansion Board LAN Expansion Board These ports are connected to the Network Blade NET 3 4 on the rear of the Chassis via the mid plane e Memory slots A memory module Add on RAM module is installed in the memory slot f CPU sockets Install the CPU One socket is installed by default Up to two sockets can be insta...

Страница 31: ...ttings pg 204 c Memory slots d CPU sockets e SAS connector 1 This connector is connected to 2 5 inch storage bay 1 f SAS connector 2 This connector is connected to 2 5 inch storage bay 2 g Connector for expansion card slot module When an expansion card slot module is installed this connector is connected to the expansion card slot module a b c d e f g Front Rear ...

Страница 32: ...s to be performed in one operation can be used in this server It is recommended that ServerStart is used to perform installation Checking precautions on installation Before installing the OS check the precautions on installation by referring to 2 3 Precautions on Installation Procedures before operation Before operating the server refer to Chapter 5 Operations after OS Installation High reliabilit...

Страница 33: ...apter explains the preparation on the server and cautions necessary before OS installation Please read this chapter before starting installation 2 1 Preparation on the Server 34 2 2 Selecting the Installation Method 39 2 3 Precautions on Installation 42 ...

Страница 34: ...sk unit that is installed in the Storage Blade delete the array configuration when installing the OS Set an array configuration again after OS installation Cautions for installing an external storage system When installing an external storage system such as the ETERNUS series in the Chassis make sure to turn the external storage system power on after the OS installation has completed Make sure the...

Страница 35: ...e hotfix module is also stored in the ServerStart CD DVD 3 The usable memory varies depending on the OS that is used table Maximum Installable Size and Maximum Available Size OS Installed memory size Available memory size Windows Server 2008 Standard 32 bit Windows Server 2003 Standard Edition Windows Server 2003 R2 Standard Edition Up to 3GB Same as the installed memory size 3GB to 4GB Depends on...

Страница 36: ...p Utility The BIOS Setup Utility must be set in the following cases For details on how to set the BIOS Setup Utility refer to 8 2 BIOS Setup Utility pg 205 The contents set with the BIOS Setup Utility are recorded in CMOS and NVRAM in the Server Blade This CMOS stores information with the built in battery When a setup message is displayed during POST even after setup was performed normally the set...

Страница 37: ...main power was turned on may cause PXE not to boot due to the Switch Blade not having been started The PXE boot function is not available for the LAN port of the 1 Gbit s Ethernet I O Module 1 Take the following steps in the BIOS Setup Utility Set PXE IBA CE slot nnnn v to the highest level in the boot priority sequence For more details about changing the boot drive refer to 8 2 15 Boot Device Pri...

Страница 38: ...e sure to change it 1 Turn the Server Blade on and start the BIOS Setup Utility 8 2 1 Starting and Exiting the BIOS Setup Utility pg 205 2 Select the Main menu Boot submenu and press the Enter key The Boot Settings window appears 3 Select Boot Device Priority and press the Enter key The Boot Device Priority submenu appears 4 Set the Boot device to put Hard Disk Drives before Removable Drives Set i...

Страница 39: ...ws Server 2003 R2 x64 Windows Server 2003 x64 Windows Server 2003 R2 Windows Server 2003 No Yes Yes For the use of Linux refer to the Fujitsu PRIMERGY website http primergy fujitsu com Installation is performed manually Refer to 4 2 Starting Manual Installation and perform installation Refer to 3 1 Quick Installation Mode and begin the install By setting the minimum settings the install will start...

Страница 40: ...er V ServerStart V6 711 For ServerStart V6 711 the following OSes can be installed Microsoft Windows Server 2003 Standard Edition Microsoft Windows Server 2003 Enterprise Edition Microsoft Windows Server 2003 Standard x64 Edition Microsoft Windows Server 2003 Enterprise x64 Edition Microsoft Windows Server 2003 R2 Standard Edition Microsoft Windows Server 2003 R2 Enterprise Edition Microsoft Windo...

Страница 41: ...vironment the quick installation mode must be selected to install the OS Select Logical Disk0 in the Select the Boot Controller and Boot Disk window and install the OS Expert mode In this mode start up Disk Manager and format the partition where your OS is installed prior to installation of the OS Select the expert mode only when installing the OS while maintaining the existing partitions Windows ...

Страница 42: ...as the OS and BOOT partitions The OS cannot be installed in a partition larger than 2TB The BOOT partition is a partition for booting Minimum information that is necessary for booting such as ntldr is set The OS partition is a partition for installing the OS 2 3 2 Notes on Configuring RAID When configuring RAID check the following beforehand Internal hard disk unit Up to two internal hard disk uni...

Страница 43: ... CD 2 3 3 Notes on a Multiple LAN Adapter Configuration Using the OS installation wizard of ServerStart you can configure multiple LAN adapters network adapters on the system However there are the following limitations Adapter numbers To configure multiple LAN adapters PG 2861L PG LND201 etc select the adapter numbers in order of Adapter 1 and Adapter 2 and enter settings for each adapter Note tha...

Страница 44: ... off the system License for use of system for ServerStart License for Use of System for ServerStart linked from the ServerStart startup window is a license for use of Windows PE contained in ServerStart of the PRIMERGY Startup Disc Windows PE for starting up ServerStart can be only used for installing Windows Server 2008 Windows Server 2003 R2 and Windows Server 2003 provided under a separate lega...

Страница 45: ...troller must be completed before the OS is installed For more details refer to the manual in the Array Controller Document Tool CD Free space required for installation The partition where the OS is installed must have enough free space for obtaining memory dump For more details refer to 5 1 Memory Dump Paging File Setting pg 100 Cautions on restarting In the course of installation a message appear...

Страница 46: ...46 Chapter 2 Checking before OS Installation ...

Страница 47: ...47 Chapter 3 OS Installation using ServerStart This chapter explains how to install the OS in the server using ServerStart 3 1 Quick Installation Mode 48 3 2 Expert Mode 55 ...

Страница 48: ...lity at ServerStart startup For the procedure for changing the boot priority refer to When installing Windows Server 2008 64 bit using ServerStart pg 38 1 Connect the USB CD DVD drive and USB floppy disk drive to the Server Blade Use the Display USB Extension Cable to connect the USB CD DVD drive and USB floppy disk drive For more information on the connection procedure refer to Start Guide 2 Turn...

Страница 49: ...rverStart floppy disk select No status backup and click Next No status backup cannot be selected in the following cases When configuring RAID using ServerStart When installing Windows Server 2003 x64 When installing Windows Server 2008 The Initialization of ServerStart core running window appears and the ServerStart initialization process starts Depending on hardware configuration this process may...

Страница 50: ... Chapter 3 OS Installation using ServerStart 4 Click Accept The Welcome to ServerStart window appears 5 Select Quick Installation and click Next The Select the Boot Controller and Boot Disk window appears ...

Страница 51: ...y the RAID level to be configured and the size of the partition All existing RAID will be deleted Also only one partition can be created When Auto is selected the RAID is configured with the following levels depending on the number of the installed disk units When two hard disk units are installed RAID1 When three hard disk units are installed RAID5 When more than three hard disk units are install...

Страница 52: ...ows Server 2003 x64 a message appears and prompts you to insert PRIMERGY Startup Disc Win64 and restart the system Insert PRIMERGY Startup Disc Win64 11 When a message prompts you to insert the OS CD DVD insert the CD DVD and click OK For Windows Server 2008 1 Insert the OS CD DVD Installation disc Copying files starts After files are copied a message prompts you to eject the CD DVD and floppy dis...

Страница 53: ...he installation process is properly proceeding When using Microsoft media the screen to input a product key may be displayed during OS installation When the input screen is displayed input the product key again 14 When a message notifies completion of installation restart the system For Windows Server 2008 The system automatically restarts when a message notifies completion of installation After r...

Страница 54: ...Refer to 2 4 Checking after Installation in ServerView User s Guide to perform the necessary settings The server setup and OS installation have been completed Refer to Chapter 5 Operations after OS Installation pg 99 and perform necessary procedures before starting server operations ...

Страница 55: ...nnot be installed in Expert mode 3 2 1 Starting Up the Expert Mode Start up the expert mode 1 Connect the USB CD DVD drive and USB floppy disk drive to the Server Blade Use the Display USB Extension Cable to connect the USB CD DVD drive and USB floppy disk drive For more information on the connection procedure refer to Start Guide 2 Turn on the server and insert PRIMERGY Startup Disc immediately S...

Страница 56: ...re selected Click Continue The Initialization of ServerStart core running window appears and the ServerStart initialization process starts Depending on hardware configuration this process may take a few minutes After completion the license agreement window appears 4 Click Accept The Welcome to ServerStart window appears ...

Страница 57: ...Start Floppy Disk Creation of a ServerStart floppy disk starts When the creation is completed the Floppy disk has been created message appears 7 Click OK The Please Select your Keyboard window appears 8 Select your keyboard language from the drop down list and click OK The subsequent start procedure may take several minutes The Welcome to ServerStart window appears ...

Страница 58: ...on configuration of hard disk units is described 10 Click MS Windows Operating Systems The Microsoft Windows Operating System Installation window appears 11 Click Install MS Windows Server 2003 or MS The Installation of MS Windows Server 2003 window appears 12 Click Install MS OS interactively expertise required The expert mode starts Start up the configuration tools to set items Exiting a tool re...

Страница 59: ...Manager starts up 2 Format the OS installation partition Select the OS installation partition and click the Partition menu Format The Format Partition window appears Be sure to set the active partition on drive C 3 Set items and click Format The partition is formatted 4 When the formatting is completed click the File menu Exit Disk Manager closes and the display returns to the expert mode window ...

Страница 60: ...stalled For example operation on Server 2003 R2 is given below Server 2003 R2 is corresponding to your OS to be installed 1 Click Installation Wizard for MS Windows Server 2003 A message prompts you to specify the configuration file 2 Click No The Windows Installation window appears 3 Enter the password in Password for Administrator account and Please repeat Password and click Next If the password...

Страница 61: ...61 PRIMERGY BX620 S4 Server Blade User s Guide The Computer Identification window appears 4 Set items and click next The Installation Directory and Time Zone window appears ...

Страница 62: ...OS Installation using ServerStart 5 Set items and click next The User Name window appears 6 Set items and click next The Display Settings window appears 7 Set items and click next The Network Protocol window appears ...

Страница 63: ...d click next The Software Components window appears If Windows Server 2003 R2 is selected at the Computer Identification R2 components are always copied to the hard disk To install the components click Properties and check t box of the components to be installed ...

Страница 64: ...erStart 9 Set items and click next The Services window appears Simple Network Management Protocol is always installed Click Properties to change the set tings 10 Set items and click leave wizard The display returns to the expert mode window ...

Страница 65: ...ns select application software to be installed and click Set all applications to be installed on the Selected applications list Although the selection can be released in the expert mode it may take a long time to restore the system when errors occur without the management tools Be sure to install these tools DSNAP Broadcom Advanced Control Suite RAID Management Tool ServerView for Apache ServerVie...

Страница 66: ...procedure However corrections made here are not reflected on the configuration file 1 Click Click here to Start the Installation of OS A confirmation window asking whether you want to save the current settings appears 2 Click Yes The following window appears 3 Enter the file name and click Save As Installation starts automatically 1 If a message prompts you to insert Array Controller Document Tool...

Страница 67: ...art appears click Restart The system restarts and installs high reliability tools Thus the Command Prompt windows may appear and disappear during installation of ServerView the installation process is properly proceeding 7 Press the Enter key when a message notifies completion of installation 8 Restart the system Click Start Shutdown to restart the system After restarting enter the specified passw...

Страница 68: ...OS Installation using ServerStart The server setup and OS installation have been completed Refer to Chapter 5 Operations after OS Installation pg 99 and perform necessary procedures before starting server operations ...

Страница 69: ...hapter explains how to install the OS without using ServerStart 4 1 Creating Driver Disks 70 4 2 Starting Manual Installation 76 4 3 Installing the LAN Driver 89 4 4 Installing the Fibre Channel Driver 94 4 5 Installing SAS RAID Ctrl Driver 97 ...

Страница 70: ...ded with the PRIMERGY Startup Disc Prepare for it in advance For Windows Server 2008 32 bit 64 bit table Drivers Required for Installing Windows Server 2008 32 bit 64 bit Expansion board onboard controller Driver Chipset OS standard Onboard VGA Driver provided with the PRIMERGY Startup Disc Onboard LAN controller Driver provided with the PRIMERGY Startup Disc Onboard array controller OS standard E...

Страница 71: ...with the PRIMERGY Startup Disc 4Gbit s FC I O Module Driver provided with the PRIMERGY Startup Disc SCSI Ctrl U160 lp PG 1301L OS standard SAS RAID Ctrl PG 248EL Driver provided with the PRIMERGY Startup Disc table Drivers Required for Installing Windows Server 2003 Expansion board onboard controller Driver Chipset Driver provided with the PRIMERGY Startup Disc Onboard VGA Driver provided with the...

Страница 72: ...uter beforehand referring to 5 4 1 Installing ServerStart pg 113 If a different version of ServerStart has been installed uninstall it and install the proper version For details on how to uninstall ServerStart refer to Uninstalling ServerStart pg 115 Starting ServerStart If ServerStart has already been started it is not necessary to restart it If it has not start it up according to the following p...

Страница 73: ...Blade and set PRIMERGY Startup Disc ServerStart starts up and select media window for the configuration file appears 3 Insert the ServerStart floppy disk Make sure that on local drive floppy USB stick and A are selected and click Continue The Initialization of ServerStart core running window appears and the initialization operation launches In some cases initialization operation may take a few min...

Страница 74: ...he ServerStart floppy disk Creating driver disks Start up ServerStart and confirm that the Welcome to ServerStart window is displayed 1 Click FloppyBuilder The ServerStart FloppyBuilder window appears 2 Select Drivers Diskettes for OS The FloppyBuilder Driver Disk window appears 3 Click the type of the driver you want to create ...

Страница 75: ...sert a floppy disk 5 Perform the subsequent operations according to the messages on the window The floppy disk will be formatted automatically and file copying will start The driver disk is automatically created When a message appears indicating that creating the disk is completed click OK and eject the floppy disk ...

Страница 76: ...he USB CD DVD drive and USB floppy disk drive For more information on the connection procedure refer to Start Guide 3 Turned on the Server Blade and configure RAID Turn on the Server Blade to display the following message and press the Ctrl C key to start up the BIOS Utility If RAID is not required to be configured proceed to step 4 The array system is configured by using BIOS Utility For more det...

Страница 77: ...er Blade User s Guide 5 Setup window for Windows Server 2008 installation appears Set each item according to the window 6 Click Next Continue installation procedures according to the setup window The OS selection window appears ...

Страница 78: ...The Update Driver Software window appear 5 Click Browse my computer for driver software 6 Insert PRIMERGY Startup Disc and click Browse to select the following folder Windows Server 2008 Standard 32 bit CD DVD drive VGA_8 24 50 3 Driver XP_INF Windows Server 2008 Standard 64 bit CD DVD drive VGA_8 24 50 3 Driver XP6A_INF When driver installation has completed the following message is displayed 7 R...

Страница 79: ... perform necessary operations 4 2 2 Installing Windows Server 2008 Server Core Installation procedure 1 Create driver disks Prepare the necessary drivers before installing Windows Server 2008 Server Core Some drivers are created from the PRIMERGY Startup Disc For details about how to create driver disks refer to 4 1 Creating Driver Disks pg 70 2 Connect the USB CD DVD drive and USB floppy disk dri...

Страница 80: ...32bit and for 64bit Check them before inserting the DVD ROM When the active area is specified on the hard disk the following message appears Pressing any key while this message is displayed boots the system from the DVD ROM 5 The setup window for Windows Server 2008 installation appears Set each item according to the window Press any key to boot from CD or DVD ...

Страница 81: ...atically performed by the setup program reboot will occur a few times 9 Set a password for the Administrator Click Other Users when it is displayed The user ID and password entry window appears Enter Administrator as the ID leave password empty and click The window where the password can be changed appears 10 Install SNMP service 1 Execute the following command case sensitive start w ocsetup SNMP ...

Страница 82: ...tings for the RAID management tool ServerView RAID For details refer to the manual in the Array Controller Document Tool CD For the manual of the SAS RAID Ctrl to be used refer to 2 3 2 Notes on Configuring RAID pg 42 Setting an array administrator account A Windows user account is required when using ServerView RAID Create the group raid adm and create an account with any name for an array admini...

Страница 83: ...the BIOS Utility The array system is configured by using BIOS Utility For more details refer to the manual in the Array Controller Document Tool CD Turn off the Server Blade after configuring the array system 4 Insert the Windows Server 2003 x64 CD DVD installation disc Turn on the Server Blade after checking there are no floppy disks in the floppy disk drive and insert the Windows Server 2003 x64...

Страница 84: ...e installation procedure 8 Install the ChipSet driver 1 Insert the PRIMERGY Startup Disc into the drive of the server When the ServerStart window appears exit ServerStart 2 Execute the following command on the PRIMERGY Startup Disc CD DVD drive DRIVERS ChipSet Intel 5000P infinst_autol exe The installation wizard starts up 3 Click Next Follow the instructions in the window to perform installation ...

Страница 85: ...s refer to 4 4 Installing the Fibre Channel Driver pg 94 12 Install high reliability tools To ensure stable server operation refer to Chapter 6 High Reliability Tools pg 163 and install high reliability tools 13 Perform settings for the RAID management tool ServerView RAID For details refer to the manual in the Array Controller Document Tool CD For the manual of the SAS RAID Ctrl to be used refer ...

Страница 86: ...onfigured by using BIOS Utility For more details refer to the manual in the Array Controller Document Tool CD Turn off the Server Blade after configuring the array system 4 Insert the Windows Server 2003 CD DVD Turn on the Server Blade and insert the Windows Server 2003 CD DVD immediately into the CD DVD drive Check there are no floppy disks in the floppy disk drive When the active area is specifi...

Страница 87: ... 2003 Service Pack For details refer to the description in the window 9 Install the ChipSet driver 1 Insert the PRIMERGY Startup Disc into the drive of the server When the ServerStart window appears exit ServerStart 2 Execute the following command on the CD DVD CD DVD drive DRIVERS ChipSet Intel 5000P infinst_autol exe The installation wizard starts up 3 Click Next Follow the instructions in the w...

Страница 88: ... Driver pg 94 13 Install high reliability tools To ensure stable server operation refer to Chapter 6 High Reliability Tools pg 163 and install high reliability tools 14 Perform settings for the RAID management tool ServerView RAID For details refer to the manual in the Array Controller Document Tool CD For the manual of the SAS RAID Ctrl to be used refer to 2 3 2 Notes on Configuring RAID pg 42 Se...

Страница 89: ...ERS LAN Broadcom Onboard w2k8 setup exe 3 Click Next 4 Select I accept the license agreement and click Next 5 Click Install Driver installation starts 6 Click Finish 7 Eject the PRIMERGY Startup Disc and restart the Server Blade For Eth Ctrl 2x1Gbit PCI E 1000 BASE T lp PG 2861L 1 Insert the PRIMERGY Startup Disc 2 Execute the following file DRIVERS LAN Intel APPS PROSETDX Vista32 DxSetup exe The ...

Страница 90: ... Next 5 Click Next 6 Click Install Driver installation starts 7 Click Finish 8 Eject the PRIMERGY Startup Disc and restart the Server Blade For Windows Server 2008 64 bit For Onboard LAN 1 Insert the PRIMERGY Startup Disc 2 Execute the following file DRIVERS LAN Broadcom Onboard w2k8x64 setup exe 3 Click Next 4 Select I accept the license agreement and click Next 5 Click Install Driver installatio...

Страница 91: ...s window For Server Core system only drivers can be installed Driver Intel PROSet for Windows device manager Advanced Network Service For 1Gbit s Ethernet I O Module PG LND201 1 Insert the PRIMERGY Startup Disc 2 Execute the following file DRIVERS LAN Broadcom Ext w2k8x64 setup exe 3 Click Next 4 Select Modify and click Next 5 Click Next 6 Click Install Driver installation starts 7 Click Finish 8 ...

Страница 92: ...s Intel PROSet and Advanced Network Services for program functions to be installed For 1Gbit s Ethernet I O Module PG LND201 1 Insert the PRIMERGY Startup Disc 2 Execute the following file DRIVERS LAN Broadcom Ext W2K3x64 DrvInst setup exe 3 Click Next Driver installation starts 4 Click Finish 5 Eject the PRIMERGY Startup Disc and restart the Server Blade For Windows Server 2003 For Onboard LAN 1 ...

Страница 93: ...ayed Proceed with the installation by following the instructions displayed in the window Also only select Drivers Intel PROSet and Advanced Network Services for program functions to be installed For 1Gbit s Ethernet I O Module PG LND201 1 Insert the PRIMERGY Startup Disc 2 Execute the following file DRIVERS LAN Broadcom Ext W2K3 DrvInst setup exe 3 Click Next Driver installation starts 4 Click Fin...

Страница 94: ...ols Computer Management 2 Click Device Manager Two fiber channel adapters of the 2Gbit s FC I O Module are displayed with the name below QLogic Fibre Channel Adapter under Storage controllers Double click the fibre channel controller and perform the following Steps 3 to 12 on all fibre channel ports 3 Double click the icon or name of the fibre channel controller The properties window appears 4 Ins...

Страница 95: ... Close Detected drivers are displayed 12 Click Close For Windows Server 2008 Server Core installation 1 Insert the PRIMERGY Startup Disc into the server 2 Move to the directory where the driver is stored using command prompt and execute the following command pnputil i a ql2x00 inf 3 The following message is displayed x differs depending on the installation order Processing inf ql2x00 inf Successfu...

Страница 96: ...click the icon or name of the fibre channel controller The properties window appears 4 Insert the PRIMERGY Startup Disc into the server 5 Click the Driver tab and click Update Driver The Welcome to the Hardware Update Wizard window appears 6 Select Install from the list or specified location and click Next 7 Select Not searching and select installation driver and click Next 8 Click Have Disk 9 Ent...

Страница 97: ... RAID Ctrl Driver This section explains how to install a driver when adding SAS RAID Ctrl PG 248EL Use the PRIMERGY Array Controller Document Tool disk to install update the SAS RAID Ctrl driver For details refer to the manual in the Array Controller Document Tool CD ...

Страница 98: ...98 Chapter 4 Manual OS Installation ...

Страница 99: ...hese operations before operating the server 5 1 Memory Dump Paging File Setting 100 5 2 Creating Backup Data for System Recovery 107 5 3 Storing the System Setting Information 110 5 4 Creating Maintenance Tools 113 5 5 Notes Before Operating the Server 117 5 6 LAN Driver Advanced Setup BACS 123 5 7 LAN Driver Advanced Setup Intel PROSet 151 ...

Страница 100: ... before starting configuration to obtain memory dump Checking hard disk free space To obtain memory dump sufficient hard disk capacity is required for creating paging files and memory dump files The obtainable dump types and required hard disk capacity are as follows Complete memory full dump recommended When the system unexpectedly stops contents of the whole system memory are recorded The file i...

Страница 101: ... unexpectedly stops History of such files is stored in the directory displayed in Small dump directory Paging file 2MB or more Memory dump file 64KB or 128KB Memory dump file setting Set up the memory dump file according to the following procedures 1 Log on to the server with administrator privileges 2 Check free space of the drive where the memory dump file is to be stored Check the required amou...

Страница 102: ...memory dump file Each time a fatal error occurs a new file is created in the directory specified in Small dump directory Kernel memory dump Only kernel memory is recorded to the memory dump file 2 In Dump file or Small dump directory specify the directory to save the memory dump file with its full path In case of kernel memory dump or complete memory dump if Overwrite any existing file is checked ...

Страница 103: ...00 If the drive has no free space refer to Cannot collect the memory dump pg 240 3 Display the System Properties window For Windows Server 2008 1 Click Start Control Panel Control Panel appears 2 Double click the System icon System Control Panel appears 3 Select Advanced system settings from the tasks The System Properties window appears For Windows Server 2003 1 Click Start Control Panel System T...

Страница 104: ...104 Chapter 5 Operations after OS Installation 5 Click the Advanced tab For Windows Server 2008 For Windows Server 2003 ...

Страница 105: ...ars For Windows Server 2008 If Automatically manage paging file size for all drivers is checked uncheck it For Windows Server 2003 7 Specify the drive where the paging file is to be created In Drive select the drive where the system is installed The selected drive is displayed in Drive in Paging file size for selected drive ...

Страница 106: ...ize as required 9 Enter a value in Maximum size Specify a value larger than the Initial size 10 Click Set The settings are saved and the value specified is displayed in Paging File Size of Drive 11 Click OK to close the Virtual Memory window 12 Click OK to close the Performance Options window 13 Click OK to close the System Properties window 14 Restart the system The setting is enabled after the s...

Страница 107: ...ckup function For Windows Server 2008 backup and restoration of the whole system can be performed using the Windows Server Backup function After installation perform a full backup for the whole system configuration only once Incremental backup can be specified to be automatically performed to only store changed data Set or operate it according to the operation configuration Windows Server backup d...

Страница 108: ...omated System Recovery ASR set To create it an unused formatted floppy disk and media to store the backup file are required Only system information can be restored by using the Automated System Recovery ASR set that is created in this procedure Data such as files created by customers are not included Regular data backup using a backup device is recommended For backup refer to 9 5 Backup pg 251 1 C...

Страница 109: ...d 8 When the process is completed a message appears Eject the floppy disk according to the message and put a label on it Label example Windows Automated System Recovery Disk Backup bkf Created at 12 00 04 01 2003 9 Click OK to exit Backup Utility 10 Click Close to close the Backup Progress window An automated system recovery set has been created Store the automated system recovery set just created...

Страница 110: ...uration information will be used during maintenance etc send it to your maintenance personnel Preparation for using Server Management Tools Use the Display USB Extension Cable to connect to the USB floppy disk drive to the Server Blade For the procedure to create Server Management Tools disk refer to 5 4 2 Creating Server Management Tools Disk pg 116 Cautions Server Management Tools are for this S...

Страница 111: ...he window for selecting a keyboard appears 2 Select a keyboard Select 1 for the Japanese keyboard or 2 for the English keyboard The Japanese keyboard is selected by default 3 When the DOS prompt window appears enter the following command and press the Enter key A SMT read bat If storing has already been performed with Server Management Tools the stored file must exist in the floppy disk In this ca...

Страница 112: ...ion For details of ServerView refer to ServerView User s Guide 1 Turn on the server and insert the Server Management Tools disk into the floppy disk drive The window for selecting a keyboard appears 2 Select a keyboard Select 1 for the Japanese keyboard or 2 for the English keyboard The Japanese keyboard is selected by default 3 When the DOS prompt window appears enter the following command and pr...

Страница 113: ...n perform installation again For details on how to uninstall ServerStart refer to Uninstalling ServerStart pg 115 5 4 1 Installing ServerStart Install ServerStart on a client computer when creating a drive disk using FloppyBuilder function System requirements for client computers Client computers must satisfy the following requirements Using ServerStart on the server ServerStart can be installed t...

Страница 114: ...the OS in use Fol low as below 1 Click Run A massage appears that The publisher could not be verified Are you sure you want to run this software 2 Click Run Execute SeStSetup exe in the disk when Fujitsu ServerStart Setup window is not displayed 3 Check the checkbox of Classic only and click OK The Setup window appears 4 Click Next The License Agreement window appears 5 Select I accept the license...

Страница 115: ...t the system according to the message When the system restarts insert PRIMERGY Startup Disc and start installation again If the This program does not respond message appears during restart operation click Exit to continue the restart operation When the installation is completed the completion window appears 9 Click Exit ServerStart has been installed to the client computer Uninstalling ServerStart...

Страница 116: ...e model of the server Version and Level of the Server Management Tools Date of the floppy disk created 5 4 3 Creating a DOS Floppy Disk For DOS data stored into the floppy disk refer to the file in the following folder of the PRIMERGY Startup Disc CD DVD drive FreeDOS To create a DOS floppy disk you need an unused floppy disk Prepare it in advance 1 Click FloppyBuilder For details on procedures fo...

Страница 117: ...unction from CD DVD Drives Perform the following procedures to change the settings of the auto run function from the CD DVD drives after server installation 1 Make the registry editable and change the value of AutoRun of the following registry key HKEY_LOCAL_MACHINE System CurrentControlSet Services CDRom To enable auto run set the value of AutoRun to 1 and to disable auto run set the value to 0 2...

Страница 118: ...own direction to the actual power off If this time is set insufficiently the power will be cut off before system shutdown which may result in destruction of data For more details refer to the manuals for UPS and UPS management software Power supply control by UPS The following settings are required to power the server on automatically using the UPS management software PowerChute Network Shutdown P...

Страница 119: ...to the Switch Blade not having been started The PXE boot function is not available for the LAN port of the 1 Gbit s Ethernet I O Module 5 5 5 Changing the system drive size only for Windows Server 2008 For Windows Server 2008 the partition size can be extended or reduced after installation has completed Extending the partition size of a system drive To extend the partition size of a system drive p...

Страница 120: ...at can be specified in Select the amount of space in MB is displayed in Maximum available space in MB 7 Click Next The Completing the Extend Volume Wizard window appears 8 Check the disk size and click Finish The Disk Management window appears 9 Click Exit in the File menu Server Manager finishes Reducing the partition size of system drive When reducing the partition size of system drive perform t...

Страница 121: ... is displayed in Total size after shrink in MB Specify the value so that the total size after reduction becomes the desired partition size The maximum value that can be specified in Enter the amount of space to shrink in MB is dis played in Size of available shrink space in MB Click Shrink to start the shrinking process Make sure to check whether the proper value is specified in Total size after s...

Страница 122: ...ey entry using the keyboard Enter the key entry again In the Windows or Linux system if the KVM switch is operated while the NumLock CapsLock and ScrollLock LEDs are on by pressing their keys on the keyboard connected to the Chassis those LEDs may go off To return the LEDs lamps to the normal state press the NumLock CapsLock and ScrollLock keys again If KVM switch is operated frequently during Lin...

Страница 123: ...Jumbo frame using LAN cards PG 2861L Perform other advanced settings for LAN cards PG 2861L 5 6 1 BACS Installation If Broadcom Control Suite 2 or Broadcom Control Suite 3 is not displayed in the Control Panel install BACS according to the following installation procedures For Windows Server 2008 1 Execute the following file contained in the PRIMERGY Startup Disc For Windows Server 2008 32 bit CD ...

Страница 124: ...allation For Windows Server 2003 x64 1 Execute the following file contained in the PRIMERGY Startup Disc CD DVD drive DRIVERS LAN Broadcom Onboard MgmtApps x64 setup exe The installer starts up 2 Click Next License agreement window appears ...

Страница 125: ...ERGY BX620 S4 Server Blade User s Guide 3 Click I accept the terms in the license agreement and click Next Custom Set up window appears 4 Click Next Proceed the installation by following the window instructions ...

Страница 126: ...OS is installed manually BACS will not be installed 1 Execute the following file contained in the PRIMERGY Startup Disc CD DVD drive DRIVERS LAN Broadcom Onboard MgmtApps IA32 setup exe The installer starts up 2 Proceed the installation by following the window instructions When the window below appears during the installation procedure check BASP and click Next ...

Страница 127: ...s Server Blade teaming is possible with any Intel Broadcom adapter For Windows Server 2008 Creating a team 1 Log in with Administrator or same privileges 2 Click Start All Programs Broadcom Broadcom Control Suite 3 Broadcom Control Suite 3 starts 3 Click Team Management ...

Страница 128: ...hapter 5 Operations after OS Installation 4 Click Create a Team in the Teams menu The Welcome to the Broadcom Teaming Wizard window appears 5 Click Next The Creating Modifying a Team Team Name window appears ...

Страница 129: ... the team type and click Next The following is an explanation for when selecting Smart Load Balancing TM and Failover SLB as an example The Creating Modifying a Team Assigning Team Members window appears 8 Select the adapter to be incorporated in the Team from the Available Adapters list and click Add The selected adapter is added in the Team Members list ...

Страница 130: ...for the standby member and click Next The Creating Modifying a Team Configure LiveLink window appears Auto Fallback can be selected when using the Team as a standby member LiveLink does not support Auto Fallback LiveLink detects loss of network connectivity beyond the switch and routes traffic only through team members that have a live link ...

Страница 131: ...d click Next The operation varies between When selecting Yes pg 131 and When selecting No pg 131 When selecting No The Creating Modifying a VLAN Configure VLAN Support window appears Go to Step 12 When selecting Yes The Configure LiveLink TM attributes window appears Perform the following procedure ...

Страница 132: ...1 to 10 Probe VLAN ID When setting tag VLAN for probe of LiveLink specify the value between 0 to 4096 The following window appears 2 Specify the Target IP address and click OK Returns to the Configure LiveLink TM attributes window Entering an IP address for Target1 is required Up to four Targets can be specified 3 Click Next The Configure the IP address for each team member window appears 4 Select...

Страница 133: ...ter the IP address of the team member for LiveLink in IP address and click OK Returns to the Configure the IP address for each team member window 7 Set IP addresses repeating Steps 4 to 6 for all team members on the Team Members list 8 Click Next The Creating Modifying a VLAN Configure VLAN Support window appears ...

Страница 134: ...ion 12 Specify whether or not to create a VLAN and click Next If creating create a VLAN by following the instructions displayed in the window When not creating the following completion window appears 13 Click Finish The following window appears ...

Страница 135: ...eted the multiple adapters that were selected above are displayed as one virtual adapter Set the IP address in this virtual adapter Deleting a team 1 Click Start All Programs Broadcom Broadcom Control Suite 3 Broadcom Control Suite 3 starts 2 Select Teams Delete Team The following window appears 3 Click Yes to delete the selected team ...

Страница 136: ... a team Creating a team p 127 2 Click File Team Save As 3 Click Yes to save the created team Restoring a team 1 Call the saved team by clicking File Team Restore The following window appears 2 Click Apply Exit The following window appears 3 Click Yes to restore the team ...

Страница 137: ...rver Blade User s Guide For Windows Server 2003 Creating a team 1 Click Start All Programs Broadcom Broadcom Control Suite2 Broadcom Control Suite2 starts 2 Click Tools Create a Team The Broadcom Teaming Wizard window appears ...

Страница 138: ...ter 5 Operations after OS Installation 3 Click Next The Creating Modifying a Team Team Name window appears 4 Assign your team a unique name and click Next The Creating Modifying a Team Team Type window appears ...

Страница 139: ...An explanation for when Smart Load Balancing TM and Failover SLB is selected is explained in the example The Creating Modifying a Team Assigning Team Members window appears 6 Specify which adapters to include in the team and click Next The Creating Modifying a Team Designating a Standby Member window appears ...

Страница 140: ...ect Auto Fallback Disable Mode if you use the member as a standby member LiveLink feature is not supported if Auto Fallback Disable Mode is enabled LiveLink detects loss of network connectivity beyond the switch and routes traffic only through team members that have a live link 8 Specify whether you want LiveLink and click Next The Creating Modifying a VLAN Configure VLAN Support window appears ...

Страница 141: ... or not to create a VLAN and click Next When creating create a VLAN by following the instructions displayed in the window When not creating the following completion window appears 10 Click Finish The following window appears 11 Click Yes The following window appears ...

Страница 142: ...ings Deleting a team 1 Click Start All Programs Broadcom Broadcom Control Suite2 Broadcom Control Suite2 starts 2 Click Tools Delete a Team to delete a Team Saving a team 1 Create a Team Creating a team p 137 2 Click File Team Save As to save a Team you have created by now Restoring a team 1 Click File Team Restore to open a Team you restored before 2 And click File Apply to complete a Team restor...

Страница 143: ...trol Panel Broadcom Control Suite 3 BACS starts 2 Right click a LAN adapter or the Team name of a Teamed Up adapter and click Add VLAN from the displayed menu The Welcome to the Broadcom Teaming Wizard window appears A LAN adapter is displayed with a mark The Team name of a Teamed Up adapter is displayed with a mark ...

Страница 144: ...stallation 3 Click Next The Creating Modifying a VLAN Naming window appears 4 Specify a VLAN name and click Next The Creating Modifying a VLAN Tagging window appears A VLAN Name that has already been used cannot be used Enter another name ...

Страница 145: ...ecting Untagged The Creating Modifying a VLAN Additional VLANs window appears Go to Step 6 When selecting Tagged The Creating Modifying a VLAN Tag Value window appears 1 Specify the tag value of VLAN between 1 to 4094 and click Next 2 Click OK The Creating Modifying a VLAN Additional VLANs window appears ...

Страница 146: ...lick Yes When finished adding VLANs select No and click Next When selecting Yes Repeat Steps 3 to 5 When selecting No The following window appears 7 When adding teams has completed select the process in the window above and click Finish The following window appears 8 Click Yes ...

Страница 147: ...oadcom Control Suite 2 BACS starts 2 Right click a LAN adapter or the Team name of a Teamed Up adapter and click Add VLAN from the displayed menu The Welcome to the Broadcom Teaming Wizard window appears A LAN adapter is displayed with a mark The Team name of a Teamed Up adapter is displayed with a mark ...

Страница 148: ...tallation 3 Click Next The Creating Modifying a VLAN Naming window appears 4 Enter the VLAN Name click Next The Creating Modifying a VLAN Tagging window appears You cannot use a VLAN Name that has already been used Enter another set value ...

Страница 149: ...Skip to the Step 7 When selecting Tagged The Creating Modifying a VLAN Tag Value window appears 1 Specify the VLAN tag value 1 to 4094 and click Next 2 Click OK The Creating Modifying a VLAN Additional VLANs window appears 6 Select Yes when adding another VLAN or select No when adding additional VLANs has completed and click Next When selecting Yes Repeat the Step 3 through Step 5 ...

Страница 150: ... Installation When selecting No The following window appears 7 When adding a team has completed select the procedure in the above window and click Finish The following window appears 8 Click Yes The following window appears 9 Click OK ...

Страница 151: ... displayed in the property of LAN adapters which can be selected from the Device Manager install Intel PROSet according to the following installation procedures For Windows Server 2008 1 Execute the following file in the PRIMERGY Startup Disc For Windows Server 2008 64 bit CD DVD drive Drivers LAN Intel APPS PROSETDX Vistax64 DxSetup EXE For Windows Server 2008 32 bit CD DVD drive Drivers LAN Inte...

Страница 152: ...lick Close 5 7 2 Notes on Referring to the Intel PROSet Help Topics When referring to help topics note the following points Do not use the driver downloaded from the Intel Corporation online service page on this server If the descriptions in the help and this manual vary give priority to this manual The LAN cards names in Help corresponds to the cards as follows The controller used for each device...

Страница 153: ...st be connected to the same switch as well as AFT Switch Fault Tolerance SFT Switch Fault Tolerance SFT is a redundancy function equal in configuration to AFT when LAN ports are connected to a separate switch SFT switches the link to be used between LAN ports and switches that are connected to the LAN ports when a failure occurs However a failure in links outside of the switches and in the figure ...

Страница 154: ...ed When adding deleting a Static link type member perform such operation in a linked down state Only a link down error between a LAN card onboard LAN and the switch it connects with and the equivalent errors lead to switching of the route Therefore if only the switch or LAN card onboard LAN is partially damaged and the route being used is normal at the link level the route will not be switched in ...

Страница 155: ...use Intel PROSet according to the following procedure 1 Click Start Administrative Tools Computer Management to start Intel PROSet 2 Click the Setting tab and click Delete Team The confirmation message appears 3 Click Yes 4 Restart the Server Blade For Windows Server 2003 Creating a team Follow the steps below to create a Team 1 Log on to the Server Blade with administrator privileges 2 Click Star...

Страница 156: ... Deleting a team Follow the steps below to delete a Team 1 Log on to the Server Blade with administrator privileges 2 Click Start Settings Control Panel Intel PROSet Wired and start Intel PROSet 3 Select the OS to delete 4 Click Delete team The confirmation message appears 5 Click OK 6 Click OK to exit Intel PROSet 7 Restart the Server Blade Creating an AFT ALB or SFT team in Windows Server 2003 c...

Страница 157: ...een disabled with a team 14 Information The secondary adapter has been added to a team again Adapter name 15 Information The next adapter link is connected Adapter name 16 Error Team name The last adapter has been unlinked Network connection has failed 17 Information Team name The adapter has established a link again The network connection has been recovered 18 Information The primary adapter at t...

Страница 158: ...e Intel PROSet Do not disable or delete a VLAN from the Device Manager or Network and Dial up Connections Up to ten VLANs can be set to a LAN port Up to four VLANs whose NetBIOS over TCP IP is enabled can be set in the whole system On a VLAN only use TCP IP protocols When LLC and the LNDFC protocols are installed by the Fujitsu communication control service these protocols are bound connected unco...

Страница 159: ...steps below to delete a VLAN 1 Log on to the Server Blade with administrator privileges 2 Click Start Settings Control Panel Intel PROSet for Wired Connections to start Intel PROSet 3 Select the VLAN to be deleted and click it 4 Click Delete VLAN The confirmation message appears 5 Click OK When an attempt is made to delete the last VLAN the message will be displayed Click OK 6 Click OK to exit Int...

Страница 160: ...ted a virtual adapter Intel Advanced Network Services Virtual Adapter will appear Upper protocols will be bound with this virtual adapter You cannot bind them with the LAN card consisting a team The IP address should be specified in this virtual adapter 9 Restart the Server Blade Deleting a VLAN Follow the steps below to delete a VLAN 1 Log on to the Server Blade with administrator privileges 2 Cl...

Страница 161: ...ddress Enter 12 hexadecimal characters beginning with 02 5 Click OK to exit Intel PROSet 6 Restart the Server Blade When returning to a global address delete the value specified in step 4 For Windows Server 2003 1 Log on to the Server Blade with administrator privileges 2 Click Start Settings Control Panel Intel PROSet Wired and start Intel PROSet 3 Select a LAN adapter to set the local address an...

Страница 162: ...Start Administrative Tools Computer Management select Device Manager and then double click Network Adapter 3 Double click the LAN adapter to be set and click the Advanced tab 4 Specify the value to be used for Jumbo Packets 5 Click OK to exit Intel PROSet 6 Restart the Server Blade For Windows Server 2003 1 Log on to the Server Blade with administrator privileges 2 Click Start Settings Control Pan...

Страница 163: ...mend that high reliability tools be installed This chapter explains the installation and necessary settings of high reliability tools 6 1 RAID Management Tool 164 6 2 Server Monitoring Tool ServerView 165 6 3 Maintenance Support Tool HRM server 168 6 4 Solving Problems Early DSNAP 169 ...

Страница 164: ...high reliability tools 6 1 1 Before starting operation After installing the OS in the server perform the following settings For details refer to the manual in the Array Controller Document Tool CD Setting for an array administrator account Set an array administrator account for the RAID management tool ServerView RAID A Windows user account is required when using ServerView RAID Create the group r...

Страница 165: ...rresponding countermeasures must be taken For that reason monitoring the server with ServerView is necessary If ServerView is not applied the following very serious problems may occur RAID error monitoring ServerView notifies of the RAID errors In an environment where ServerView is not applied the administrator is not notified of the RAID errors Leaving the RAID error unattended may lead to a syst...

Страница 166: ...t applied power supply irregularities cannot be detected during operation In order to detect the problem the server must reboot to run the BIOS Setup Utility or the Server Management Tools System stops due to power supply failures cannot be prevented 6 2 1 Installing ServerView When installed using ServerStart If the OS is installed using ServerStart ServerView will be installed at once with the O...

Страница 167: ... installation referring to 2 4 Checking after Installation in ServerView User s Guide Boot monitoring setting We recommend enabling the Boot Monitoring function after ServerView is installed For setting procedures and explanation on the function refer to Restart Settings Tab of 3 4 Serious Error Handling ASR in ServerView User s Guide ...

Страница 168: ...nstalled manually Linux HRM server cannot be installed using ServerStart To install HRM server manually into a Linux system refer to HRM server for PRIMERGY Windows Linux at the following location of the PRIMERGY Startup Disc CD DVD drive PROGRAMS Japanese2 HRM iasv_hrm_install pdf It is necessary to install ServerView to use HRM server 6 3 2 How to use For system requirements for HRM server or us...

Страница 169: ...Windows Server 2008 64 bit CD DVD drive PROGRAMS Japanese DSNAPx64 DSNAP EXE For Windows Server 2008 32 bit CD DVD drive PROGRAMS Japanese DSNAP x86 DSNAP EXE For Windows Server 2003 x64 CD DVD drive PROGRAMS Japanese DSNAPx64 DSNAPx64 EXE For Windows Server 2003 CD DVD drive PROGRAMS Japanese DSNAP DSNAP EXE 6 4 2 How to Use Refer to the following file stored in the PRIMERGY Startup Disc Use a te...

Страница 170: ...170 Chapter 6 High Reliability Tools ...

Страница 171: ...al Options 172 7 2 Removing and Attaching the Top Cover 174 7 3 Installing a CPU 176 7 4 Installing Memory Modules 182 7 5 Installing an Expansion Card 188 7 6 Installing an Expansion Board 194 7 7 Installing an Internal Hard Disk Unit 197 7 8 BIOS Setting with Expansion Card Installed 201 7 9 Connection Examples of an External Option Device 202 ...

Страница 172: ...to do so may cause electric shock For details on how to remove the Server Blade from the Chassis refer to BX600 S3 Blade Server System Unit Hardware Guide Do not install unauthorized third party internal options Doing so may cause a device failure fire or electric shock Do not damage or modify internal cables or devices Doing so may cause a device failure fire or electric shock Internal hard disk ...

Страница 173: ...sed The internal components such as the radiation fin remain hot just after the Server Blade was removed from the Chassis When installing or removing internal options turn the Server Blade off and wait for a while to begin operations In the array system configuration RAID1 you can replace the internal hard disk unit without turning the power off The circuit boards and soldered parts of internal op...

Страница 174: ...talling Server Blades Storage Blades in BX600 S3 Blade Server System Unit Hardware Guide 4 While pressing the buttons slide the top cover a little backward and carefully pull it up When installing or removing the top cover make sure to remove the Server Blade from the Chassis Failure to do so may cause electric shock For details on how to remove the Server Blade from the Chassis refer to BX600 S3 ...

Страница 175: ...over To attach the top cover simply reverse the removal procedures Make sure that no tools or unnecessary components were left inside the Server Blade before attaching the top cover back into place Before turning on the Server Blade make sure that the top cover is attached ...

Страница 176: ...rver Blade from the Chassis refer to BX600 S3 Blade Server System Unit Hardware Guide Do not install unauthorized third party CPUs Doing so may cause failures Do not use CPUs that differ in frequency cache capacity An error message appears on the BIOS screen The circuit boards and soldered parts of internal options are exposed They can be damaged by static electricity Before handling them first to...

Страница 177: ...ecifications pg 264 to check the contents of the optional package table List of Available CPUs Product name Model Remarks Processor Xeon E5205 1 86GHz 6MB PG FG43G 1 86GHz 6MB Dual core Processor Xeon X5260 3 33GHz 6MB PG FG43H 3 33GHz 6MB Dual core Processor Xeon E5405 2GHz 12MB PG FG43J 2GHz 12MB Quad core Processor Xeon E5420 2 5GHz 12MB PG FG43K 2 5GHz 12MB Quad core Processor Xeon X5460 3 16G...

Страница 178: ...hassis to discharge static electricity 3 Remove the Server Blade from the Chassis to install a CPU 4 2 Installing Server Blades Storage Blades in BX600 S3 Blade Server System Unit Hardware Guide 4 Remove the top cover 7 2 Removing and Attaching the Top Cover pg 174 5 Remove the dummy CPU cover 6 Pull up the tab of the CPU slot cover to remove the cover Dummy CPU cover Loosen the screws CPU slot co...

Страница 179: ...n the CPU and on the CPU socket 3 Hold the parts shown in ellipses on the CPU in the following figure and align the markings and carefully insert the CPU When opening the CPU fastener be careful not to bend any pins in the CPU socket Doing so may cause failures Do not touch the CPU electrode Doing so may cause a failure When installing the CPU in the socket be careful not to bend any pins in the C...

Страница 180: ...r 7 2 Removing and Attaching the Top Cover pg 174 12 Install the Server Blade to the Chassis 4 2 Installing Server Blades Storage Blades in BX600 S3 Blade Server System Unit Hardware Guide 13 Turn on the Server Blade and check the BIOS Setup Utility settings Start the BIOS Setup Utility and select the Server menu the CPU Status submenu to check that CPUn Status n slot number is set to Enabled If t...

Страница 181: ...Status Submenu pg 220 Removing the defective CPU 1 Turn on the server and check the location of the defective CPU by the message displayed during POST 2 Replace the defective CPU with a new CPU according to 7 3 3 How to Install a CPU pg 178 3 Turn on the server and start the BIOS Setup Utility 8 2 1 Starting and Exiting the BIOS Setup Utility pg 205 4 Select CPU Status on the Server menu and check...

Страница 182: ...g or removing memory Failure to do so may cause burns When installing or removing memory modules make sure to remove the screws on the specified points only There is chance of injury if screws other than those on the specified points are removed It may also damage the server Touch only the specified part of the printed circuit board Failure to do so may cause injury It may also damage the server T...

Страница 183: ...e Memory Modules DIMM in pairs and memory modules are extended in pairs The following memory module types can be used on this Server Blade Packaged items of optional memory Before installing memory modules refer to Appendix B 2 Memory Specifications pg 265 to check the contents of the optional package table List of Available Memory Modules Product name Model Remarks Memory Module 1GB PG RM1CJ 512M...

Страница 184: ... placed on the same location Identification label location Identification label patterns When a memory module is viewed with the corner circled in the above figure to the lower left identification labels are applied in any of the following patterns table Identification Label Patterns Pattern Label A Label B Label C 1 Not applied Not applied Not applied 2 Applied Not applied Not applied 3 Not appli...

Страница 185: ...ored set is automatically restored Installation conditions Install the memory module according to the following conditions I Install memory module Do not install memory module Install memory modules of the same model to the four slots that make up one mirror set The capacity of two mirror sets can be different BIOS settings After installing the memory module perform the following settings 1 Start ...

Страница 186: ...dware Guide 4 Remove the top cover 7 2 Removing and Attaching the Top Cover pg 174 5 Install or remove memory modules When installing Insert a memory module properly into the memory slot The levers close If the levers are not closed completely push them with your fingers When removing Open the levers on both ends 6 Check that the memory module is inserted all the way 7 Attach the top cover 7 2 Rem...

Страница 187: ... slot location that has defective memory 9 2 2 Error Messages pg 234 9 3 System Event Log pg 243 If defective memory is discovered replace it and then restart the Server Blade Replacing the defective memory Replace the defective memory with a new one according to 7 4 3 How to Install Remove Memory Module pg 186 After replacing the memory module start the BIOS Setup Utility and select the Server me...

Страница 188: ... Server Blade from the Chassis Failure to do so may cause electric shock For details on how to remove the Server Blade from the Chassis refer to BX600 S3 Blade Server System Unit Hardware Guide The circuit boards and soldered parts of internal options are exposed They can be damaged by static electricity Before handling them first touch a metal part of the Chassis to discharge static electricity D...

Страница 189: ...rd Before installing an expansion card refer to the notes in the expansion card manual SCSI card Connection of a SCSI device Connect the SCSI device supported by this server to the SCSI card Operations of unsupported SCSI devices are not guaranteed table Available expansion card slot module Product name Model Remarks Expansion Card Slot Module PG CS103 64bit 133MHz PCI X Expansion Card Slot Module...

Страница 190: ... initialization is automatically executed to ensure data consistency For details about initialization refer to the manual in the Array controller Document Tool CD 7 5 3 How to Install an Expansion Card To install the PCI X and PCI Express cards perform the same procedures 1 Turn off the Server Blade 3 3 Turning Off the Server in BX600 S3 Blade Server System Unit Hardware Guide 2 Touch the metal pa...

Страница 191: ...keep the removed slot cover for later use 7 Install the expansion card to the expansion card slot module 1 Securely insert the expansion card in the PCI slot Insert the expansion card with its circuitry side facing downwards 2 Secure the expansion card using the screw Secure the expansion card using the screw removed in step 6 Screw Slot cover 1 Screw PCI slot 2 ...

Страница 192: ... 10 Attach the top cover 7 2 Removing and Attaching the Top Cover pg 174 11 Install the Server Blade in the Chassis 4 2 Installing Server Blades Storage Blades in BX600 S3 Blade Server System Unit Hardware Guide 12 Turn on the Server Blade and check the BIOS Setup Utility settings Referring to 7 8 BIOS Setting with Expansion Card Installed pg 201 confirm whether the setting satisfies card installa...

Страница 193: ...193 PRIMERGY BX620 S4 Server Blade User s Guide How to remove an expansion card To remove the expansion card simply reverse the installation procedures ...

Страница 194: ...ssis Failure to do so may cause electric shock For details on how to remove the Server Blade from the Chassis refer to BX600 S3 Blade Server System Unit Hardware Guide The circuit boards and soldered parts of internal options are exposed They can be damaged by static electricity Before handling them first touch a metal part of the Chassis to discharge static electricity Do not touch the circuitry ...

Страница 195: ... a metal part of the Chassis to discharge static electricity 3 Remove the Server Blade from the Chassis to install an expansion board 4 2 Installing Server Blades Storage Blades in BX600 S3 Blade Server System Unit Hardware Guide 4 Remove the top cover 7 2 Removing and Attaching the Top Cover pg 174 5 Install the expansion board Check that the expansion board is securely inserted to the slot table...

Страница 196: ... expansion board in the Server Blade and the FC Network Blade in the Chassis then install the SFP mod ule option in the FC Network Blade For details refer to BX600 S3 Blade Server System Unit Hardware Guide 9 Turn on the Server Blade and check the BIOS Setup Utility settings Referring to 7 8 BIOS Setting with Expansion Card Installed pg 201 confirm whether the setting satisfies card installation c...

Страница 197: ...en backing up data to another hard disk unit you should make backups on a file or block basis Use the unit in a dry place with low airborne dust levels Use the device on a shock and vibration free surface Keep the device away from direct sunlight radiators or other heat sources Do not use the unit in a place where the temperature is extremely high or low or experiences extreme temperature changes ...

Страница 198: ...troller When manually installing the OS the array must be configured under the onboard array controller before installation To enable the RAID1 array configuration the array must be initialized after its configuration is completed For more details on how to create the array configuration and initialize the array refer to the manual in the Array controller Document Tool CD table Available Internal ...

Страница 199: ... to accommodate an internal hard disk unit A dummy unit is inserted into a bay not occupied by an internal hard disk unit Pull the dummy unit out towards you with its tabs being pressed inward Be sure to keep the removed dummy units for later use 4 Install the internal hard disk unit into the Server Blade 1 Fully insert the internal hard disk unit in the bay while the cover of the internal hard di...

Страница 200: ...it use both hands to pull it out 4 Install a new internal hard disk unit or a dummy unit 7 7 3 How to Install the Internal Hard Disk Unit pg 199 Replacing the failed internal hard disk unit When RAID RAID1 is configured with this server a failed hard disk unit can be replaced and the restoration can be performed without turning off the server and peripheral devices hot swappable hot pluggable For ...

Страница 201: ...PG FCD102 1Gbit s Ethernet I O Module PG LND201 Eth Ctrl 2 x 1Gbit PCI E 1000 BASE T lp PG 2861L SCSI Ctrl U160 lp PG 1301L SAS RAID Ctrl PG 248EL For a device that starts the OS use the BIOS Setup Utility to set the optional ROM OPROM to Enabled For more details on the setting procedures refer to 8 2 5 PCI Configuration Submenu pg 212 in the Advanced menu Refer to the PRIMERGY BX620 S2 Server Bla...

Страница 202: ... Blade Connect the Storage Blade to the SAS RAID Ctrl installed in the expansion car slot module The following shows a connection example Baseboard Mid plane SCSI Cable PG CBLS001 PG CBLS002 Sold separately PRIMERGY SX10 Backup cabinet PG R1BC4 Internal hard disk units SCSI Ctrl U160 lp PG 1301L Expansion Card Slot Module PCI X PG CS103 Server Blade Chassis Front Baseboard Server Blade Midplane Ex...

Страница 203: ...203 Chapter 8 Hardware Configuration Utilities This chapter explains how to make the environment settings necessary to operate the Server Blade 8 1 Switch Block Settings 204 8 2 BIOS Setup Utility 205 ...

Страница 204: ...lectric shock For details on how to remove the Server Blade from the Chassis refer to BX600 S3 Blade Server System Unit Hardware Guide table Switch Block Settings Switch No Description Switch 1 Sets whether or not to delete a password ON Deletes the password OFF Does not delete the password Default Switch 2 Sets whether or not to clear the information stored on the CMOS ON Clears the information s...

Страница 205: ...600 S3 Blade Server System Unit Hardware Guide 3 After the memory capacity is displayed if Press F2 to run Setup Press F12 for BBS POPUP appears on the screen press the F2 key The Main menu appears BIOS Version nnnn BMC F W Version nnnn System Time hh mm ss System Date xxx mm dd yyyy Sync RTC with Mgmt Blade Enabled System Memory Size 3072MB v0n nn C Copyright 1985 2004 American Megatrends Inc BIO...

Страница 206: ... end of an item Enter Selects a set item For items displayed with displays the submenu When a submenu is displayed pressing the Esc key returns to the menu window Changes the value of an item F2 F3 Changes the color of the BIOS setting window F7 Sets the set values of all the items to the stored values F9 Sets all the items to the initial values F10 Saves the settings and exits the BIOS Setup Util...

Страница 207: ...nter key The message Discard changes and exit setup is displayed 3 Use the keys to move the cursor to OK or Cancel and press the Enter key When selected Save Changes and Exit Select OK to exit After saving changes to settings the BIOS Setup Utility closes and the server restarts To return to the BIOS Setup Utility without exiting this program select Cancel When selected Discard Changes and Exit Se...

Страница 208: ...ime is set If a highly precise system time is necessary install a network synchronized time system NTP etc System Date Present date The system date is set in month day year format For example April 20 2008 is set as 04 20 2008 This can be set when Sync RTC with Mgmt Blade is set to Disabled Sync RTC with Mgmt Blade Disabled Enabled Initial value Sets whether or not to synchronize the time between ...

Страница 209: ...CI Configuration Configures the PCI device Press the Enter key to display the submenu 8 2 5 PCI Configuration Submenu pg 212 CPU Configuration Configures CPU Press the Enter key to display the submenu 8 2 6 CPU Configuration Submenu pg 213 Exit Reset Configuration Data No CPU Configuration Peripheral Configuration PCI Configuration v0n nn C Copyright 1985 2004 American Megatrends Inc BIOS SETUP UT...

Страница 210: ... 3E8 IRQ 4 2E8 IRQ 3 Sets the I O port address and IRQ level of the serial port USB Configuration Configure the USB device Press the Enter key to display the submenu USB Configuration Submenu p 211 Main Security Exit Boot Server Peripheral Configuration Serial 1 Serial Port1 Address 3F8 IRQ4 v0n nn C Copyright 1985 2004 American Megatrends Inc BIOS SETUP UTILITY Advanced USB Configuration Allows B...

Страница 211: ... not to use the USB connected keyboard and mouse This item appears when USB Functions is set to 4 USB Ports USB Mass Storage Device Configuration Press the Enter key to display the USB Mass Storage Device Configuration submenu This item appears when the device is connected via USB USB Mass Storage Reset Delay 20Sec Unchangeable Sets the number of seconds to wait for a response after USB Mass Stora...

Страница 212: ...OPROM to Onboard LAN6 OPROM Disabled Initial value Enabled PCI slot OPROM Disabled Initial value Enabled Daughter Board OPROM Disabled Initial value Enabled Exit v0n nn C Copyright 1985 2004 American Megatrends Inc Main Security Exit Boot Server BIOS SETUP UTILITY Advanced PCI Configuration Onboard Disk OPROM Enabled Onboard LAN 1 OPROM Enabled Onboard LAN 2 OPROM Disabled Onboard LAN 3 OPROM Disa...

Страница 213: ...use of the security function to avoid buffer overflow Intel R SpeedStep tm tech Maximum Minimum Automatic Disabled Initial value Sets the CPU power saving function This item is not supported when the Xeon processor E5405 2GHz 12MB CPU is used Intel R C State tech Disabled Unchangeable Sets the function to optimize the performance and power status by moving the CPU status according to the load Exit...

Страница 214: ...nistrator password must be specified For details about procedures for setting changing and deleting the password refer to 9 4 2 Security against Unauthorized Use pg 248 Clear User Password Selecting this item and pressing the Enter key will delete the user password This item appears when User Password is specified Password Check Setup Initial value Always Sets the scope protected by the password T...

Страница 215: ...s Guide Supervisor Password Lock Standard Initial value Extended Set the scope protected by the setup password This item appears when Supervisor Password or User Password is specified table Items on the Security Menu Item Setting Description ...

Страница 216: ... a memory setting Press the Enter key to display the submenu 8 2 11 Memory Status Submenu pg 221 Console Redirection Configures console settings Press the Enter key to display the submenu 8 2 12 Console Redirection Submenu pg 222 System Information Configures system settings Press the Enter key to display the submenu 8 2 13 System Information Submenu pg 223 Exit Server Configuration Post Errors En...

Страница 217: ...nced Security Exit Boot Exit ASR R OS Boot Watchdog Timer Disabled v0n nn C Copyright 1985 2004 American Megatrends Inc BIOS SETUP UTILITY Server Enable Disable OS Boot Watchdog Timer Boot Retry Counter Retry 3 times ASR R Boot Delay Minute 2 After Power Failure Last State F1 Esc Select Item Select Screen Change Option General Help Exit F10 Save and Exit Tab Select Field ...

Страница 218: ...ring function If the system is started with this function enabled the server may automatically turn off or restart improperly If the OS Boot Monitoring function is needed it should be reset to enabled before resuming normal server operation When setting this function refer to ServerView User s Guide to fully learn about its specifications in order to use it properly with the correct settings Timer...

Страница 219: ...ndby time After Power Failure Stay Off Last State Initial value Power On Sets the server operation when power supply is restored after power failure or turning on the main power of the Chassis Stay Off The power stays turned off Last State The power state before the power failure is restored Power On The power is turned on Note When a UPS scheduled operation is performed in an OS such as Windows S...

Страница 220: ...s the CPU status After replacing the CPU set to Enabled CPU2 Status Main Advanced Security Exit Boot Exit CPU Status CPU1 Status Enabled v0n nn C Copyright 1985 2004 American Megatrends Inc BIOS SETUP UTILITY Server If a CPU is failed but equipped the Service Processor has stopped the CPU on demand or due to CPU errors Status of empty CPU slot is unchangeable CPU2 Status Enabled F1 Esc Select Item...

Страница 221: ...or Sets whether or not to use the memory redundancy function If using the redundant memory function installing ServerView is necessary DIMM 1 2 Enabled Unchangeable Displays the memory status After replacing memory set to Enabled DIMM 3 4 DIMM 5 6 DIMM 7 8 Main Advanced Security Exit Boot Exit Memory Status v0n nn C Copyright 1985 2004 American Megatrends Inc BIOS SETUP UTILITY Server If enabled t...

Страница 222: ...Address is set to On board COM A Flow Control XON XOFF Unchangeable Sets flow control when console redirection is set Only XON XOFF is available in this Server Blade This item appears when Com Port Address is set to On board COM A Mode Standard Initial value Enhanced Sets whether or not to continue console redirection after POST when console redirection is set This item appears when Com Port Addre...

Страница 223: ... Board LAN1 Mac Address to On Board LAN6 Mac Address Displays the MAC address of On Board LAN1 to On Board LAN6 Main Advanced Security Exit Boot Exit System Information Manufacturer Intel Brand String Genuine Intel R CPU 3 00GHz Frequency 3 00GHz FSB Speed 666MHz Stepping F62 Cache L1 32 KB Cache L2 4096 KB On Board LAN1 Mac Address nn nn nn nn nn nn On Board LAN2 Mac Address nn nn nn nn nn nn On ...

Страница 224: ...evice Priority Submenu pg 225 Hard Disk Drives Sets the priority sequence for each device Press the Enter key to display the submenu Removable Drives and CD DVD Drives are displayed when the USB device is connected Removable Drives CD DVD Drives Boot Device Priority Hard Disk Drives v0n nn C Copyright 1985 2004 American Megatrends Inc BIOS SETUP UTILITY Main Advanced Security Exit Boot Server Boot...

Страница 225: ...USB Y E USB FDU 1 USB GENERIC CDR 1 SCSI ID LUN Network MBAv Network MBAv 2 Sets the boot priority sequence for each device Use the keys to change the order of priority for the selected device while shifting it one by one You can also replace the priority order between two devices specified in the steps below 1 Select the first device to change the priority sequence and press the Enter key 2 Selec...

Страница 226: ...ly saved settings remain valid Load Previous Value Sets all set values to the currently stored values Get Default Values Loads and displays the default settings for the server Save Changes and Exit Discard Changes and Exit Load Previous Value Get Default Values v0n nn C Copyright 1985 2004 American Megatrends Inc BIOS SETUP UTILITY Main Advanced Security Exit Boot Server Exit Options Exit system s...

Страница 227: ...tenance to be performed after server operations start 9 1 Daily Maintenance 228 9 2 Troubleshooting 229 9 3 System Event Log 243 9 4 Security 248 9 5 Backup 251 9 6 Restoring the system 254 9 7 Reinstalling the OS 257 9 8 Maintenance Service 258 9 9 Maintenance Notes 260 ...

Страница 228: ...mponent Names and Functions pg 27 and Chapter 1 Component Names and Functions in the BX600 S3 Blade Server System Unit Hardware Guide Server Monitoring Tool ServerView ServerView is software that monitors whether the server hardware is in a normal state to protect important server resources When using ServerView the server hardware is monitored all the time Early detection of errors is made possib...

Страница 229: ... on PRIMERGY update modules drivers and the software refer to the Fujitsu PRIMERGY website http www fujitsu com global services computing server ia driver Regarding BIOS and firmware contact to Fujitsu Support Office Refer to the following website http www fujitsu com global contact computing PRMRGY_index html 9 2 1 Hardware Troubleshooting This section explains hardware related troubleshooting If...

Страница 230: ...aintenance Support pg 259 and collect the required information An error message is displayed Refer to 9 2 2 Error Messages pg 234 The LAN does not operate properly The Switch Blade may not be running properly Check the Switch Blade settings Switch Blade If there is a problem with network connection first check the wiring and confirm that the device is normally connected to network If the error sti...

Страница 231: ... sessions may already be opened Try connecting after waiting for a while When using a spanning tree check the connection state 30 seconds after the cable has been connected Cannot access the setup screen of the Switch Blade in the serial port connection of the Management Blade Check that serial port and terminal emulator settings are correct by referring to BX600 Management Blade Hardware Guide Fo...

Страница 232: ... may be an error in the system area of the memory Contact an office listed in the Contact Information of the Start Guide Typing the keyboard does not display any characters or the mouse cursor does not move Check to see whether the keyboard and mouse are connected properly If they are not connected turn the server off and then connect the cables to the server For the connection procedures refer to...

Страница 233: ...d on the OS Check the settings For details refer to the CD DVD drive manual Check to see whether the CD DVD is inserted properly If it is not correctly insert the CD DVD so that the label is facing up Check to see that the CD DVD is not dirty If it is dirty wipe it with a soft dry cloth Check to see that the CD DVD is not scratched or bent If scratched or damaged replace the CD DVD The unit does n...

Страница 234: ...rror If the message still appears the Server Blade must be replaced Contact an office listed in the Contact Information of the Start Guide Reboot and Select proper Boot device or Insert Boot Media in selected Boot device and press a key No drive to boot OS is detected Check to see whether the drives hard disk CD DVD drive floppy disk drive etc and cables to be used for booting have no error If the...

Страница 235: ...ntact Information of the Start Guide PCI ROM conflict PCI IRQ conflict PCI IRQ routing table error No enough Space to copy PCI Option ROM Warning Now CPU1 Max support Freq doesn t match with last time Press F1 use the present CPU1 or shutdown to change CPU1 A CPU error has occurred Correct the current settings using the BIOS Setup Utility or restore the default settings If the message still appear...

Страница 236: ...ess the R key ERROR Fail to create data file The following are possible causes Check the floppy disk status The floppy disk is write protected Disable the write protect and retry The floppy disk is not inserted into the floppy disk drive Insert the proper floppy disk and then retry There is an error in the contents of the floppy disk Create the Server Management Tools disk again If this occurred w...

Страница 237: ...7 PRIMERGY BX620 S4 Server Blade User s Guide Other messages Contact an office listed in the Contact Information of the Start Guide table Server Management Tools List of Error Messages Message Description ...

Страница 238: ... following error messages may appear during installation using ServerStart Observe the corrective action against the relevant error WzDiskAdmin System Error Last Error The device is not ready appears Optional SCSI SAS devices e g hard disk cabinet DAT unit may be connected Disconnect the optional SCSI SAS devices and perform installation again Connect the optional devices after the installation co...

Страница 239: ... ROM 2 Start the Command Prompt and move to the i386 folder of the CD DVD drive 3 Execute the following command to extract tftp exe in the Systemroot system32 folder 4 Confirm that tftp exe exists in the Systemroot System32 folder Error window appears after installing or uninstalling ServerView For Windows Server 2003 For Windows Server 2003 with Service Pack 1 applied the following message may ap...

Страница 240: ... settings of the paging file and memory dump file For setting procedures refer to 5 1 Memory Dump Paging File Setting pg 100 table List of event log errors that may occur after Installation ID Description Cause and corrective action 62 This computer is a domain PDC at the root of forest Use the net command net time setsntp server name to configure it for synchronization from an external time sourc...

Страница 241: ...nnot be collected select a write type of debugging information within the range of free space of the volume size If the above does not provide a solution try increasing the size of the hard disk or adding an additional hard disk unit For setting procedures refer to 5 1 Memory Dump Paging File Setting pg 100 Restoring the system In the event where the system file system configuration or environment...

Страница 242: ...n a Linux environment the time displayed on the OS the software clock value on the OS is written to the hardware clock in the server when the OS is shut down Procedure for prohibiting the time on the OS from being written to the hardware clock When you do not want the time on the OS to be written to the hardware clock at an OS shutdown comment the following line out in etc rc0 d S01halt runcmd Syn...

Страница 243: ...he system event log When an system event log occurs save the log using Server Management Tools and contact an office listed in the Contact Information in the Start Guide The system event log of this Server Blade can be viewed from the management terminal via the Management Blade BX600 Management Blade Hardware Guide The Server Management Tools disk is for this Server Blade only Do not use those to...

Страница 244: ...iew OS Boot Monitoring function is disabled default setting is Disabled If you start up the system while the OS Boot Monitoring function remains enabled the operation of the Server Blade may become unpredictable at such times as an abrupt power interruption or restart If the OS Boot Monitoring function is needed it should be reset to enabled before resuming normal server operation For details of S...

Страница 245: ...not ensured Key operations The following shows the key operations in the menu window of Server Management Tools Exiting Server Management Tools Press the Esc key once in the menu window of Server Management Tools The power can be turned off when the DOS prompt is displayed table List of Server Management Tools key operations Key Roles of key Selects an item Enter Executes the selected item Esc Exi...

Страница 246: ...s the F2 key in the System Event Log SEL window 2 Enter the name of the file to save the log and press the Enter key The logs are saved on a floppy disk with the specified file name table List of System Event Log SEL window key operations Key Roles of keys PageUp PageDown Ctrl Home Ctrl End Scrolls the screen Esc Ends the System Event Log SEL window and returns to the Server Management Tools menu ...

Страница 247: ...nt log and save delete logs as necessary The following shows the steps for deleting an event log 1 Press the F3 key in the System Event Log SEL window The following window appears 2 Press the Enter key This deletes the system event log If you continue operations with event logs full it is difficult to remedy a fault Event logs should be periodically saved and deleted FUJITSU SIEMENS COMPUTERS ENTE...

Страница 248: ... When a password is set the server is accessible to only the users who know the password The password is set in the BIOS Setup Utility For details on the BIOS Setup Utility refer to 8 2 BIOS Setup Utility pg 205 Password types The following two types of password can be set in this Server Blade The type of password defines the privileges of server operations Supervisor password Administrator passwo...

Страница 249: ...ssword setting press the Esc key 6 In the Confirm New Password field enter the password you have entered in Step 4 and press the Enter key Display in Supervisor Password or User Password changes from Not Installed to Installed Logging on as a user enables you to set the user authority only such as user password Changing and deleting a password If a password is already set you can change or delete ...

Страница 250: ... leaking out the data on the hard disk must be wiped before disposal or transfer However wiping the hard disk is not an easy task Simply initializing formatting the hard disk or deleting the files may give the pretense that the data no longer exists but in reality the data is simply no longer accessible to the OS However it is still accessible to malicious individuals that can restore the data The...

Страница 251: ...vices Software and Their Operations Backup operations differ depending on network operating systems applications and system operations Contact an office listed in the Contact Information in the Start Guide and make backups using the following items Backup device e g DAT72 unit Backup software Standard backup software supplied with the OS software for tape backup etc The Windows Server Backup funct...

Страница 252: ...be replaced sooner than later As a guide to when the life span of the media will expire write the date it was first used on the media Rotating media Perform backup operations using multiple mediums on a rotating basis When using a single media cartridge repeatedly backup data can be temporarily lost in the event the backup fails Also if the hard disk fails during backup the backup data cannot be r...

Страница 253: ...his function may cause the media to be ejected from an internal device of the server and hit the Chassis cover If this is the case open the cover when ejecting or do not eject the media Media label types and positions When writing information such as the name on media use the label that came with the media The area in which a label can be posted on the media of each device varies Failing to post l...

Страница 254: ...s Server 2008 The whole server can be restored using the Windows Server Backup function Items required Windows Server 2008 DVD ROM Installation disc Backup data created using the Windows Server Backup function connectable shared folder DVD etc 1 Insert the Windows Server 2008 DVD ROM Installation disc immediately after turning on the server Check that there is not already a floppy disk inserted in...

Страница 255: ...ckup data is in a folder on another machine or when the backup data is not the latest data select Restore specific backup In this case the window to specify a restoration target appears after clicking Next Select the backup to be restored and click Next When the backup data is stored on the network specify the shared folder in which the backup data is stored from Advanced Settings The window to se...

Страница 256: ...on the driver to be used refer to 4 2 4 Installing Windows Server 2003 pg 86 For how to create driver disks refer to 4 1 Creating Driver Disks pg 70 1 Insert the Windows Server 2003 CD DVD after turning on the server Check that there is not already a floppy disk inserted in the floppy disk drive at this time 2 When a message prompting you to press the F6 key appears immediately after the start of ...

Страница 257: ...alling the OS 9 7 1 Checking before OS Reinstallation Deletion of data from the disk Reinstallation deletes all disk contents Save the necessary data and system configuration in a different location Other notes Any remaining notes are the same as those for initial installation Make sure to check the settings in advance ...

Страница 258: ... s who have signed up to hardware maintenance contract will be provided with replacement parts free of charge and will have higher priority for replacement Customer s not signed up to hardware maintenance contract will be charged for operation cost including the maintenance parts separately Replacing non durable components To ensure stable operation of the server system it is recommended that a ma...

Страница 259: ...f internal options Configuration information of Server Blade Set values with BIOS Setup Utility OS used in Server Blade LAN WAN system configuration Phenomena what happened when doing what what was displayed etc Date time of occurrence Environmental settings of the server LED statuses USB floppy disk drive The latest Server Management Tools disk with a setting information stored Maintenance work N...

Страница 260: ...r data was written correctly on internal hard disk unit in the past is stored in the SAS module or the expansion card slot module As the information is lost due to replacement the initialization is automatically executed to ensure the data integrity You can restore this information using maintenance tool just before the replacement and write back after the replacement however if you cannot restore...

Страница 261: ...he server and internal options It also covers how to recycle the products A Server Blade Specifications 262 B Specifications for Internal Options 264 C External Floppy Disk Drive USB Notes on Usage 267 D About Switch Blade PG SW107 Connection 268 E Recycling 271 ...

Страница 262: ...m 32GB 4GB DIMM 8 slots PCI slots For expansion board Standard N A Option PCI X 64 bit 133MHz 1 or PCI Express x8 1 For PCI card Standard N A Option PCI X 64 bit 133MHz 1 or PCI Express x4 1 Internal 2 5 inch hard disk drive 2 bays hot pluggable Adding size 73 4GB 146 8GB 10 025rpm SAS 73 4GB 15 000rpm SAS Maximum 293 6GB 146 8GB 2 CD DVD drive Type DVD ROM drive unit USB external option 1 Floppy ...

Страница 263: ...ndows Server 2003 Standard x64 Edition Windows Server 2003 Enterprise x64 Edition Windows Server 2003 R2 Standard Edition Windows Server 2003 R2 Enterprise Edition Windows Server 2003 R2 Standard x64 Edition Windows Server 2003 R2 Enterprise x64 Edition Red Hat Enterprise Linux ES v 4 for x86 Red Hat Enterprise Linux ES v 4 for EM64T Red Hat Enterprise Linux AS v 4 for x86 Red Hat Enterprise Linux...

Страница 264: ... CPU Specifications Dual Core Processor Item Functions and Specifications Product name Processor Xeon E5205 1 86GHz 6MB Processor Xeon X5260 3 33GHz 6MB Product ID PG FG43G PG FG43H Number of core 2 Clock frequency 1 86GHz 3 33GHz Internal secondary cache size 6MB Front side bus 1066MHz 1333MHz table CPU Specifications Quad Core Processor Item Functions and Specifications Product name Processor Xe...

Страница 265: ...CJ PG RM2CJ PG RM4CJ PG RM8CJ Component 512MB DDR2 667 FBD 2 1GB DDR2 667 FBD 2 2GB DDR2 667 FBD 2 4GB DDR2 667 FBD 2 Capacity 1GB 2GB 4GB 8GB Clock frequency 667MHz Number of pins 240 table Internal Hard Disk Unit Specifications Item Functions and Specifications Product name HDD SAS 10k 73GB hot plug 2 5inch HDD SAS 10k 147GB hot plug 2 5inch HDD SAS 15k 73GB hot plug 2 5inch Product ID PG HDD71B...

Страница 266: ...nsion card slot module 1 Specifications table Expansion card slot module specifications Item Contents Product name Expansion Card Slot Module Product ID PG CS103 PG CS104 PCI slot PCI X 64 bit 133MHz 1 PCI Express x4 1 Dimension unit mm 40 200 85 W D H Weight Approx 260 g ...

Страница 267: ...lling windows manually and at system recovery When performing system recovery using Windows Server 2003 Automatic System Recovery ASR also when installing Windows manually system recovery installation might not be performed properly This is caused by the device driver being unreadable due to recognition failure of the floppy disk media replacement After pressing the Enter key in accordance with th...

Страница 268: ...5 NET2 3 6 No 6 NIC6 LAN6 NET1 4 2 1 No 1 NIC1 LAN1 Small Big NET2 4 2 No 2 NIC2 LAN2 NET1 5 3 No 3 NIC3 LAN3 NET2 5 4 No 4 NIC4 LAN4 NET1 6 5 No 5 NIC5 LAN5 NET2 6 6 No 6 NIC6 LAN6 NET1 7 3 1 No 1 NIC1 LAN1 Small Big NET2 7 2 No 2 NIC2 LAN2 NET1 8 3 No 3 NIC3 LAN3 NET2 8 4 No 4 NIC4 LAN4 NET1 9 5 No 5 NIC5 LAN5 NET2 9 6 No 6 NIC6 LAN6 NET1 10 4 1 No 1 NIC1 LAN1 Small Big NET2 10 2 No 2 NIC2 LAN2 ...

Страница 269: ... NET2 22 2 No 2 NIC2 LAN2 NET1 23 3 No 3 NIC3 LAN3 NET2 23 4 No 4 NIC4 LAN4 NET1 24 5 No 5 NIC5 LAN5 NET2 24 6 No 6 NIC6 LAN6 NET1 25 9 1 No 1 NIC1 LAN1 Small Big NET2 25 2 No 2 NIC2 LAN2 NET1 26 3 No 3 NIC3 LAN3 NET2 26 4 No 4 NIC4 LAN4 NET1 27 5 No 5 NIC5 LAN5 NET2 27 6 No 6 NIC6 LAN6 NET1 28 10 1 No 1 NIC1 LAN1 Small Big NET2 28 2 No 2 NIC2 LAN2 NET1 29 3 No 3 NIC3 LAN3 NET2 29 4 No 4 NIC4 LAN4...

Страница 270: ... installed When planning a network pay attention to the LAN numbers device names in the OS and local area connection names above If the OS is Windows the MAC address device name and local connection name can be checked with the ipconfig all command in command prompt Local area connection name Device name MAC Address ...

Страница 271: ...wever just formatting or deleting files may not avoid the risk that the data is restored and used for wrongful purposes If confidential or private information is saved in order to make it impossible to be restored it is recommended to use third party data wiping tools Disposing of used up batteries Used up batteries must be disposed of as industrial waste and therefore require special processing L...

Страница 272: ...272 Appendix ...

Страница 273: ...us Submenu 220 Creating a DOS Floppy Disk 116 Creating Driver Disks 70 Creating Maintenance Tools 113 D Defective CPU Disconnection Function 181 Defective Memory Disconnection Function 187 DIMM 183 Disk Manager 59 Drive Letter Assignment 117 Driver types Windows Server 2003 71 Windows Server 2003 x64 71 Windows Server 2008 32 bit 64 bit 70 DSNAP 24 169 Installation 169 Usage 169 Dual Core Intel Xe...

Страница 274: ...PROSet 151 M Main Menu BIOS 208 Manual installation Linux 88 Windows Server 2003 86 Windows Server 2003 x64 83 Windows Server 2008 Full 76 Windows Server 2008 Server Core 79 Memory Dump 100 240 Memory Dump File Setting 101 Memory Dump Setting 100 Memory modules Available Memory Modules 183 How to Install 186 How to Remove 186 Identifying 184 Installation location 183 Specifications 265 Memory moni...

Страница 275: ...fications 262 ServerStart 20 Cautions 43 Features 20 Installation 113 Supported expansion cards 45 Uninstallation 115 ServerView 23 24 165 Installation 166 Settings Required Before Operating the Server 117 SNMP service 241 Solving problems 169 Specifications for Internal Options 264 Switch block 31 Setting 204 System diagnosis support tools 24 System event log 243 Deleting 247 Saving 246 Viewing 2...

Страница 276: ... party copyrights or other rights arising from the use of any information in this manual No part of this manual may be reproduced in any form without the prior written permission of Fujitsu PRIMERGY BX620 S4 Server Blade User s Guide B7FH 5591 01ENZ0 00 Issued in Issued by August 2008 FUJITSU LIMITED ...

Отзывы: