


10
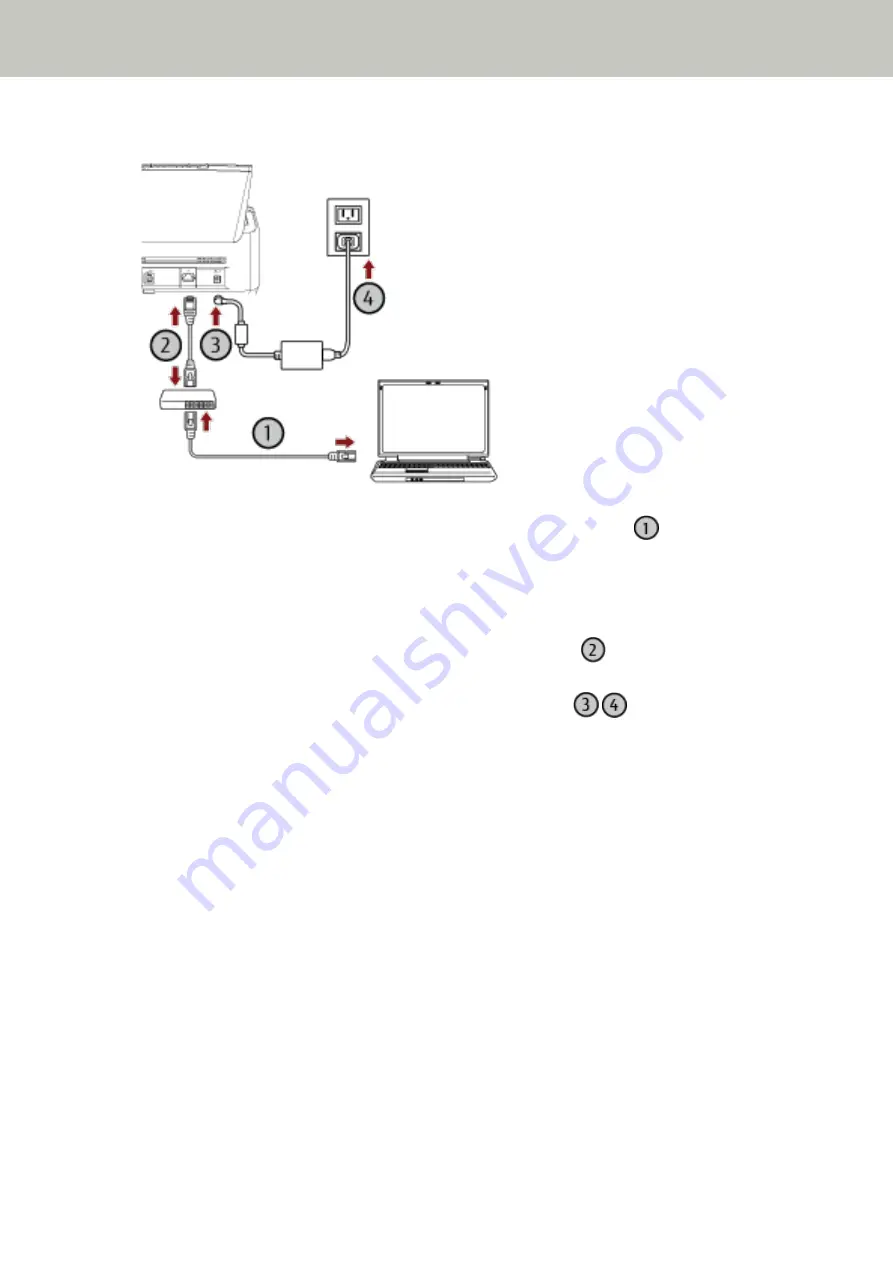
Connect the scanner to the computer as follows.
a
Connect the computer to a network device via a wired LAN or Wi-Fi (
).
The procedure below shows an example of connecting the computer to a network device via a wired
LAN.
For details about how to connect the computer to the network, refer to your computer manual.
b
Connect the scanner to the network device via a wired LAN (
).
c
Connect the power cable to the scanner and the AC outlet (
,
).
d
Turn on the scanner.
For details, refer to
How to Turn the Power ON (page 72)
11
Click the [Select a Scanner] button in the [How to Connect the Scanner] window.
The [Scanner Selection Tool] window appears.
12
In the scanner list, select the IP address of the scanner that you want to use.
The default scanner name is "(Model Name) - (Serial No.)".
The serial number is printed on the label on the back of the scanner, so remove the ADF paper chute (feeder)
to check the number. For details, refer to
Checking the Product Label (page 332)
.
For details about Scanner Selection Tool, refer to the Network Setup Tool for fi Series Help.
The browser opens and the login window for fi Series Network Settings appears.
13
Enter the administrator password, and click the [Login] button.
For details about the administrator password, refer to
The [Scanner Information] window for fi Series Network Settings appears.
14
Specify the following items:
Specify each setting item on each web page and click the [Apply to the scanner] button.
Scanner Setup
63
Содержание fi-8150
Страница 36: ...Parts and Functions Common Parts for All Models Inside ADF Scanner Overview 36 ...
Страница 38: ... Document sensor This section explains about names of the document sensors in detail Scanner Overview 38 ...
Страница 80: ...How to Close the Document Cover 1 Gently close the document cover Basic Operations 80 ...
Страница 218: ... For fi 8290 fi 8270 fi 8250 fi 8250U Daily Care 218 ...
Страница 235: ...5 Attach the shaft Replacing the Consumables 235 ...
Страница 239: ...a Open the sheet guide by lifting the tab Replacing the Consumables 239 ...
Страница 342: ...4 Click the OK button The password is set Scanner Settings Software Operation Panel 342 ...
Страница 344: ...The password is cleared Scanner Settings Software Operation Panel 344 ...
Страница 346: ...4 Click the OK button The password is set Scanner Settings Software Operation Panel 346 ...
Страница 426: ...Outer Dimensions fi 8290 fi 8270 fi 8250 fi 8250U Unit mm in Appendix 426 ...


