background image

56

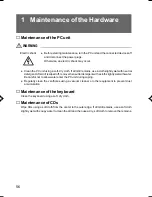
1 Maintenance of the Hardware

Maintenance of the PC unit

 WARNING

Before starting maintenance, turn the PC unit and the connected devices off

and disconnect the power plugs.

Otherwise, an electric shock may occur.

Clean the PC unit using a soft, dry cloth. If dirt still remains, use a cloth slightly wet with neutral
detergent. After dirt is wiped off, remove the neutral detergent with a cloth slightly wet with water.
Be careful not to allow water enter the PC unit during wiping.

Regularly clean the ventholes using a vacuum cleaner or other equipment to prevent dust
accumulation.

Maintenance of the keyboard

Clean the keyboard using a soft, dry cloth.

Maintenance of CDs

Wipe CDs using a soft cloth from the center to the outer edge. If dirt still remains, use a soft cloth
slightly wet with soapy water to clean the dirt and then use a dry, soft cloth to remove the remains.

Electric shock

08Panac(55-71)

01/11/2000, 09:23

56

Содержание DESKPOWER 2000 FPC-M80000

Страница 1: ...istered trademarks of Microsoft Corporation MS MS DOS Windows NT Windows for Workgroups Windows 98 Window 2000 Pentium Celeron and MMX technology are trademarks of Intel Corporation Phoenix and Phoenix logo are registered trademarks of Phoenix Technologies Ltd All other products are trademarks or registered trademarks of their respective companies Copyright 2000 Fujitsu Limited All rights reserved...

Страница 2: ...ot sure of the type of power available consult your dealer or local power company 8 This product is equipped with a 3 wire grounding type plug a plug having a third grounding pin This will only plug into a grounding type power outlet This is a safety feature If you are unable to insert the plug into the outlet contact your electrician to replace your obsolete outlet Do not defeat the purpose of th...

Страница 3: ... has been dropped or the cabinet has been damaged f If the product exhibits a distinct change in performance indicating a need for service 14 CAUTION Whenreplacingthebattery besuretoinstallitwiththepolaritiesinthecorrect position There is a danger of explosion if the battery is replaced with an incorrect type or is mistreated Do not recharge disassemble or dispose of in fire Replace only with the ...

Страница 4: ...ymbolized in the icon and outlined above it The icon indicates the corresponding instruction is intended to tell you not to do something The meaning of the instruction is symbolized in the icon and outlined above it The icon indicates the corresponding instruction is intended to tell you to do something The meaning of the instruction is symbolized in the icon and outlined above it Representing key...

Страница 5: ...y be different from those which actually appear on your PC screen depending on installed options Referencing products In this manual products are referred to using their respective abbreviations as explained below Windows 98 refers to Microsoft Windows 98 operating system Windows Me refers to Microsoft Windows Millennium operating system Windows NT 4 0 and Windows NT refer to Microsoft Windows NT ...

Страница 6: ...dismount an optional unit for your PC switch off the PC and all units linked to it and unplug them from their respective outlets Otherwise electric shock may occur When removing exterior parts in order to mount option parts or others inside the cabinet switch off the power supply for PC unit and peripheral devices linked with it and disconnect the power cable from outlet before working to avoid ri...

Страница 7: ...ch as how to switch on and off the power and handle storage media Be sure to read this chapter Chapter 3 Troubleshooting This chapter explains what to do if your PC does not operate as you expect or if an error message appears Read this chapter as required Chapter 4 Technical Information This chapter describes the name of each component of your PC information related to maintenance of the PC the s...

Страница 8: ...splay Keyboard and Mouse Cables 9 Connecting the display keyboard mouse cables 10 Connecting the power cable 12 4 Turning On the Power 14 Notes on power on 15 Turning on the power 15 5 Turning Off the Power 16 Notes on power off 17 Turning off the power 17 6 Resetting 20 Resetting the PC 21 7 CD ROM 22 Notes on handling 23 Notes on using the drive 23 Inserting or removing a CD 23 8 Floppy Disk 24 ...

Страница 9: ...city 35 Location of memory modules 36 Applicable memory modules 36 Installing memory modules 36 Removing memory modules 37 4 Installing Expansion Cards 38 Applicable expansion cards 39 Installing an expansion card 39 5 Installing an Internal Hard Disk 41 Notes on handling the hard disk 41 Master and slave 41 Installing a disk in the internal hard disk bay 43 Installing a disk in the front access b...

Страница 10: ...tions 64 Disposal 64 USB Windows 98 2000 Me model 64 USB keyboard Windows 98 Me model 64 Addition of USB components Windows 98 2000 Me model 65 Precautions on using display 65 Precautions on using analog display 65 Precautions on using analog LCD 65 Adjustment of analog display screen position 65 Display of video memory capacity 65 Selection of screen resolution 65 Connection of display 66 Replace...

Страница 11: ...CHAPTER 1 Installation and Connection ...

Страница 12: ...2 1 Part Names and Functions This section explains the names and functions of the parts of the PC unit and the motherboard Front of the PC unit 1 2 3 4 5 6 7 8 9 10 11 12 13 14 ...

Страница 13: ...tholes take air in for cooling inside 8 CD ROM drive Insert a CD ROM into this drive to read data or programs or insert a music CD for playback 9 Front access bay Attach front access bay options such as internal hard disk and MO magneto optical disk to this bay 10 Eject button Press this button to insert or remove a CD ROM or music CD This button can be used when the PC is on Do not press this but...

Страница 14: ...4 Back of the PC unit 1 2 3 4 5 6 7 8 10 9 11 12 13 14 ...

Страница 15: ...ifier 6 LINE IN terminal Connect the output terminal of audio equipment to this terminal 7 Microphone jack Plug a capacitor microphone to this jack 8 Venthole An opening provided to let heat go out of the PC Do not block it 9 Outlet Connect the power cable of the display to this outlet 10 Inlet Connect the power cable of the PC unit to this connector 11 Parallel connector Connect the cable of a pr...

Страница 16: ...pre installed It can be replaced with one having more capacity 2 Internal hard disk bay Install an IDE compliant internal hard disk 3 Venthole An opening provided to let heat go out of the PC Do not block it 4 Power supply unit 5 PCI slots PCI card expansion slots 1 2 3 4 5 ...

Страница 17: ...py disk drive cable to this connector 4 Primary IDE connector Connect a cable of the hard disk running OS 5 Secondary IDE connector Connect a CD ROM drive cable to this connector 6 PCI connector Insert a PCI card PCIs1 2 3 and 4 are arranged in this order from the top in the figure above 7 Internal battery This battery is used to save setup values of the PC The life is about 5 years under normal u...

Страница 18: ...d to direct sunlight or near a heater and other areas with high temperatures Areas with temperatures below 10 C Areas where you may trip on a cable Areas subjected to a strong magnetic field such as near a television or speaker Unstable areas with violent vibration or on a slanted surface Example of installation Install your PC as shown in the figures below PC unit Display Keyboard Mouse Point Whe...

Страница 19: ...cur Use a Fujitsu supplied display keyboard and mouse Otherwise an electric shock a fire or fault may occur CAUTION Connect the cables correctly An incorrect connection could result in a fault in the PC unit or peripheral devices For a device having a service outlet connect only devices specified in the manual to the outlet Otherwise a fire or fault may occur When accessing any component on the PC...

Страница 20: ...e plug on one end of the power cable for display which is supplied with the PC unit to the outlet of the PC unit 2 Connect the power cable to the display Connect the plug on one end of the power cable for display which is supplied with the PC unit to the inlet on the back of the display 3 Connect the keyboard With the mark on the connector of the keyboard cable facing right plug the keyboard conne...

Страница 21: ...ble facing right plug the mouse connector to the back of the PC unit as indicated by the mouse label color on the back 5 Connect the display cable to the PC unit ConnectthedisplaycableconnectortothedisplayconnectoronthebackofthePCunitandtighten the cable connector screws ...

Страница 22: ... the electrodes of the plug or slots in the outlet wipe it off with a dry cloth Point Do not include the power cable in a star burst connection Do not entangle the power cable with the keyboard or mouse cable In the event of lightning disconnect the power cable from the outlet When connecting the power cable to a two pin outlet use the adapter plug supplied with the power cable to connect the grou...

Страница 23: ... the other end of the power cable to an outlet When connecting the power cable to a two pin outlet attach the adapter plug supplied with the power cable to the cable plug and then connect to the outlet Connectthegroundingwireextendingfromtheadapterplug tothegroundingterminalandsecure it by tightening the screw ...

Страница 24: ...display power is automatically turned on each time the power switch on the PC is pressed as in Step 2 below When turning on the power after turning it off or turning off the power after turning it on wait at least 10 seconds Although the screen may be distorted temporarily or display horizontal lines at the beginning of a screen display such as the Windows startup and shutdown screen or when the d...

Страница 25: ...e PC main unit The power lamps on the display and PC light up After the PC is turned on the FUJITSU logo appears during which power on self test is being performed then the system starts up Power lamp of PC unit Power switch of PC unit ...

Страница 26: ... shut down Do not turn off the system during power on self test POST After the OS completely starts up turn off the system by referring to Turning off the power below If the PC becomes inoperable or Advanced Power On OFF Power Off Source Power Button of BIOS Setup is set to Disabled turn the power off by pressing the power switch for more than four seconds In this case the PC cannot be turned on b...

Страница 27: ...er then click Yes The power is turned off Point The power can also be turned off in the following procedure 1 Press the Ctrl Alt Delete keys The Windows NT security dialog box appears 2 Click Shutdown The Computer shutdown dialog box appears 3 Click Shut down and turn off the power then click OK The power is automatically turned off ...

Страница 28: ...ty dialog box appears 2 Click Shutdown The Shut down Windows dialog box appears 3 Select Shutdown and click OK The power is automatically turned off For Windows 2000 1 Click the Start button then click Shut down The Shut down Windows dialog box appears 2 Select Shutdown and click OK The power is automatically turned off ...

Страница 29: ...19 For Windows Me 1 Click the Start button then click Shut down Windows The Shut down Windows dialog box appears 2 Select Shutdown and click OK The power is automatically turned off ...

Страница 30: ...The Abort programs dialog box appears Proceed as instructed by the messages For Windows NT 1 Click the Start button then click Shut down The Shut down Windows dialog box appears 2 Click Restart the computer then click Yes The PC is reset Point The PC can also be reset in the following procedure 1 Press the Ctrl Alt Delete keys The Windows NT security dialog box appears 2 Click Shutdown The Compute...

Страница 31: ...ars 3 Select Restart and click OK The PC is reset For Windows Me 1 Click the Start button then click Shut down Windows The Shut down Windows dialog box appears 2 Select Restart and click OK The PC is reset Point If everything on Windows Me has become inoperable proceed as follows 1 Press the Ctrl Alt Delete keys The Abort programs dialog box appears Proceed as instructed by the messages ...

Страница 32: ...sedistorted broken or cracked Otherwise a fault may occur Faults caused by the use of a defective CD shall not be covered by the warranty ThisPCcanusecircularCDsonly Donotuseodd shapedCDs Otherwise afaultmayoccur Faults caused by the use of an odd shaped CD shall not be covered by the warranty Do not use any separately sold CD ROM cleaning disk Otherwise a foreign substance like dust may adhere to...

Страница 33: ... CD in the center of the tray 3 Press the Eject button The tray enters the unit to load the CD Point The Busy lamp lights up when the CD is loaded Proceed to the following operation after mak ing sure that the Busy lamp turns off Removing the CD Confirm that the Busy lamp is off then press the Eject button to remove the CD Busy lamp Eject button Label side Tray ...

Страница 34: ...hem in an extreme temperature environment Do not place them in a humid and dusty environment Do not overlay too many labels causes clogging in the drive Keep the hard disk drive free from condensation or moisture Inserting or removing a floppy disk Point Use DOS V formatted floppy disks Operation with other types of floppy disks is not guaranteed Inserting a floppy disk With the surface with the a...

Страница 35: ...e floppy disk access lamp is off Point Do not press the floppy disk eject button while the floppy disk access lamp is on Data stored on the disk may be damaged 2 Press the floppy disk eject button The floppy disk is ejected Floppy disk access lamp ...

Страница 36: ...26 ...

Страница 37: ...CHAPTER 2 Hardware ...

Страница 38: ... be used on your PC WARNING Use only peripheral devices recommended by Fujitsu Otherwise an electric shock a fire or fault may occur CAUTION When installing or removing a peripheral device do not remove screws other than those specified in the manual Otherwise personal injury or faults may occur Read this manual carefully to ensure correct cable connections An incorrect connection could result in ...

Страница 39: ...he power supply unit The power supply unit is a box shaped component on the back inside the PC Since the unit contains some high voltage components do not disassemble it Be careful with the cables and components inside Do not damage or modify them Be careful of static electricity PC boards and electronic parts of internal peripheral devices are exposed They may be damaged by static electricity gen...

Страница 40: ...h an internal floppy disk drive SCSI option such as magneto optical disk drive or IDE compliant hard disk as necessary Unlike external devices front access bay options receive power from the PC unit and therefore require no outlet They also save space 3 Internal hard disk bay Connect an IDE compliant internal hard disk 4 Expansion card slots Insert an expansion card For instance a SCSI card allows...

Страница 41: ...0 Me or Windows NT 4 0 Service Pack 6a is used By default DMA is set to ON Refer to the manual for your hard disk to check whether it supports Ultra DMA 66 When installing a hard disk unit that does not support Ultra DMA 66 be sure to set DMA to OFF or disable the function If it is used with DMA set to ON or enabled the unit may not work properly and may destroy data Only one ATAPI compliant magne...

Страница 42: ...ur When installing or removing a front access bay option do not remove screws other than those specified Otherwise personal injury or faults may occur When accessing any component on the PC board touch the specified areas only Otherwise personal injury or faults may occur Electric shock Injury Injury ...

Страница 43: ... bay option remove the front panel as well Remove the cover and panel as follows 1 Turn off the PC and all devices connected to it and unplug them 2 Remove three screws from the back of the PC unit 3 Remove the cover in the direction of the arrow Slide the cover to the back of the PC unit and lift it for removal 2 Removing the Cover ...

Страница 44: ...the front panel Releasing the lower stopper first facilitates removal of the front panel 5 Remove the front panel Point Remove the cover and front panel as necessary For reinstallation follow the opposite procedure from that explained above stop stop ...

Страница 45: ... install the memory WARNING Beforeinstallingorremovingamemorymodule turnoffthePCandalldevices connected to it and unplug them Otherwise an electric shock may occur Use Fujitsu supplied memory modules Otherwise an electric shock a fire or fault may occur CAUTION When installing or removing a memory module do not remove screws other than those specified Otherwise personal injury or faults may occur ...

Страница 46: ...tes of memory can be installed on the PC In the standard configuration DIMM2 has a memory module Use a 64 bit SDRAM DIMM memory module supplied by Fujitsu to increase the memory capacity of the PC Installing removing memory modules Installing memory modules 1 Remove the cover 2 Pull the hooks on both sides of the slot outward DIMM1 DIMM2 ...

Страница 47: ...ooked securely Point When inserting a memory module into the slot hold the PC so that it will not fall Work will be easier on a PC in a horizontal position 4 Reinstall the cover Removing memory modules 1 Remove the cover 2 Pull the hooks on both sides of the slot outward and remove the memory module Be careful not to drop the module Point Do not pull the hooks too violently Otherwise the memory mo...

Страница 48: ...essing any component on the PC board touch the specified areas only Otherwise personal injury or faults may occur Before installing an expansion card resources must be set The floppy disk drive or hard disk drive built in the PC uses a path predetermined for each device to exchange data with the CPU or memory These paths have subclasses including I O addresses DMA channels interrupt requests IRQs ...

Страница 49: ...ith slots for PCI cards Install a PCI card in one of the PCI 2 to 4 slots Installing an expansion card 1 Remove the cover 2 Remove the slot cover Remove one screw to remove the cover Point Keep the removed slot cover PCI slot PCI2 PCI3 PCI4 Slot cover ...

Страница 50: ...connector Completely insert the expansion card into the connector 4 Fix it with the screw Fix the expansion card with the screw removed in Step 2 5 Reinstall the cover Point For removal follow the opposite procedure from that explained above ...

Страница 51: ...netic field Do not disassemble or break down the hard disk Keep the hard disk free from condensation or moisture Point Improper handling may damage the data stored on the disk Always make backup copies of important data Even hard disks of the same type have different capacities It is recommended to back up data not in units of hard disks but in units of files or sectors Master and slave This PC ca...

Страница 52: ...ables differ between those to be connected to the primary and secondary IDEs Use a shorter cable 30cm for connection to the primary IDE and a longer one 45cm for connection to the secondary IDE By default the pre installed internal hard disk and CD ROM are set to the cable select Be sure to connect the hard disk that runs OS to the primary IDE connector as a master If it is connected as a slave or...

Страница 53: ... to the slave or cable select 2 If brackets are attached to both sides of the internal hard disk to be replaced installed remove the brackets Remove the four screws to remove the brackets 3 Remove the cover 4 Remove the mounting bracket from the PC unit Remove one screw to remove the bracket 5 Replace or install the internal hard disk Removethefourscrewsfromthesidesoftheremovedmountingbracketsandi...

Страница 54: ... the primary IDE connector in the PC unit When installing the first disk connect the master connector of the primary IDE cable to the connector of the internal hard disk When installing the second one connect the intermediate connector marked SLAVE in the figure below of the primary IDE cable connected to the first hard disk to the connector of the internal hard disk Primary IDE cable To the mothe...

Страница 55: ...stallation After installing the first internal hard disk use the attached Recovery CD ROM to configure sectors and install OS for each sector After installing the second internal hard disk configure as follows For Windows 98 Me model After installing a hard disk use the FDISK command from the MS DOS prompt to configure sectors Then format the additional hard disk from My Computer For Windows NT mo...

Страница 56: ...ernal hard disk configure as follows For Windows 98 Me model After installing a hard disk use the FDISK command from the MS DOS prompt to configure sectors Then format the additional hard disk from My Computer For Windows NT model On Disk Administrator configure sectors and format the hard disk Disk Administrator is activated by clicking the Start button Program then Administration tools common Fo...

Страница 57: ...ed Refer to the related manual and set a unique ID Before installing an internal IDE option set it to the master slave or cable select 1 Remove the cover and front panel 2 Remove the blank panel from the front panel Remove two screws from both edges of the blank panel The blank panel need not be removed when installing an internal hard disk Point When installing a magneto optical disk drive fix th...

Страница 58: ... of the option is aligned with the front panel surface Secure the option with the four screws To install an internal hard disk reinstall the blank plate 5 Connect flat cables When connecting an IDE compliant internal option TheconnectorofthesecondaryIDEcable whichismarked Tothemotherboard inthefigure below is connected to the secondary IDE connector in the PC unit Secondary IDE cable To the mother...

Страница 59: ...tical disk CD ROM When connecting a SCSI compliant internal option Connect the connector on the one side of a SCSI card flat cable to the connector of an internal SCSI option Connect the connector on the other side to the connector of the SCSI card installed on the expansion slot 6 Connect the power cable Connect a free power cable to the connector on the installed internal option After installing...

Страница 60: ...al hard disk from My Computer After installing a magneto optical disk drive format it from My Computer MO disks formatted onWindows98maynotbeusedonotheroperatingsystems forexample MS DOSorWindows NT For Windows NT model After installing a hard disk configure sectors and format the disk by using Disk Administrator Disk Administrator is activated by clicking the Start button Program then Administrat...

Страница 61: ...CHAPTER 3 Troubleshooting ...

Страница 62: ... of the display adjusted correctly Adjust the screen using these controls The screen sways Is there any substance generating a strong electromagnetic field ex TV near the display If any keep it away from the display The left and right sides of the screen are concealed Adjust the horizontal screen size using the adjustment button of the display Data cannot be written to or read from a floppy disk C...

Страница 63: ...orm to the specifications If not use a conforming CD The characters entered using the keyboard are not displayed Is the keyboard connected correctly The mouse cursor does not move Is the mouse connected correctly The SCSI device connected via a SCSI card is not recognized by Windows 98 2000 Me Check the following Is a SCSI card driver installed Confirm it as follows For Windows 98 Me 1 Double clic...

Страница 64: ...54 ...

Страница 65: ...CHAPTER 4 Technical Information ...

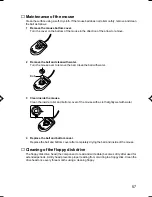
Страница 66: ...ped off remove the neutral detergent with a cloth slightly wet with water Be careful not to allow water enter the PC unit during wiping Regularly clean the ventholes using a vacuum cleaner or other equipment to prevent dust accumulation Maintenance of the keyboard Clean the keyboard using a soft dry cloth Maintenance of CDs Wipe CDs using a soft cloth from the center to the outer edge If dirt stil...

Страница 67: ...e ball with water 3 Clean inside the mouse Clean the inside roller and bottom cover of the mouse with a cloth slightly wet with water 4 Replace the ball and bottom cover Replace the ball and bottom cover after completely drying the ball and inside of the mouse Cleaning of the floppy disk drive The floppy disk drive head the component to read and write data becomes dirty after used for extended per...

Страница 68: ...power plug of this PC to a different outlet from that accepting the power plug of a television or radio Precautions on television radio Keep a television or radio away from this PC Adjust the direction or position of a television radio antenna to eliminate interference Keep the antenna wiring of a television radio away from this PC Use a coaxial cable for an antenna Whether the PC or peripheral de...

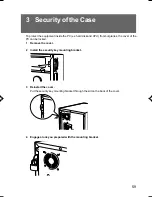
Страница 69: ... and CPU from burglaries the cover of the PC can be locked 1 Remove the cover 2 Install the security key mounting bracket 3 Reinstall the cover Put the security key mounting bracket through the slit on the back of the cover 4 Engage a lock you prepared with the mounting bracket ...

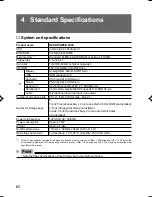
Страница 70: ...nous RS 232C x 1 D SUB 9 pin Centronics compliant ECP supported D SUB 25 pin Microphone input line input line output PCI x 3 half 270mm max Rev 2 1 5 Front Front access bay x 2 onto one of which CD ROM pre installed 3 5 inch floppy disk drive pre installed Inside 3 5 inch hard disk bay x 2 onto one of which disk pre installed 100 230V AC 50 60Hz Approx 75W Approx 9 0kg 179mm x 344mm x 360mm W x D ...

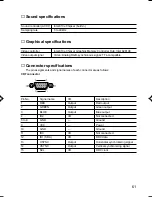
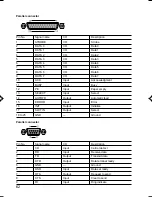
Страница 71: ... compatible Connector specifications The pin assignments and signal names of each connector are as follows CRT connector Pin No Signal name I O Description 1 RED Output Red output 2 GREEN Output Green output 3 BLUE Output Blue output 4 ID2 I O Not connected 5 to 8 GND Ground 9 VCC Power 10 GND Ground 11 ID0 I O Not connected 12 ID1 SDA I O DDC data 13 HSYNC Output Horizontal synchronizing signal 1...

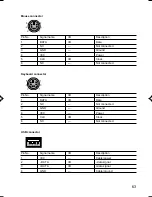
Страница 72: ... BUSY Input Busy 12 PE Input Paper empty 13 SELECT Input Select 14 AUTOFD Output Automatic feed 15 ERROR Input Error 16 INIT Output Initialize 17 SLCTIN Output Select 18 to 25 GND Ground Parallel connector Pin No Signal name I O Description 1 CD Input Carrier detect 2 RD Input Receive data 3 TD Output Transmit data 4 DTR Output Data terminal ready 5 GND Ground 6 DSR Input Data set ready 7 RTS Outp...

Страница 73: ...5 CLK I O Clock 6 NC Not connected Keyboard connector Pin No Signal name I O Description 1 DATA I O Data 2 NC Not connected 3 GND Ground 4 VCC Power 5 CLK I O Clock 6 NC Not connected USB connector Pin No Signal name I O Description 1 VCC Cable power 2 DATA I O data signal 3 DATA I O data signal 4 GND Cable ground ...

Страница 74: ...uire a special device driver to be installed USB is supported by Windows 98 2000 and Me Depending on the type of a connected USB device Windows may not be closed properly In this case remove the device and close Windows USB keyboard Windows 98 Me model After selecting Control Panel Accessibility Options FilterKeys Settings and enabling Use Shortcut theshortcutkeyfunctionisdisabledand UseFilterKeys...

Страница 75: ...rs of some analog displays may not be detected automatically this does not cause any operational problem and thus such displays can be used as they are Precautions on using analog LCD On some analog LCDs the screen may appear to be doubled or tripled In this case set the refresh rate to 60Hz Adjustment of analog display screen position For an analog display the BIOS Setup or MS DOS screen may be d...

Страница 76: ... replaced without the above setting reinstall the display driver as follows 1 Start Windows in the Safe mode 2 Set the graphic adapter to Standard PCI graphic adapter VGA and restart Windows 3 Reinstall the display driver For Windows NT model 1 Turn the PC off and replace the display 2 Start the PC with Windows NT Workstation Version 4 00 VGA mode 3 Set the resolution number of colors and refresh ...

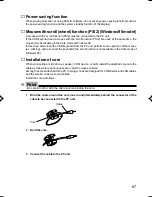
Страница 77: ...rform some operation of the mouse ex clicking and reconnect the keyboard the scroll function is not available in the Safe mode of Windows 98 Installation of core When connecting a microphone speaker COM device or LAN install the attached core onto the cable as follows to reduce unnecessary electric wave emission Among the cores attached to the PC the larger ones are designed for COM device and LAN...

Страница 78: ...rtwhichhasbeendisabledonWindows98 2000 Me itmustbeenabledonWindows 98 2000 Me To enable it uncheck Disable under this hardware environment for the port setting on Device Manager on Windows 98 2000 Me and resume the PC When the port is set to Disabled on BIOS Setup nothing appears on Device Manager Power restoration function This PC cannot be operated by controlling AC input using uninterruptible p...

Страница 79: ...tech 21 The Computer Centre Singapore 128388 Tel 65 776 0688 Fax 65 776 0788 Fujitsu PC Asia Pte Ltd Malaysia Branch 8th Floor Wisma Damansara Jalan Semantan 50490 Kuala Lumpur Malaysia Tel 603 253 3997 Fax 603 253 4245 Website www fujitsu pc asia com ...

Отзывы: