4. Adjustment
32
FinePix F601 Zoom (U/E/EG) SERVICE MANUAL
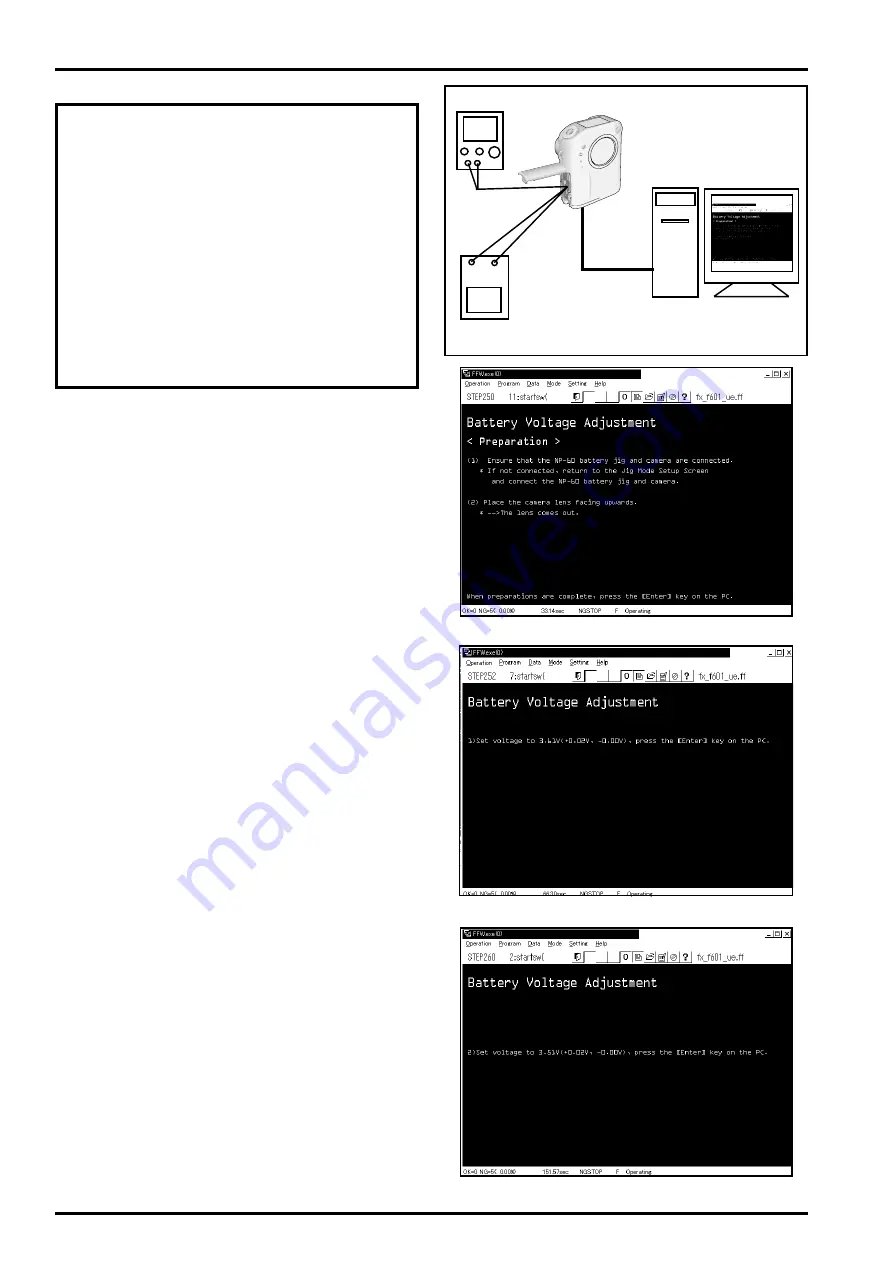
4-11. [F1]: Battery Voltage Adjustment
(note)
1) When adjusting the battery voltage, supply power
(5V) to the camera from the
[Specified NP-60 Bat-
tery Jig]
before setting the jig mode.
2) Always measure input voltage in the vicinity of the
DC IN terminal.
3) When reducing the voltage, adjust the stabilized
power supply to ensure that the voltage is not re-
duced excessively from the measured point. The
adjustment software may produce an error if com-
munication between the adjustment software and
the camera is disrupted. Restart the adjustment
software in this case.
<Step 1>
Select
[F1]
from
[Adjustment Select Screen (Fig.4)]
(ie
press the [F1] key on the computer).
---> The
[Battery Voltage Adjustment Preparation Screen
(Fig.5)]
is displayed.
<Step 2>
Follow the instructions on the [Battery Voltage Adjust-
ment Preparation Screen (Fig.5)], and make the follow-
ing preparations.
1) Ensure that the NP-60 battery jig and camera are con-
nected.
* If not connected, return to the Jig Mode Setup Screen
and connect the NP-60 battery jig and camera.
2) Place the camera lens facing upwards.
When preparations are complete, press the [Enter] key
on the computer.
---> The
[3.61V Input Screen (Fig.6)]
is displayed.
<Step 3>
Follow instructions on the [3.61V Input Screen (Fig.6)],
and adjust BATT_HALF voltage. Set voltage to
3.61V(+0.02V, -0.00V)
, press the [Enter] key on the com-
puter.
---> The
[3.51V Input Screen (Fig.7)]
is displayed.
<Step4>
Follow instructions on the [3.51V Input Screen (Fig.7)],
and adjust BATT_PREEND. Set voltage to
3.51V(+0.02V,
-0.00V)
, press the [Enter] key on the computer.
---> The
[3.20V Input Screen (Fig.8)]
is displayed.
<Fig.5> Battery Voltage Adjustment Preparation Screen
<Fig.6> 3.61V Input Screen
<Fig.7> 3.51V Input Screen
Stabilized power supply
DC_5V
+ -
USB cable
Digital voltmeter
Connections for Battery Voltage Adjustment


