8
9
CLEANING SANITISATION DISINFECTION STERILISATION
Switch off the device before any cleaning procedure and unplug the power cable from
the socket.
DEVICE AND TUBING EXTERIOR (B)
Use only a damp cloth with antibacterial soap (non-abrasive and with no solvents of any
sort).
ACCESSORIES
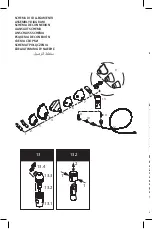
Open the nebuliser by turning the upper part (13.3) anticlockwise, remove the nozzle
(13.2) from the upper part (13.3). Disassembly by pressing as shown by the 2 arrows in the
“Connection diagram” in point 13.2.
Then proceed according to the following instructions.
CLEANING AT HOME - SANITISATION AND DISINFECTION
SANITISATION
Before and after each use, sanitise the nebuliser cup and the accessories, choosing one of
the methods described below.
method A:
Sanitise accessories
1-2-3-4-5-6-7-8-10-11-13.1-13.2-13.3-13.4
under po-
table hot water (approximately 40°C) with a gentle, non abrasive dish detergent.
method B:
Sanitise accessories
1-2-3-4-5-6-7-8-10-11-13.1-13.2-13.3-13.4
in the dish-
washer with a hot cycle.
method C:
Sanitise accessories
1-2-3-4-5-6-7-8-10-11-13.1-13.2-13.3-13.4
by immers-
ing them in a solution of 50% water and 50% white vinegar, then rinse thoroughly under
potable hot water (approximately 40 °C).
If you want to also perform the cleaning for DISINFECTION, jump to the DISINFECTION
paragraph.
After having sanitised the accessories, shake them vigorously and place them on a paper
towel. Alternatively, dry them with a jet of hot air (for example, a hair dryer).
DISINFECTION
After sanitising the nebuliser cup and the accessories, disinfect them choosing one of the
methods described below.
method A:
Accessories
1-2-3-4-5-6-7-8-10-11-13.1-13.2-13.3-13.4
can be disinfected.
The disinfectant must be an electrolytic chloroxidizer (active principle: sodium hypochlo-
rite) specific for disinfecting, which is available in any pharmacy.
Implementation:
- Fill a container big enough to hold all of the parts to disinfect with a solution of potable
water and disinfectant, according to the proportions indicated on the packaging of the
disinfectant.
- Completely immerse each part in the solution, taking care to avoid the formation of air
bubbles on the parts. Leave the parts immersed for the amount of time indicated on the
packaging of the disinfectant associated with the concentration chosen for the solution.
- Remove the disinfected parts and rinse abundantly with warm potable water.
- Dispose of the solution following the instructions provided by the disinfectant manufac-
turer.
method B:
Disinfect the accessories
1-2-3-4-8-10-11-13.1-13.2-13.3-13.4
by boiling
them in water for 10 minutes; use demineralised or distilled water to prevent calcium de-
posits.
method C:
Disinfect the accessories
1-2-3-4-8-10-11-13.1-13.2-13.3-13.4
with a hot
steam steriliser for baby-bottle (not the microwave type). Perform the process faithfully fol-
lowing the instructions of the steriliser. To ensure that the disinfection is effective, choose
a steriliser with an operating cycle of at least 6 minutes.
After having disinfected the accessories, shake them vigorously and place them on a pa-
per towel. Alternatively, dry them with a jet of hot air (for example, from a hair dryer).
CLEANING IN A CLINICAL OR HOSPITAL SETTING - DISINFECTION AND STERILISATION
Before disinfection or sterilisation, sanitise the nebuliser cup and the accessories, choosing
one of the methods described below.
method A:
Sanitise accessories
1-2-3-4-5-6-7-8-10-11-13.1-13.2-13.3-13.4
under pota-
ble hot water (approximately 40°C) with a gentle, non abrasive dish detergent.
method B:
Sanitise accessories
1-2-3-4-5-6-7-8-10-11-13.1-13.2-13.3-13.4
in the dish-
washer with a hot cycle.
DISINFECTION
Accessories
1-2-3-4-5-6-7-8-10-11-13.1-13.2-13.3-13.4
can be disinfected.
The disinfectant must be an electrolytic chloroxidizer (active principle: sodium hypochlo-
rite) specific for disinfecting, which is available in any pharmacy.
Implementation:
- Fill a container big enough to hold all of the parts to disinfect with a solution of potable
water and disinfectant, according to the proportions indicated on the packaging of the
disinfectant.
- Completely immerse each part in the solution, taking care to avoid the formation of air
bubbles on the parts. Leave the parts immersed for the amount of time indicated on the
packaging of the disinfectant associated with the concentration chosen for the solution.
- Remove the disinfected parts and rinse abundantly with warm potable water.
- Dispose of the solution following the instructions provided by the disinfectant manufac-
turer.
If you want to also perform the STERILISATION, jump to the STERILISATION paragraph.
After having disinfected the accessories, shake them vigorously and place them on a pa-
per towel. Alternatively, dry them with a jet of hot air (for example, from a hair dryer).
STERILISATION
Accessories
1-2-3-4-8-11-13.1-13.2-13.3-13.4
can be sterilised.
Device: Fractionated vacuum overpressure steam steriliser in accordance with EN 13060.
Implementation:
Wrap every single part to be treated with a sterile barrier system or
packaging in accordance with Norm EN 11607. Place the packed components in the steam
steriliser. Run the sterilisation cycle according to the operating instructions of the device by
selecting a temperature of 134 °C and a time of 10 minutes first.
Storage:
Store the sterilised parts as per the instructions for use of either the sterile barrier
system or packaging.
The sterilisation procedure is validated in its conformity to ISO 17665-1.
At the end of each use store the accessories in a dry place away from dust.
For the “
CLEANING SANITISATION DISINFECTION STERILISATION”
of accessories 9 fol-
low the instructions in the instruction manual.
USE OF NEBULIZATION MANUAL CONTROL
To achieve continuous nebulisation action you should not use the manual nebulisation
control (10), especially in the case of children or persons with reduced physical, sensory,
or mental capabilities. The manual nebulisation control is useful for limiting dispersion of
the medication in the surrounding environment.
To start nebulizing close with a
finger the hole of the nebulizer
manual control (10) and breathe
in gently; we recommend to
hold your breath for a moment
so that the inhaled aerosol drop-
lets can be deposited,
meanwhile, to disable nebuliz-
ing, remove your finger from the
hole of the nebulizer manual
control to avoid the waste of
drug, optimizing its acquisition.
Then exhale slowly.
Содержание PF6 Basic2
Страница 1: ......
Страница 33: ...31 Flaem www flaem it 1 2 3 4 5 PE 6 7 8 9 10 11 12 1 2 13 RF6 Basic2 13 1 13 2 13 3 13 4 93 42 1 6 d po so os...
Страница 44: ...42 SOFTTOUCH SoftTouch 13 2 13 1 13 4 13 3 13 2 13 1 13 3 3 4 5 10 11 RF6 Basic2 2 RF6 Basic2 5 ml 2...
Страница 48: ...46 www flaem it Flaem 13 2 1 13 3 13 4 13 1 13 10 13 RF6 Basic2 13 1 13 2 13 3 13 4 dir 93 42 EEC 6...
Страница 49: ...47 1 SOFTTOUCH SoftTouch 13 1 2 13 3 3 4 4 10 RF6 Basic2 RF RF6 Basic2 5...
Страница 53: ...MEMO E...
Страница 54: ...MEMO...
Страница 55: ......


