26
WORKSHOP MANUAL
TL 250
CHAPTER 6
DASHBOARD
3-3
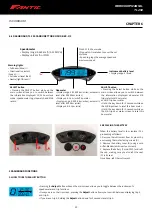
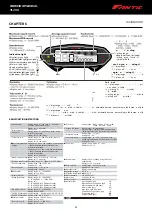
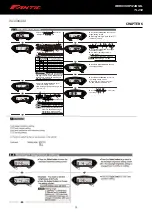
Meter size
3-6
The settings screen description
4
Enter settings and function index menu
a 1.
Circumference and sensing pointsetting
a 2.
RPM pulse setting
a 3.
Fuel gauge resistance setting
Fuel level manual setting
Fuel level resistance auto detection setting
Fuel warning setting
a 4.
Clock setting
a 5.
Backlight brightness setting
a 6.
Oil maintenance mileage setting
a 7.
Speed unit setting
a 8.
External ODO
a 9.
Internal ODO
●
Press and hold the Adjust
button for 3 seconds to enter setting
screen.
4-1
4-2
4-3
4-3-1
4-3-2
4-3-3
4-4
4-5
4-6
4-7
4-8
4-9
--------------------------
----------------------------------------------
------------------------------------
-------------------------------------
--------------------
------------------------------------------
----------------------------------------------------
--------------------------------------
---------------------------------
-----------------------------------------------
---------------------------------------------------
----------------------------------------------------
●Function index
3-5
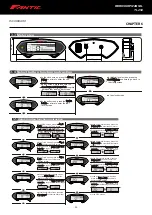
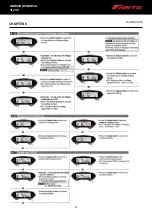
Adjust button function instruction
3-4
Select button function instruction
●
In the ODO sereen, press the
Adjust buttons for 3 seconds
to enter settings (Please refer to 4).
●
In the ODO sereen, press the Adjust
button to enter the Trip A screen.
●
In the Trip B screen, press the Adjust
button to enter the oil maintence
mileage screen.
●
Press and hold the Adjust button for 3
seconds to reset Trip B screen.
●
In total hour meter screen, press the
Adjust button to enter the hour meter
A screen.
●
In the Trip A screen, Press the Adjust
button to enter the Trip B screen.
●
Press and hold the Adjust button for 3
seconds to reset Trip A screen.
●
In the hour meter A screen, press the
Adjust button to enter the hour meter
B screen.
●
Press and hold the Adjust button for 3
seconds to reset hour meter A screen.
●
In the hour meter B screen, press the
Adjust button to enter the Max. record
screen.
●
Press and hold the Adjust button for 3
seconds to reset hour meter B screen.
●
In the Max. record screen, press the
Adjust button one time to enter the
Average speed record screen.
●
Press and hold the Adjust button for 3
seconds to reset Max. record screen.
●
In the Average speed record screen,
press the Adjust button one time to
enter the ODO sereen.
●
In the ODO sereen.
●
Press and hold the Adjust button for 3
seconds to reset Average speed record
screen.
●
In the oil maintence mileage screen,
press the Adjust button to enter the
total hour meter screen.
●
Press and hold the Adjust button for 3
seconds to reset oil maintence mileage
screen.
●
In the fuel level screen, press the
Select button one time to go back to
the clock screen.
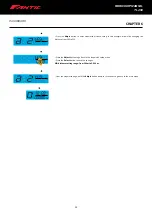
In settings screen, button is not pressed in 30 seconds, or speed > 3 km/h,
will automatically return to main screen.
After exiting settings screen, it will record the parameters.
NOTE
NOTE
●Total millage screen -
Press and hold the Adjust button for 3 seconds to
enter setting screen.
●Press the
Adjust button to select setting screen for Circumference and sensing
pointsetting, RPM pulse setting, Fuel gauge resistance setting (Fuel level manual
setting / Fuel level resistance auto detection setting / Fuel warning setting), Clock
setting, Backlight brightness setting, Oil maintenance mileage setting, Speed unit
setting, External ODO, Internal ODO.
●In any setting screen, hold the
Select button for 3 seconds to return to main screen.
●
In the clock screen.
●
In the volt screen, press the Select
button one time to enter the fuel
level screen.
●
In any screen, press and hold the
Select buttons for 3 seconds to switch
between rpm and fuel bar screen.
●
In the clock screen, press the Select
button one time to enter the volt
screen.
120 mm
46 mm
20 mm
37 mm
8 mm
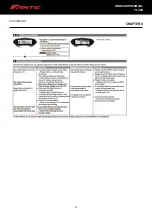
4-1
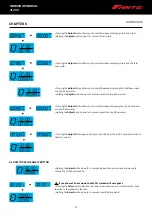
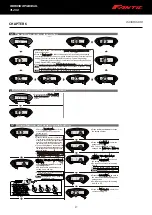
Circumference and sensing pointsetting
●
Press the Select button to enter the
circumference and sensing point
setting screen.
●Example
:
If the tire circumference is
1,300 mm.
●Press the
Select button
to choose
the setting number.
●EX. Now the tire circumference is
setting from 1,000 mm.
●Press the
Adjust button
to choose
the setting number.
Please reset this setting value when
you change a different size tire.
●Please measure the tire circumference (
The tire you will install the sensor on) and
make sure the number of magnet sensor
point (You could install the magnet into
the disc screw or the sprocket screw.)
●The speed displayed on the meter will be
affected by the setting, please make sure
the setting number is correct before you
make the setting.
NOTE
Setting range
:
300 ~ 2
,
500 mm
Setting unit
:
1 mm
Now the digit in thousands setting
number is flashing!
P.S.
●You could define the
valve as the starting
point and the terminal
point to measure the
wheel circumference
with a measuring tape.
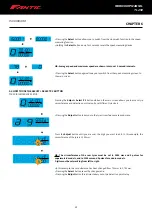
●Press the
Adjust button to enter next
operation setting.
●
Press the Select button to go back to
the circumference and sensing point
setting screen.
●
Ex. Now the sensor point is setting
from 1P to 6P.
●
Press the Select button to enter the
sensor point setting.
●
EX. The circumference setting is
changed from 1,000 mm to 1,300 mm.
NOTE
Sensitive point
:
1 ~ 20
Now the setting value is flashing!
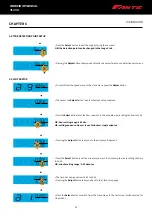
●
Example
:
If the sensor point is
setting 6P.
●
Press the
Adjust
button to choose
the setting number.
●
Ex. Now the sensor point is setting
from 1P.
wh041ba02a(P6-3)
Содержание TL 250
Страница 1: ...1 WORKSHOP MANUAL E N...
Страница 3: ...WORKSHOP MANUAL TL 250...
Страница 11: ...11 WORKSHOP MANUAL TL 250...
Страница 30: ...30 WORKSHOP MANUAL TL 250 CHAPTER 6 DASHBOARD 39 GENERAL CONTENT AND CONSULTATION ENGLISH...
Страница 49: ...49 49 WORKSHOP MANUAL TL 250...
Страница 50: ...50 50 CHAPTER 15 ELECTRICAL DEVICES 15 3 WIRING DIAGRAM TL 250 4 STROKE 2016 WORKSHOP MANUAL TL 250...
Страница 51: ...51 CHAPTER 15 ELECTRICAL DEVICES 51 WORKSHOP MANUAL TL 250...
Страница 136: ...136 136 WORKSHOP MANUAL TL 250...

