Model 5600MSC Master Clock/SPG Manual
TECHNICAL DESCRIPTION
Revision
1.6
Page
4-9
3. A virtual database known as the Management Information Base (MIB) lists all the variables
being controlled and which both the Manager and Agent understand. Please contact Evertz for
further information about obtaining a copy of the MIB for interfacing to a third party
Manager/NMS.
4.4.1. Connecting the 5600MSC to VistaLINK
®
Follow the instructions in section 2.1.4 to connect the 5600MSC to the Ethernet network. Once you
have established a physical connection you will need to set up the IP addresses of the 5600MSC using
the
IP Rules
menu items on the
GENERAL
menu.
4.4.2. Installing
VistaLINK
®
In order to control the 5600MSC, you will need at least version 10.1.42 of the
Vista
LINK
®
configuration
tool. If you received the
Vista
LINK
®
Toolkit CD-ROM with the 5600MSC, insert it into the PC’s CD-
ROM drive. In a few seconds a screen will appear with a menu guiding you through the
Vista
LINK
®
installation. You want to press the button to install the
Vista
LINK
TM
-C Configuration tool.
If you have an older version of
Vista
LINK
®
, or you are upgrading firmware in an existing 5600MSC and
do not have
Vista
LINK
®
contact the Evertz customer support department to receive your free copy of
the
Vista
LINK
®
-C Configuration utility.
If you are installing
Vista
LINK
®
-C version 10.1.42 you will also need to download the JAR file from
Downloads section of the Evertz web site (
). You will need to put it into the
lib\products
folder of the VLPro install directory. If you installed the software in the default location put the JAR file
in the
C:\Program Files\Evertz\VistaLinkPro\lib\products
folder.
4.4.3. Using
VistaLINK
®
The 5600MSC should be auto-discoverd by
Vista
LINK
®
PRO and appear under the
Hardware
section
of the
Vista
LINK
®
PRO Navigation Tree named with its given IP Address. If the 5600MSC is not auto-
detected (because it is on another subnet) it can be manually added by right clicking the
Hardware
node and selecting
Add/Update frame
.
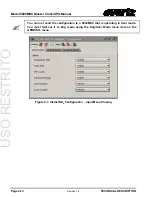
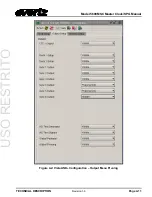
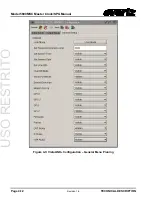
Right click the discovered 5600MSC to open the
Configuration View
screen. The screen is broken into
three tabs, one for each of the 5600MSC menus. To view the other screens, click on the appropriate
tab of the configuration screen. Figure 4-1 to Figure 4-3 show each of the configuration screens. To
hide items on one of the menus, set the dropdown beside the menu item name to
hidden
. To make the
menu item visible, set the dropdown to
visible
. On the Sync output menus set the dropdown to
phasing
only
if you want to hide all the menu items except the phasing controls.
On the
GENERAL
tab you will see a text box for you to enter a numeric password. This password will
be used when you are switching from
User
mode to
Engineering
mode. You can also choose where
you want to place the 5600MSC into User Mode when you send the configuration or not.
Once you have finished configuring the menu tree you can save the configuration in VistaLINK
®
. You
can also send it to the 5600MSC by pressing the
Apply
button on the VistaLINK
®
toolbar.
USO
RESTRITO
Содержание 5600MSC Series
Страница 2: ...USO RESTRITO ...
Страница 14: ...Model 5600MSC Master Clock SPG Manual Revision 1 6 This page left intentionally blank USO RESTRITO ...
Страница 41: ...Model 5600MSC Master Clock SPG Manual Revision 1 6 This page left intentionally blank USO RESTRITO ...
Страница 42: ...USO RESTRITO ...
Страница 114: ...USO RESTRITO ...
Страница 116: ...Model 5600MSC Master Clock SPG Manual Revision 1 6 This page left intentionally blank USO RESTRITO ...


