28
Upper Drive Unit Removal
When installing the MAPS in an existing chamber, it may be necessary to remove the upper drive unit to avoid
damage to the chamber or to the unit.
Following are the steps to separate the upper and lower drive units.
1.
Prior to disconnecting the fiber optic cables from the upper drive unit, label and mark the locations for
reconnection.
2.
Verify the fiber optic cables to the upper motor base are not switched.
3. Remove the bracket mounted on the drive unit that is attached to cable carrier. Two #6 screws hold the bracket
to the unit.
4. Remove the cable clip holding the power cable.
5. Remove the bracket on the opposite side of the unit that ties the drive unit to the turntable top. This temporary
bracket holds the unit in place for shipping.
6. Turn the brake knob to release the drive unit and allow it to move toward center of table.
Note:
When the turntable top is in place, use the brake knob to adjust the
Equipment Under Test (EUT) to the center of rotation (middle of the quiet
zone) by sliding the mast assembly back and forth.
7. Remove the two 1/4-20 hex head screws that hold the wood top support bracket, and then remove the bracket.
8. Slide the drive unit carrier out.
9. Reinstall in reverse order.
Note:
The brake knob must be in the upper position to allow the drive unit to
slide onto the rail system. Verify all hardware is secured.
Support Bracket
Hex Screw
Brake Knob
Fiber Optics
Power Input
Bracket
Содержание ETS-LINDGREN MAPS 2112 Series
Страница 1: ...Multi Axis Positioning System MAPSTM User Manual 1719784 Rev A May 2020...
Страница 2: ......
Страница 4: ...4...
Страница 8: ...8...
Страница 18: ...18...
Страница 20: ...20...
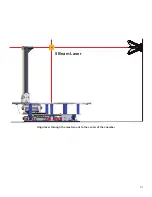
Страница 31: ...31 Align laser through the mast mount to the center of the chamber 5 Beam Laser...
Страница 34: ...34...
Страница 36: ...36...
Страница 38: ......


