24
Anchor Plate Installation
1.
The anchor plates are held in place by 1/4–20 screws and set collars. Screw the anchor plates to the floor
using 14x1 square socket flat head screws.
2.
Drill pilot holes for these screws, and make sure to vacuum shavings to provide good contact with the floor.
Continue mounting the remainder of the plates.
3.
When all anchor plates are securely mounted, remove the 1/4–20 screws that hold the anchor plates to the
base. Discard the screws.
4.
Use a bubble level to verify the turntable unit is flat. This is a preliminary check only; final leveling of the
turntable will be completed in a later step.
5. Use shim plates to level the table. The shim plates will remain in place after the installation.
Reconnecting Power and Fiber Optics
Electrical installation must be performed by a qualified electrician, and
in accordance with local and national electrical standards. See Step 4 of
Electrical Installation
, page 19.
Make sure the power is off and secured before proceeding.
Connections for power and fiber optics
1.
Run fiber optic and power cables thru cable carrier track.
2.
Plug in fiber optics and power cable.
Содержание ETS-LINDGREN MAPS 2112 Series
Страница 1: ...Multi Axis Positioning System MAPSTM User Manual 1719784 Rev A May 2020...
Страница 2: ......
Страница 4: ...4...
Страница 8: ...8...
Страница 18: ...18...
Страница 20: ...20...
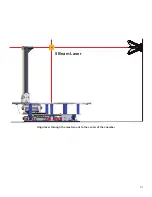
Страница 31: ...31 Align laser through the mast mount to the center of the chamber 5 Beam Laser...
Страница 34: ...34...
Страница 36: ...36...
Страница 38: ......


