


QuadroCS Manual II: Administrator's Guide
Administrator's Menus
Quadro
CS
(SW Version 3.0.x)
34
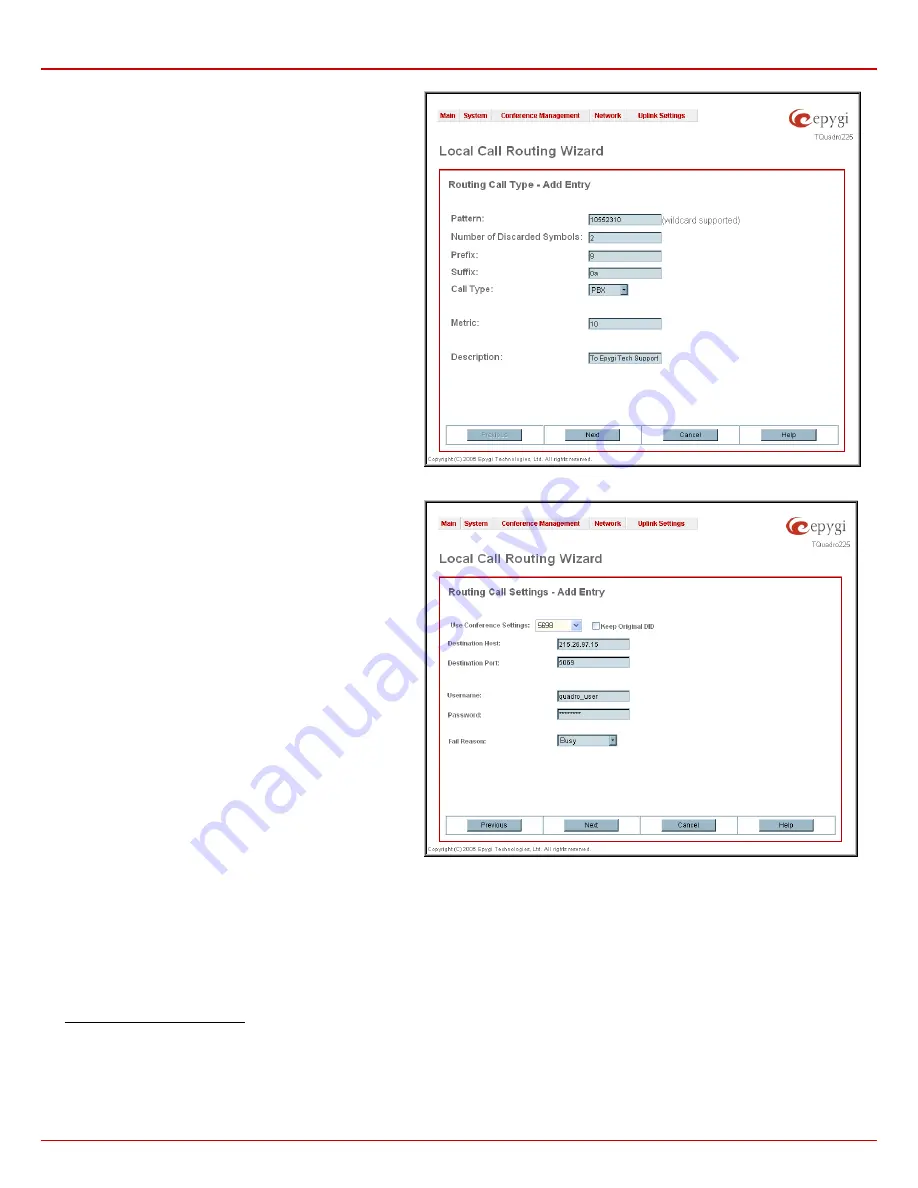
Number of Discarded Symbols (NDS)
requires the number of
symbols that should be discarded from the beginning of the
routing pattern. The field should be empty if no digits need to be
discarded. Only numeric values are allowed for this field,
otherwise an error message occurs: “Error: Number of
Discarded Symbols is incorrect - digits allowed only”.
Prefix
requires entering the symbols (letters, digits and any
characters supported in the SIP username) that will be placed in
front of the routing pattern instead of the discarded digits.
Suffix
requires entering the symbols (letters, digits and any
characters supported in the SIP username) that will be placed in
the end of the routing pattern. (For example, if the routing
Pattern
is 12345, the
Number of Discarded Symbols
is two,
and the
Prefix
is 909 and
Suffix
is 0a, the final phone number
will be 9093450a.)
Call Type
gives a possibility to select the call type (SIP or IP-
PSTN).
Metric
allows entering a rating for the selected route in a range
from 0 to 20. If no value is inserted to this field, 10 will be taken
as the default. If two route entries match a user’s dial string, the
route with the lower metric will be chosen.
The
Description
text field requires an optional description of the
routing pattern.
Fig. 0-48 Local Routing Wizard – Page 1
The second page of the
Local Routing Wizard
contains
different components depending on the
Call Type
selected on
the previous page.
Use Conference Settings
allows to select the conference on
behalf of the call that will be placed. The SIP settings of the
selected conference will be used as the caller information. If no
entry is selected in this list, the original caller information will be
kept. When
Keep original DID
checkbox is selected, called
destination will receive the original caller’s information, rather
than the information of conference selected from the
Use
Conference Settings
list.
The
Destination IP Address
text field requires the IP address
of the destination (for a direct call) or the SIP server (for calls
through the SIP server).
The
Destination Port
text field requires the port number of
either the destination or the SIP server.
The
User Name
and
Password
text fields require the
identification settings for the public SIP server or servers
requiring authentication.
The
Call End Point (CEP)
checkbox defines whether the
destination is the end point (the specified user phone will ring) or
a remote destination routing table that should be parsed for
matching patterns to continue the call routing.
The
Multiple Logons (ML)
checkbox is available for IP-PSTN
call type only and allows or denies multiple logon to the public
SIP server with the same username at the same time.
Fig. 0-49 Local Routing Wizard – Page 2
Fail Reason
offers a list of failure reasons (cannot establish connection, wrong number, busy, none and any). If the destination you wish to call is
unavailable, busy, or the dialed number was incorrect (depending on the selected Failure Reason), the local routing table will be parsed for the next.
The
Move Up/Move Down
buttons are used to move the local routing patterns one level up or down within the
Local Routing
table. The sequence
of the routing patterns is important as the
Local Routing
table is parsed from the top down and routing will take place according to the first pattern
that matches the dialed number. The
Move To
button is used to move the selected entry to a different position in the Local Routing Table, which will
increase or decrease the selected pattern’s priority. Pressing this button will open a page to specify the row number and the desired position of the
selected entry (before or after the defined row).
To create Local Routing pattern
1.
Click on the
Local Routing Table
link on the
Call Routing
page.
2.
Press
the
Add
button on the
Local Routing
page.
3.
Select
the
Call Type
from the drop down list.
4.
Specify
the
Pattern
in the corresponding field.
5.
Select
the
Number of Discarded Digits
and
Prefix
if required.
6.
Enter
a
Description
if needed.
7.
Click
Next
.


