Installing the Wall mount
43
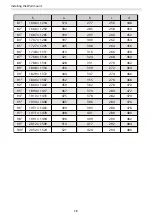
a
b
c1
d1
c2
d2
80"
1868 × 800
281
184
357
549
232
424
81"
1891 × 810
287
190
360
552
233
425
82"
1914 × 820
294
197
364
556
236
428
83"
1938 × 830
301
204
367
559
237
429
84"
1961 × 840
307
210
370
562
239
431
85"
1984 × 850
314
217
374
566
241
433
86"
2008 × 860
321
224
377
569
243
435
87"
2031 × 870
327
230
380
572
244
436
88"
2054 × 880
334
237
383
575
246
438
89"
2078 × 890
341
244
387
579
248
440
90"
2101 × 900
347
250
390
582
249
441
91"
2125 × 911
354
257
393
585
251
443
92"
2148 × 921
361
264
396
588
252
444
93"
2171 × 931
367
270
400
592
255
447
94"
2195 × 941
374
277
403
595
256
448
95"
2218 × 951
381
284
406
598
257
449
96"
2241 × 961
388
291
410
602
260
452
97"
2265 × 971
394
297
413
605
261
453
98"
2288 × 981
401
304
416
608
263
455
99"
2311 × 991
408
311
419
611
264
456
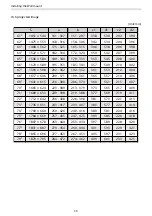
100"
2335 × 1001
414
317
423
615
267
459
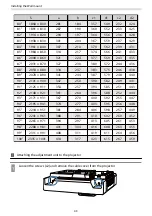
S
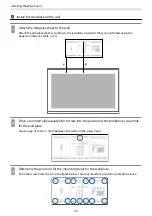
Attaching the adjustment unit to the projector
a
Loosen the screws (x2) and remove the cable cover from the projector
Содержание ELPHD02
Страница 1: ...Installation Guide ...
Страница 18: ...Introduction 17 Max 5m Max 5m ...
Страница 29: ...Installing the Wall mount 28 Horizontal slide 45 45 Forward backward slide 0 383 ...
Страница 68: ...Installing the Wall mount 67 b Select Geometry Correction from the Installation menu c Select Quick Corner ...
Страница 77: ...Installing the Control Pad 76 For Canadian Users ...
Страница 79: ...Installing the Control Pad 78 ...
Страница 96: ...Installing the Touch Unit 95 Wavelength 932 to 952 nm ...
Страница 99: ...Installing the Touch Unit 98 Adjustment range 79 5 140 5 15 76 ...
Страница 138: ...Setting the Projector 137 c Select EDID from the Signal I O menu d Select 3240x1080 60Hz ...


