Appendix
139
Symbol mark
Approved stand‐
ards
Meaning
IEC60417
No.5032
Alternating current
To indicate on the rating plate that the equipment is suitable for
alternating current only; to identify relevant terminals.
IEC60417
No.5031
Direct current
To indicate on the rating plate that the equipment is suitable for
direct current only; to identify relevant terminals.
IEC60417
No.5172
Class II equipment
To identify equipment meeting the safety requirements specified
for Class II equipment according to IEC 61140.
ISO 3864
General prohibition
To identify actions or operations that are prohibited.
ISO 3864
Contact prohibition
To indicate injury that could occur due to touching a specific part
of the equipment.
---
Never look into the projection lens while the projector is on.
---
To indicate that you must never place anything on the projector.
ISO3864
IEC60825-1
Caution, laser radiation
To indicate the equipment has a laser radiation part.
ISO 3864
Disassembly prohibition
To indicate a risk of injury, such as electric shock, if the equipment
is disassembled.
IEC60417
No.5266
Standby, partial standby
To indicate that part of the equipment is in the ready status.
ISO3864
IEC60417
No.5057
Caution, movable parts
To indicate that you must keep away from movable parts ac‐
cording to protection standards.
IEC 60417-6056
Caution (movable fan blades)
To indicate that you must keep away from the blades of the mov‐
able fan according to protection standards.
IEC 60417-6043
Caution (sharp corners)
To indicate that you must not touch the sharp corners of the
product according to protection standards.
--
Never look into the projection lens while the projector is on.
ISO7010
No. W027
ISO 3864
Warning, light emission (UV, visible light, IR and so on)
To indicate that you must be careful not to injure your eyes or
skin when near light emitting sections.
IEC60417
No.5109
Not to be used in residential areas
To indicate that the electrical equipment/device is not suitable
for use in a residential area.
Содержание ELPHD02
Страница 1: ...Installation Guide ...
Страница 18: ...Introduction 17 Max 5m Max 5m ...
Страница 29: ...Installing the Wall mount 28 Horizontal slide 45 45 Forward backward slide 0 383 ...
Страница 68: ...Installing the Wall mount 67 b Select Geometry Correction from the Installation menu c Select Quick Corner ...
Страница 77: ...Installing the Control Pad 76 For Canadian Users ...
Страница 79: ...Installing the Control Pad 78 ...
Страница 96: ...Installing the Touch Unit 95 Wavelength 932 to 952 nm ...
Страница 99: ...Installing the Touch Unit 98 Adjustment range 79 5 140 5 15 76 ...
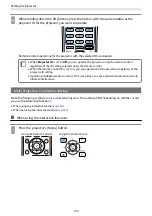
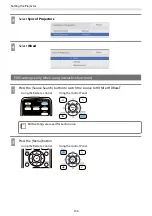
Страница 138: ...Setting the Projector 137 c Select EDID from the Signal I O menu d Select 3240x1080 60Hz ...


