Contents
2
About This Installation Guide
Contents of this Guide . . . . . . . . . . . . . . . . . 1
Introduction
Using the Product Safely . . . . . . . . . . . . . . . 4
Safety indications . . . . . . . . . . . . . . . . . . . . . . . 4
Explanation of Symbols . . . . . . . . . . . . . . . . . . . 4
Package Contents . . . . . . . . . . . . . . . . . . . . . 5
Wall mount . . . . . . . . . . . . . . . . . . . . . . . . . . . . 5
Main Mount . . . . . . . . . . . . . . . . . . . . . . . . . 5
Accessories . . . . . . . . . . . . . . . . . . . . . . . . . . 6
Touch Unit . . . . . . . . . . . . . . . . . . . . . . . . . . . . 7
Items to prepare in addition to items
supplied with the product . . . . . . . . . . . . . . . 8
Touch Unit Bracket . . . . . . . . . . . . . . . . . . . . . . 8
Items to prepare in addition to items
supplied with the product . . . . . . . . . . . . . . . 8
Control Pad . . . . . . . . . . . . . . . . . . . . . . . . . . . . 9
Items to prepare in addition to items
supplied with the product . . . . . . . . . . . . . . . 9
Pen stand . . . . . . . . . . . . . . . . . . . . . . . . . . . . . 9
Items to prepare in addition to items
supplied with the product . . . . . . . . . . . . . . 10
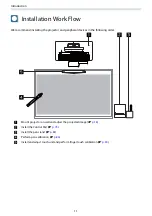
Installation Work Flow . . . . . . . . . . . . . . . 11
When Installing Multiple Projectors . . . . . . . . . . 12
Figures of Installation Dimensions . . . . 13
Connection Figure . . . . . . . . . . . . . . . . . . . 15
Connecting the Touch Unit and the Control Pad . 15
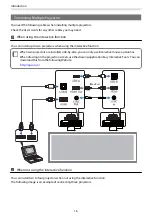
Connecting Multiple Projectors . . . . . . . . . . . . . 16
When using the interactive function . . . . . . . 16
When not using the interactive function . . . . 16
Installing the Wall mount
Cautions on Installing the Wall Mount . 18
Wall Mount Specifications . . . . . . . . . . . . 24
External dimensions . . . . . . . . . . . . . . . . . . . . . 25
Adjustment range . . . . . . . . . . . . . . . . . . . . . . 27
Vertical slide . . . . . . . . . . . . . . . . . . . . . . . . 27
Horizontal slide . . . . . . . . . . . . . . . . . . . . . . 28
Forward/backward slide . . . . . . . . . . . . . . . . 28
Mini PC installation plate . . . . . . . . . . . . . . . . . 29
Installing the Bracket . . . . . . . . . . . . . . . . . . . . 31
Determining the installation position
(projection distance tables) . . . . . . . . . . . . . . 31
Install the wall plate on the wall . . . . . . . . . . 45
Attaching the setting plate to the wall plate . . 47
Attaching peripheral devices . . . . . . . . . . . . 52
Adjusting the position of the projected image . . 55
Preparations before adjusting . . . . . . . . . . . . 56
Auto Screen Adjustment . . . . . . . . . . . . . . . . 58
Performing mechanical adjustment using
the Setting Plate Installation Guide . . . . . . . . 61
Adjusting using the projector menus . . . . . . . 64
Attaching the covers . . . . . . . . . . . . . . . . . . . . 70
Attaching a Security Cable . . . . . . . . . . . . . . . . 72
Installing the Control Pad
Notes on the Control Pad . . . . . . . . . . . . . 73
For Canadian Users . . . . . . . . . . . . . . . . . . . . . 76
Control Pad Specifications . . . . . . . . . . . . 77
External dimensions . . . . . . . . . . . . . . . . . . . . . 77
Cable routing holes . . . . . . . . . . . . . . . . . . . . . 77
Installing the Control Pad . . . . . . . . . . . . 79
Installing the pen stand
Notes on the Pen Stand . . . . . . . . . . . . . . . 82
Pen Stand Specifications . . . . . . . . . . . . . 83
External dimensions . . . . . . . . . . . . . . . . . . . . . 83
Installing the Pen Stand . . . . . . . . . . . . . . 84
When securing with magnets . . . . . . . . . . . . . . 84
When securing with screws . . . . . . . . . . . . . . . . 85
Содержание ELPHD02
Страница 1: ...Installation Guide ...
Страница 18: ...Introduction 17 Max 5m Max 5m ...
Страница 29: ...Installing the Wall mount 28 Horizontal slide 45 45 Forward backward slide 0 383 ...
Страница 68: ...Installing the Wall mount 67 b Select Geometry Correction from the Installation menu c Select Quick Corner ...
Страница 77: ...Installing the Control Pad 76 For Canadian Users ...
Страница 79: ...Installing the Control Pad 78 ...
Страница 96: ...Installing the Touch Unit 95 Wavelength 932 to 952 nm ...
Страница 99: ...Installing the Touch Unit 98 Adjustment range 79 5 140 5 15 76 ...
Страница 138: ...Setting the Projector 137 c Select EDID from the Signal I O menu d Select 3240x1080 60Hz ...

