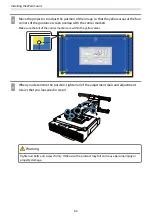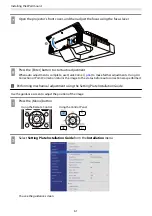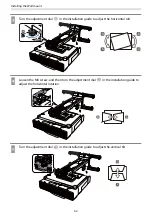
Installing the Wall mount
72
d
Attach the cable cover to the projector, and then secure it with the screws (x2)
Attaching a Security Cable
Perform one of the following security measures if necessary.
Install a commercially available theft-prevention wire lock
Pass the wire lock through the security cable installation points on the projector and the setting plate.
Install a security wire from Kensington
The security slot on this product is compatible with the Microsaver Security System manufactured by Kensington.
See the following for more details on the Microsaver Security System.
Содержание ELPHD02
Страница 1: ...Installation Guide ...
Страница 18: ...Introduction 17 Max 5m Max 5m ...
Страница 29: ...Installing the Wall mount 28 Horizontal slide 45 45 Forward backward slide 0 383 ...
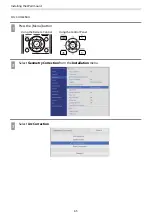
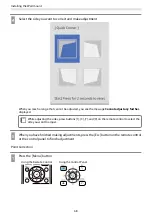
Страница 68: ...Installing the Wall mount 67 b Select Geometry Correction from the Installation menu c Select Quick Corner ...
Страница 77: ...Installing the Control Pad 76 For Canadian Users ...
Страница 79: ...Installing the Control Pad 78 ...
Страница 96: ...Installing the Touch Unit 95 Wavelength 932 to 952 nm ...
Страница 99: ...Installing the Touch Unit 98 Adjustment range 79 5 140 5 15 76 ...
Страница 138: ...Setting the Projector 137 c Select EDID from the Signal I O menu d Select 3240x1080 60Hz ...


