background image

Parent topic:

Using BrightLink With a Computer

Windows Pen Input and Ink Tools

If you are using Windows 8.x, Windows 7, or Windows Vista, you can use the pen input and Ink tools to
add input and annotations to your work. You can also use these features over a network when you set
the interactive features to be available on your network. See the

EasyMP Network Projection Operation

Guide

for instructions on setting up your computer for network projection.

Enabling Windows Pen Input and Ink Tools
Using Windows Pen Input and Ink Tools

Parent topic:

Using the Interactive Features

Enabling Windows Pen Input and Ink Tools

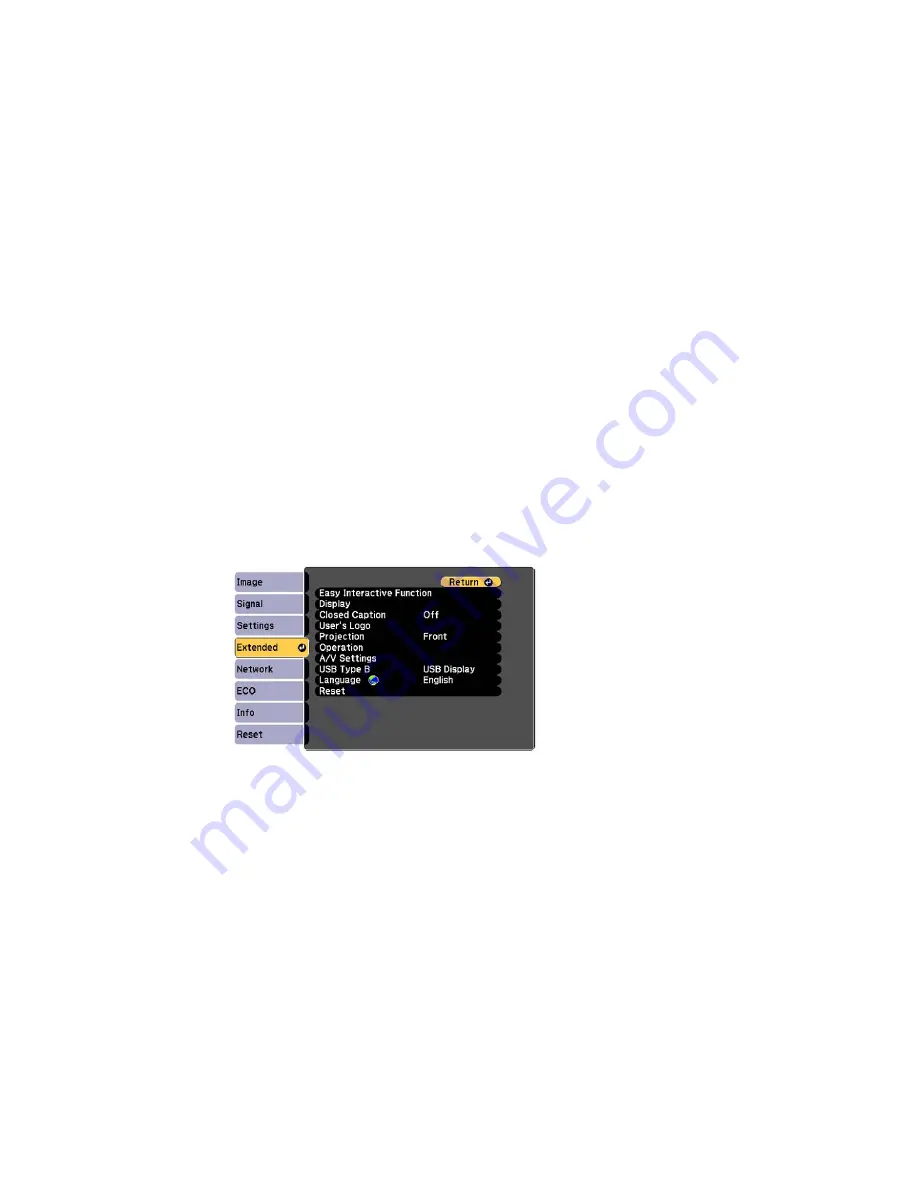
To use the pen input and Ink tools in Windows 8.x, Windows 7, or Windows Vista, you need to adjust the
pen operation mode in your projector's menus.

1.

Press the

Menu

button, select the

Extended

menu, and press

Enter

.

147

Содержание BrightLink 575Wi+

Страница 1: ...BrightLink 575Wi 585Wi 595Wi User s Guide ...

Страница 2: ......

Страница 3: ...21 Projector Parts Base 23 Projector Parts Control Panel 24 Projector Parts Interactive Pens and Pen Tray 25 Projector Parts Remote Control 27 Projector Parts Touch Unit 28 Setting Up the Projector 31 Projector Placement 31 Projector Setup and Installation Options 31 Projection Distance 32 Removing and Attaching the Cable Cover 34 Projector Connections 35 Connecting to Computer Sources 36 Connecti...

Страница 4: ... a USB Device or Camera From the Projector 49 Connecting to a Document Camera 49 Connecting Multiple Projectors of the Same Model 50 Installing Batteries in the Remote Control 52 Installing Batteries in the Pens 53 Using the Projector on a Network 55 Wired Network Projection 55 Connecting to a Wired Network 56 Selecting Wired Network Settings 56 Wireless Network Projection 59 Installing the Wirele...

Страница 5: ...ith Quick Corner 84 Resizing the Image with the Wide and Tele Buttons 85 Adjusting the Image Position 86 Focusing the Image 87 Remote Control Operation 88 Using the Remote Control as a Wireless Mouse 90 Using the Remote Control as a Pointer 91 Selecting an Image Source 91 Projection Modes 93 Changing the Projection Mode Using the Remote Control 93 Changing the Projection Mode Using the Menus 94 Im...

Страница 6: ...king the Projector s Buttons 115 Installing a Security Cable 115 Creating a User Pattern to Display 116 Using the Interactive Features 118 Interactive Modes 118 Using the Projected Screen as a Whiteboard Whiteboard Mode 118 Drawing on a Projected Image Annotation Mode 120 Controlling Computer Features from a Projected Screen PC Interactive Mode 121 PC Interactive Mode System Requirements 124 Using...

Страница 7: ...nu Settings 158 Using the Projector s Menus 158 Image Quality Settings Image Menu 160 Input Signal Settings Signal Menu 161 Projector Feature Settings Settings Menu 164 Projector Setup Settings Extended Menu 167 Projector Network Settings Network Menu 175 Projector Setup Settings ECO Menu 176 Projector Information Display Info Menu 178 Event ID Code List 179 Projector Reset Options Reset Menu 180 ...

Страница 8: ... Appears 211 Solutions When the Image is Not Rectangular 212 Solutions When the Image Contains Noise or Static 213 Solutions When the Image is Fuzzy or Blurry 213 Solutions When the Image Brightness or Colors are Incorrect 214 Solutions to Sound Problems 215 Solutions to Microphone Problems 215 Solving Projector or Remote Control Operation Problems 216 Solutions to Projector Power or Shut Off Prob...

Страница 9: ...e Pen Specifications 226 Remote Control Specifications 227 Touch Unit Specifications 227 Projector Dimension Specifications 227 Projector Electrical Specifications 227 Projector Environmental Specifications 229 Projector Safety and Approvals Specifications 229 Supported Video Display Formats 229 USB Display System Requirements 232 Notices 233 Recycling 233 Important Safety Information 233 Importan...

Страница 10: ......

Страница 11: ...BrightLink 575Wi 585Wi 595Wi User s Guide Welcome to the BrightLink 575Wi 585Wi 595Wi User s Guide 11 ...

Страница 12: ...m image WXGA from just 9 1 inches 231 mm away Easily mounted on a wall or table with the optional table projection mount for fast low cost installations Can be mounted vertically to create an interactive workspace directly on a table surface Reduced shadow interference and glare Bright high resolution images BrightLink 575Wi Up to 2700 lumens of color brightness color light output and 2700 lumens ...

Страница 13: ...com projectorapp U S or epson ca projectorapp Canada for more information Innovative display and operation features Low total cost of ownership with long life projector lamp and high efficiency air filter High digital zoom ratio for larger images in shorter projection distances 10000 1 contrast ratio and Auto Iris control for sharp detailed images Built in closed captioning decoder Powerful 16 W s...

Страница 14: ...ents Save all the packaging in case you need to ship the projector Always use the original packaging or equivalent when shipping Make sure your projector box included all of these parts 1 Projector 2 Remote control 14 ...

Страница 15: ... 8 BrightLink 595Wi Note A box containing the projector wall mount is also included Parent topic Projector Features Related concepts Projector Connections Additional Components Depending on how you plan to use the projector you may need to obtain the following additional components To receive a composite video signal you need an RCA style video or A V cable See your local computer or electronics d...

Страница 16: ...Port Thunderbolt port or Mini DVI port for video output to the projector s VGA video port you need to obtain an adapter Contact Apple for compatible adapter options Parent topic Projector Features Optional Equipment and Replacement Parts You can purchase screens other optional accessories and replacement parts from an Epson authorized reseller To find the nearest reseller call 800 GO EPSON 800 463...

Страница 17: ...tips ELPPS02 V12H668010 Interactive Pen Extension ELPPE01 V12H590001 USB extension cable V12H525001 Remote control cable set ELPKC28 V12H005C28 On Wall Cable Management Kit ELPCK01 Kensington security lock ELPSL01 Touch Unit attachment mount BrightLink 595Wi ELPPT05 90 inch whiteboard V12H468002 96 inch whiteboard V12H468001 6 ft 1 8 m VGA computer cable F3H982 06 10 ft 3 0 m VGA computer cable F3...

Страница 18: ...bodily injury Cautions must be observed to avoid damage to your equipment Notes contain important information about your projector Tips contain additional projection information Parent topic Introduction to Your Projector Where to Go for Additional Information Need quick help on using your projector Here s where to look for help Built in help system Press the Help button on the remote control or p...

Страница 19: ... your projector Projector Parts Front Top Projector Parts Side Projector Parts Interface Panel Projector Parts Base Projector Parts Control Panel Projector Parts Interactive Pens and Pen Tray Projector Parts Remote Control Projector Parts Touch Unit Parent topic Introduction to Your Projector Projector Parts Front Top 1 Remote control receiver 2 Speaker 3 Control panel 19 ...

Страница 20: ...4 Cable cover screws 5 Cable cover 6 Exhaust vent 7 Lamp cover screw 8 Lamp cover Parent topic Projector Part Locations Projector Parts Side 1 Filter cover switch 2 Security cable installation slot 20 ...

Страница 21: ...Projection window 8 Security lock port 9 Air filter cover 10 Air intake vent air filter 11 Focus lever Parent topic Projector Part Locations Projector Parts Interface Panel 1 Optional wireless LAN module slot 2 Audio1 port 3 Computer1 port 4 Audio2 port 5 USB B port 6 Network LAN port 21 ...

Страница 22: ...10 HDMI 1 MHL port 11 Audio port 12 Video port 13 SYNC In Out ports 14 Power inlet 15 TCH port for the Touch Unit connection cable BrightLink 595Wi 16 USB A port 17 RS 232C port 18 Audio Out port 19 Mic microphone port Parent topic Projector Part Locations 22 ...

Страница 23: ...Projector Parts Base 1 Ceiling mount holes 5 2 Security cable attachment point 3 Wall mount plate holes 4 4 Illumination sensor Parent topic Projector Part Locations 23 ...

Страница 24: ...justment screen and adjust screen shape and arrow buttons 5 Help button accesses projector help information 6 Esc button cancels exits functions 7 Wide Tele buttons adjust projected image size horizontal keystone adjustment buttons adjust screen shape and arrow buttons 8 Menu button accesses projector menu system 9 Power button Parent topic Projector Part Locations Related references Projector Lig...

Страница 25: ...Projector Parts Interactive Pens and Pen Tray 1 Pen tip 2 Battery light 3 Power function button 4 Attachment for optional strap or cord 5 Battery cover 25 ...

Страница 26: ...1 Installation magnets 2 Mounting holes 3 Security lock hole Parent topic Projector Part Locations 26 ...

Страница 27: ...Projector Parts Remote Control 1 Power button 2 Computer button cycles through connected computer sources 27 ...

Страница 28: ...into and out of the image 14 A V Mute button turns off picture and sound 15 Strap attachment point 16 Help button accesses projector help information 17 Freeze button stops video action 18 Volume up down buttons adjust speaker volume 19 Pointer button activates on screen pointer 20 Esc button cancels exits functions and controls wireless mouse functions 21 Pen Mode button cycles between PC Interac...

Страница 29: ...Front Cover On Front Cover Off 1 Dial cover 2 TCH port 3 Security slot 4 Adjustment dials 5 Power light 29 ...

Страница 30: ...Rear 1 Laser diffusion ports 2 Installation magnets 3 Guide markers used for performing angle adjustment Parent topic Projector Part Locations 30 ...

Страница 31: ...ou select a projector location Follow the instructions in the Installation Guide to install the projector using the included mounting equipment Leave plenty of space around and under the projector for ventilation and do not place it on top of or next to anything that could block the vents Position the projector within reach of a grounded electrical outlet or extension cord If installing vertically...

Страница 32: ...n determines the approximate size of the image The image size increases the farther the projector is from the screen but can vary depending on the zoom factor aspect ratio and other settings Use the tables here to determine approximately how far to place the projector from the screen based on the size of the projected image Conversion figures may have been rounded up or down For more detailed info...

Страница 33: ...248 2 cm 193 9 cm 121 2 cm 24 9 cm 25 4 cm 100 inches 104 1 inches 84 8 inches 53 0 inches 12 2 inches 11 1 inches 264 3 cm 215 4 cm 134 6 cm 31 1 cm 28 1 cm 16 9 Aspect Ratio Diagonal Min Image width Image height Min projection Distance from top image recommende distance of image to wall size d ceiling plate height 59 inches 77 5 inches 51 5 inches 28 9 inches 2 6 inches 8 5 inches 21 7 cm 196 8 ...

Страница 34: ...199 8 cm 107 7 cm 80 8 cm 6 2 cm 60 inches 83 7 inches 48 inches 36 inches 4 4 inches 7 7 inches 19 5 cm 212 5 cm 121 9 cm 91 4 cm 11 2 cm 70 inches 90 9 inches 56 0 inches 42 inches 7 2 inches 8 9 inches 22 5 cm 230 8 cm 142 2 cm 106 7 cm 18 2 cm 77 inches 95 9 inches 61 6 inches 46 2 inches 9 1 inches 9 7 inches 24 7 cm 243 6 cm 156 5 cm 117 3 cm 23 1 cm 80 inches 98 1 inches 64 inches 48 inches...

Страница 35: ... and audio sources to display presentations movies or other images with or without sound Connect any type of computer that has a USB port standard video output monitor port or HDMI port For video projection connect devices such as DVD players gaming consoles digital cameras and smartphones with compatible video output ports If your presentation or video includes sound you can connect audio input c...

Страница 36: ...d Menu Product Box Contents Connecting to Computer Sources Follow the instructions in these sections to connect a computer to the projector Connecting to a Computer for USB Video and Audio Connecting to a Computer for VGA Video Connecting to a Computer for HDMI Video and Audio Connecting to a Computer for Pen Use or USB Mouse Control Connecting to a Computer for Sound Parent topic Projector Connec...

Страница 37: ...s to install the Epson USB Display software Windows XP Wait as messages appear on your computer screen and the projector installs the Epson USB Display software on your computer Windows 2000 Select Computer EPSON_PJ_UD and EMP_UDSE EXE to install the Eposn USB Display software OS X The USB Display setup folder appears on your screen Select USB Display Installer and follow the on screen instruction...

Страница 38: ... Note If you choose the Computer2 port you may need to change the Monitor Out Port setting in the projector s Extended menu 4 Tighten the screws on the VGA connector Parent topic Connecting to Computer Sources Related references Projector Setup Settings Extended Menu Connecting to a Computer for HDMI Video and Audio If your computer has an HDMI port you can connect it to the projector using an opt...

Страница 39: ... to Computer Sources Connecting to a Computer for Pen Use or USB Mouse Control If you connected your computer to a Computer or HDMI port on the projector you also need to connect the USB cable so you can use the pens with your computer Connecting the USB cable also lets you set up the remote control to act as a wireless mouse but you cannot use this feature at the same time you are using the pens ...

Страница 40: ... includes sound and you did not connect it to the projector s USB B or an HDMI port you can still play sound through the projector s speaker system Just connect an optional 3 5 mm stereo mini jack audio cable as described here 1 Connect the audio cable to your laptop s headphone or audio out jack or your desktop s speaker or audio out port 2 Connect the other end to the Audio port that corresponds...

Страница 41: ...o signal sent from your video source into a mono analog signal for the internal speaker or a stereo analog signal if you are connecting to external speakers Parent topic Connecting to Video Sources Connecting to an MHL Compatible Device If you have an MHL compatible smartphone or tablet you can connect it to the projector using either an MHL cable or an HDMI cable with a device compatible MHL adap...

Страница 42: ... to VGA Video Source If your video source has component video ports you can connect it to the projector using an optional component to VGA video cable Depending on your component ports you may need to use an adapter cable along with a component video cable 1 Connect the component connectors to your video source s color coded component video output ports usually labeled Y Pb Pr or Y Cb Cr If you ar...

Страница 43: ...ings Extended Menu Connecting to a Composite Video Source If your video source has a composite video port you can connect it to the projector using an optional RCA style video or A V cable 1 Connect the cable with the yellow connector to your video source s yellow video output port 2 Connect the other end to the projector s Video port Parent topic Connecting to Video Sources Connecting to an S Vid...

Страница 44: ...er port connect the projector to the video source using an optional stereo mini jack audio cable Note If you connected your video source to the projector using an HDMI cable the audio signal is transferred with the video signal you do not need an additional cable for sound 1 Connect the audio cable to your video source s audio out ports 2 Connect the other end of the cable to the projector s Audio...

Страница 45: ...an 60 Hz may not be able to display images correctly 1 Make sure your computer is connected to the projector s Computer port If there are two computer ports make sure you use the Computer1 port 2 Connect the external monitor s cable to your projector s Monitor Out Computer 2 port Note You may need to change the Monitor Out Port setting in the projector s Extended menu and restart the computer Note...

Страница 46: ...tor s built in speaker system is disabled when you connect external speakers 1 Make sure your computer or video source is connected to the projector with both audio and video cables as necessary 2 Locate the appropriate cable to connect your external speakers such as a stereo mini jack to pin jack cable or another type of cable or adapter 3 Connect one end of the cable to your external speakers as...

Страница 47: ...ces Projector Setup Settings Extended Menu Connecting to External USB Devices Follow the instructions in these sections to connect external USB devices to the projector USB Device Projection Connecting a USB Device or Camera to the Projector Selecting the Connected USB Source Disconnecting a USB Device or Camera From the Projector Parent topic Projector Connections USB Device Projection You can pr...

Страница 48: ...s are not recommended Avoid using hard drives with multiple partitions You can project slide shows from image files on a connected USB device or memory card reader Parent topic Connecting to External USB Devices Related topics Projecting a PC Free Presentation Connecting a USB Device or Camera to the Projector You can connect your USB device or camera to the projector s USB A port and use it to pr...

Страница 49: ...om the projector 1 If the device has a power button turn off and unplug the device 2 Disconnect the USB device or camera from the projector Parent topic Connecting to External USB Devices Connecting to a Document Camera You can connect a document camera to your projector to project images viewed by the camera Depending on your Epson document camera model do one of the following to connect the docu...

Страница 50: ...ra to your computer instead of the projector See the document camera manual for details Parent topic Projector Connections Related references Optional Equipment and Replacement Parts Connecting Multiple Projectors of the Same Model If you use the interactive features of multiple projectors of the same model in the same room you need to synchronize the projectors To do this connect the optional rem...

Страница 51: ...If you are using the projector in the same room as another projector that does not support cable connection set the Wired Sync Mode setting to Mode 2 in the projector s Extended menu If you do not have the optional remote control cable set the Distance of Projectors setting in the projector s Extended menu to Mode 2 Parent topic Projector Connections Related references Projector Setup Settings Ext...

Страница 52: ...he two AA batteries that came with the projector Caution Use only the type of batteries specified in this manual Do not install batteries of different types or mix new and old batteries 1 Open the battery cover 2 Insert the batteries with the and ends facing as shown 52 ...

Страница 53: ...ording to local regulations Do not expose batteries to heat or flame Keep batteries out of the reach of children they are choking hazards and are very dangerous if swallowed Parent topic Setting Up the Projector Installing Batteries in the Pens Each pen uses one AA battery 1 Open the battery cover as shown 53 ...

Страница 54: ...2 Insert the battery with the and ends facing as shown 3 Replace the battery cover and press it down until it clicks into place Parent topic Setting Up the Projector 54 ...

Страница 55: ...cessary Use the following software and documentation to set up control and monitor network projection EasyMP Network Projection software sets up your computer for network projection See the EasyMP Network Projection Operation Guide for instructions EasyMP Monitor software Windows only lets you monitor and control your projector through the network You can download the latest software and documenta...

Страница 56: ...To connect the projector to a wired local area network LAN use a 100Base TX or 10Base T network cable To ensure proper data transmission use a Category 5 shielded cable or better 1 Connect one end of the network cable to your network hub switch or router 2 Connect the other end of the cable to the projector s LAN port Parent topic Wired Network Projection Selecting Wired Network Settings Before yo...

Страница 57: ...1 Turn on the projector 2 Press the Menu button 3 Select the Network menu and press Enter 4 Select Network Configuration and press Enter 5 Select the Basic menu and press Enter 57 ...

Страница 58: ...ault password is admin Projector Keyword lets you turn on a security password to prevent access to the projector by anyone not in the room with it You must enter a displayed randomized keyword from a computer using the EasyMP Network Projection software to access the projector Note Use the displayed keyboard to enter the name passwords and keyword Press the arrow buttons on the remote control to h...

Страница 59: ...t to the projector wirelessly using the EasyMP Network Projection software There are two ways to connect the projector to your wireless network Using the optional Quick Wireless Connection USB Key Windows only Configuring the connection manually using the projector s Network menus After installing the module and setting up the projector install the network software from the Epson Projector Softwar...

Страница 60: ...work Security Parent topic Using the Projector on a Network Related references Optional Equipment and Replacement Parts Projector Network Settings Network Menu Installing the Wireless LAN Module To use the projector over a wireless network install the Epson 802 11b g n wireless module in the projector Do not install any other type of wireless module Caution Never remove the module while its indica...

Страница 61: ...2 Unscrew and remove the cable cover if it is attached screwdriver not included 3 Insert the wireless LAN module into the port shown here 61 ...

Страница 62: ...reless Connection USB key is not included with your projector 1 Turn on the projector 2 Connect the USB key to the projector s USB A port You see a projected message that the network information update is complete 3 Remove the USB key 4 Now connect the USB key to a USB port on your computer or notebook Note In Windows Vista if you see the AutoPlay window select Run LaunchU3 exe then select Allow o...

Страница 63: ...Windows taskbar then remove the USB key from your computer Note You may need to restart your computer to reactivate your wireless LAN connection Parent topic Wireless Network Projection Selecting Wireless Network Settings Manually Before you can project from your wireless network you must select the network settings for the projector using its menu system 1 Turn on the projector 2 Press the Menu b...

Страница 64: ... a password up to 8 alphanumeric characters long for accessing the projector over the web Default user name is EPSONWEB default password is admin Projector Keyword lets you turn on a security password to prevent access to the projector by anyone not in the room with it You must enter a displayed randomized keyword from a computer using the EasyMP Network Projection software to access the projector...

Страница 65: ... and follow the on screen instructions to save your settings and exit the menus After you complete the wireless settings for your projector you need to select the wireless network on your computer Wireless LAN Menu Settings Parent topic Wireless Network Projection Wireless LAN Menu Settings Setting Options Description Wireless LAN Power On Turns on wireless LAN support Off 65 ...

Страница 66: ...ion Off mode set to Off when connecting to multiple projectors at the same time SSID Up 32 alphanumeric characters Sets the SSID network name of the wireless LAN system the projector is connecting to IP Settings DHCP On or Off Selects DHCP if your network assigns addresses automatically IP Address or turns off DHCP so you can Subnet Mask enter the network s IP address subnet mask and gateway Gatew...

Страница 67: ...s network in OS X 1 Click the AirPort icon on the menu bar at the top of the screen 2 Make sure AirPort is turned on then do one of the following If your projector is set up on an existing network Advanced mode select the network name SSID If your projector is configured for Quick mode select the projector s SSID Parent topic Wireless Network Projection Setting Up Wireless Network Security You can...

Страница 68: ...s Network Projection Wireless Security Menu Settings Settings on the Security menu let you select the type of security and security settings that match the network you are connecting the projector to Setting Options Description Security WPA2 PSK and WPA types Selects the type of security used available on the wireless network Passphrase Various keys from 8 to 32 For WPA or WPA2 PSK security charac...

Страница 69: ...u and press Enter 5 Turn on Mail Notification 6 Enter the IP address for the SMTP Server option Note Do not use these addresses 127 x x x or 224 0 0 0 through 255 255 255 255 where x is a number from 0 to 255 7 Select a number for the SMTP server Port Number from 1 to 65535 default is 25 8 Choose an Address field enter the e mail address and select the alerts you want to receive there Repeat for u...

Страница 70: ...formation Epson Projector on the subject line The name of the projector experiencing a problem The IP address of the affected projector Detailed information about the problem Note If a critical problem causes a projector to shut down you may not receive an e mail alert Parent topic Setting Up Projector Network E Mail Alerts Setting Up Monitoring Using SNMP Network administrators can install SNMP S...

Страница 71: ...ed 8 If your network environment uses a Crestron RoomView controller turn on the Crestron RoomView setting to allow the projector to be detected 9 If you are connecting to a network using Bonjour turn on the Bonjour setting 10 If you want this projector to receive broadcasted messages over the network turn on the Message Broadcasting setting Administrators can broadcast messages over the network u...

Страница 72: ...Communication On you can use a web browser to select settings and control projection even if the projector is in standby mode 1 Make sure the projector is turned on 2 Start your web browser on a computer connected to the network 3 Type the projector s IP address into the browser s address box and press the computer s Enter key You see the Web Control screen Note You may need to log in before you s...

Страница 73: ...trol 5 A V Mute button control 6 Page Up and Page Down button controls 7 Searches for sources 8 Selects the network source 9 Selects the USB Display or USB device source 10 Volume button controls 11 Closed Caption control 6 Select the icon corresponding to the projector function you want to control Parent topic Using the Projector on a Network 73 ...

Страница 74: ...ron Setting Up Crestron RoomView Support Controlling a Networked Projector Using Crestron RoomView Parent topic Using the Projector on a Network Setting Up Crestron RoomView Support To set up your projector for monitoring and control using a Crestron RoomView system make sure your computer and projector are connected to the network If you are connecting wirelessly set up the projector using the Ad...

Страница 75: ...s and exit the menus 7 Turn off the projector then turn it on again to enable the setting Parent topic Crestron RoomView Support Related references Projector Setup Settings Extended Menu Controlling a Networked Projector Using Crestron RoomView Once you have set up your projector to use Crestron RoomView you can control and monitor projection using a compatible web browser 1 Start your web browser...

Страница 76: ... through button options at the bottom of the screen Note These on screen buttons do not directly correspond to the projector s remote control buttons OK acts as the Enter button Menu displays the projector s menu 5 To view information about the projector click the Info tab 6 To change projector Crestron and password settings click the Tools tab select settings on the displayed screen and click Sen...

Страница 77: ...sizing the Image with the Wide and Tele Buttons Adjusting the Image Position Focusing the Image Remote Control Operation Selecting an Image Source Projection Modes Image Aspect Ratio Color Mode Controlling the Volume with the Volume Buttons Projecting a PC Free Presentation Turning On the Projector Turn on the computer or video equipment you want to use before you turn on the projector so it can d...

Страница 78: ...is indicates that the projector is receiving power 3 Press the power button on the projector or the remote control to turn on the projector The projector beeps and the Status light flashes blue as the projector warms up Once the projector is warmed up the Status light stops flashing and turns blue Warning Never look into the projector lens when the lamp is on This can damage your eyes and is espec...

Страница 79: ... when not in use to prolong the life of the projector Lamp life will vary depending upon mode selected environmental conditions and usage Brightness decreases over time Note When using the A V Mute feature the projector lamp is still on To turn off the lamp turn off the projector 1 Press the power button on the projector or the remote control The projector displays a shutdown confirmation screen 2...

Страница 80: ... power cord when the Status light is on or flashing 4 Parent topic Using Basic Projector Features Related references Projector Setup Settings Extended Menu Selecting the Language for the Projector Menus If you want to view the projector s menus and messages in another language you can change the Language setting 1 Turn on the projector 2 Press the Menu button 80 ...

Страница 81: ...t level If you place the projector at an angle to the screen or tilted up or down or off to the side you may need to correct the image shape for the best display quality Note For interactive use the image must be evenly rectangular without distortion Correcting Image Shape with the Keystone Buttons Correcting Image Shape with Quick Corner Parent topic Using Basic Projector Features Correcting Imag...

Страница 82: ...ay an image Note You can display a pattern to aid in adjusting the projected image using the Settings menu Note You can also display the pattern by pressing the User button on the remote control if the test pattern is assigned to this button 2 Press one of these keystone buttons on the control panel to display the Keystone adjustment screen 82 ...

Страница 83: ...rizontal keystone adjustment buttons are labeled Wide and Tele After correction your image is slightly smaller Note If the projector is installed out of reach you can also correct the image shape with the remote control using the Keystone settings in the projector menus Parent topic Image Shape 83 ...

Страница 84: ...projector and display an image Note You can display a pattern to aid in adjusting the projected image using the Settings menu Note You can also display the pattern by pressing the User button on the remote control if the test pattern is assigned to this button 2 Press the Menu button 3 Select the Settings menu and press Enter 4 Select the Keystone setting and press Enter 5 Select the Quick Corner ...

Страница 85: ...press Enter 7 Press the arrow buttons to adjust the image shape as necessary 8 When you are finished press Esc Parent topic Image Shape Resizing the Image with the Wide and Tele Buttons 1 Turn on the projector and display an image 2 To enlarge the image size press the Wide button on the projector s control panel 3 To reduce the image size press the Tele button 85 ...

Страница 86: ... menus Parent topic Using Basic Projector Features Related references Projector Feature Settings Settings Menu Related tasks Adjusting the Image Position Adjusting the Image Position You can use the Image Shift feature to adjust the image position without moving the projector Note This feature is not available if the Zoom option is set to the widest setting 1 Turn on the projector and display an i...

Страница 87: ...the Settings menu to adjust the Image Shift setting Parent topic Using Basic Projector Features Related references Projector Feature Settings Settings Menu Focusing the Image 1 Turn on the projector and display an image Note You can display a pattern to aid in adjusting the projected image using the Settings menu 2 Slide the switch to open the air filter cover on the side of the projector 87 ...

Страница 88: ...tor Features Related references Projector Feature Settings Settings Menu Remote Control Operation The remote control lets you control the projector from almost anywhere in the room up to 19 7 feet 6 m away You can point it at the screen or board or the front or back of the projector 88 ...

Страница 89: ...Avoid using the remote control in conditions with bright fluorescent lights or in direct sunlight or the projector may not respond to commands If you will not use the remote control for a long time remove the batteries Using the Remote Control as a Wireless Mouse Using the Remote Control as a Pointer Parent topic Using Basic Projector Features 89 ...

Страница 90: ...splay video 2 If you connected your computer to the Computer or HDMI port also connect a USB cable to the projector s USB B port and to a USB port on your computer for wireless mouse support 3 Start your presentation 4 Use the following buttons on the remote control to control your presentation To move through slides or pages press the up or down Page buttons To move the cursor on the screen use t...

Страница 91: ...native shape using the Settings menu 1 Press the Pointer button on the remote control 2 Use the arrow buttons on the remote control to move the pointer on the screen 3 Press Esc to clear the pointer from the screen Parent topic Remote Control Operation Related references Projector Feature Settings Settings Menu Selecting an Image Source If you connected multiple image sources to the projector such...

Страница 92: ...essary 3 Do one of the following Press the Source Search button on the projector or remote control until you see the image from the source you want Press the button for the source you want on the remote control If there is more than one port for that source press the button again to cycle through the sources 1 Computer port sources 2 Video and HDMI sources 92 ...

Страница 93: ...in front of the screen Rear Upside Down flips the image over top to bottom and horizontally to project from the wall or ceiling and behind a translucent screen Rear flips the image horizontally to project from behind a translucent screen Note The two Rear modes cannot be used with the interactive pens You can change the projection mode using the remote control or by changing the Projection setting...

Страница 94: ...riginal mode hold down the A V Mute button for five seconds again Parent topic Projection Modes Changing the Projection Mode Using the Menus You can change the projection mode to flip the image over top to bottom and or left to right using the projector menus 1 Turn on the projector and display an image 2 Press the Menu button 3 Select the Extended menu and press Enter 94 ...

Страница 95: ...ton on the remote control If you always want to use a particular aspect ratio for a certain video input source you can select it using the projector s menus Changing the Image Aspect Ratio Available Image Aspect Ratios Parent topic Using Basic Projector Features Related references Image Quality Settings Image Menu Changing the Image Aspect Ratio You can change the aspect ratio of the displayed ima...

Страница 96: ...s the aspect ratio of the image to 16 9 Full Displays images using the full width of the projection area but does not maintain the aspect ratio Zoom Displays images using the full width of the projection area and maintains the aspect ratio of the image Native Displays images as is aspect ratio and resolution are maintained Note The Auto aspect ratio setting is available only for HDMI image sources...

Страница 97: ...r other video source insert a disc or other video media and press the play button if necessary 3 Press the Color Mode button on the remote control to change the Color Mode The image appearance changes and the name of the Color Mode appears briefly on the screen 4 To cycle through all the available Color Modes for your input signal press the Color Mode button repeatedly Parent topic Color Mode Avai...

Страница 98: ...usts the colors accordingly Whiteboard Best for presentations onto a whiteboard adjusts the colors accordingly Dynamic Best for video games in a bright room Parent topic Color Mode Turning On Auto Iris In certain color modes you can turn on the Auto Iris setting to automatically optimize the image based on the brightness of the content you project 1 Turn on the projector and switch to the image so...

Страница 99: ...ojector You must adjust the volume separately for each connected input source 1 Turn on the projector and start a presentation that includes audio 2 To lower or raise the volume press the Volume buttons on the remote control A volume gauge appears on the screen 3 To set the volume to a specific level for an input source use the projector menus Parent topic Using Basic Projector Features Related re...

Страница 100: ...m media formatted for non Windows file systems try formatting the media for Windows instead You may not be able to use the security features on certain USB storage devices with PC Free features File contents File type Details extension Image jpg Make sure the file is not CMYK format Progressive format Highly compressed Above 8192 8192 resolution bmp Make sure the file resolution is not above 1280 ...

Страница 101: ...ion at the bottom of the screen and pressing Enter 1 Press the USB button on the projector remote control The PC Free screen appears 2 Do the following as necessary to locate your files If you need to display files inside a subfolder on your device press the arrow buttons to highlight the folder and press the Enter button To move back up a folder level on your device highlight Back to Top and pres...

Страница 102: ... While projecting use the following commands to control the display as necessary To rotate a displayed image press the up or down arrow button To move to the next or previous image press the left or right arrow button 5 To stop the display follow the on screen instructions or press the Esc button Parent topic Projecting a PC Free Presentation Starting a PC Free Movie Presentation After connecting ...

Страница 103: ... highlight Next page or Previous page and press Enter 3 To play back a movie press the arrow buttons to highlight the file and press Enter Note If any file names are longer than 8 characters or include unsupported symbols the file names may be shortened or changed only in the screen display If you want to play back all the movies in a folder in sequence select the Slideshow option at the bottom of...

Страница 104: ...der In Ascending Sorts files in first to last order In Descending Sorts files in last to first order Continuous Play On Displays a slide show continuously Off Displays a slide show one time through Screen Switching No Does not display the next file automatically Time 1 Second to 60 Seconds Displays files for the selected time and switches to the next file automatically high resolution images may s...

Страница 105: ...ect Wipe Transitions between images with a wipe effect Dissolve Transitions between images with a dissolve effect Random Transitions between images using a random variety of effects Parent topic Projecting a PC Free Presentation 105 ...

Страница 106: ...s to run however so you cannot resume projection at the point that you stopped it If you want to display an image such as a company logo or picture when the presentation is stopped you can set up this feature using the projector s menus 1 Press the A V Mute button on the remote control to temporarily stop projection and mute any sound 2 To turn the picture and sound back on press A V Mute again Pa...

Страница 107: ...u can draw attention to parts of a presentation by zooming into a portion of the image and enlarging it on the screen Note You can also zoom into your image using the interactive pens 1 Press the E Zoom button on the remote control You see a crosshair on the screen indicating the center of the zoom area 2 Use the following buttons on the remote control to adjust the zoomed image Use the arrow butt...

Страница 108: ...ons on the control panel Security cabling to physically cable the projector in place Password Security Types Locking the Projector s Buttons Installing a Security Cable Parent topic Adjusting Projector Features Password Security Types You can set up these types of password security using one shared password Power On Protection password prevents anyone from using the projector without first enterin...

Страница 109: ...u see this menu 2 Press the down arrow to select Password and press Enter You see the prompt Change the password 3 Select Yes and press Enter 4 Hold down the Num button on the remote control and use the numeric buttons to set a four digit password The password displays as as you enter it Then you see the confirmation prompt 5 Enter the password again You see the message Password accepted 109 ...

Страница 110: ... projector select Power On Protection press Enter select On press Enter again and press Esc 2 To prevent changes to the User s Logo screen or related display settings select User s Logo Protection press Enter select On press Enter again and press Esc 3 To prevent changes to network settings select Network Protection press Enter select On press Enter again and press Esc You can attach the Password ...

Страница 111: ...rn on the projector You must enter the correct password to use the projector 1 Hold down the Num button on the remote control while you enter the password using the numeric buttons The password screen closes 2 If the password is incorrect the following may happen You see a wrong password message and a prompt to try again Enter the correct password to proceed 111 ...

Страница 112: ...y it whenever the projector turns on You can also display the image when the projector is not receiving an input signal or when you temporarily stop projection using the A V Mute feature This transferred image is called the User s Logo screen The image you select as the User s Logo can be a photo graphic or company logo which is useful in identifying the projector s owner to help deter theft You c...

Страница 113: ...r image 5 Use the arrow buttons on the remote control to surround the image area you want to use as the User s Logo and press Enter You see a prompt asking if you want to select this image area 6 Select Yes and press Enter If you want to change the selected area select No press Enter and repeat the last step You see the User s Logo zoom factor menu 7 Select a zoom percentage and press Enter 113 ...

Страница 114: ...play it whenever there is no input signal select Display Background and set it to Logo To display it whenever you turn the projector on select Startup Screen and set it to On To display it whenever you press the A V Mute button select A V Mute and set it to Logo To prevent anyone from changing the User s Logo settings without first entering a password set a password and enable User s Logo security...

Страница 115: ...press Enter Unlocking the Projector s Buttons Parent topic Projector Security Features Unlocking the Projector s Buttons If the projector s buttons have been locked hold the Enter button on the projector s control panel for seven seconds to unlock them Parent topic Locking the Projector s Buttons Installing a Security Cable You can install two types of security cables on the projector to deter the...

Страница 116: ...tor Security Features Creating a User Pattern to Display You can transfer an image to the projector and then display it as a pattern to aid in presentations when you use the Pattern Display feature This transferred image is called the User Pattern 1 Display the image you want to project as the User Pattern from a connected computer or video source 116 ...

Страница 117: ...use the displayed image as a User Pattern 5 Select Yes and press Enter Note It takes a few moments for the projector to save the image do not use the projector its remote control or any connected equipment until it is finished You see a completion message 6 Press Esc to exit the message screen Parent topic Adjusting Projector Features Related references Projector Feature Settings Settings Menu 117...

Страница 118: ...an use the interactive pen or your finger BrightLink 595Wi as a mouse to navigate select and scroll through content from your computer It s easy to shift between interactive computer mode and annotation mode Note You can also use the Easy Interactive Tools software to provide additional interactive features such as saving your annotations and printing them See the online Easy Interactive Tools Ope...

Страница 119: ...oolbar on the bottom of the screen 2 To move the main toolbar to the other side of the screen tap the arrow on the opposite side of the screen Note You can use the pen or your finger BrightLink 595Wi to move the arrow icon up or down to reposition the toolbar 3 To close the main toolbar select the icon at the bottom of the toolbar Note If you want to hide the toolbar automatically after drawing se...

Страница 120: ... add notes to your projected content using the interactive pens or your finger BrightLink 595Wi You can use one pen both pens at the same time or a combination of pens and finger touch BrightLink 595Wi 1 Project an image from a connected device 2 Hover near or tap the board or projected image with the interactive pen or your finger BrightLink 595Wi Then tap on the annotation icon on the toolbar Yo...

Страница 121: ...e toolbar Note If you want to hide the toolbar automatically after drawing select the icon at the bottom of the toolbar 6 To show or hide the projection control toolbar select the arrow Parent topic Interactive Modes Controlling Computer Features from a Projected Screen PC Interactive Mode You can navigate select and interact with your computer programs from the projected screen using the interact...

Страница 122: ...nded menu and press the Enter button 4 Select the USB Type B setting and press the Enter button 5 Select one of the following Easy Interactive Function to use PC Interactive mode USB Display Easy Interactive Function to use PC Interactive mode and USB Display 122 ...

Страница 123: ...3 Linux 8 Press the Enter button on the remote control then press the Menu button to exit the Extended menu 9 Hover near or tap on the board or the projected image with the interactive pen or your finger BrightLink 595Wi The icon is displayed on the projected screen 10 Select the icon then select the icon You can now operate the computer using the interactive pens or your finger BrightLink 595Wi P...

Страница 124: ...Home Basic 32 bit Windows 8 x Pro Enterprise Windows 7 Ultimate Enterprise Professional Home Premium and Home Basic 32 and 64 bit CPU Intel Pentium M 1 6 GHz or faster Core2 Power PC G4 1 5 GHz or faster Duo 1 2 GHz or faster recommended Core Duo 1 5 GHz or faster recommended Memory 512MB or more 1G or more recommended Hard disk space 100MB or more Display Resolution between 1024 768 and 1920 1080...

Страница 125: ...Note The pen turns off automatically after 20 minutes of inactivity Tap the pen tip or press the button on the side to turn the pen back on 1 Pen tip 2 Battery light 3 Power function button 4 Attachment for optional strap or cord 5 Battery cover To turn on the pen tap the pen tip or press the power function button Note If you press the button the battery light flashes briefly then turns off If the...

Страница 126: ...mode or whiteboard mode do the following To select a projected item such as an icon tap the projection surface with the pen tip To draw on the projected screen tap the projection surface with the pen and drag it as necessary To move the pointer hover over the surface without touching it To switch the pen from drawing tool to eraser press and hold the power function button on the side 126 ...

Страница 127: ...tended menu Parent topic Using the Interactive Pens Related references Projector Setup Settings Extended Menu Related tasks Installing Batteries in the Pens Pen Calibration Calibration coordinates the position of the pen with the location of your cursor You only need to calibrate the first time you use your projector s interactive features Calibration results remain until you calibrate again Be su...

Страница 128: ...ibrating Manually Parent topic Using the Interactive Pens Calibrating Automatically You do not need the pens or a computer for Auto Calibration Note You can start Auto Calibration by pressing the User button on the remote control or by pressing the Menu button on the remote control as described here 1 Press the Menu button select the Extended menu and press Enter 128 ...

Страница 129: ... Enter 3 Select Auto Calibration and press Enter 4 Adjust the image focus if necessary 5 Press Enter to select Yes A pattern appears then disappears and the system is calibrated If you see a message that calibration failed you need to calibrate manually 129 ...

Страница 130: ...alibrate manually Parent topic Pen Calibration Related tasks Calibrating Manually Focusing the Image Calibrating Manually If the cursor location and pen position do not match after auto calibration you can calibrate manually 1 Press the Menu button select the Extended menu and press Enter 130 ...

Страница 131: ... Enter 3 Select Manual Calibration and press Enter 4 Adjust the image focus if necessary 5 Press Enter to select Yes A flashing green circle appears in the upper left corner of your projected image 6 Touch the center of the circle with the tip of the pen 131 ...

Страница 132: ...The circle disappears and you see another circle below the first one 132 ...

Страница 133: ...of a new column Note Make sure you are not blocking the signal between the pen and the interactive receiver next to the projection window on the projector If you make a mistake press the Esc button on the remote control to go back to the previous circle To restart the calibration process press and hold the Esc button for 2 seconds 8 Continue until all of the circles disappear Parent topic Pen Cali...

Страница 134: ...ing the Touch Unit and calibrating for finger touch interactivity Touch Unit Safety Instructions Calibrating for Finger Touch Interactivity Using Finger Touch Operations Parent topic Using the Interactive Features Touch Unit Safety Instructions The Touch Unit enables finger touch interactivity with your projector BrightLink 595Wi Do not connect it to any other projectors or devices A built in high...

Страница 135: ...y optical devices such as a magnifying glass or mirror This could cause personal injury or fire Do not view the laser light from the Touch Unit using an optical device such as an eye loupe magnifying glass or microscope especially within 2 75 inches 70 mm of the laser diffusion ports This could damage your eyes Unplug the projector from the electrical outlet and refer all repairs to qualified serv...

Страница 136: ...ivity Finger touch calibration coordinates the positioning of your finger with the location of the cursor BrightLink 595Wi Note Make sure you have calibrated the pens before calibrating for finger touch interactivity 1 Press the Menu button select the Extended menu and press Enter 136 ...

Страница 137: ...2 Select the Easy Interactive Function setting and press Enter 3 Select Touch Unit Setup and press Enter 137 ...

Страница 138: ...ouch Calibration and press Enter The following screen appears 5 Adjust the image focus if necessary 6 Press Enter to select Yes A flashing green circle appears in the upper left corner of your projected image 138 ...

Страница 139: ...below the first one Note For the most accurate calibration make sure you touch the center of the circle with the tip of your finger Note Make sure you are not blocking the signal between your finger and the interactive receiver next to the projection window on the projector 8 Touch the center of the next circle with your finger and continue until all of the circles disappear 139 ...

Страница 140: ...nger Touch Interactivity Related tasks Focusing the Image Calibrating Automatically Calibrating Manually Using Finger Touch Operations You can use your finger to interact with the projected screen just as you would use an interactive pen BrightLink 595Wi You can use either a pen or your finger or use both at the same time When performing touch operations with your finger you can use two fingers in...

Страница 141: ...light on the Touch Unit remains lit 6 To write or draw on the projection surface in annotation mode or whiteboard mode do the following To select a projected item such as an icon tap the projection surface with your finger To draw on the projected screen tap the projection surface with your finger and drag it as necessary 141 ...

Страница 142: ... other zoom in or toward each other zoom out To rotate an image touch the image with your fingers and rotate your hand To drag up or down on a page or move backward or forward in a browser window use swiping gestures or flicks Note Finger touch operations may not work correctly with long or artificial nails or fingers wearing bandages If your fingers are too close together or crossed or your sleev...

Страница 143: ...tive Tools Operation Guide for detailed information Save and print your annotations Use the Tablet PC input panel in Windows 8 x Windows 7 or Windows Vista Use Ink Tools for annotation in Microsoft Office applications Adjusting the Pen Operation Area Easy Interactive Tools Parent topic Using the Interactive Features Adjusting the Pen Operation Area If you connect a different computer or adjust the...

Страница 144: ...2 Press the Menu button select the Extended menu and press Enter 3 Select the Easy Interactive Function setting and press Enter 144 ...

Страница 145: ...4 Set the Pen Mode setting to PC Interactive 5 Select Advanced in the PC Interactive section and press Enter 145 ...

Страница 146: ...nteractive pen as a mouse to navigate select scroll draw save and interact with projected content from your computer These two modes are available Annotation interactive mode displays the toolbar on the projected image and lets you use the pen as a mouse to open applications access links and operate scroll bars for example using one pen at a time You can also annotate whatever is displayed from yo...

Страница 147: ...ble on your network See the EasyMP Network Projection Operation Guide for instructions on setting up your computer for network projection Enabling Windows Pen Input and Ink Tools Using Windows Pen Input and Ink Tools Parent topic Using the Interactive Features Enabling Windows Pen Input and Ink Tools To use the pen input and Ink tools in Windows 8 x Windows 7 or Windows Vista you need to adjust th...

Страница 148: ...tting and press Enter 3 Select Pen Operation Mode and press Enter 4 Select one of the following One User Pen BrightLink 575Wi 585Wi Mode 1 or Mode 2 when using Ink tools BrightLink 595Wi this also lets you use Windows multi touch features 148 ...

Страница 149: ...g on your version of Microsoft Office To open the Touch Keyboard in Windows 8 x right click or tap and hold on the Taskbar then select Toolbars Touch Keyboard Select the keyboard icon on the screen and select the pen icon To open the Tablet PC input panel in Windows 7 or Windows Vista select All Programs Accessories Tablet PC Tablet PC Input Panel You can write in the box using the interactive pen...

Страница 150: ...t camera iPad or other source Whiteboard annotation mode lets you project a white or black screen or one of 4 background patterns and use the toolbar to write or draw as you would on a chalkboard or dry erase board Using PC Free Annotation Built in Tools for Use Without a Computer Using the Built in Whiteboard Annotation Mode Changing Pen Width and Color Using the Built in Toolbar Projector Contro...

Страница 151: ...r select the icon at the bottom of the toolbar Note If you want to hide the toolbar automatically after drawing select the icon at the bottom of the toolbar Parent topic Using BrightLink Without a Computer Built in Tools for Use Without a Computer The built in toolbar is embedded in the projector and provides fewer functions than Easy Interactive Tools For example you cannot save your work with th...

Страница 152: ...notation mode tools on the right Switch to annotation mode Switch to whiteboard annotation mode Undo the last annotation Redo the last undo Select a white or black background or one of 4 patterns whiteboard mode only Change custom pen color and width Write or draw free form lines with custom pen 152 ...

Страница 153: ...olbar Parent topic Using BrightLink Without a Computer Using the Built in Whiteboard Annotation Mode In whiteboard annotation mode you can project a solid or patterned background and then write or draw on it as you would on a chalkboard or dry erase board 1 Select the Whiteboard tool on the built in toolbar You see a white background 2 If you want to change the background do the following Select t...

Страница 154: ... multiple pens you can select different colors and line widths for each pen When using touch operations BrightLink 595Wi all users share the same color and line width 1 Select the arrow next to the custom Pen or Highlighter pen on the toolbar 2 Select the color and line width you want 3 Select the right arrow icon to close the selection window Parent topic Using BrightLink Without a Computer Proje...

Страница 155: ...ttom of the list Zoom into and out of the image Turn off the picture and sound Pause video action Decrease the volume Increase the volume Close the projector control toolbar Selecting Network Device Display from the Projector Control Toolbar Parent topic Using BrightLink Without a Computer Related tasks Turning On the Projector 155 ...

Страница 156: ... devices to the projector via a network you can select to project an image from up to 50 of those devices using the projector control toolbar You can select the image source from computers that are running EasyMP Multi PC Projection and smartphones or tablets that are running Epson iProjection 1 Select the icon on the projector control toolbar An image source list appears 2 Select the Participant ...

Страница 157: ...3 Select the user name for the device from which you want to project 4 Select Return You see the selected user s screen image Parent topic Projector Control Toolbar 157 ...

Страница 158: ...e Settings Settings Menu Projector Setup Settings Extended Menu Projector Network Settings Network Menu Projector Setup Settings ECO Menu Projector Information Display Info Menu Projector Reset Options Reset Menu Using the Projector s Menus You can use the projector s menus to adjust the settings that control how your projector works The projector displays the menus on the screen 1 Press the Menu ...

Страница 159: ...the current input source 3 To change settings in the displayed menu press Enter 4 Press the up or down arrow button to move through the settings 5 Change the settings using the buttons listed on the bottom of the menu screens 6 To return all the menu settings to their default values select Reset 7 When you finish changing settings on a menu press Esc 8 Press Menu or Esc to exit the menus Parent to...

Страница 160: ...See the list of available Color Adjusts the vividness of image Modes colors for various image types and environments Brightness Varying levels available Lightens or darkens the overall image Contrast Varying levels available Adjusts the difference between light and dark areas of the image Color Saturation Varying levels available Adjusts the intensity of the image colors Tint Varying levels availa...

Страница 161: ... the image brightness Off when certain Color Modes are selected Note The Brightness setting does not affect lamp brightness To change the lamp brightness mode use the Power Consumption setting Parent topic Adjusting the Menu Settings Related references Available Color Modes Input Signal Settings Signal Menu Normally the projector detects and optimizes the input signal settings automatically If you...

Страница 162: ...ing Wide the Auto option Normal Tracking Varying levels available Adjusts signal to eliminate vertical stripes in computer images Sync Varying levels available Adjusts signal to eliminate fuzziness or flickering in computer images Position Up down left right Adjusts the image location on the screen Progressive Off Sets whether to convert interlaced to progressive signals Video for certain video im...

Страница 163: ...ted if the black areas of the image are too bright Input Signal Auto Specifies the signal type from input sources connected to RGB computer ports Component Auto detects signals automatically RGB corrects color for computer RGB video inputs Component corrects color for component video inputs Video Signal Auto Specifies the signal type from the input sources connected to the Various video standards ...

Страница 164: ...dges visible by Off a selectable percentage or 4 automatically 8 Image Processing Fine Adjusts image processing speed quality Fast Parent topic Adjusting the Menu Settings Projector Feature Settings Settings Menu Options on the Settings menu let you customize various projector features 164 ...

Страница 165: ...ull Lock Controls projector button locking to secure the projector Partial Lock Full Lock locks all buttons Off Partial Lock locks all buttons except the power button Off no buttons locked Pointer Shape Three shapes available Changes the shape of the remote control pointer feature Volume Varying levels available Adjusts the volume of projector s speaker system or external speakers Mic Input Level ...

Страница 166: ... Selects various pattern display options Pattern Type Pattern Display lets you display User Pattern the selected pattern type on the Test Pattern screen to aid in presentation Pattern Type selects the type of grid or line pattern to display User Pattern captures a projected screen and saves it as a pattern for display Test Pattern displays a test pattern to assist in focusing and zooming the image...

Страница 167: ...ze various projector setup features that control its operation Easy Interactive Function Settings Setting Options Description General Easy Interactive Function settings Auto Calibration Auto Calibration and Manual Calibration start calibration for Manual Calibration pen operations 167 ...

Страница 168: ...tion position of the Touch Unit Power turns on the Touch Unit power Angle Adjustment performs angle adjustment for laser diffusion Touch Calibration performs calibration for finger touch operations Pen Mode PC Free Annotation Selects the mode for the interactive pens PC Interactive Hovering On Turns the pen hovering feature on and off when set to On the Off pointer follows the pen tip as you hover...

Страница 169: ... an eraser Confirm Clear Screen lets you display a confirmation screen before clearing all of the content Color Palette lets you choose a different palette if certain colors are difficult to see PC Interactive Easy Interactive Function settings Pen Operation Mode Mode 1 Selects the operating system version for pen operations Mode 2 Mode 1 when using Windows Mode 3 XP or earlier Mode 2 when using O...

Страница 170: ... operation and adjustment options Auto Adjust Pen Area Pen Tip Button assign either Manual Adj Pen Area Right Click or Left Click to the pen tip button Select either Auto Adjust Pen Area or Manual Adj Pen Area as the pen area adjustment option Other Extended Settings 170 ...

Страница 171: ...ts the screen color or logo to display when A V Mute is turned on Toolbar Tab controls whether the tab is always displayed in annotation mode Pen Mode Icon controls the display and position of the pen icon in interactive computer mode Projector Control controls where the projector control toolbar is displayed on the screen Closed Caption Off Controls use of closed captions and selects the closed c...

Страница 172: ... High Altitude Mode Direct Power On lets you turn on the projector without pressing Startup Source Search the power button Monitor Out Port High Altitude Mode regulates the projector s operating temperature at altitudes above 4921 feet 1500 m Startup Source Search automatically detects the image signal that is input when the projector is turned on Monitor Out Port specifies the function of the Mon...

Страница 173: ...jector output audio and video signals even while it is standby mode This setting is only available when Standby Mode is set to Communication On Audio Output Selects the audio input port when projecting images from the Computer1 Computer2 S Video Video and USB A ports HDMI1 Audio Output and HDMI 2 Audio Output Selects which Audio port provides audio output when viewing images from the HDMI 1 and HD...

Страница 174: ...ets you display your computer s image through the USB port and use the interactive pens with your computer Wireless Mouse USB Display lets you use the wireless mouse feature and display your computer s image through the USB port interactivity not available Language Various languages available Selects the language for projector menu and message displays not changed by Reset option Parent topic Adju...

Страница 175: ...etwork information and set up the projector for monitoring and control over a network Setting Options Description Net Info Wireless LAN Connection mode Displays wireless network status and details Antenna level Projector Name DHCP IP Address Subnet Mask Gateway Address MAC Address 175 ...

Страница 176: ...tion Accesses additional network Configures your network settings menus Parent topic Adjusting the Menu Settings Related concepts Wired Network Projection Wireless Network Projection Projector Setup Settings ECO Menu Settings on the ECO menu let you customize projector functions to save power When you select a power saving setting a leaf icon appears next to the menu item 176 ...

Страница 177: ...tomatically places the projector in standby mode after Off an interval of inactivity Sleep Mode Timer 1 to 30 minutes Sets the interval for Sleep Mode A V Mute Timer On Automatically turns off the projector after 30 minutes if A V Off Mute is enabled Standby Mode Communication On Enable this setting to allow the following operations to occur Communication Off when the projector is in standby mode ...

Страница 178: ...bout the projector and input sources by viewing the Info menu However you cannot change any settings in the menu Note Available settings depend on the current input source The lamp usage timer does not register any hours until you have used the lamp for at least 10 hours Information item Description Lamp Hours Displays the number of hours H the lamp has been used in Normal and ECO Power Consumptio...

Страница 179: ...ay be needed by a service technician Serial Number Displays the projector s serial number Version Displays the projector s firmware version Event ID Displays the Event ID number corresponding to a specific projector problem see the list of Event ID codes Event ID Code List Parent topic Adjusting the Menu Settings Related references Optional Equipment and Replacement Parts Projector Lamp Specificat...

Страница 180: ...jector to the same SSID 0892 The WPA WPA2 authentication type does not match Make sure the wireless network security settings are correct 0893 The WEP TKIP AES encryption type does not match Make sure the wireless network security settings are correct 0894 Communication with unauthorized access point was disconnected Contact your network administrator 0898 Failed to acquire DHCP address Make sure ...

Страница 181: ...when you replace the lamp using the Reset Lamp Hours option You cannot reset the following settings using the Reset All option Input Signal User s Logo Language Network menu items Lamp Hours Password Zoom Image Shift Parent topic Adjusting the Menu Settings 181 ...

Страница 182: ...rt of the projector turn it off and unplug the power cord Never open any cover on the projector except as specifically explained in this manual Dangerous electrical voltages in the projector can injure you severely Warning Do not try to service this product yourself except as specifically explained in this manual Refer all other servicing to qualified servicers Cleaning the Projection Window Clean...

Страница 183: ... obstacle sensor glass circled in red periodically or if you see a message telling you to remove any obstacles that are interfering with the projection area To remove dust or smudges gently wipe the obstacle sensor glass with lens cleaning paper To remove stubborn smudges moisten a soft lint free cloth with lens cleaner and gently wipe the obstacle sensor glass Warning Do not use a lens cleaner th...

Страница 184: ...r replaceable filter to protect your projector and make regular maintenance simple Filter maintenance intervals will depend on the environment If regular maintenance is not performed your Epson projector will notify you when the temperature inside the projector has reached a high level Do not wait until this warning appears to maintain your projector filter as prolonged exposure to high temperatur...

Страница 185: ...2 Slide the air filter cover latch and open the air filter cover 185 ...

Страница 186: ...air filter out of the projector 4 Vacuum the front of the air filter the side with the tabs to remove any remaining dust Note If dust is difficult to remove or the air filter is damaged replace the air filter 186 ...

Страница 187: ...5 Place the air filter back in the projector as shown 187 ...

Страница 188: ...6 Close the air filter cover and slide the latch Parent topic Air Filter and Vent Maintenance 188 ...

Страница 189: ...owing situations After cleaning the air filter you see a message telling you to clean or replace it The air filter is torn or damaged You can replace the air filter while the projector is mounted on the wall or ceiling 1 Turn off the projector and unplug the power cord 189 ...

Страница 190: ...2 Slide the air filter cover latch and open the air filter cover 190 ...

Страница 191: ...3 Pull the air filter out of the projector Note Air filters contain polypropylene Dispose of used air filters according to local regulations 191 ...

Страница 192: ...4 Place the new air filter in the projector as shown 192 ...

Страница 193: ...5 Close the air filter cover and slide the latch Parent topic Air Filter and Vent Maintenance 193 ...

Страница 194: ...es Optional Equipment and Replacement Parts Projector Lamp Specifications Projector Information Display Info Menu Replacing the Lamp Before you replace the lamp let the projector cool down for at least one hour so the lamp will not be hot Warning Let the lamp fully cool before replacing it to avoid injury You can replace the lamp while the projector is mounted on the wall or ceiling 1 Turn off the...

Страница 195: ...3 Use the screwdriver included with the replacement lamp to loosen the screw securing the lamp cover 4 Slide off the lamp cover 195 ...

Страница 196: ...crews do not come all the way out 6 Lift up the lamp handle and gently pull the lamp out of the projector Note The lamp s in this product contain mercury Please consult your state and local regulations regarding disposal or recycling Do not put in the trash 196 ...

Страница 197: ...ojector along the guide rail If it does not fit easily make sure it is facing the right way Press the handle down Caution Do not touch any glass on the lamp assembly to avoid premature lamp failure 8 Tighten the screws to secure the lamp 197 ...

Страница 198: ...rent topic Projector Lamp Maintenance Related tasks Resetting the Lamp Timer Resetting the Lamp Timer You must reset the lamp timer after replacing the projector s lamp to clear the lamp replacement message and to keep track of lamp usage correctly Note Do not reset the lamp timer if you have not replaced the lamp to avoid inaccurate lamp usage information 1 Turn on the projector 2 Press the Menu ...

Страница 199: ...or Esc to exit the menus Parent topic Projector Lamp Maintenance Related tasks Replacing the Lamp Replacing the Remote Control Batteries The remote control uses two AA manganese or alkaline batteries Replace the batteries as soon as they run out Caution Use only the type of batteries specified in this manual Do not install batteries of different types or mix new and old batteries 199 ...

Страница 200: ...ld batteries Warning If the battery fluid has leaked wipe it away with a soft cloth and avoid getting the fluid on your hands If it gets on your hands wash them immediately to avoid injury 3 Insert the batteries with the and ends facing as shown 200 ...

Страница 201: ...s and are very dangerous if swallowed Parent topic Projector Maintenance Replacing the Interactive Pen Batteries Each pen uses one AA alkaline or Sanyo Eneloop rechargeable battery Replace the battery as soon as it runs out When the battery is low the pen light flashes as you turn on the switch When the battery runs out the pen light goes out Caution Use only the type of batteries specified in thi...

Страница 202: ... as shown 4 Replace the battery cover and press it down until it clicks into place Warning Dispose of used batteries according to local regulations Do not expose batteries to heat or flame Keep batteries out of the reach of children they are choking hazards and are very dangerous if swallowed Parent topic Projector Maintenance Replacing the Interactive Pen Tips If the pen tips become damaged or no...

Страница 203: ...ected to the projector When transporting the projector a long distance or as checked luggage pack it in a firm box with cushioning around it and mark the box Fragile When shipping the projector for repairs place it in its original packing materials if possible or use equivalent materials with cushioning around the projector Mark the box Fragile Note Epson shall not be liable for any damages incurr...

Страница 204: ...ed Where to Get Help Projection Problem Tips If the projector is not working properly try turning it off and unplugging it Then plug it back in and turn it on If this does not solve the problem check the following The lights on the projector may indicate what the problem is The projector s Help system can display information about common problems if the projector is operating The solutions in this...

Страница 205: ...d color of the lights and look for a solution in the table here 1 Power light 2 Status light 3 Lamp light 4 Temp temperature light Power light Status light Lamp light Temp light Status and solution Blue Blue Off Off Normal operation Blue Flashing blue Off Off Warming up Wait for an image to appear Blue Off Off Off Standby or sleep mode 205 ...

Страница 206: ...y objects Clean or replace the air filter Make sure the environmental temperature is not too hot Off Flashing blue Off Orange Projector has overheated and turned off Leave it turned off to cool down After about five minutes do the following Make sure that the vents and air filter are not clogged with dust or obstructed by nearby objects Clean or replace the air filter If operating the projector at...

Страница 207: ...ector Off Flashing blue Off Flashing A fan or sensor has a problem Turn orange the projector off unplug it and contact Epson for help Off Flashing blue Flashing Flashing Auto Iris error Turn the projector off orange orange unplug it and contact Epson for help Off Flashing blue Orange Orange Power error ballast Turn the projector off unplug it and contact Epson for help Off Flashing blue Flashing O...

Страница 208: ...ished do one of the following To select another problem to solve press Esc To exit the help system press Help Parent topic Solving Problems Solving Image or Sound Problems Check the solutions in these sections if you have any problems with projected images or sound Solutions When No Image Appears Solutions When Image is Incorrect Using the USB Display Function Solutions When No Signal Message Appe...

Страница 209: ...u to make sure they are correct for the current video source Adjust the Brightness setting or select the Normal Power Consumption setting Check the Display setting to make sure Messages is set to On If the projector does not respond when you press the control panel buttons the buttons may be locked Unlock the buttons If the projector does not respond when you press buttons on the remote control ma...

Страница 210: ...ter feature not available with Windows 2000 Turn off the Transfer layered window setting in the Epson USB Display Settings program on your computer Parent topic Solving Image or Sound Problems Solutions When No Signal Message Appears If the No Signal message appears try the following solutions Press the Source Search button and wait a few seconds for an image to appear Turn on the connected comput...

Страница 211: ...ed display See your laptop manual for details 1 Open the System Preferences utility and select Displays 2 Click the Arrangement tab 3 Select the Mirror Displays checkbox Parent topic Solutions When No Signal Message Appears Solutions When Not Supported Message Appears If the Not Supported message appears try the following solutions Make sure the correct input signal is selected on the Signal menu ...

Страница 212: ...lving Image or Sound Problems Related references Input Signal Settings Signal Menu Supported Video Display Formats Solutions When the Image is Not Rectangular If the projected image is not evenly rectangular try the following solutions If the projector is not mounted on the wall or ceiling place it directly in front of the center of the screen facing it squarely if possible Use the Image Shift set...

Страница 213: ...tor If you are projecting from a computer press the Auto button on the remote control to automatically adjust the Tracking and Sync settings If you adjusted the image shape using the projector controls try decreasing the Sharpness setting to improve image quality If you connected an extension power cable try projecting without it to see if it caused interference in the signal If you are using the ...

Страница 214: ...k or light or the colors are incorrect try the following solutions Press the Color Mode button on the remote control to try different color modes for the image and environment Check your video source settings Adjust the available settings on the Image menu for the current input source such as Brightness Contrast Tint Color Adjustment and or Color Saturation Make sure you selected the correct Input...

Страница 215: ...ur computer If you are using a Mac and you do not hear sound from an HDMI source make sure your Mac supports audio through the HDMI port If not you need to connect an audio cable If you want to use a connected audio source when the projector is off set the Standby Mode option to Communication On and the A V Output option to Always On Make sure the Audio Output option is set to the correct audio po...

Страница 216: ...y connected to the projector and to a working electrical outlet The projector s buttons may be locked for security Unlock the buttons or use the remote control to turn on the projector The power cord may be defective Disconnect the cord and contact Epson If the projector s lamp shuts off unexpectedly it may have entered standby mode after a period of inactivity Press the power button to wake the p...

Страница 217: ...t If available turn off one of the remote receivers in the projector s menu system or check if all the remote receivers were turned off If you lose the remote control you can order another one from Epson Parent topic Solving Projector or Remote Control Operation Problems Related references Projector Feature Settings Settings Menu Optional Equipment and Replacement Parts Remote Control Operation So...

Страница 218: ...ent topic Solving Problems Solutions When Hardware Device Not Found Message Appears If the Hardware device not found message appears try the following solutions Check the USB cable connection from the projector to your computer Try disconnecting and then reconnecting the cable If you are projecting from a laptop computer make sure the battery has enough power or connect the laptop to a power outle...

Страница 219: ...battery If you are projecting from a computer make sure the USB cable is connected to the computer and projector Dim the room lights and turn off any fluorescent lights Make sure the projection surface and pen receiver are not in direct sunlight or other sources of bright lighting Remove any decorative lights from around the projector or projection surface If the pen tip is worn out or damaged you...

Страница 220: ...Speed Make sure there is no interference from infrared remote controls mice or infrared microphones Make sure you have performed pen calibration and finger touch calibration Try recalibrating Parent topic Solving Interactive Problems Solutions When Manual Calibration Does Not Work If you are having trouble calibrating manually try the following solutions If the circle does not move to the next pos...

Страница 221: ...nd select Manual Adj Pen Area Try changing the computer s resolution to 1280 800 Parent topic Solving Interactive Problems Solutions When the Interactive Pens Are Slow or Difficult to Use If the pens are difficult to use or respond too slowly try the following solutions For easier operation hold the pen perpendicular to the projection surface For the best performance connect your computer to the p...

Страница 222: ... the network correctly If an error shut down the projector it cannot send an e mail Make sure you set up the projector e mail alert settings correctly on the projector s network Mail menu or in the network software Set the Standby Mode setting to Communication On so the network software can monitor the projector in standby mode Parent topic Solving Problems Related concepts Wired Network Projectio...

Страница 223: ...ll have the following information ready Product name Product serial number located on the bottom or rear of the projector or in the menu system Proof of purchase such as a store receipt and date of purchase Computer or video configuration Description of the problem Purchase Supplies and Accessories You can purchase screens other optional accessories and replacement parts from an Epson authorized r...

Страница 224: ...ecifications Projector Safety and Approvals Specifications Supported Video Display Formats USB Display System Requirements General Projector Specifications Type of display Poly silicon TFT active matrix Resolution 1280 800 pixels WXGA Lens F 1 80 Focal length 3 71 mm Color reproduction Full color Up to 1 billion colors Brightness BrightLink 575Wi Normal Power Consumption mode White light output 27...

Страница 225: ...ounted interactive features not available in rear projection mode Optical aspect ratio 16 10 width to height Focus adjustment Manual Zoom adjustment Digital Zoom ratio 1 1 35 Tele to Wide Internal sound system 16 W monaural Noise level 35 dB Normal Power Consumption mode 28 dB ECO Power Consumption mode Keystone correction angle Vertical 3 Horizontal 3 USB B port compatibility One USB 1 1 and 2 0 ...

Страница 226: ...sumption mode Up to about 4000 hours ECO Power Consumption mode Up to about 6000 hours Note Turn off this product when not in use to prolong the life of the projector Lamp life will vary depending upon mode selected environmental conditions and usage Brightness decreases over time Parent topic Technical Specifications Interactive Pen Specifications Batteries One AA alkaline per pen Size 6 3 inches...

Страница 227: ...ser Class 1 Dimensions Height 3 7 inches 95 mm Width 8 2 inches 207 mm Depth 2 inches 51 mm Weight 15 9 oz 450 g Parent topic Technical Specifications Projector Dimension Specifications Height excluding feet 6 1 inches 155 mm Width 14 4 inches 367 mm Depth 14 8 inches 375 mm Weight 12 1 lb 5 5 kg Parent topic Technical Specifications Projector Electrical Specifications Rated frequency 50 60 Hz Pow...

Страница 228: ... Consumption mode 280 W Standby 0 33 W Communication Off 4 3 W Communication On Power consumption BrightLink 575Wi 220 to 240 V Operating Normal Power Consumption mode 318 W ECO Power Consumption mode 230 W Standby 0 44 W Communication Off 4 3 W Communication On BrightLink 585Wi 595Wi Operating Normal Power Consumption mode 358 W ECO Power Consumption mode 270 W Standby 0 44 W Communication Off 4 ...

Страница 229: ...ideo Display Formats For best results your computer monitor or video card resolution should be set to display in the projector s native resolution However your projector includes Epson s SizeWise chip that supports other computer display resolutions so your image will be resized to fit automatically Your computer s monitor or video card refresh rate vertical frequency must be compatible with the p...

Страница 230: ...70 75 85 1152 864 60 75 85 1280 1024 60 75 85 1280 960 SXGA 60 75 1400 1050 WSXGA 60 1680 1050 UXGA 60 1600 1200 MAC13 67 640 480 MAC16 75 832 624 MAC19 75 1024 768 59 1024 768 MAC21 75 1152 870 Composite video TV NTSC 60 720 480 TV SECAM 50 720 576 TV PAL 50 60 720 576 Component video SDTV 480i 60 720 480 SDTV 576i 50 720 576 SDTV 480p 60 720 480 SDTV 576p 50 720 576 230 ...

Страница 231: ...768 WXGA 60 1440 900 WXGA 60 1600 900 WSXGA 60 1680 1050 SXGA 60 1280 960 60 1280 1024 SXGA 60 1400 1050 UXGA 60 1600 1200 SDTV 480i 480p 60 720 480 SDTV 576i 576p 50 720 576 HDTV 720p 50 60 1280 720 HDTV 1080i 50 60 1920 1080 HDTV 1080p 24 30 50 60 1920 1080 MHL input signals VGA 60 640 480 SDTV 480i 480p 60 720 480 SDTV 576i 576p 50 720 576 HDTV 720p 50 60 1280 720 HDTV 1080i 50 60 1920 1080 231...

Страница 232: ... 32 and 64 bit Windows Vista Ultimate Enterprise Business Home Premium and Home Basic 32 bit Windows 7 Ultimate Enterprise Professional and Home Premium 32 and 64 bit Home Basic and Starter 32 bit Windows 8 x Pro and Enterprise 32 and 64 bit USB version USB 1 1 and above USB 2 0 recommended CPU Mobile Pentium III 1 2 GHz or faster Power PC G4 1 GHz or faster Core 1 6 GHz or faster recommended Duo ...

Страница 233: ...t light can damage your eyes Never let children look into the lens when it is on Never open any cover on the projector except the lamp and filter covers Dangerous electrical voltages inside the projector can severely injure you Except as specifically explained in this User s Guide do not attempt to service this product yourself Refer all servicing to qualified service personnel Warning The project...

Страница 234: ...s Use the type of power source indicated on the projector Use of a different power source may result in fire or electric shock If you are not sure of the power available consult your dealer or power company Place the projector near a wall outlet where the plug can be easily unplugged Take the following precautions when handling the plug Do not hold the plug with wet hands Do not insert the plug in...

Страница 235: ... modify the projector Refer all repairs to qualified service personnel Unplug the projector from the wall outlet and refer servicing to qualified service personnel under the following conditions if it does not operate normally when you follow the operating instructions or exhibits a distinct change in performance if smoke strange odors or strange noises come from the projector if the power cord or...

Страница 236: ...a lit candle on or near the projector Do not modify the power cord Do not place heavy objects on top of the power cord or bend twist or pull it excessively Keep the power cord away from hot electrical appliances If the lamp breaks ventilate the room to prevent gases contained in the lamp from being inhaled or coming in contact with your eyes or mouth If you do inhale gases or gases come in contact...

Страница 237: ...n radiate radio frequency energy and if not installed and used in accordance with the instructions may cause harmful interference to radio communications However there is no guarantee that interference will not occur in a particular installation If this equipment does cause interference to radio and television reception which can be determined by turning the equipment off and on the user is encour...

Страница 238: ...tTM and SizeWiseTM are trademarks and Epson StoreSM and Extra CareSM are service marks of Epson America Inc Mac and OS X are trademarks of Apple Inc registered in the U S and other countries HDMI and High Definition Multimedia Interface are the trademarks or registered trademarks of HDMI Licensing LLC General Notice Other product names used herein are for identification purposes only and may be tr...

Страница 239: ...ev 219 wireless_tools 29 EPSON original drivers The GNU General Public License Version 2 is as follows You also can see the GNU General Public License Version 2 at http www gnu org licenses GNU GENERAL PUBLIC LICENSE Version 2 June 1991 Copyright C 1989 1991 Free Software Foundation Inc 51 Franklin Street Fifth Floor Boston MA 02110 1301 USA Everyone is permitted to copy and distribute verbatim co...

Страница 240: ...on we want its recipients to know that what they have is not the original so that any problems introduced by others will not reflect on the original authors reputations Finally any free program is threatened constantly by software patents We wish to avoid the danger that redistributors of a free program will individually obtain patent licenses in effect making the program proprietary To prevent th...

Страница 241: ...re is no warranty or else saying that you provide a warranty and that users may redistribute the program under these conditions and telling the user how to view a copy of this License Exception if the Program itself is interactive but does not normally print such an announcement your work based on the Program is not required to print an announcement These requirements apply to the modified work as...

Страница 242: ...ies the executable If distribution of executable or object code is made by offering access to copy from a designated place then offering equivalent access to copy the source code from the same place counts as distribution of the source code even though third parties are not compelled to copy the source along with the object code 4 You may not copy modify sublicense or distribute the Program except...

Страница 243: ... a licensee cannot impose that choice This section is intended to make thoroughly clear what is believed to be a consequence of the rest of this License 8 If the distribution and or use of the Program is restricted in certain countries either by patents or by copyrighted interfaces the original copyright holder who places the Program under this License may add an explicit geographical distribution...

Страница 244: ...DVISED OF THE POSSIBILITY OF SUCH DAMAGES END OF TERMS AND CONDITIONS How to Apply These Terms to Your New Programs If you develop a new program and you want it to be of the greatest possible use to the public the best way to achieve this is to make it free software which everyone can redistribute and change under these terms To do so attach the following notices to the program It is safest to att...

Страница 245: ...s written by James Hacker signature of Ty Coon 1 April 1989 Ty Coon President of Vice This General Public License does not permit incorporating your program into proprietary programs If your program is a subroutine library you may consider it more useful to permit linking proprietary applications with the library If this is what you want to do use the GNU Lesser General Public License instead of t...

Страница 246: ...strategy to use in any particular case based on the explanations below When we speak of free software we are referring to freedom of use not price Our General Public Licenses are designed to make sure that you have the freedom to distribute copies of free software and charge for this service if you wish that you receive source code or can get it if you want it that you can change the software and ...

Страница 247: ... General Public License because it does Less to protect the user s freedom than the ordinary General Public License It also provides other free software developers Less of an advantage over competing non free programs These disadvantages are the reason we use the ordinary General Public License for many libraries However the Lesser license provides advantages in certain special circumstances For e...

Страница 248: ...ivities other than copying distribution and modification are not covered by this License they are outside its scope The act of running a program using the Library is not restricted and output from such a program is covered only if its contents constitute a work based on the Library independent of the use of the Library in a tool for writing it Whether that is true depends on what the Library does ...

Страница 249: ...e or collective works based on the Library In addition mere aggregation of another work not based on the Library with the Library or with a work based on the Library on a volume of a storage or distribution medium does not bring the other work under the scope of this License 3 You may opt to apply the terms of the ordinary GNU General Public License instead of this License to a given copy of the L...

Страница 250: ...ey are linked directly with the Library itself 6 As an exception to the Sections above you may also combine or link a work that uses the Library with the Library to produce a work containing portions of the Library and distribute that work under terms of your choice provided that the terms permit modification of the work for the customer s own use and reverse engineering for debugging such modific...

Страница 251: ...ibrary side by side in a single library together with other library facilities not covered by this License and distribute such a combined library provided that the separate distribution of the work based on the Library and of the other library facilities is otherwise permitted and provided that you do these two things a Accompany the combined library with a copy of the same work based on the Libra...

Страница 252: ...idity of any such claims this section has the sole purpose of protecting the integrity of the free software distribution system which is implemented by public license practices Many people have made generous contributions to the wide range of software distributed through that system in reliance on consistent application of that system it is up to the author donor to decide if he or she is willing ...

Страница 253: ...ARY AS PERMITTED ABOVE BE LIABLE TO YOU FOR DAMAGES INCLUDING ANY GENERAL SPECIAL INCIDENTAL OR CONSEQUENTIAL DAMAGES ARISING OUT OF THE USE OR INABILITY TO USE THE LIBRARY INCLUDING BUT NOT LIMITED TO LOSS OF DATA OR DATA BEING RENDERED INACCURATE OR LOSSES SUSTAINED BY YOU OR THIRD PARTIES OR A FAILURE OF THE LIBRARY TO OPERATE WITH ANY OTHER SOFTWARE EVEN IF SUCH HOLDER OR OTHER PARTY HAS BEEN ...

Страница 254: ...is projector product includes the open source software program University of California Berkeley License Berkeley Software Distribution License which applies the terms and conditions provided by owner of the copyright to the BSD License The BSD License are WITHOUT ANY WARRANTY without even the implied warranty of MERCHANTABILITY AND FITNESS FOR A PARTICULAR PURPOSE List of BSD License programs bus...

Страница 255: ... software program libjpeg which applies the terms and conditions provided by owner of the copyright to the libjpeg The libjpeg are WITHOUT ANY WARRANTY without even the implied warranty of MERCHANTABILITY AND FITNESS FOR A PARTICULAR PURPOSE List of libjpeg programs libjpeg 6b License terms of conditions of each program which are provided by owner of the copyright to the libjpeg are as follows Cop...

Страница 256: ...e use of any IJG author s name or company name in advertising or publicity relating to this software or products derived from it This software may be referred to only as the Independent JPEG Group s software We specifically permit and encourage the use of this software as the basis of commercial products provided that all warranty or liability claims are assumed by the product vendor ansi2knr c is...

Страница 257: ...bpng 1 2 49 License terms of conditions of each program which are provided by owner of the copyright to the libpng are as follows For conditions of distribution and use see copyright notice in png h Copyright c 1998 2012 Glenn Randers Pehrson Version 0 96 Copyright c 1996 1997 Andreas Dilger Version 0 88 Copyright c 1995 1996 Guy Eric Schalnat Group 42 Inc This copy of the libpng notices is provid...

Страница 258: ...ng to the same disclaimer and license as libpng 0 96 with the following individuals added to the list of Contributing Authors Tom Lane Glenn Randers Pehrson Willem van Schaik libpng versions 0 89 June 1996 through 0 96 May 1997 are Copyright c 1996 1997 Andreas Dilger Distributed according to the same disclaimer and license as libpng 0 88 with the following individuals added to the list of Contrib...

Страница 259: ...y source or altered source distribution The Contributing Authors and Group 42 Inc specifically permit without fee and encourage the use of this source code as a component to supporting the PNG file format in commercial products If you use this source code in a product acknowledgment is not required but would be appreciated A png_get_copyright function is available for convenient use in about boxes...

Страница 260: ...nly marked as such and must not be misrepresented as being the original software 3 This notice may not be removed or altered from any source distribution Jean loup Gailly jloup gzip org Mark Adler madler alumni caltech edu If you use the zlib library in a product we would appreciate not receiving lengthy legal documents to sign The sources are provided for free but without warranty of any kind The...

Страница 261: ... whether in Source or Object form made available under the License as indicated by a copyright notice that is included in or attached to the work an example is provided in the Appendix below Derivative Works shall mean any work whether in Source or Object form that is based on or derived from the Work and for which the editorial revisions annotations elaborations or other modifications represent a...

Страница 262: ...r Derivative Works thereof in any medium with or without modifications and in Source or Object form provided that You meet the following conditions a You must give any other recipients of the Work or Derivative Works a copy of this License and b You must cause any modified files to carry prominent notices stating that You changed the files and c You must retain in the Source form of any Derivative...

Страница 263: ...ent and under no legal theory whether in tort including negligence contract or otherwise unless required by applicable law such as deliberate and grossly negligent acts or agreed to in writing shall any Contributor be liable to You for damages including any direct indirect special incidental or consequential damages of any character arising as a result of this License or out of the use or inabilit...

Страница 264: ...am newlib which applies the terms and conditions provided by owner of the copyright to the newlib The newlib are WITHOUT ANY WARRANTY without even the implied warranty of MERCHANTABILITY AND FITNESS FOR A PARTICULAR PURPOSE List of newlib programs aes src 29 04 09 This projector product includes the open source software program aes src 29 04 09 which applies the terms and conditions provided by ow...

Страница 265: ...ll apply to the contents of the newlib subdirectory 1 Red Hat Incorporated Copyright c 1994 2007 Red Hat Inc All rights reserved This copyrighted material is made available to anyone wishing to use modify copy or redistribute it subject to the terms and conditions of the BSD License This program is distributed in the hope that it will be useful but WITHOUT ANY WARRANTY expressed or implied includi...

Страница 266: ...R OTHERWISE ARISING IN ANY WAY OUT OF THE USE OF THIS SOFTWARE EVEN IF ADVISED OF THE POSSIBILITY OF SUCH DAMAGE 3 David M Gay AT T 1991 Lucent 1998 The author of this software is David M Gay Copyright c 1991 by AT T Permission to use copy modify and distribute this software for any purpose without fee is hereby granted provided that this entire notice is included in all copies of any software whi...

Страница 267: ... which specifically grants the user the right to modify use and distribute this software provided this notice is not removed or altered All other rights are reserved by AMD AMD MAKES NO WARRANTY OF ANY KIND EXPRESS OR IMPLIED WITH REGARD TO THIS SOFTWARE IN NO EVENT SHALL AMD BE LIABLE FOR INCIDENTAL OR CONSEQUENTIAL DAMAGES IN CONNECTION WITH OR ARISING FROM THE FURNISHING PERFORMANCE OR USE OF T...

Страница 268: ...software for any purpose 9 Hans Peter Nilsson Copyright C 2001 Hans Peter Nilsson Permission to use copy modify and distribute this software is freely granted provided that the above copyright notice this notice and the following disclaimer are preserved with no changes THIS SOFTWARE IS PROVIDED AS IS AND WITHOUT ANY EXPRESS OR IMPLIED WARRANTIES INCLUDING WITHOUT LIMITATION THE IMPLIED WARRANTIES...

Страница 269: ...erH Inc SuperH which specifically grants the user the right to modify use and distribute this software provided this notice is not removed or altered All other rights are reserved by SuperH SUPERH MAKES NO WARRANTY OF ANY KIND EXPRESS OR IMPLIED WITH REGARD TO THIS SOFTWARE IN NO EVENT SHALL SUPERH BE LIABLE FOR INDIRECT SPECIAL INCIDENTAL OR CONSEQUENTIAL DAMAGES IN CONNECTION WITH OR ARISING FRO...

Страница 270: ...TWARE EVEN IF ADVISED OF THE POSSIBILITY OF SUCH DAMAGE 14 Alexey Zelkin Copyright c 2000 2001 Alexey Zelkin phantom FreeBSD org All rights reserved Redistribution and use in source and binary forms with or without modification are permitted provided that the following conditions are met 1 Redistributions of source code must retain the above copyright notice this list of conditions and the followi...

Страница 271: ...T LIABILITY OR TORT INCLUDING NEGLIGENCE OR OTHERWISE ARISING IN ANY WAY OUT OF THE USE OF THIS SOFTWARE EVEN IF ADVISED OF THE POSSIBILITY OF SUCH DAMAGE 16 FreeBSD Copyright c 1997 2002 FreeBSD Project All rights reserved Redistribution and use in source and binary forms with or without modification are permitted provided that the following conditions are met 1 Redistributions of source code mus...

Страница 272: ...s are met 1 Redistributions of source code must retain the above copyright notice this list of conditions and the following disclaimer 2 Redistributions in binary form must reproduce the above copyright notice this list of conditions and the following disclaimer in the documentation and or other materials provided with the distribution THIS SOFTWARE IS PROVIDED BY THE AUTHOR AND CONTRIBUTORS AS IS...

Страница 273: ...AND ON ANY THEORY OF LIABILITY WHETHER IN CONTRACT STRICT LIABILITY OR TORT INCLUDING NEGLIGENCE OR OTHERWISE ARISING IN ANY WAY OUT OF THE USE OF THIS SOFTWARE EVEN IF ADVISED OF THE POSSIBILITY OF SUCH DAMAGE 20 DJ Delorie i386 Copyright C 1991 DJ Delorie All rights reserved Redistribution and use in source and binary forms is permitted provided that the above copyright notice and following para...

Страница 274: ...s list of conditions and the following disclaimer 2 Redistributions in binary form must reproduce the above copyright notice this list of conditions and the following disclaimer in the documentation and or other materials provided with the distribution THIS SOFTWARE IS PROVIDED BY THE AUTHOR AND CONTRIBUTORS AS IS AND ANY EXPRESS OR IMPLIED WARRANTIES INCLUDING BUT NOT LIMITED TO THE IMPLIED WARRA...

Страница 275: ...ftMine Corporation Rights transferred to Franklin Electronic Publishers Redistribution and use in source and binary forms with or without modification are permitted provided that the following conditions are met 1 Redistributions of source code must retain the above copyright notice this list of conditions and the following disclaimer 2 Redistributions in binary form must reproduce the above copyr...

Страница 276: ...ENCE OR OTHERWISE ARISING IN ANY WAY OUT OF THE USE OF THIS SOFTWARE EVEN IF ADVISED OF THE POSSIBILITY OF SUCH DAMAGE 31 M Warner Losh targets using libc posix Copyright c 1998 M Warner Losh imp freebsd org All rights reserved Redistribution and use in source and binary forms with or without modification are permitted provided that the following conditions are met 1 Redistributions of source code...

Страница 277: ...IAL DAMAGES INCLUDING BUT NOT LIMITED TO PROCUREMENT OF SUBSTITUTE GOODS OR SERVICES LOSS OF USE DATA OR PROFITS OR BUSINESS INTERRUPTION HOWEVER CAUSED AND ON ANY THEORY OF LIABILITY WHETHER IN CONTRACT STRICT LIABILITY OR TORT INCLUDING NEGLIGENCE OR OTHERWISE ARISING IN ANY WAY OUT OF THE USE OF THIS SOFTWARE EVEN IF ADVISED OF THE POSSIBILITY OF SUCH DAMAGE 33 Daniel Eischen targets using libc...

Страница 278: ...r in the documentation and or other materials provided with the distribution 3 The name of the company may not be used to endorse or promote products derived from this software without specific prior written permission THIS SOFTWARE IS PROVIDED BY ARM LTD AS IS AND ANY EXPRESS OR IMPLIED WARRANTIES INCLUDING BUT NOT LIMITED TO THE IMPLIED WARRANTIES OF MERCHANTABILITY AND FITNESS FOR A PARTICULAR ...

Страница 279: ... NOT LIMITED TO THE IMPLIED WARRANTIES OF MERCHANTABILITY AND FITNESS FOR A PARTICULAR PURPOSE AREDISCLAIMED IN NO EVENT SHALL CODESOURCERY BE LIABLE FOR ANY DIRECT INDIRECT INCIDENTAL SPECIAL EXEMPLARY OR CONSEQUENTIAL DAMAGES INCLUDING BUT NOT LIMITED TO PROCUREMENT OF SUBSTITUTE GOODS OR SERVICES LOSS OF USE DATA OR PROFITS OR BUSINESS INTERRUPTION HOWEVER CAUSED AND ON ANY THEORY OF LIABILITY ...

Страница 280: ...DISCLAIMED IN NO EVENT SHALL THE COPYRIGHT OWNER OR CONTRIBUTORS BE LIABLE FOR ANY DIRECT INDIRECT INCIDENTAL SPECIAL EXEMPLARY OR CONSEQUENTIAL DAMAGES INCLUDING BUT NOT LIMITED TO PROCUREMENT OF SUBSTITUTE GOODS OR SERVICES LOSS OF USE DATA OR PROFITS OR BUSINESS INTERRUPTION HOWEVER CAUSED AND ON ANY THEORY OF LIABILITY WHETHER IN CONTRACT STRICT LIABILITY OR TORT INCLUDING NEGLIGENCE OR OTHERW...

Страница 281: ... PARTICULAR PURPOSE AND NONINFRINGEMENT IN NO EVENT SHALL THE AUTHORS OR COPYRIGHT HOLDERS BE LIABLE FOR ANY CLAIM DAMAGES OR OTHER LIABILITY WHETHER IN AN ACTION OF CONTRACT TORT OR OTHERWISE ARISING FROM OUT OF OR IN CONNECTION WITH THE SOFTWARE OR THE USE OR OTHER DEALINGS IN THE SOFTWARE TOPPERS JSP This projector product includes the open source software program TOPPERS JSP which applies the ...

Страница 282: ...hese terms of utilization and the following stipulation of no guarantee shall be inserted in documentation accompanying redistribution user s manual etc b The TOPPERS Project shall be notified owing to a method in which the form of distribution is decided otherwise 4 The above copyright holder and the TOPPERS Project shall be exempt from responsibility for whatever damages occur either directly or...

Страница 283: ...ames of its contributors may be used to endorse or promote products derived from this software without specific prior written permission THIS SOFTWARE IS PROVIDED BY THE REGENTS AND CONTRIBUTORS AS IS AND ANY EXPRESS OR IMPLIED WARRANTIES INCLUDING BUT NOT LIMITED TO THE IMPLIED WARRANTIES OF MERCHANTABILITY AND FITNESS FOR A PARTICULAR PURPOSE ARE DISCLAIMED IN NO EVENT SHALL THE REGENTS OR CONTR...

Страница 284: ...ove copyright holder and the TOPPERS Project shall be exempt from responsibility for whatever damages occur either directly or indirectly through the utilization of this software This software is something that is provided with no guarantee The above copyright holder and the TOPPERS Project make no guarantee whatsoever in regard to this software including the possibility of its application In addi...

Страница 285: ... Attribution Parent topic Notices A Note Concerning Responsible Use of Copyrighted Materials Epson encourages each user to be responsible and respectful of the copyright laws when using any Epson product While some countries laws permit limited copying or reuse of copyrighted material in certain circumstances those circumstances may not be as broad as some people assume Contact your legal advisor ...

Отзывы: