


36167-1-0316
Page 31
NOTICE
: The termination cap must pass through the wall
firestop from the exterior of the building. Adjust the termination
cap to its final exterior position on the building.
CAUTION
The termination cap must be positioned so that the arrow is
pointing up. Failure to properly position the parts may result in
a hazardous situation.
Attach the termination cap with the four wood screws provided.
Before attachment of the termination, run a bead of silicone
sealant rated above 250°F on its outside edge to make a seal to
the exterior wall.
CAUTION
Replace the wood screws with the appropriate fasteners for
use on stucco, brick, concrete or other types of siding. Failure
to use the proper fasteners may result in a hazardous situation.
CAUTION
Install a vinyl siding standoff if the exterior walls are finished
with vinyl siding or materials that could become discolored or
warp.
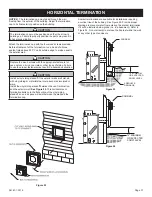
Install the vinyl siding standoff between the vent termination
and the exterior wall.
See figure 52.
This horizontal vent
termination bolts onto the flat portion of the vinyl siding
standoff, so an air space will exist between the wall and the
termination cap.
figure 52
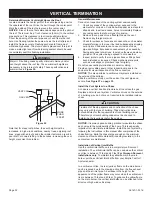
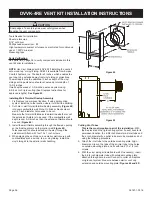
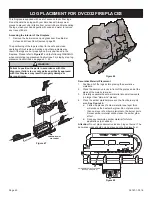
Snorkel terminations are available for installations requiring
a vertical rise of the building. See Figure 53. Provide proper
drainage to prevent water from entering the snorkel termination
if it will be installed below grade (i.e. in a basement). Refer to
Figure 54. Do not attempt to enclose the Snorkel within the wall
or any other type of enclosure.
ADEQUATE
DRAINAGE
SNORKEL
12” MINIMUM
OR EXPECTED
SNOW LEVEL
12” MINIMUM
OR EXPECTED
SNOW LEVEL
SNORKEL
figure 53
figure 54
hORIzONTAL TERMINATION
Содержание DVCD32FP3-2
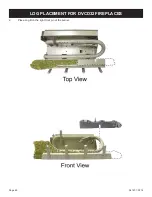
Страница 41: ...36167 1 0316 Page 41 1 Place Log A on the left front pin of the burner LOG PLACEMENT for DVCD32 fireplaces ...
Страница 42: ...36167 1 0316 Page 42 2 Place Log B on the right front pin of the burner LOG PLACEMENT for DVCD32 fireplaces ...
Страница 44: ...36167 1 0316 Page 44 4 Place Log D onto the rear log support LOG PLACEMENT for DVCD32 fireplaces ...
Страница 48: ...36167 1 0316 Page 48 Log placement is complete LOG PLACEMENT for DVCD32 fireplaces ...
Страница 51: ...36167 1 0316 Page 51 1 Place Log A on the left front pin of the burner LOG PLACEMENT For DVCD36 fireplaces ...
Страница 52: ...36167 1 0316 Page 52 2 Place Log B on the right front pin of the burner LOG PLACEMENT For DVCD36 fireplaces ...
Страница 54: ...36167 1 0316 Page 54 4 Place Log D onto the rear log support LOG PLACEMENT For DVCD36 fireplaces ...
Страница 57: ...36167 1 0316 Page 57 Log placement is complete LOG PLACEMENT For DVCD36 fireplaces ...
Страница 60: ...36167 1 0316 Page 60 1 Place Log A on the left front pin of the burner LOG PLACEMENT for DVCD42 fireplaces ...
Страница 61: ...36167 1 0316 Page 61 2 Place Log B on the right front pin of the burner LOG PLACEMENT for DVCD42 fireplaces ...
Страница 62: ...36167 1 0316 Page 62 3 Place Log D onto the rear log support LOG PLACEMENT for DVCD42 fireplaces ...
Страница 67: ...36167 1 0316 Page 67 Log placement is complete LOG PLACEMENT for DVCD42 fireplaces ...


