background image

GB

16

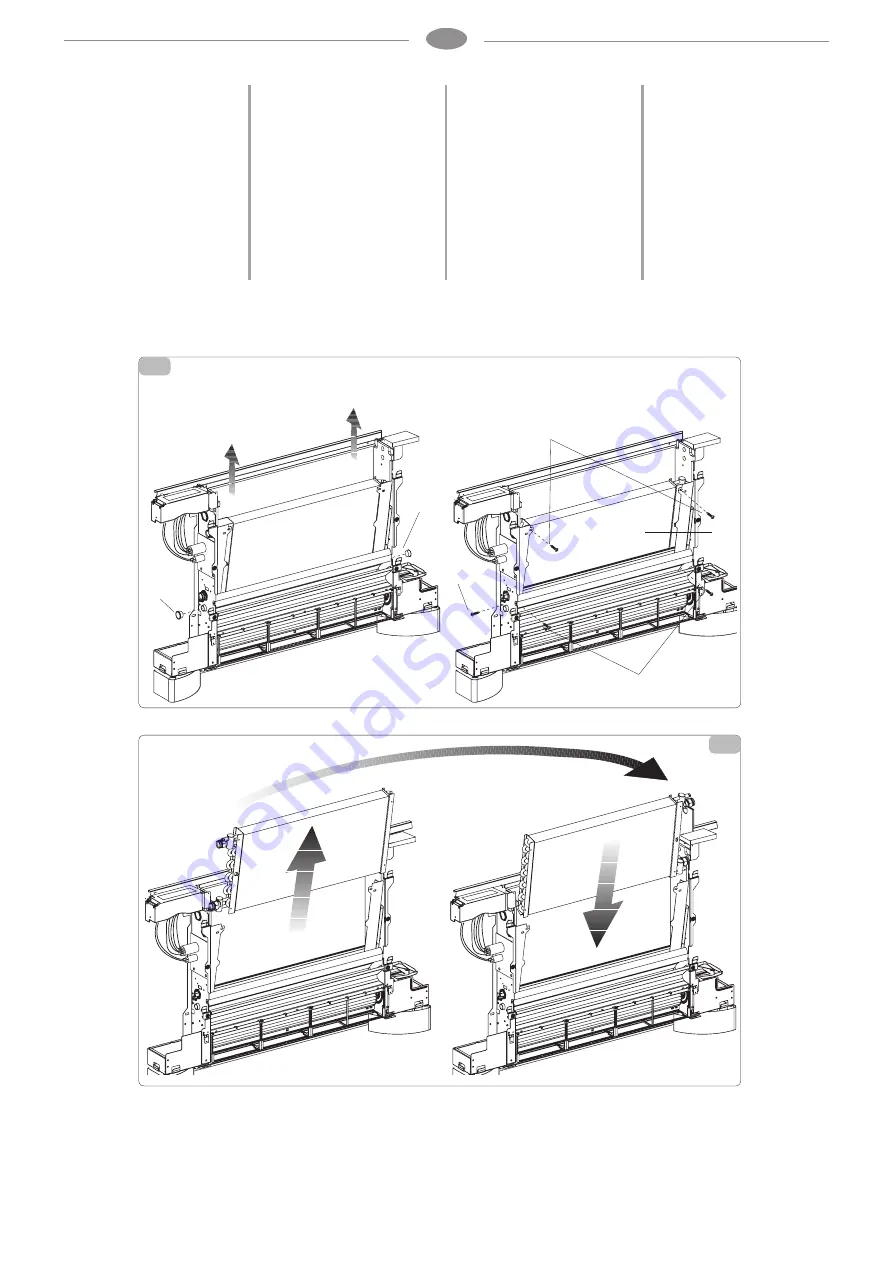
Disassembling the heat 

exchangers

-  Unscrew the four screws that  

secure the heat exchanger (fig. 

21 ref. C);

-  remove the coil water probe, if 

present.

-  remove the heat exchanger (fig. 

21 ref. F);

-  remove the drip guard extension 

from the central pan (fig. 21 ref. 

D);

-  on the opposite side, remove 

the plug on the condensate 

evacuation hole (fig. 21 ref. E);

22

21

C

E

D

C

F

G

-  unscrew the fixing screw  

of the central condensate drain 

pan (fig. 21 ref. G), set the pan 

on the opposite side so that the 

connection nozzle for the drip 

guard extension comes out of 

the structure, therefore block 

the pan with the previously 

removed screw; 

-  reinsert the drip guard extension 

and the cap on the opposite 

side;

-  open the pre-cut hexagonal holes  

on the right side insulation and 

close the hexagonal holes on 

the left edge with insulating 

material;

-  rotate the exchanger, bringing 

the connections to the opposite 

side, and reinsert it on the 

machine (fig. 22);

-  tighten all the heat exchanger 

fixing screws.

Once all the described steps have 

been completed, reassemble 

all the previously disassembled 

components, following the 

disassembly steps in inverse 

order.

Содержание ETI 2100

Страница 1: ...INSTALLATION AND USE MANUAL GB SILENCE THIN ETM ETI Fan Coil with Smart Touch controls ...

Страница 2: ...his publication may be subject to changes at any time and without any notice whatsoever for technical and or com mercial reasons as they arise therefore we cannot be held responsible for any errors or imprecisions contained herein All rights reserved No part of this pubblication may be reproduced or distributed without written permission from Emmeti Warning Keep these manuals in a dry place avoidi...

Страница 3: ...hangers P 17 Fitting the front grid safety support P 18 Filling the system P 18 Evacuating the air while filling the system P 18 Maintenance external cleaning cleaning the air intake filter P 21 Anomalies and solutions P 22 Hydraulic kit fitting components list of hydraulic accessories types of hydraulic connections piping diameter opening the sides P 23 Adjusting the retainer P 23 3 Way Valve Wit...

Страница 4: ...r ATTENTION since if not obeyed they can cause damage to the unit and or persons or property In the event of any problems not covered by this booklet contact the Technical Assistance Service in your area promptly Make sure that this booklet always accompanies the unit This booklet constitutes an integral and essential part of the product and must be delivered to the user In the event that the unit...

Страница 5: ...ysical damage Electrical hazard if the operation described is not performed in compliance with the safety regulations there lies the risk of suffering physical damage due to contact with live elements GENERAL WARNINGS After unpacking check that the contents are intact and that all partsareincluded Ifnot contact EMMETI who sold the appliance to you The packaging contains fan coil unit thermal insul...

Страница 6: ... electro galvanised sheet metal with high resistance B Water heat exchanger coil in copper pipes and aluminium fins with high efficiency turbulence Eurokonus 3 4 type threaded fittings which conform to the new EU standardisation requirements The coil is equipped with a sensor to detect the water temperature ETM ETI version electronic 1 G B A L M H F E I ATTENTION Itisunderstoodthatthisequipment is...

Страница 7: ...ed sheet metal with a quick release device for cleaning the filters and a safety microswitch I Condensate drain pan for vertical installation in ABS easily removable for cleaning operations For ETM versions to be installed horizontally the horizontal condensate drain pan kit BRC accessory is available L Back panel soundproofing structure in compressed yarn FIMBORD GR900 with high resistance M Fron...

Страница 8: ...could compromise the input and output air circulation the installation wall is possibly an external perimeter wall so as to allow the outward condensate drain in case of a ceiling installation the air flow is not directed directly towards people INSTALLATION METHOD The following descriptions of the various assembly phases and the relative drawings refer to a machine version with connections on the...

Страница 9: ...m 7 B A D A B C 8 OPENING THE SIDES On the left side lift the lid that covers the screw loosen the screw that secures the left panel move it slightly to the left and lift it On the opposite side lift the lid that covers the screw and unscrew it Move the side panel slightly to the right and lift it A lid B fixing screws C left panel D right panel ...

Страница 10: ...ill with a suitable tip and insert the dowels 2 for each bracket fig 10 ref A fix the two brackets fig 10 ref B Do not over tighten the screws so as to be able to adjust the brackets with a level bubble fig 11 Lock the two brackets definitively by tightening the four screws completely Check its stability by manually moving the brackets to the right and left up and down Assemble the unit checking t...

Страница 11: ...e inclination to the unit towards the drain pipe so as to facilitate the water output fig 13 ref D Tighten all 6 fixing screws securely The horizontal condensate drain pan kit accessories are available to install the ETM versions ETM BRC20 BRC40 BRC60 BRC80 BRC100 13 A A B B C D HYDRAULIC CONNECTIONS Piping diameter The minimum internal diameter that is to be complied with for the hydraulic connec...

Страница 12: ...ain pipe is connected to that already found on the machine For the ETM versions to be installed horizontally the ETM BRC20 BRC80 horizontal condensatedrainpankitaccessories are available If possible drain the condensate liquid directly into a gutter or a rainwater drain If drained into the sewer system it is advisable to install a siphon to prevent the backflow of odours towards the rooms The curv...

Страница 13: ...le rubber pipe are connected correctly to the pan fig 16 ref A insert the side of the machine while keeping the pipe in po sition in abutment on the front grid close the side securely checking that the pipe remains blocked in the specific slot on the side fig 16 ref B NOTE abide by the following warnings for a horizontal in stallation make sure the machine is in stalled perfectly level or with a s...

Страница 14: ...pecular Connect the motor to the control kits by using the relevant optional CCM DC wiring cod 07524061 Disassembling the panelling Remove the upper grid fig 17 ref E by unscrewing the two fixing screws fig 17 ref F Remove the lower front grid fig 18 ref A Unscrew the front panel fig 18 ref E fixing screws fig 18 ref B D and remove it B A D A B C E F F 17 On the left side lift the lid that covers ...

Страница 15: ...lace it on the opposite side 20 C D F Disconnect the electrical connection connectors Remove the wiring inside the ma chine and reinsert them from the opposite side Use the appropriate CCM DC wiring for right hand connections cod 07524061 for the motor con nection available as an accessory Reverse the mounting positions fig 20 ref C of the control panel and remount them in their respective positio...

Страница 16: ...site side so that the connection nozzle for the drip guard extension comes out of the structure therefore block the pan with the previously removed screw reinsert the drip guard extension and the cap on the opposite side openthepre cuthexagonalholes on the right side insulation and close the hexagonal holes on the left edge with insulating material rotate the exchanger bringing the connections to ...

Страница 17: ...the bag provided with the instruction manual and accessories must be installed by the installer 24 A B B C C B C Separate the two clamps fig 24 ref A open the front grid and unscrew the fixing screws of the springs completely fig 24 ref B secure the two clamps by retightening the screws fig 24 ref B secure the other part of the clamps to the grid using the screws supplied fig 24 ref C close the gr...

Страница 18: ... other annually by the Technical Assistance Department which is technically authorised and trained and can also dispose of original spare parts if necessary 28 EVACUATION OF THE AIR DURING THE FILLING OF THE SYSTEM Open all the system interception devices manual or automatic Start filling by slowly opening the system water filling tap For the ETM and ETI models installed in a vertical position act...

Страница 19: ...mble the filter on the fan coil fig 32 ref A paying particular attention to insert the lower edge fig 32 ref B in its seat fig 32 ref C A B C D It is forbidden to use the appliance without the mesh filter The appliance is fitted with a safety switch that prevents the fan from running without the intake grid or if it is set incorrectly After cleaning the filter check that the intake grid is install...

Страница 20: ...20 20 GB 31 A B A B 32 B C C B 33 A B 33 ...

Страница 21: ...hether the water circulation is restored Check the operating state of the valve by feeding it separately at 220 V If it is activated the problem may be in the electronic control Check the motor windings and the free rotation of the fan Check that the contact of the microswitch is activated when the grid closes Check the electrical connections Check the leak and tighten the connections securely Che...

Страница 22: ...panel slightly to the right and lift it B A D A B C 1 ATTENTION IN CASE OF MOD ELS WITH CONNECTIONS TO THE RIGHT IF YOU HAVE NOT ORDERED THE DEVICE CON FIGURED ACCORDINGLY YOU MUSTINVERTTHEPOSITIONOF THE COIL AND WIRING AS DE SCRIBED IN THE PARAGRAPH ROTATING THE CONNECTIONS IN THE INSTRUCTIONS FOR INSTALLATION FOUND IN THE PACKAGING OF THE FAN COIL UNIT For quick and correct assembly of the compo...

Страница 23: ...ag onal slot 2 Close the adjustment screw with a 5 mmAllen key fig 4 ref A 3 Fully screw the slotted grub screw Then mark the reference adjustment point with an x fig 4 ref B 4 Align the screwdriver on the x Then open with a number of rotations fig 4 ref C according to the diagram p Q shown on the graphics page ATTENTION the number of revolutions refers to the micro metric grub screw Then fully op...

Страница 24: ...hydraulic lines and joints must be thermally insulated Avoid partial pipe insulation Avoid tightening too much so as not to damage the insulation For the threaded connections to be water tight use hemp and green paste Teflon tape is recommend ed in the presence of antifreeze liquid in the hydraulic circuit 9 A B C ETM ETI VERSION WITH 3 WAY DIVERTER VALVE ETM ETI versions floor mounted connections...

Страница 25: ... the two brown terminals on the appliance are short replace them with those in the kit s packaging connect the H2 water probe connector ref F on the appliance the water temperature probe controls the temperature inside the coil and determines fan start up according to preset param eters minimum winter and maximum summer functions Check that it is inserted correctly in the pit on the coil make the ...

Страница 26: ...e water temperature detection probe found on the appliance positioned in the specific coil pit If the probe is not connected the absence is signalled by the red and blue LEDs flashing simultaneously and the operation being blocked The summer winter button must be pressed for 5 seconds ref A to confirm the probe free operation This condition will be saved by the board for all subsequent start ups I...

Страница 27: ...Insert the blind panel in its seat in the upper part of the appliance and secure it with the two screws provided ref A To install the connection box open the box ref B engage the lower tooth in the relevant slot ref C on the side of the appliance engage the upper part of the box at the side ref D secure it with the two screws provided ref E secure the earth cable to the appliance structure ref M u...

Страница 28: ...N input ref C of the board leaving it open the board goes into heating mode closing it it goes into cooling mode If after connecting the probe it is disconnected or measures incon sistent values e g installation of probe 2 kΩ instead of the correct one of 10 kΩ the anomaly is signalled with 3 flashes pause of the LED ref A and blocked operation To confirm operation without the probe disconnect and...

Страница 29: ...be 10 kω ntc Placed in the coil on the machine See paragraph water probe management SA Remote room probe TAD 15 Collegamenti a cura dell installatore B A H4 ON H2 SW GRL DATA I O L MOTOR N EV1 N EV2 N EV V1 V2 V3 V4 EST INV H2 M1 INN FR A10 F1AT LED N L Y1 CF SA E I RDC TM Minimum water temperature thermostat CF Remote input to activate the window contact function E I Remote input to activate the ...

Страница 30: ... coil it performs the minimum winter temperature 30 C and maximum summer temperature 20 C function The control panel is fitted with a memory so all settings will not be lost if shut down or in the event of a power failure The commands cannot be installed on the ETI version After a period of 20 seconds from the last action the brightness of the panel is specifically reduced to increase the comfort ...

Страница 31: ...key for about 2 seconds to switch the operating mode between heating and cooling visible through the activation of the 2 active heating or cooling symbols Key Operation Display mode off Keep the mode off key pressed for about 2 seconds The absence of any luminous signal from the display identifies the stand by status no mode On Off Key Operation Display Use the two increase and decrease keys to se...

Страница 32: ...panel is specifically reduced to increase the comfort during the night time and the display shows the room temperature Should this brightness be still annoying the display can be turned off completely by pressing the Heating Cooling button for 20 seconds until appears on the display Restore the normal minimum brightness by pressing the Heating Cooling button for 20 seconds until appears on the dis...

Страница 33: ...ure drops 2 kPa max 7 8 7 2 11 5 21 3 kPa med 3 8 4 2 3 3 11 2 kPa min 1 5 1 3 8 6 3 8 Air flow rate m3 h max 146 294 438 567 m3 h med 90 210 318 411 m3 h min 49 118 180 247 Sound power level dB A max 50 51 53 55 dB A med 44 45 46 47 dB A min 33 35 36 36 Total absorbed electrical power kW max 0 011 0 019 0 020 0 029 kW med 0 006 0 009 0 010 0 013 kW min 0 003 0 005 0 004 0 005 Max power W 12 21 22...

Страница 34: ...58 GB 240 260 280 2100 ...

Страница 35: ...59 GB 240 260 280 2100 ...

Отзывы: