GLAZING THE LOUVRE
1. The louvre must be glazed after it has been installed to the structure.
2. Open the louvre using the handle.
3. Slide each individual blade of glass between the jambs into the aluminium holders.
4. The glass will come to rest in the holder at the bottom of the jambs.
GLAZING THE STRUCTURE
Having anchored the structure to the wall and its base, observing the earlier comments about lev-
els, square etc, you can commence glazing.
If you are out on any of the 4 key points i.e.
1. Plumb wall
2. Level base
3. Square base
4. Base set at 90º to wall
Then you will have difficulty in glazing. So please be sure before starting this section of
construction
1. Horticultural glass
Each section has a number of panes, please refer to the chart on the next page for the specific sizes
and quantities.
With each section start with the bottom pane of glass (
Key point
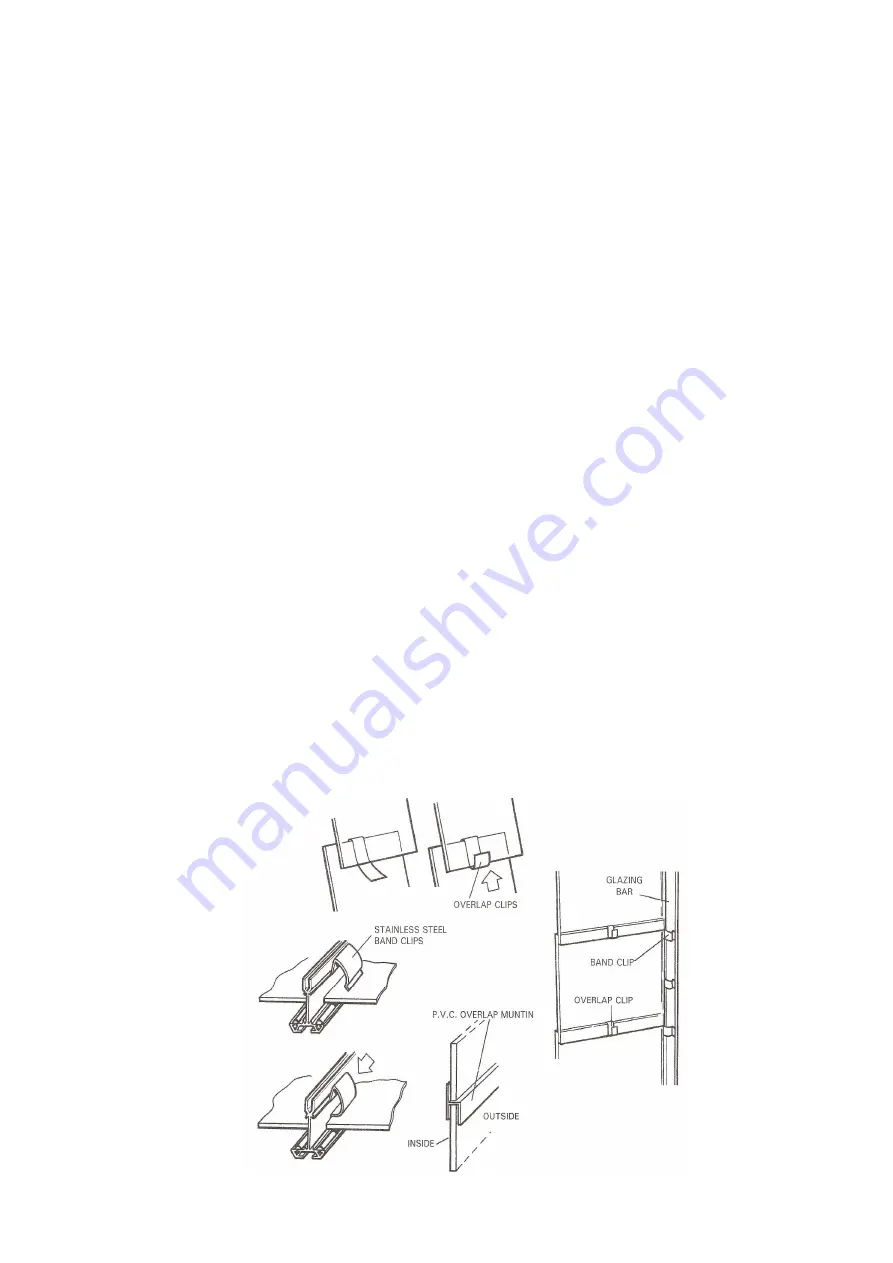
) insert, 2 stainless steel band clips
approx 6” (150mm) from the bottom, and 2 more approx 5/8” (16mm) from the top.
Put one overlap clip on to the top of the pane of glass with the tail outside. Offer the next pane of
glass to the glazing bars resting the glass on to the two upper clips. Exert some pressure onto the
upper pane of glass with one hand and bend the overlap upwards to form a hook with the other
hand. Insert 4 more stainless steel clips as outlined above. Do the same with the next pane of glass
and throughout the rest of the glazing. N.B. the vent slam bar can be adjusted up/down to afford
proper opening and closing and to ensure that the glass panes under the vent fit correctly
Содержание KENSINGTON 10 x 6
Страница 1: ......
Страница 2: ......
Страница 3: ......
Страница 17: ...DOOR FRAME...
Страница 36: ...6 WIDE LT TOUGHENED GLASS PLAN Glass pane for standard door on gable end Louvre on rear end...
Страница 39: ...OPTIONAL EXTRAS RAIN WATER KIT FOR GUTTERING...
Страница 40: ...ELITE 1407...


