background image

4

4-4

Previewing and Manipulating Jobs

T

O


EDIT


A


JOB

1.

Select a processed/held job in the Active Jobs window, and choose Preview from the 
Actions menu.

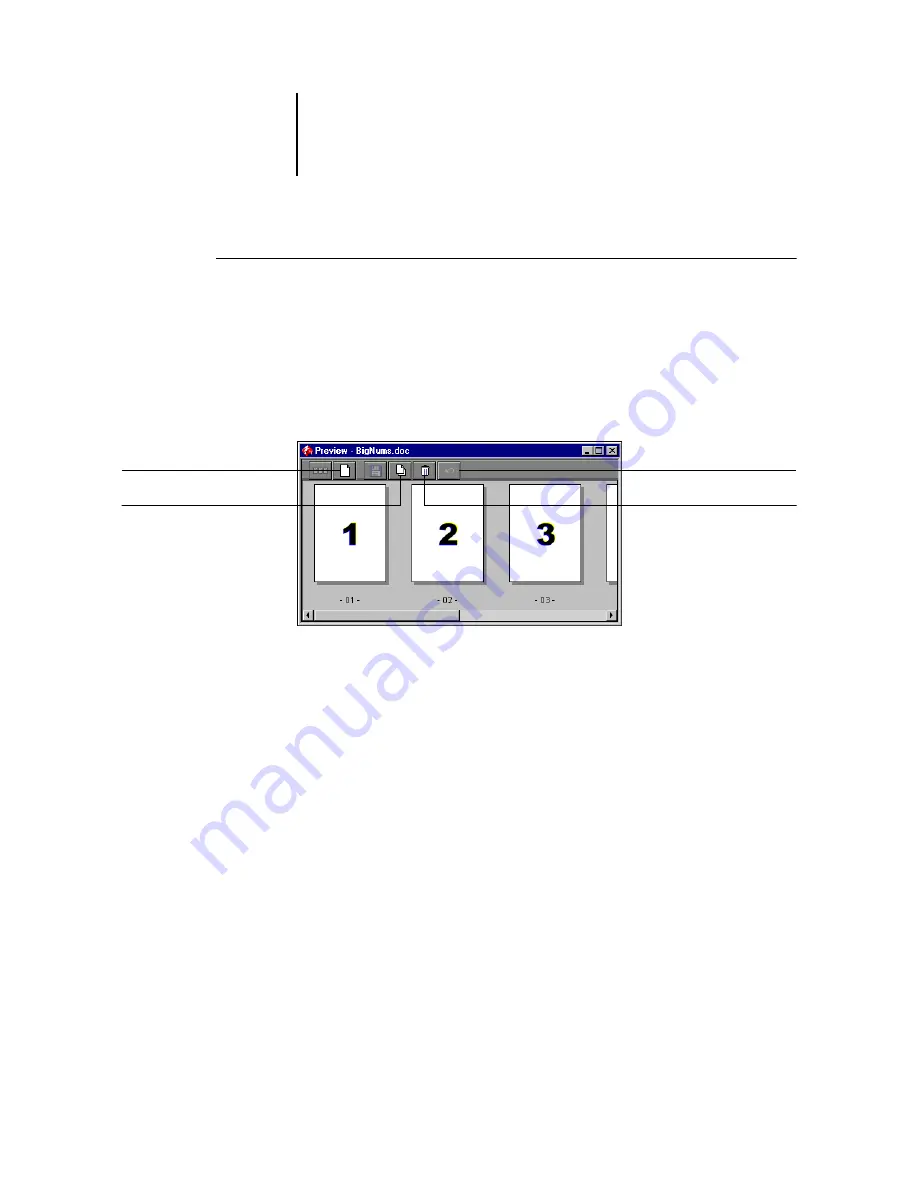
The Preview window opens, displaying thumbnails of the pages in the job. 

2.

Select the pages you want to edit.

Shift-click to select multiple, sequential pages; Ctrl-click to select multiple, 
non-sequential pages.

3.

Apply the desired edits.

To apply edits to the selected pages, click any of the following buttons that appear 
under the title bar of the Preview window:

Full-Screen Preview

—Opens a full-screen preview of the currently selected page 

(see 

page 4-2

). The full-screen Preview window allows you to rotate selected pages.

Duplicate

—Duplicates the currently selected pages. (You can also choose Duplicate 

from the Actions menu.)

Delete

—Deletes the currently selected pages. (You can also choose Delete from the 

Actions menu.)

Undo

—Reverses recently performed edits.

4.

To move pages within the Preview window, click to select the pages, and hold down the 
mouse button as you drag the selected pages to the new location.

Shift-click to select multiple, sequential pages; Ctrl-click to select multiple, 
non-sequential pages. Release the Shift or Ctrl key before moving the pages.

If you move the pages on top of existing pages, the pages are overwritten.

Full-screen preview 

Duplicate 

Delete

Undo

Содержание KM-C1530

Страница 1: ...Fiery X3e JOB MANAGEMENT GUIDE ...

Страница 2: ...d jobs from their computers The Color Guide provides information on managing the color output of the Fiery X3e It explains how to calibrate your copier and take advantage of the Fiery ColorWise color management system as well as features in ColorWise Pro Tools The Fiery Color Reference addresses concepts and issues associated with managing color output of the Fiery X3e and outlines key workflow sc...

Страница 3: ...rks Print Me Everywhere You Go RIPChips Splash Velocity Velocity Balance Velocity Build Velocity Design Velocity Estimate Velocity Scan and VisualCal are trademarks of Electronics For Imaging Inc All other terms and product names may be trademarks or registered trademarks of their respective owners and are hereby acknowledged Legal Notices APPLE COMPUTER INC APPLE MAKES NO WARRANTIES EXPRESS OR IM...

Страница 4: ...ible for procuring the appropriate cables Die Einhaltung zutreffender Bestimmungen hängt davon ab dass geschirmte Ausführungen benützt werden Für die Beschaffung richtiger Ausführungen ist der Betreiber verantwortlich Software License Agreement YOU SHOULD CAREFULLY READ THE FOLLOWING TERMS AND CONDITIONS BEFORE USING THIS SOFTWARE IF YOU DO NOT AGREE TO THE TERMS AND CONDITIONS OF THIS AGREEMENT D...

Страница 5: ...REEMENT OR COMMUNICATION WITH YOU AND EFI SPECIFICALLY DISCLAIMS ANY IMPLIED WARRANTY OR CONDITION OF MERCHANTABILITY OR FITNESS FOR A PARTICULAR PURPOSE OR NONINFRINGEMENT OF THIRD PARTY RIGHTS Limitation of Liability TO THE MAXIMUM EXTENT PERMITTED BY LAW EFI AND ITS SUPPLIERS SHALL NOT BE LIABLE FOR ANY DAMAGES INCLUDING LOSS OF DATA LOST PROFITS COST OF COVER OR OTHER SPECIAL INCIDENTAL CONSEQ...

Страница 6: ......

Страница 7: ...1 2 Spooling processing and printing 1 3 Visualizing job flow 1 4 Communicating with users 1 5 What the operator should check 1 7 Overview of the job management utilities 1 8 Command WorkStation 1 8 Fiery WebSpooler and Fiery Spooler 1 9 Chapter 2 Introduction to Command WorkStation The Command WorkStation interface 2 1 Active Jobs window 2 3 Jobs window 2 4 Activity monitor 2 6 Job status indicat...

Страница 8: ... pages 2 21 Setting preferences 2 22 Managing Fiery X3e fonts 2 24 Chapter 3 Using Command WorkStation Starting up and logging in 3 1 Logging in to the Fiery X3e 3 1 Access levels 3 4 Logging out 3 5 Removing the Fiery X3e from the Login Server dialog box 3 5 Monitoring jobs 3 5 Selecting jobs 3 6 Sorting job displays 3 6 Customizing job ticket information 3 7 Managing job flow 3 8 Importing jobs ...

Страница 9: ... Previewing and Manipulating Jobs Previewing jobs 4 1 Displaying thumbnail previews 4 1 Displaying full screen previews 4 2 Editing and merging jobs 4 3 Editing jobs 4 3 Merging jobs 4 5 Chapter 5 Using DocBuilder Pro Previewing and merging jobs 5 1 Imposition window 5 2 Job previews 5 4 Navigating in the Imposition window 5 6 Switching between page view and layout view 5 7 Setting magnification l...

Страница 10: ...licating and deleting sheets 6 20 Rotating pages 6 22 Setting gutter sizes 6 23 Managing templates 6 24 Tips for using the Imposition feature of DocBuilder Pro 6 25 Page level operations 6 25 Saving imposed jobs 6 26 Chapter 7 Fiery WebSpooler and Fiery Spooler Tracking and managing jobs with Fiery WebSpooler 7 1 About the Fiery WebSpooler window 7 3 Manipulating job options and job flow 7 5 Overr...

Страница 11: ...ler 7 20 Connecting to a different Fiery X3e from Fiery Spooler 7 21 Appendix A Basics of Imposition Printing books with the Imposition feature of DocBuilder Pro A 1 Basics of imposition layout A 1 Printer s marks A 4 Additional sheets A 6 Binding methods A 6 Gang Up printing A 9 Appendix B Templates 1 Up Full Bleed B 1 2 Up Perfect B 2 2 Up Saddle B 4 3 Up Trifold Brochure B 6 4 Up Gate Fold B 8 ...

Страница 12: ...ooting C 4 Command WorkStation does not respond C 4 Command WorkStation fails to connect to a Fiery X3e C 5 Unexpected printing results C 6 Clearing the server C 7 Users are unable to connect to the Fiery X3e C 7 Setup error messages C 9 AutoCal error messages C 9 Index ...

Страница 13: ...b workflows that commonly occur on the Fiery X3e Chapter 2 introduces the Command WorkStation user interface It also provides information on basic Command WorkStation functions such as printing Fiery X3e information pages setting preferences and managing Fiery X3e fonts Chapter 3 provides instructions on how to monitor and manage job flow using Command WorkStation It explains how to hold process p...

Страница 14: ... introduced However the following general terms are used throughout PostScript PS A computer language designed as a page description language The Fiery X3e uses this language for imaging the page and communicating with applications and the copier The term PostScript can also be used to refer to PDF data jobs PDF is a structured form of PostScript that provides the ability to preview scale and reor...

Страница 15: ...a noun a raster image processor RIP is the computer processor that performs this function The Fiery X3e RIP changes text and graphics commands in PostScript or PCL into specifications for each dot of toner deposited on a page by the copier Process The term process is used interchangeably with the term RIP in this manual to refer to raster image processing Print The task of rendering or imaging a p...

Страница 16: ......

Страница 17: ...ironment controls the entire job flow and all printing Print jobs arriving from remote users are spooled to the Fiery X3e hard disk and stored until the operator decides it is time to print them Additional functions job overrides prioritizing and font management are reserved for the operator At the other extreme anyone on the local network can control all printing and Fiery X3e functions operator ...

Страница 18: ...in preparation for job management by the operator Establish communication between users and the operator The operator and remote users must agree on a method for communicating print needs such as Fiery FreeForm masters Users can attach instructions to jobs using print option and notes fields see page 1 5 Understanding job flow In an operator controlled printing environment remote users send jobs t...

Страница 19: ...image data associated with each dot is rendered on the printer The raster data tells the printer whether or not to apply toner to each position on the page Printing After processing the job typically moves on to the printing stage During this stage the raster image associated with the job is transferred from the Fiery X3e to the copier at a high speed The raster image is then rendered onto paper a...

Страница 20: ... status flags you may see in the Command WorkStation Active Jobs window Boldface items represent commands you can issue from Command WorkStation Fiery WebSpooler or Fiery Spooler to release held jobs Printed Spooling Spooled Held Processing RIPping PostScript and PCL data Process RIP and Hold Processed Held Print and Hold Processing RIPping Print Print Printing Printing Printing Processing RIPping...

Страница 21: ...iate printing you must issue the Print command A raster copy of the original job remains in processed held status even after the original job has finished printing Communicating with users As the operator the job management tools allow you to communicate with the users who originate print jobs You can help the users become better informed about the Fiery X3e and the copier so that they can choose ...

Страница 22: ...the Fiery X3e before deletion Instructions for setting up the printer on client computers Sources of PostScript printer drivers PPDs color reference files and additional information Recommended PPD settings Conflicting settings and common PostScript errors FreeForm information regarding use of master and variable data Imposition information regarding use of the DocBuilder Pro option Characteristic...

Страница 23: ...hey send Job ticket information You can view and potentially override the print options specified by users by checking job ticket information To display user defined print options choose Properties in Command WorkStation see page 3 11 or Override Print Settings in Fiery WebSpooler or Fiery Spooler see page 7 7 Notes fields Users can enter accounting information in Notes fields such as User name an...

Страница 24: ...following job management features Monitoring activity on the Fiery X3e and controlling job flow Viewing and overriding user defined print option settings Editing and merging job files Tracking job activity through the Job Log Command WorkStation The most powerful of the job management utilities Command WorkStation must be installed on a Windows computer that has a network connection to the Fiery X...

Страница 25: ...he Fiery X3e Fiery Spooler must be installed on a networked Mac OS computer and can only be used on that computer Both Fiery WebSpooler and Fiery Spooler offer job management functions similar to those of Command WorkStation The default Fiery WebSpooler user interface appears in the following illustration the user interface of Fiery Spooler is similar For information on using Fiery WebSpooler or F...

Страница 26: ......

Страница 27: ...ive Jobs window jobs in the Hold queue and can send more jobs from a nearby computer The chapter also describes the Setup functions of Command WorkStation such as printing Fiery X3e information pages setting application preferences correcting tray alignment and managing Fiery X3e fonts The Command WorkStation interface Command WorkStation provides a graphical means to monitor preview and manage pr...

Страница 28: ...and WorkStation window The following sections describe each component in the Command WorkStation window 1 Menu bar see page 2 13 2 Job status indicators see page 2 9 3 Action buttons see page 2 10 4 Active Jobs window see page 2 3 5 Jobs window see page 2 4 6 Activity monitor see page 2 6 1 2 3 4 6 5 ...

Страница 29: ...hide or drag it to a different location By issuing job management commands you release held jobs in the window for processing and printing cancel jobs currently processing or printing and send jobs back to held status for future action For more information on the status flags displayed in the Active Jobs window see Job status indicators on page 2 9 In the Active Jobs window you can Monitor and man...

Страница 30: ...obs displayed All panels of the Jobs window allow you to customize the job ticket information see page 3 7 and monitor jobs on multiple Fiery X3e servers see page 2 10 Printed Jobs panel The Printed Jobs panel lists all jobs that have completed printing from selected Fiery X3e servers Newly printed jobs are added to the top of the list The Printed Jobs panel lists all printed jobs until the job li...

Страница 31: ...on on using the Archive panel see Archiving jobs on page 3 19 FreeForm panel The FreeForm panel lists the names of all master files used for Fiery FreeForm variable data printing Jobs listed in the FreeForm panel represent preRIPped master files stored on the Fiery X3e NOTE The FreeForm panel is not available if you logged in as Guest ...

Страница 32: ...e servers or a selected Fiery X3e The activity shown can include jobs released for spooling processing RIPping or printing Held jobs do not appear in the Activity monitor Display the Activity monitor by selecting All Servers from the server selection menu in the Active Jobs window The title bar of the Activity monitor indicates the name of the Fiery X3e being monitored You can use the Fiery X3e se...

Страница 33: ... to a corresponding status box spooling processing or printing If the Fiery X3e is connected to more than one copier the copier handling the job is listed under the job name When no activity occurs on the Fiery X3e the status boxes read Idle Error conditions When an error occurs the Server Name bar for the affected Fiery X3e appears highlighted in red Details of the error appear under the expanded...

Страница 34: ...ery X3e disk Processing Displays the file name of the job currently being processed RIPped along with an animated preview of the page currently being processed Printing Displays the file name of the job currently being printed and the page number currently printing With multiple copies the copy number is also displayed General Info Displays the total and available hard disk space and the total and...

Страница 35: ...ery X3e hard disk spooled held light yellow The job has been downloaded to the Fiery X3e hard disk and requires job management instructions from the operator waiting to process light blue The job is queued to be processed RIPped processing medium blue The job is currently being processed RIPped processed held dark yellow The job has been processed RIPped and requires job management instructions fr...

Страница 36: ...w thumbnail previews of selected jobs You can also use the Preview windows to reorder and delete pages of a job and to merge pages from several jobs into a single merged job Monitoring single or multiple Fiery X3e servers You can set the Active Jobs window Jobs window and Activity monitor to display job information for a single Fiery X3e or all connected Fiery X3e servers TO SPECIFY THE FIERY X3E ...

Страница 37: ...to show a specific combination and arrangement of components TO SELECT A LAYOUT STYLE Choose Layouts from the Window menu and then choose a layout style from the submenu that appears You can choose from three preset layouts Default Style 1 or Style 2 and three custom layouts For a description of the components included with each of the preset layouts see page 2 17 You can define and change the con...

Страница 38: ...appear with standard window frames You can drag the blank title bar of the window to move the component or drag the edges of the window to resize the component You can also click the window Close box to hide the component NOTE When the Jobs window is docked you can resize it vertically by clicking and dragging its top edge TO DOCK OR UNDOCK A COMPONENT Double click the window grip in the component...

Страница 39: ...the command turning it off The menu bar always appears in the Command WorkStation window and cannot be dragged to a different location Menu Command Submenu command Description File Import Job Imports a job file into the Direct Hold or Print queue of the Fiery X3e selected in the Active Jobs window Archived Job Imports an archived job file into the Hold queue of the Fiery X3e selected in the Active...

Страница 40: ...job with either the spooled held flag or the processed held flag Process and Hold Processes the selected job in the Active Jobs window Printed Jobs panel or Archive panel and holds a copy of the job The copied job is marked with the processed held flag Print and Hold Prints the selected job in the Active Jobs window Printed Jobs panel or Archive panel and holds a copy of the job The copied job is ...

Страница 41: ...hive panel Send To Sends the selected held job in the Active Jobs window to another Fiery X3e Cancel Processing Cancels processing of the selected job in the Active Jobs window This command is available only for jobs displaying the processing status flag Cancel Printing Cancels printing of the selected job in the Active Jobs window This command is available only for jobs displaying the printing st...

Страница 42: ...dministrator NOTE After you restart the Fiery X3e you may need to log in to the Fiery X3e again to reestablish the connection Reboot Server Allows you to restart the Fiery X3e currently selected in the Active Jobs window after shutting down the Fiery X3e hard disk This command is available only if you are logged in as Administrator NOTE After you restart the Fiery X3e you may need to log in to the...

Страница 43: ...up print groups and passwords For more information about Printing Groups and Secured Print Member Printing see the Configuration Guide Window Layouts Default Displays the following Command WorkStation components Menu bar Job Status Helper Action buttons Active Jobs window Jobs window Activity monitor selected server view Style 1 Displays the following Command WorkStation components Menu bar Job st...

Страница 44: ...ed Jobs window is displayed Activity Monitor Switches the Activity monitor on or off A check mark next to the command indicates the Activity Monitor is displayed Action Buttons Switches the Action buttons on or off A check mark next to the command indicates the buttons are displayed Job Status Helper Switches the Job status indicators on or off A check mark next to the command indicates the helper...

Страница 45: ...lected job When multiple jobs are selected you can right click any of the selected jobs 3 Choose the desired command from the context sensitive menu Preparing to work with Command WorkStation This section describes the setup and administrative tasks before you begin working with Command WorkStation Connecting to the Fiery X3e You can maintain connections to multiple Fiery X3e servers simultaneousl...

Страница 46: ...e list of Fiery X3e servers you frequently monitor Each row in the Login Server dialog box displays the name of an Fiery X3e the name of the copier associated with that Fiery X3e and a Login button represented by a key icon 3 Click the Login button next to the Fiery X3e name to establish the connection 4 Click the Administrator Operator or Guest button 5 Enter your password and click Log In Key ic...

Страница 47: ...bs window select the Fiery X3e for which you want to print information pages NOTE To print information pages you must be logged in to the Fiery X3e as Administrator 2 Choose Print Pages from the Server menu A dialog box containing the information page options appears 3 In the Select Printer area specify where you want to print the pages Server The pages you specify are printed to the Fiery X3e Loc...

Страница 48: ...work addresses of the Fiery X3e Job Log Lists a log of the last 55 jobs processed or printed For information on the fields in the Job Log and printing it in other forms see Using the Job Log on page 3 21 Control Panel Map Provides an overview of the screens you can access from the Control Panel For information on using these screens to set up the Fiery X3e see the Configuration Guide Color Charts ...

Страница 49: ...and WorkStation to remember the last access level and password used to log in to each Fiery X3e When you log in to the Fiery X3e again Command WorkStation automatically populates the Login dialog box with the previous access level and password Temporary path Specifies the folder where Command WorkStation temporarily stores copies of the jobs you edit or change Change the temporary path by clicking...

Страница 50: ...ou must be logged in to the Fiery X3e with Administrator privileges Downloading fonts either from Command WorkStation or with Fiery Downloader requires that the Direct connection be published in Setup see the Configuration Guide NOTE You cannot download TrueType fonts If you use TrueType fonts in Windows you can print them by converting them to Adobe Type 1 fonts To convert TrueType fonts with the...

Страница 51: ...To select multiple sequential fonts select the first font and Shift click the last font Ctrl click to select multiple non sequential fonts NOTE The printer fonts included with the Fiery X3e built in fonts are locked These fonts appear with a lock icon next to the name and cannot be deleted 5 To refresh the font list click Update 6 To print the font list click Print Click to update the font list di...

Страница 52: ...nt s to download The File name field displays the name of the selected file 3 Select the font name and click Add You can navigate to different drives and folders to select fonts to download To select multiple sequential fonts select the first font and Shift click the last font Ctrl click to select multiple non sequential fonts To remove a font from the Files to be imported list select the font nam...

Страница 53: ...ion and log in to one or more Fiery X3e servers TO START COMMAND WORKSTATION Click Start on the Windows taskbar choose Programs Fiery and then choose Command WorkStation 4 When you start Command WorkStation for the first time the Login Server list does not display any Fiery X3e servers For instructions on configuring and adding Fiery X3e servers to the Login Server list see the User Software Insta...

Страница 54: ...ry X3e must appear in Login Server list before you can log in to it A white key icon indicates the Fiery X3e has never been connected to Command WorkStation If the Fiery X3e is already connected the color of the key icon indicates the level of access granted Purple indicates Administrator access Orange indicates Operator access Cyan indicates Guest access The Login dialog box appears Key icon ...

Страница 55: ...quired enter a password Your log in access level determines which Command WorkStation functions are available to you 4 Click Log In to establish a connection to the Fiery X3e This manual assumes you are logged into the Fiery X3e as an Operator The following section discusses the three different access levels in greater detail ...

Страница 56: ... use all Command WorkStation functions Until an Administrator password is defined in Fiery X3e Setup you can log in to Command WorkStation as an Administrator without entering a password and you are given full privileges After the administrator has performed Setup and specified passwords Command WorkStation user options depend on your login level This manual assumes that you are logged in to the F...

Страница 57: ...MOVE THE FIERY X3E FROM THE LOGIN SERVER DIALOG BOX 1 From the Server menu select Log in Log out 2 Select the Fiery X3e in the Login Server dialog box 3 Click the Trash can icon to remove the Fiery X3e from the list The Trash can is available only for disconnected Fiery X3e servers Monitoring jobs The Active Jobs window and the Printed Jobs panel of the Jobs window provide a visual way of monitori...

Страница 58: ...anel The Printed Jobs panel displays jobs that have printed successfully along with failed jobs that have dropped from the print queue as a result of an error A failed job appears highlighted in red you can double click the job to display a more detailed error report Selecting jobs Selecting a job allows you to apply job management commands from the Actions menu to it You can also select multiple ...

Страница 59: ...t information according to your workflow needs For example if you are monitoring multiple servers you can add Fiery and Device columns to track the Fiery X3e location of individual jobs The information in the Date Time column is based on the date and time settings of the Regional Settings control panel You can access the Regional Settings control panel from the Start Settings Control Panel menu in...

Страница 60: ...ed network or jobs previously archived to external devices For information on archiving jobs see page 3 19 TO IMPORT A JOB 1 Choose Import from the File menu and then choose Job or Archived Job The Select Files to Import dialog box appears 2 Locate and select the job file to import and click Add The job appears in the Files to be imported list To import multiple jobs select each additional job and...

Страница 61: ...n the Active Jobs window or Printed Jobs panel 4 Click Import Using job management commands As the operator you can issue the following job management commands from the Actions menu to release or hold selected jobs in the Active Jobs window and Printed Jobs panel Print Process and Hold Print and Hold Remove Raster Data Hold ...

Страница 62: ... Jobs window or the selected job in the Printed Jobs or Archive panel and marks the job with either the spooled held flag or the processed held flag Held on the Fiery X3e hard disk indefinitely if raster data is included with job Process and Hold Processes the selected job in the Active Jobs window Printed Jobs panel or Archive panel and holds a copy of the job The copied job is marked with the pr...

Страница 63: ...s you can override settings for each job or all the jobs at once Use the Job Properties dialog box to view the user Notes and Instructions fields included with jobs TO VIEW AND OVERRIDE PRINT SETTINGS 1 To view and override print settings for a single held job select the job in the Active Jobs window or Printed Jobs panel You can also select a job in the Archive or FreeForm panel to view print set...

Страница 64: ... intended to be viewed and annotated by the operator but their contents are associated with the job and are deleted when the job is deleted after printing Notes fields can be viewed but not changed by the operator their contents are transcribed to the Job Log just as the user sent them NOTE Some print options available in the printer driver are not displayed in the Job Properties dialog box For in...

Страница 65: ...e setting from the list NOTE To retain a copy of the job with its original settings duplicate the job and rename the duplicate before you change any settings NOTE For some options changing the setting requires that the job be reRIPped these options appear with an icon to the left of the option name 4 To print the current list of print settings on a local printer click Print Window 5 To apply the p...

Страница 66: ...tivity monitor For more information see Monitoring single or multiple Fiery X3e servers on page 2 10 With servers that support the feature you can use the Send to command to transfer jobs between servers For example by viewing print jobs on all connected servers in the Active Jobs window you can monitor the print load on each Fiery X3e in your printing environment If one Fiery X3e has received a d...

Страница 67: ...select the job and choose Cancel Printing from the Actions menu When the print job is canceled a Canceling message appears on the Fiery X3e Control Panel The name of the canceled job appears in the Job Log NOTE Canceled jobs may be partially printed and may include pages with one or more missing color planes or pages that are completely blank Canceling a job at the Control Panel From the Fiery X3e...

Страница 68: ...ster print settings To make use of all 100 available FreeForm Masters the operator must override the Create Master and Use Master print settings from Command WorkStation NOTE For any new Create Master or Use Master setting to take effect the job must be reRIPped For background information on using the Fiery FreeForm feature see the Printing Guide Creating and monitoring FreeForm masters Users can ...

Страница 69: ...oose the FreeForm master number you want to assign to the job 5 Click OK 6 Choose Process and Hold from the Actions menu to assign the job a destination Choose Print or Print and Hold from the Actions menu for a hard copy of the FreeForm master After processing the master job appears in the FreeForm panel of the Jobs window TO DELETE A FREEFORM MASTER 1 In the FreeForm panel select the master job ...

Страница 70: ...om the Actions menu 2 Scroll to FreeForm in the Job Properties dialog box and right click the Use Master print setting 3 Choose the FreeForm master job to use as the master document 4 Click OK 5 Choose Process and Hold Print or Print and Hold from the Actions menu to assign the job a destination Particularly with a variable data job Process and Hold the job so you can preview it before printing ...

Страница 71: ... to assign before printing For all jobs sent to the Fiery X3e users should specify information such as the desired FreeForm master number to the operator using the Notes and Instructions fields in the Printer Job Notes dialog box NOTE When specifying additional print settings for FreeForm jobs certain print option settings must match for both the master and the variable job Also certain settings i...

Страница 72: ... select any held job 2 Choose Archive from the Actions menu 3 To archive the job internally to the Fiery X3e hard disk click OK The job is archived internally and appears in the Archive panel of the Jobs window 4 To archive the job externally to the Command WorkStation hard disk or to a device on the network click Add Click to add a device ...

Страница 73: ...ve rasters The Archive rasters option appears dimmed for PostScript data jobs and jobs archived to Server Internal NOTE Large raster data files may take considerable time to archive 7 Select an archive volume and click OK Archived jobs appear in the Archive panel of the Jobs window Using the Job Log The Job Log panel of the Jobs window displays a list of all the jobs processed or printed since the...

Страница 74: ...r the Job Log automatically every 55 jobs The administrator can also choose the Job Log page size For more information see the Configuration Guide NOTE If a job was saved from the Imposition window of DocBuilder Pro with a new name and then printed it appears in the Job Log with the name of the original job not the new name TO PRINT THE JOB LOG ON A LOCAL PRINTER 1 Choose Print from the File menu ...

Страница 75: ...job file names or dates of creation You can limit your search to jobs on a single Fiery X3e or all connected Fiery X3e servers Use the Find command to search for jobs that appear in the Active Jobs window and in the Printed Jobs Archive FreeForm and Job Log panels of the Jobs window You can perform advanced searches based on the file sizes and specific print options associated with jobs You can sa...

Страница 76: ...earch to jobs created on a certain date or range of dates select Range Use the From and To menus to specify start and end dates 5 Click Search to find the jobs that meet the specified search criteria The Search Results dialog box lists found jobs You can customize the appearance of this window in the same manner as the Active Jobs and Jobs windows For example you can display jobs on all connected ...

Страница 77: ... options Command WorkStation searches for jobs that include all the selected options For example if you specify a stapling and a punching option for your search Command WorkStation only finds jobs that have both stapling and punching specified To clear all fields in the Find dialog box at any time click New Search 5 Click Search to find the jobs that meet the specified search criteria The Search R...

Страница 78: ... REUSE A FIND TEMPLATE 1 In the Find dialog box choose the desired template from the Queries menu The dialog box is automatically populated by the search parameters associated with the template 2 Click Search to begin searching for jobs ...

Страница 79: ...o option allows you to use additional preview and edit features For more information see page 5 1 Previewing jobs Use the Preview windows to preview pages of any processed or held job in the Active Jobs window Displaying thumbnail previews When you select a processed held job and choose Preview from the Actions menu a preview window opens displaying thumbnail images of the selected job TO VIEW THU...

Страница 80: ...ttom of the Preview window to scroll through the pages in the job Displaying full screen previews You can open any page in the Preview window as a full screen image for a more detailed inspection TO VIEW A FULL SCREEN PREVIEW OF A JOB 1 Select a page in the Preview window and click the Full Screen Preview icon Scroll bar Click for full screen preview ...

Страница 81: ...ns in the full screen preview to display adjacent pages rotate the page or return to the small preview 2 Click the Close button to close the full screen preview Editing and merging jobs Use the Preview windows to reorder the pages of a processed held job and merge pages from several jobs into a single job Editing jobs Use the Preview windows to edit any processed held job from the Active Jobs wind...

Страница 82: ...the currently selected page see page 4 2 The full screen Preview window allows you to rotate selected pages Duplicate Duplicates the currently selected pages You can also choose Duplicate from the Actions menu Delete Deletes the currently selected pages You can also choose Delete from the Actions menu Undo Reverses recently performed edits 4 To move pages within the Preview window click to select ...

Страница 83: ... page layout application with text pages created in a word processing application Or you can customize a slide presentation by inserting slides from a different presentation To merge pages from two different jobs both jobs must reside on the same Fiery X3e NOTE Before merging processed held jobs make sure the jobs have been processed using the print option settings for the final output Replace sin...

Страница 84: ... in the Active Jobs window and choose Preview from the Actions menu 2 Select another job and choose Preview from the Actions menu The job is displayed in another Preview window NOTE To merge pages both jobs must reside on the same Fiery X3e Source document preview Destination document preview ...

Страница 85: ...en pages before the first page or after the last page in the first Preview window Moving the selection over an existing page replaces the existing page with the one you are moving Moving the selection to the left or right of a page places the selection in that location and renumbers the pages The cursor changes to reflect the activity Multiple levels of undo are available use the Undo button to un...

Страница 86: ...ew source job 5 When you have finished merging pages click Save The Save As dialog box appears 6 Enter a new name for the merged job and click Yes NOTE When multiple users are connected to the Fiery X3e via Command WorkStation Fiery WebSpooler or Fiery Spooler only one user should make changes at a time If multiple users make changes in the same job simultaneously unexpected results might occur ...

Страница 87: ... windows of Command WorkStation to preview edit and merge PostScript and PDF jobs that have been spooled and held You can apply all of the features discussed in Chapter 4 to spooled held jobs and processed held jobs alike NOTE Detailed descriptions of the DocBuilder Pro enhancements to the Preview windows follow When applicable page number references to sections in other chapters are provided Prev...

Страница 88: ...ooled held or processed held Inserting blank pages You can insert blank pages into a spooled held PostScript or PDF job First open the job in a Preview window Right click a page thumbnail and choose Blank Page from the menu A blank page is inserted after the currently selected page Imposition window NOTE The imposition feature is not supported for PCL jobs From the Imposition window you can impose...

Страница 89: ... installed the DocBuilder Pro option you must install a dongle on your workstation If the dongle is not attached an error message appears For more information contact your authorized service support technician To impose a processed held job select the job in the Active Jobs window and choose Remove Raster Data from the Actions menu to put the job in a spooled held status Then select Impose from th...

Страница 90: ...indow displays the job No layout is applied unless the job has been previously imposed Templates for common layouts are provided and can be invoked from the Imposition window as described in Using templates on page 5 10 Job previews The Imposition window provides a preview of a job s pages allowing you to manipulate the source PDF ...

Страница 91: ...der they are intended to be read Note that the Preview windows in Command WorkStation image jobs as reader s spreads The paper used to print a printer s spread is known as a sheet In duplex printing each sheet has two imageable surfaces one on the front side and one on the back side of the sheet Each imageable surface contains one printer s spread Reader s spread Printer s spread ...

Страница 92: ... Pan tool Preview mode Layout mode Mixed Page mode and Fixed Page mode buttons are located in the upper right corner of the window Selecting the Pan or Zoom tool changes the appearance of the cursor to indicate you can use that tool to manipulate the preview When you choose Preview or Layout mode or Mixed Page mode or Fixed Page mode a blue border appears around the selected view and the appearanc...

Страница 93: ...y display different sets of printer s marks for more information see the following table NOTE Preview mode puts more stress on your system s processor than Layout mode You can improve performance on slower systems by doing most of your work in Layout mode switching to Preview mode only when you need to see content In Layout mode you can rotate individual pages on the sheet For more information see...

Страница 94: ...osition the magnifying glass cursor over a page and click to zoom in The magnifying glass cursor displays a plus sign to indicate increased magnification of page views Each time you click the current magnification doubles up to a maximum of 800 3 Hold the Ctrl key and click to zoom out Each time you click the current magnification is reduced in half down to a minimum of 12 4 Right click the Zoom t...

Страница 95: ...rge sheet you can use this tool to drag a particular portion of the sheet into view At the bottom of the window you can manipulate the content view using a standard scroll bar or the Surface menu The Surface menu opens the Go To Surface dialog box which allows you to specify numerically the surface to display in the preview area TO USE THE PAN TOOL 1 Click the Pan tool to select it The cursor chan...

Страница 96: ...ting You can apply any template to any job making it easy to apply layout and printing settings quickly and efficiently DocBuilder Pro supplies built in templates that define settings for commonly used layouts such as 2 Up Saddle 3 Up Trifold Brochure 4 Up Gatefold and so on You can also create your own templates For a complete listing of built in templates see Appendix B For information on creati...

Страница 97: ...n the Save As dialog box the name of the original spooled source file appears with a new extension dbp If you mistakenly close the Imposition window when you intend to keep working click Cancel in the Save As dialog box The original PostScript or PDF file remains intact even after the converted file has been edited and saved in the Imposition window NOTE When you rename an imposed file you must in...

Страница 98: ......

Страница 99: ...ed Page mode allows you to impose documents that contain pages of different sizes When you open the Imposition window for a document that contains different page sizes Mixed Page mode is selected automatically you cannot switch to Fixed Page mode When you open the Imposition window for a document that contains a single page size you can select either Mixed Page or Fixed Page mode Some imposition s...

Страница 100: ...n settings are applied to the current job immediately but are not saved permanently until you save the job itself Layout Rows Columns Yes Yes Printer s Marks Yes Yes Printer s Marks Pull into Page Edge No Yes Bleeds Yes No Scale Apply To Not editable always set to All Slots on All Surfaces Editable Scale Mode Available options Scale to Fit Custom Available options Scale to Fit Custom Fit Width Fit...

Страница 101: ...ox You can also specify any unit of measurement in any field that accepts input by adding one of the following abbreviations to the new value i in or the inch symbol specifies inches for example 8 5 i 8 5 in 8 5 mm specifies millimeters for example 8 5 mm pt or pts specifies points for example 8 5 pts Sheet settings Sheet settings allow you to specify characteristics of the paper on which the job ...

Страница 102: ...rences dialog box When specifying a sheet size setting consider the size of the final output During imposition DocBuilder Pro automatically scales pages if needed to fit the sheet s maximum imageable area The area does not necessarily extend to the edges of the sheet For example if you perform 1 Up imposition of 8 5x11 pages onto 8 5x11 sheets the final pages will be scaled smaller than 8 5x11 To ...

Страница 103: ...the job is printed as duplex using a Top Top setting meaning that the tops of pages on opposing sides of a sheet are located on the same edge usually the preferred choice for imposed book layouts Layout settings A layout is a plan that specifies the number ordering and rotation of page images on the sheet DocBuilder Pro supports layouts of up to 25 pages per sheet in a matrix of up to 5 rows by 5 ...

Страница 104: ...e prompted with a message that all custom page edits Add Delete or Duplicate applied to the job are canceled Columns Click the Columns up and down arrows to specify the number of columns up to five in a layout or specify the number of columns in the layout by typing a value in the Columns field Changes to the Columns value are reflected immediately in the main window whether you are in Layout or P...

Страница 105: ...ies according to the job DocBuilder Pro allows you to define the set of printer s marks displayed For example ganged up business cards do not require fold marks while a 4x4 book layout does To specify which marks are shown click Define and choose options in the Define Marks dialog box The Define Marks dialog box allows you to enable or disable trim marks fold marks and the individual elements of t...

Страница 106: ... the trim lines on the page This allows you to move the printer s marks away from the final trimmed area of the page A positive offset moves the printer s marks out from the center of the page and a negative offset moves the printer s marks closer to the center of the page Properties Click Properties to customize the appearance of trim marks and fold marks You can specify the horizontal and vertic...

Страница 107: ...ess the Ctrl key and click the mark directly in the imposition window Disabled marks are indicated by an X Bleeds The Bleeds option moves the trim marks into the image by the amount you specify to ensure that the printed area extends beyond the edge of the trimmed sheet Ctrl click to disable enable mark Non imageable area Trim marks Image ...

Страница 108: ...NOTE When you specify a bleed you move the trim marks into the page by the bleed value on both the top and the bottom of the page and on both sides of the page Therefore you reduce the size of your finished page by twice the bleed amount If you plan on using bleeds design your image to be slightly larger than the size of the final trimmed page and select a larger paper size to accommodate trimming...

Страница 109: ...same column as the currently selected page All Slots on All Surfaces Applies scaling to all pages in the job Scale Mode Choose a scaling option from the Scale Mode menu Scale to Fit Scales page s to best fill the slot without printing past its edge Scale to fit is the default mode Fit Width Scales page s to fill the width of each page slot on the sheet This option is not available in Fixed Page mo...

Страница 110: ...ew mode the Clipping icon appears to the left of the Scale Factor field In addition the appearance of the page preview itself makes scaling problems obvious content truncates at the edge of the preview sheet just as it would on a printed sheet Alignment and Offsets The Alignment and Offsets settings are enabled when you choose Fit Height Fit Width or Custom from the Scale Mode menu in Mixed Page m...

Страница 111: ...n align the page to the top left corner of the slot by clicking the Alignment control corresponding to that position You can fine tune the placement further by entering values from 5184 to 5184 points in the Offsets fields Offset values are calculated in reference to the alignment position and reset to zero when you specify a new alignment Click to specify upper left alignment Page is aligned in s...

Страница 112: ...nd the size of the job NOTE If you are using a layout with more than two columns or rows the Binding selection is unavailable You can specify the following binding edge options Left Edge Specifies binding across the left edge of the booklet The booklet reads from left to right Right Edge Specifies binding across the right edge of the booklet The booklet reads from right to left You can specify any...

Страница 113: ...type and the ordering and orientation of pages specified by the current layout Gang Up To enable gang printing and disable binding settings select Gang Up In gang printing you place multiple pages on a sheet for collate and cut finishing rather than having DocBuilder Pro impose them in the order required by a particular binding method A collate and cut layout reorders pages in a manner that causes...

Страница 114: ...ide of the second sheet is filled with images of page three and the back side is filled with images of page four and so on until all pages in the job are imaged Documents laid out in this order may tend to be collated more easily than when printed in another order The Repeat option enables what is commonly known as step and repeat printing Step and repeat is most often used when printing multiple ...

Страница 115: ...laces pages in an arrangement that is often more appropriate for printing a single copy of a job This option does not fully collate itself hand collating is necessary but optimizes the sheet size while limiting the run to a single copy ...

Страница 116: ...d and cut This option minimizes the need for collating by hand and is most appropriate for printing single copies of a document 2 3 4 5 6 7 8 9 10 11 12 1 4 7 10 1 2 5 8 11 3 6 9 12 3 6 9 12 2 5 8 11 4 7 10 1 3 6 9 2 1 5 4 8 7 12 11 10 12 11 10 9 8 7 6 5 4 3 2 1 12 page document 2 x 2 Unique Collate Cut Duplex off Collate sheets Sheet 1 Sheet 2 Sheet 3 Cut Collate pages ...

Страница 117: ...ose a job its pages are automatically arranged in a particular order according to the layout you select Each page number in Layout mode represents the page from the source document that DocBuilder Pro images in a designated position on the finished sheet However to reorder individual pages manually arrange them in the main window To assign a different page to a particular location in the layout us...

Страница 118: ... a page number that does not already exist in your job For example if your job has 10 pages you cannot type 12 Adding duplicating and deleting sheets You can add duplicate or delete sheets by right clicking any sheet in either Preview or Layout mode TO ADD OR DUPLICATE SHEETS 1 Right click a sheet in Preview or Layout mode and then choose Add Sheet s or Duplicate Sheet from the menu that appears 2...

Страница 119: ...eet s from the menu that appears The Delete Sheet s dialog box appears 2 To delete a single sheet select Delete Sheet and specify the number of the sheet you want to delete To delete a range of sheets select Delete All Sheets After and specify the starting number of the sheet range to delete or select From and enter values for the start and end numbers of the sheets to delete A single sheet or ran...

Страница 120: ...Page mode or in 180 increments for Fixed Page mode If you apply a 90 rotation to a page in Mixed Page mode and then switch to Fixed Page mode the rotation will be canceled TO ROTATE PAGES 1 To rotate a single page click the Rotate icon on that page 2 To rotate all pages in the job press the Shift and Ctrl keys and click the Rotate icon on any page Rotate icon 16 1 2 5 Sheet 1 front side Sheet 1 ba...

Страница 121: ...l key and click the Rotate icon on Page 1 then Pages 2 3 and 4 rotate as well because they are in the same location on the front and back sides of the sheet Setting gutter sizes DocBuilder Pro defines the locations of gutters for you according to the layout and sheet size governing the imposition of the job In Layout mode you can specify the size of a gutter by entering a value in the gutter size ...

Страница 122: ...nd WorkStation saves templates see Setting preferences on page 2 22 You can save all imposition settings in custom templates except the following Sheet size setting Custom printer s marks properties The Pull into Page Edge setting and custom offset settings for printer s marks The Apply To setting in the Scale pane Settings made in Custom scale mode in the Scale pane Offsets settings in the Scale ...

Страница 123: ...ate Tips for using the Imposition feature of DocBuilder Pro This section provides information that will help you get the most out of the imposition features of DocBuilder Pro Page level operations Consider the following when editing pages of a job Adding a binding offset You can set gutters on each page independently to allow extra room for binding For more information see Setting gutter sizes on ...

Страница 124: ... for the imposed job The original PostScript or PDF remains intact even after the converted file has been edited and saved in the Imposition window If imposition data has changed the data is saved to the Fiery X3e and associated with the new PDF Maintaining associated imposition data separately from the job s PDF data allows DocBuilder Pro to impose in RIP without modifying the PDF data and allows...

Страница 125: ...omputers only To use Fiery Spooler users need only a network connection to the Fiery X3e NOTE The interface of Fiery Spooler for Mac OS computers is virtually identical to that of Fiery WebSpooler Tracking and managing jobs with Fiery WebSpooler Use Fiery WebSpooler to perform the following functions from your workstation Override current job option settings Delete jobs and cancel processing Dupli...

Страница 126: ... WEBSPOOLER WINDOW 1 Start your Internet browser 2 Enter the IP address or DNS name of the Fiery X3e Consult the operator or administrator for this information The Fiery X3e home page appears You can access Fiery WebTools from the Fiery X3e home page 3 Click the WebTools icon to launch Fiery WebTools The Fiery X3e Fiery WebTools home page appears 4 Click WebSpooler on the home page 5 To log in as ...

Страница 127: ...ol RIP and Print status bars When the Fiery X3e receives print jobs the Fiery WebSpooler window becomes a dynamic display filled with the names of jobs and their characteristics The Spool RIP and Print areas of the Fiery WebSpooler window represent the stages of printing a job Jobs come in at the top level Spool and drop down to the Print level unless they are held along the way The job icons disp...

Страница 128: ...ogged in as Administrator or Operator you can interact with a job wherever it appears in the window by selecting it and choosing a command from the Job menu or by double clicking the job and setting override options For more information see Manipulating job options and job flow on page 7 5 Errors Jobs with an error are shown in red To display the error double click the job Note that you cannot che...

Страница 129: ...Chapter 1 before manipulating jobs with Fiery WebSpooler Choose this command from the Job menu To do this Raster data is Delete Job s Delete the job s from the list Deleted Cancel Printing Cancel the currently printing job Deleted Cancel RIPping Cancel the currently processing job Deleted Duplicate Job s Duplicate one or more selected PostScript or PCL data jobs in the Spool or Print areas creates...

Страница 130: ...nt as soon as the processor and copier are free before other waiting jobs Held in RAM after printing can be selected in the Print area while it remains there or held in RIP area saved to disk if destination was RIP and Hold Remove Raster Remove the raster from a job that has raster data leave the PostScript or PCL job in place Deleted Override Print Settings Change the print options for the job se...

Страница 131: ...ride Print Settings dialog box to see all the job options NOTE For some options changing the setting requires that the job be reRIPped these options are displayed with an icon to the left of the option name The options set here are the same ones you set from the Print dialog box when you print from an application For information about setting and overriding these print options see Appendix A of th...

Страница 132: ...printing Hold Raster icon PostScript PCL and raster data after printing ready for fast reprint PostScript or PCL data already rasterized and held Spool area icon What it indicates How long you see the job 1 Yellow PostScript icon Yellow job row PostScript or PCL data from a user on the network no destination is defined Until a destination is chosen 2 White printer icon White job row PostScript or ...

Страница 133: ...re they are displayed with a white printer icon Icon 2 When jobs reach the head of the queue they are RIPped and printed without operator intervention Direct Connection Jobs printed to the Direct connection are not displayed in the Command WorkStation job lists They are displayed briefly in the status bars where they cannot be selected and are included in the Job Log RIP area The job icons in the ...

Страница 134: ...uctions therefore they all have white icons and rows NOTE A job row that appears in light red indicates that an error occurred while printing the job To see the error double click anywhere in the row While it is printing a job consists of PostScript or PCL and raster data The raster data in RAM is not cleared until memory is needed to rasterize the next job As long as the raster data is intact the...

Страница 135: ...erge features eliminate the limitations of certain software applications You can merge raster pages of documents of different types and from different computer operating systems You can merge color pages from graphics programs with text pages from a word processor Previewing raster jobs You can use Thumbnail A to preview pages of the currently RIPping job You can also use Thumbnail A and Thumbnail...

Страница 136: ...dow In this mode Thumbnail A displays each page of the currently processing job after it has been RIPped 3 Choose a PostScript file in the Spool or Print area and select RIP and Hold Print or Print and Hold As pages are RIPped they are displayed in Thumbnail A 4 When you have finished viewing click the Thumbnail A tab to close the thumbnail window Click to display the currently rasterizing job Cli...

Страница 137: ...he Job menu NOTE Wait until all pages have been displayed before opening another raster file with Thumbnail A If the job contains many pages it may take some time for the entire job to be displayed 3 When you have finished viewing click the Thumbnail A or Thumbnail B tab to close the thumbnail window Click to close the thumbnail window Click to open a full screen preview ...

Страница 138: ...iew full screen previews of all its pages 2 To close the full screen preview click the X button above the preview Editing and merging raster files The ability to work with raster files gives you new opportunities to combine documents from different sources into a single file For example you can combine covers and chapter head pages created in a page layout application with text pages created in a ...

Страница 139: ...to see the commands available for pages in Thumbnail A You can also access most of these commands by clicking the icons along the left side of Thumbnail A You can use the slider bar at the bottom of the window to scroll through pages in the job Delete Deletes the currently selected pages Duplicate Duplicates the currently selected pages Preview Opens a full screen preview of the currently selected...

Страница 140: ...nail B display another held raster job from the RIP area The Thumbnail B tab opens a second thumbnail view which cannot be edited but can be used as a source for pages added to the document in Thumbnail A NOTE To merge documents the page sizes of the source document and the target document must be the same Before editing or merging raster files with the thumbnail windows make sure the source files...

Страница 141: ...available use Undo to undo all the way back to your first edit There is no Redo function NOTE Make sure to save the merged job before deleting any of the jobs you used to create the merged job Thumbnail B pages moved into Thumbnail A adopt some specific attributes of the Thumbnail A job such as the document and user name 4 To close a thumbnail window click the same tab you used to open it the Thum...

Страница 142: ...s If you are unable to view changes in a job or if selecting a thumbnail window results in a message indicating zero pages close and restart Command WorkStation Fiery WebSpooler or Fiery Spooler Using the Job Log From Fiery WebSpooler you can view and print a log of all jobs printed by the Fiery X3e including jobs downloaded with Fiery Downloader NOTE If you logged in as Administrator you can dele...

Страница 143: ... process time page description language file size device paper size media number of originals total number of pages and Notes The Status column provides the following information about jobs 4 To update the Job Log click the Update button 5 To print the Job Log choose Print Job Log from the File menu or click the Print button OK The job printed normally ERROR An error occurred during processing or ...

Страница 144: ... where you want to save the file and click Save The Job Log is saved as a text file and the Job Log window reappears You can view the information in any application that can read a text file Items are separated by tabs To return to the job list choose Show Job List from the Window menu Fiery Spooler for Mac OS computers For Mac OS the Fiery Spooler interface is almost identical to that of Fiery We...

Страница 145: ...or details on the job icons that appear in Fiery Spooler see Job icons on page 7 8 Connecting to a different Fiery X3e from Fiery Spooler Although the Fiery Spooler for Mac OS and Fiery WebSpooler interfaces are nearly identical the method for establishing and changing a connection to the Fiery X3e differs between the two With Fiery Spooler you can connect to a different Fiery X3e using the follow...

Страница 146: ... A DIFFERENT FIERY X3E 1 Choose Open Fiery from the File menu 2 Select the Fiery X3e in the Chooser window For information on setting up the connection to the server see the User Software Installation Guide 3 Click OK The Fiery Spooler main window appears ...

Страница 147: ... large number of copies Until recently the only way around these limitations was to use traditional printing systems to impose your document that is to arrange its pages in the correct order and orientation for printing and a variety of binding styles You might have used a service bureau to access high volume high resolution color printers However DocBuilder Pro teamed with digital color copiers n...

Страница 148: ...the final booklet their ordering and positioning on the sheet must differ from the normal book reading order You can demonstrate this for yourself using an ordinary sheet of paper TO MODEL AN EIGHT PAGE BOOKLET 1 Fold the paper in half horizontally Fold the top edge of the sheet down to meet the bottom edge 2 Fold the paper again vertically Fold the left edge of the sheet over to the right edge No...

Страница 149: ... The front cover of the booklet should be page 1 and the back cover of the booklet should be page 8 You can also underline each number to highlight the page orientation NOTE Printing on both sides of the sheet is called duplex printing printing on only one side of the sheet is called simplex printing Not all copiers support duplex printing and of those that do variations in implementation exist Do...

Страница 150: ...placement which you can use to create a plan or sketch of how pages are placed on the sheet This plan is called a layout DocBuilder Pro frees you from the tedious and error prone process of creating accurate physical models of the imposed book in order to lay out pages With DocBuilder Pro you simply open the source file to be imposed and specify how many rows and columns of pages to image on a she...

Страница 151: ...defined by a dotted line called a fold mark similarly the location of a cut is defined by a solid line called a trim mark Specialized marks also define the size and locations of margins space surrounding the page s content area gutters space between pages and bleeds extensions of content beyond a trim mark used to ensure that the printed area extends to the very edge of a trimmed page DocBuilder P...

Страница 152: ... sheet blank If you do not want blank pages in the middle of the finished book insert blank pages intentionally for example after the cover page after the table of contents or between chapters To insert blank pages open the job in the Thumbnail A window right click the page you want to add the blank to or pull down the Page menu and select Insert blank page DocBuilder Pro allows you to add blank p...

Страница 153: ...nd budget Saddle stitch binding is very cost efficient but is more suitable for small booklets than for large jobs A rule of thumb is that saddle stitch binding works best for booklets or brochures with a maximum of 88 pages Conversely perfect binding is more expensive but more suitable for larger jobs DocBuilder Pro reorders imposed pages automatically according to your choice of binding method w...

Страница 154: ...es in the saddle increases so does the amount of this shift which is known as shingling To counteract the effects of shingling illustrated in an exaggerated manner in the following figure the bindery trims the edges of the finished book to a common edge Trimming the bound pages resolves only half of the problem however as the edges of pages move so do the content areas imaged on them The apparent ...

Страница 155: ...you change any aspect of the imposed job that is affected by creep Gang Up printing Layout is essential for defining the elements of complex print jobs such as booklets and books but it can also be useful for smaller jobs Consider for example how you might approach the task of printing business cards It is slow wasteful and expensive to print a single business card per sheet when you can repeat th...

Страница 156: ...If you need to print business cards for several different clients you could perform a Gang Up Repeat printing job for each but you might still wind up wasting paper and time if the jobs do not fit easily into a simple multiple of sheets A more efficient approach is to print several jobs on a single sheet and then print that sheet as many times as required The technique of printing multiple jobs on...

Страница 157: ...int one page per sheet The printer s marks indicate where to cut the paper so that the color content extends to the edge of the paper The following settings are applied for this layout Bleeds Printer s Marks trim marks and job label only Scale to Fit Gang Up Unique NOTE There are no page number restrictions for the 1 Up Full Bleed layout Appendix B Templates ...

Страница 158: ...for a perfect bound book Each sheet is folded once and stacked on top of one another For more information on binding methods see page A 6 The following settings are applied for this layout Duplex Bleeds Printer s Marks fold marks trim marks and job label Scale to Fit Binding Perfect ...

Страница 159: ...nal blank pages will be added if necessary Pages will be ordered in groups of four so that when folded each sheet has four sequential pages For example 4 pages 8 pages NOTE The Creep Adjustment option has no effect on this template 4 1 2 3 Sheet 1 front side Sheet 1 back side 4 1 2 3 Sheet 1 front side Sheet 1 back side 8 5 6 7 Sheet 2 front side Sheet 2 back side ...

Страница 160: ...for a saddle bound book All of the sheets are folded together one inside the other For more information on binding methods see page A 6 The following settings are applied for this layout Duplex Bleeds Printer s Marks fold marks trim marks and job label Scale to Fit Binding Saddle ...

Страница 161: ...ber of pages Additional blank pages will be added if necessary Pages will be ordered so that when sheets are folded and stitched together into signatures the pages will be sequential For example 4 pages 8 pages 4 1 2 3 Sheet 1 front side Sheet 1 back side 8 1 2 7 Sheet 1 front side Sheet 1 back side 6 3 4 5 Sheet 2 front side Sheet 2 back side ...

Страница 162: ... three sections Although the three sections are the same width the space between each section varies so that the leftmost panel can be folded over the other two panels The following settings are applied for this layout Duplex Printer s Marks fold marks trim marks and job label only Scale to Fit Gang Up Unique ...

Страница 163: ...th jobs that have six pages If the job contains more or less than six pages an error message appears The pages will be ordered as follows The 3 Up Trifold Brochure is usually folded as shown in the following illustration 3 6 2 4 Sheet 1 front side Sheet 1 back side 1 5 ...

Страница 164: ... most often in the case of a four panel brochure The finished brochure unfolds to double then four times the original size The following settings are applied for this layout Duplex Printer s Marks fold marks trim marks and job label only Scale to Fit Gang Up Unique ...

Страница 165: ...obs that have eight pages If the job contains more or less than eight pages an error message appears The pages will be ordered as follows The 4 Up Gate Fold is usually folded as shown in the following illustration 3 8 4 5 Sheet 1 front side Sheet 1 back side 1 6 2 7 ...

Страница 166: ...printed sheet By rotating the two topmost pages the signature can be folded both horizontally and vertically and trimmed The finished booklet will have all pages in the correct order and rotation The following settings are applied for this layout Duplex Bleeds Printer s Marks fold marks trim marks and job label Scale to Fit Binding Saddle ...

Страница 167: ...o folds at 90 degrees trimmed and stitched together into signatures the pages will be sequential Note that although this layout requires two folds the template applies a fold mark on the spine fold only For example 8 pages 16 pages The 4 Up Head to Head is usually folded as shown in the following illustration 8 1 2 7 Sheet 1 front side Sheet 1 back side 6 3 4 5 16 1 2 15 Sheet 1 front side Sheet 1...

Страница 168: ...any panels to be folded on top of one another without stressing the folded spine The most common example is a road map The following settings are applied for this layout Duplex Printer s Marks fold marks trim marks and job label only Scale to Fit Gang Up Unique ...

Страница 169: ...s that have eight pages If the job contains more or less than eight pages an error message appears The pages will be ordered as follows The 4 Up Z Fold is usually folded as shown in the following illustration 2 3 6 7 Sheet 1 front side Sheet 1 back side 4 8 5 1 ...

Страница 170: ......

Страница 171: ...and the Command WorkStation window will be updated after a short delay When an error interferes with printing you will see a message in Command WorkStation The status bar that displays the message indicates the process in which the error occurred The following table presents Fiery X3e messages in alphabetical order with the appropriate corrective action for each one You can cancel the pending prin...

Страница 172: ...power or cable connection Check to make sure the copier is turned on There might be a problem with the cable connection between the Fiery X3e and the copier Make sure the cable has not come loose The Fiery X3e will resume printing when the cable is securely connected to both the Fiery X3e and the copier Door open ___ open Cover open One of the doors on the copier is open Close the door to resume p...

Страница 173: ...e for a replacement Sort Staple Punch error Unable to staple punch duplex An error has occurred in the specified location Printing will proceed when the error has been resolved Warming Up This is a normal status message The copier is warming up and will be ready for printing in a few minutes Warning Image Control An error has been detected by the copier s moisture sensor or one of its drum thermis...

Страница 174: ... not update or no jobs are displayed and the mouse has no effect you cannot select a job or a window use a right mouse command or select a menu item the Fiery X3e is down or network communication has failed To force an exit from Command WorkStation press Ctrl Alt Delete and use the Program Manager to close Command WorkStation At the Fiery X3e disconnect and reconnect the network cable and try prin...

Страница 175: ...A new Efinl ini file will be created in the C Windows folder when you reconfigure the connection If the Efinl ini file contains configuration information for several servers or information that is not readily recreated keep the Efinl ini file as a backup 3 Print a Configuration page You will use the information on this page to configure the connection to the server 4 Start Command WorkStation 5 Wh...

Страница 176: ...ly reflect user settings and that Page Range and Scale percent are All and 100 respectively unless they were changed after being sent for printing The job does not print Some printing errors may be displayed in the Print status bar When the job is in the Printed queue jobs that had a PostScript error are displayed in a light red job row Double click anywhere in the row to see the error message The...

Страница 177: ... Users are unable to connect to the Fiery X3e If users are unable to connect to the Fiery X3e or are unable to find the Fiery X3e from their workstations the network administrator may need to troubleshoot their network connections and check settings on the servers they use for printing If settings have changed it may be necessary to reconfigure the Fiery X3e For example if print servers or print q...

Страница 178: ...ubleshoot the network connection If you are unable to connect and you cannot print the Test Page check the copier s touch panel display If this happens Try this The copier displays a diagnostic or error message Take the appropriate corrective action as described in the copier manual or in Error messages on page C 1 The copier is not in Standby mode The copier s Automatic Power Off function may hav...

Страница 179: ...ause it is crooked or the data is corrupted Error 11 The color strips on the measurement page are inconsistent Error 12 The copier model being used is not supported Error 20 The measurement page cannot be scanned because the dots per inch dpi are incorrect Error 102 The grayscale strip is crooked or positioned incorrectly Error 103 The grayscale strip is positioned too far to the left or right of ...

Страница 180: ......

Страница 181: ... from Fiery WebSpooler 7 5 Cancel Processing command 3 15 Cancel RIPping command from Fiery WebSpooler 7 5 Clear command archived jobs C 7 clipping icon 6 6 6 12 clipping indicators Layout mode 6 12 Preview mode 6 12 clipping views 6 12 collate and cut finishing 6 15 Color Charts 2 22 columns scaling 6 11 setting 6 6 command menus see menus Command WorkStation layout styles 2 11 logging in 3 1 log...

Страница 182: ...erview 1 9 Fiery Spooler for Mac OS differences from Fiery WebSpooler 7 21 interface 7 1 Fiery WebSpooler accessing 7 2 Cancel Printing command 7 5 Cancel RIPping command 7 5 Delete Job s command 7 5 functions available with 7 2 Guest view only privileges 7 2 Hold command 7 6 Job menu 7 5 Operator password 7 2 overview 1 9 Print and Hold command 7 6 Print command 7 6 Process Next command 7 6 raste...

Страница 183: ...3 saddle stitched binding 6 23 H held jobs 7 9 Hold command 3 10 7 6 Hold queue 1 2 3 8 I icons clipping 6 6 6 12 Delete Template 6 25 Print area 7 10 RIP area 7 9 Save Template 6 24 Spool area 7 8 importing jobs 3 8 imposing jobs 5 3 imposition data and temporary files 6 26 page reordering 6 19 saving 6 26 saving settings as template 6 24 settings 6 24 templates folder 2 24 Imposition Template Pa...

Страница 184: ... 2 22 displaying 7 18 exporting to a file 3 22 panel 2 6 3 21 printing on local printer 3 22 using from Fiery WebSpooler 7 18 viewing printed jobs 7 4 Job menu commands 7 5 job name 6 7 Job Properties dialog box 3 11 3 17 Job status indicators 2 9 job ticket definition 1 7 job ticket information customizing 3 7 sorting by 3 6 jobs flow monitoring 3 5 Jobs window 2 4 job ticket information 3 7 L la...

Страница 185: ...tor controlled environment setting up 1 2 orientation setting 6 5 Override Print Settings command 7 6 overriding print settings 3 11 P page aligning on sheet 6 12 Fixed Page mode 6 1 6 11 6 12 maximum number in layout 6 5 Mixed Page mode 6 1 6 8 6 10 6 11 6 12 numbers in layout view 6 19 reordering automatically A 7 reordering on sheet 6 19 rotating 6 22 viewing individual 5 8 page numbers 6 19 pa...

Страница 186: ...6 7 A 5 gutters A 5 job label 6 7 A 5 job name 6 7 margins A 5 overview A 5 properties 6 8 sheet information 6 7 time 6 7 Trim Marks 6 7 A 5 printer s spread 5 5 printing Color Charts 2 22 Configuration page 2 22 Control Panel map 2 22 defined xv error 7 10 font list 2 22 in job flow 1 3 Job Log 2 22 Test Page 2 22 printing duplex 6 5 A 3 problems see troubleshooting Process and Hold command 1 5 3...

Страница 187: ...3 6 Send to server command 3 14 server clearing C 7 load balancing 3 14 logging in from Command WorkStation 3 1 logging out from Command WorkStation 3 5 managing multiple servers 3 14 monitoring 2 10 printing information pages 2 21 RAM requirements 3 1 selecting 2 10 working with more than one 3 14 server fonts see fonts sheet defined 5 5 A 1 number of rows 6 6 orientation 6 5 reordering pages 6 1...

Страница 188: ... 7 6 Delete command 7 15 Duplicate command 7 15 editing options 7 15 page commands 7 14 page display 7 12 window 7 15 Thumbnail B 7 15 command 7 6 time 6 7 Trim Marks 6 7 A 5 troubleshooting Command WorkStation cannot connect to server C 5 Command WorkStation hangs C 4 general guidelines C 4 slow redraw 5 7 unexpected printing results C 6 users are unable to connect to the printer C 7 U Undo comma...

Отзывы: