


(6) Key the VHF 1 Comm mic (transmit on VHF 1 Comm) repeatedly.
(a) Make sure no strike data appears on the GPS 400W Lightning display as a result
of keying the VHF 1 transmitter.
(7) Tune the VHF 2 COMM radio to a test frequency.
(a) Select COM 2 as the ACTIVE radio.
(8) Key the VHF 2 Comm mic (transmit on VHF 2 Comm) repeatedly.
(a) Make sure no strike data appears on the GPS 400W Lightning display as a result
of keying the VHF 2 transmitter.
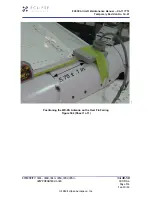
(9) Verify aircraft is positioned so that it can be freely turned 45° (± 5°) clockwise (to the
right).
Verify aircraft is positioned so that it can be freely turned 45° to the right. Make sure
area around aircraft is clear.
(a) Make sure area around aircraft is clear.
(b) Make sure that WX-PA tester can be moved with the aircraft.
(c) Make sure adequate cable is deployed from the external power cart to allow the
aircraft to turn 45° to the right.
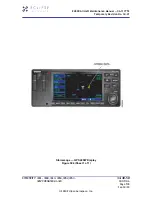
(10) Power up the WX-PA Portable Analyzer unit.
•
After the WX-PA completes self-test, the MODE MENU will be displayed.
(11) On the WX-PA, select “Continuous Out” on the MODE MENU, then push the MENU/
ENTR button once (so that WX-PA indicates “PAUSED” and not “RUNNING”).
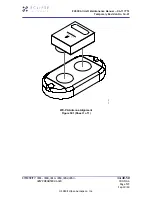
(12) On the WX-PA, push the FLAPS/A button to select top mount antenna configuration.
(13) On the WX-PA, select a cardinal bearing of 0° and a range of 55 NM.
•
Use F1 and F2 buttons to adjust range and the F3 and F4 buttons to adjust
bearing.
(14) On the WX-PA, with “Continuous Out” still selected on the MODE MENU, push the
MENU/ENTR button once so that the WX-PA indication changes from “PAUSED” to
“RUNNING”.
EA500 Aircraft Maintenance Manual — 06-117751
Temporary Revision No. 34-21
EFFECTIVITY: 0001 - 0008, 0010 - 0050, 0052, 0054 -
0267 PRE SB 500-31-024
34-40-50
CONFIG A
Page 511
Sep 30/20
© 2020 Eclipse Aerospace, Inc.


