Installation Instructions for Wi-Q™ Technology 45HQ Mortise Locks
BEST
a Product Group of
dormakaba USA Inc.
Preparing the door
2
2
Align templates
Note:
If the door is a fabricated hollow metal door, deter-
mine whether it is properly reinforced to support the lock.
If door reinforcement is not adequate, consult the door
manufacturer for information on proper reinforcement.
For dimensions for preparing metal doors, see the Q03
Template—Installation Specifications for 45HQ Mortise
Locks (T82603).
1 Separate the four templates provided on the
Q06 Tem-
plate—Installation Template for 45HQ Mortise Locks
(T82606).
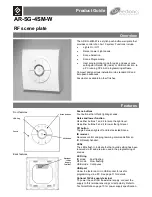
2 Position one of the door edge templates on the door,
making sure that the lock case mortise shown on the
template aligns with the mortise pocket prepared in
the door.
3 Using the centerlines on the door edge template as a
guide, position the appropriate door template on each
side of the door. You need to take the bevel into
account. Tape the templates to the door.
3
Center punch and drill holes
1 Center punch the necessary drill points. See the
instructions on the template.
2 Drill the holes.
Note 1:
To locate the center of a hole on the opposite side
of the door, drill a pilot hole completely through the door.
Note 2:
For holes through the door, it is best to drill half-
way from each side of the door to prevent the door from
splintering.
4
Install door status switch
(optional for deadbolt TV function locks
only)
1 Position the shield on the door status switch with the
notch facing downwards (towards the mortise pocket).
Caution: Make sure the wires are not routed across
any sharp edges or over any surface that could
damage its sleeving.
Figure 2 Aligning the templates
Installation
template
Door edge
template
Centerline
Centerline
Figure 3 Installing the door status switch
Door
status
switch
Shield
Содержание BEST Wi-Q ONGUARD
Страница 7: ...A Glossary Glossary 109 B Lock Installation Lock Installation 113 ...
Страница 40: ...40 2 Select Inbound Rules Figure 13 Inbound Rules Select Inbound Rules ...
Страница 44: ...44 6 Select Allow the connection Click Next to continue See Figure 17 Figure 17 Allow the Connection ...
Страница 45: ...45 7 De select the Public option Click Next Figure 18 De select Public ...
Страница 52: ...52 Figure 27 Wi Q Interface Setup Wizard Click Next ...
Страница 57: ...57 Figure 33 Custom Setup Options Click Next ...
Страница 58: ...58 10 The wizard is now ready to begin installation Click Install Figure 34 Begin Installation Click Install ...
Страница 75: ...75 To add a new Sign On Credential 1 Select Add Figure 52 Add Segment Sign On Credential 1 ...
Страница 113: ...B Lock installation ...
Страница 168: ...6161 East 75th Street Indianapolis IN 46250 USA Phone 1 800 392 5209 https dhwsupport dormakaba com hc en us 172713 S3 ...