Installation Instructions for Wi-Q Technology™ EXQ Exit Hardware Trim
BEST
a Product Group of dormakaba USA Inc.
7
Installation Instructions for Wi-Q Technology™ EXQ Exit Hardware Trim
Installing the exit hardware and trim
5
Drill holes
Caution:
Double-check for the correct lock func-
tion, hand, and bevel before drilling.
1 Drill the trim holes that are required for your applica-
tion; follow the instructions on the trim template and
refer to the figures in step 2.
Note 1:
To locate the center of a hole on the opposite
side of the door, drill a small pilot hole through the door.
Note 2:
For holes through a wood door, drill halfway
from each side of the door to keep the door from splinter-
ing.
6
Install mortise case
(mortise exit devices only)
Install the mortise case in the door; follow the instruc-
tions provided by the exit hardware manufacturer.
7
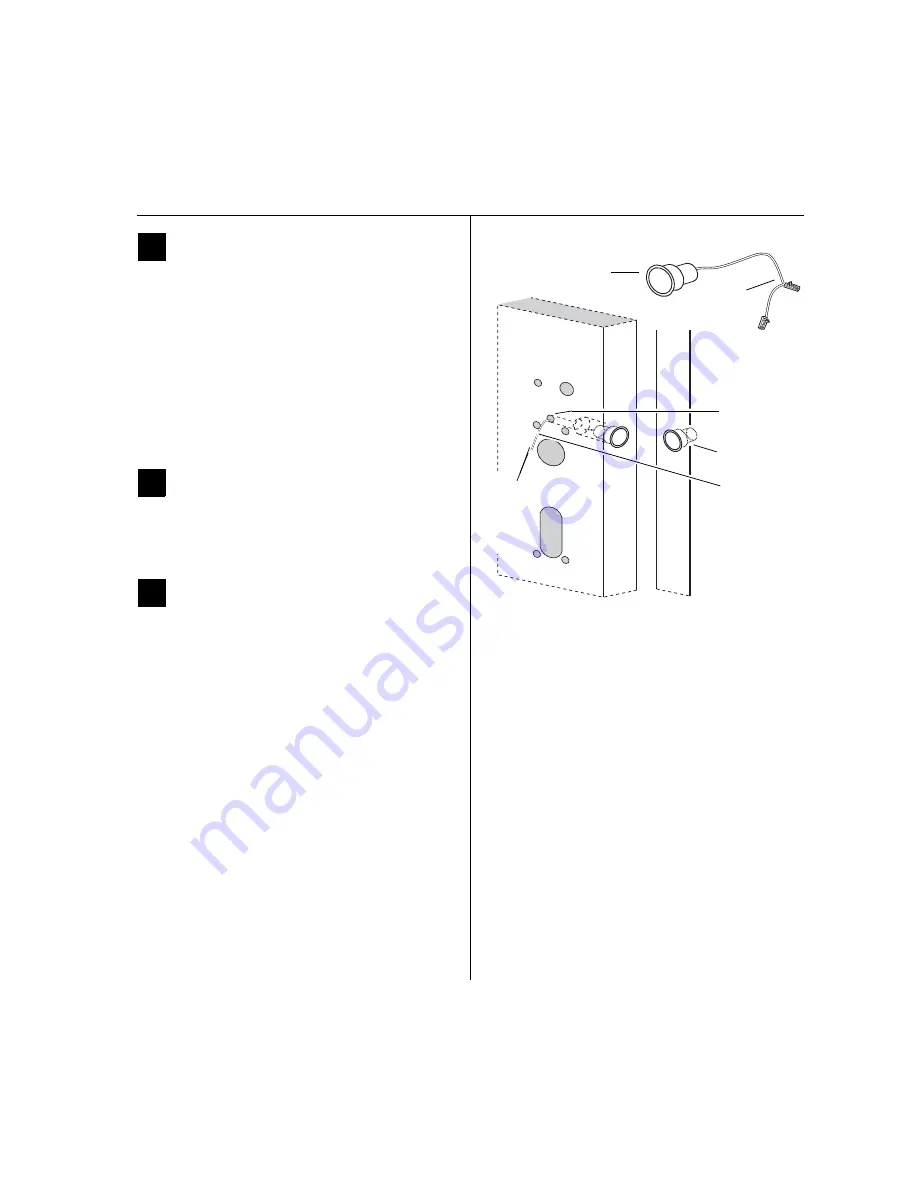
Install door sensing switch
1 Clip off the purple wires and connector and remove.
2 Clip off the connector from the white door sensing
harness (with black sleeving) and leave as much wire
as possible. See Figure 9. These wires will be butt-
spliced to the sensing harness from the trim. See
“Route sensor wires” on page 14.
3 Route the door sensing switch wires through the chan-
nel and out through the wire routing hole to the exit
device side. See Figure 9.
4 Press-fit the door sensing switch into the 1” diameter
hole in the door.
5 Mark and drill 1” diameter hole in the frame, aligned
with the door position switch (for the magnet).
Note:
For double-door applications, this hole will be into
the edge of the opposing door leaf (not the frame).
6 Press-fit the door sensing magnet into the 1” diameter
hole in the frame.
Figure 9
Installing the door sensing switch and magnet,
Precision 2100 shown
Door sensing
magnet
Door sensing
harness
Wire routing
hole
Inside Door
Frame
See Q07 and
Q08 templates
for other door
sensing wire
routing.
Door sensing
switch
Clip both
connectors
off here
Route
the door
sensing
harness
to the
inside.
Содержание BEST Wi-Q ONGUARD
Страница 7: ...A Glossary Glossary 109 B Lock Installation Lock Installation 113 ...
Страница 40: ...40 2 Select Inbound Rules Figure 13 Inbound Rules Select Inbound Rules ...
Страница 44: ...44 6 Select Allow the connection Click Next to continue See Figure 17 Figure 17 Allow the Connection ...
Страница 45: ...45 7 De select the Public option Click Next Figure 18 De select Public ...
Страница 52: ...52 Figure 27 Wi Q Interface Setup Wizard Click Next ...
Страница 57: ...57 Figure 33 Custom Setup Options Click Next ...
Страница 58: ...58 10 The wizard is now ready to begin installation Click Install Figure 34 Begin Installation Click Install ...
Страница 75: ...75 To add a new Sign On Credential 1 Select Add Figure 52 Add Segment Sign On Credential 1 ...
Страница 113: ...B Lock installation ...
Страница 168: ...6161 East 75th Street Indianapolis IN 46250 USA Phone 1 800 392 5209 https dhwsupport dormakaba com hc en us 172713 S3 ...


